eLeaP Administrator’s Manual (V5+ALL)

Administrator’s Manual
All Modules
Table of Contents
Dashboard and Special Instructions 12
Organization Content Summary 17
Forum & Inbox (Communication) 18
Modifying Your Personal Profile 19
Modifying Your Company Profile 22
Editing Your Profile Fields 23
Uploading your Company Logo 28
Activate/Deactivate Settings: 46
Continuing Education Settings: 51
Adding Chapters and Lessons to a Course 51
Adding a Chapter to a Course 51
Adding a Lesson to a Course 54
Complex Course e-Learning Objects: 59
Uploading & Embedding Files 64
Adding an Observation Checklist Course 72
Add/Edit Observation Checklist Statements 73
Observation Checklist Gradable Statement Types 74
Observation Checklist Non-Gradable Statement Types: 75
Activating/Editing/Ordering Statements 75
Assigning an Observation Checklist Course 76
How to perform an Observation Checklist Assessment 76
Administrator performing assessments: 76
Supervisor performing assessments: 78
Observation Assessment – Reports & Files 81
Types of Feedback Form Fields 96
Discuss/Course-Specific Forum 97
Continuing Education Results 111
Certificate Background Image: 128
Customize Certificate Fields: 128
Certificate Release Options: 129
Adding a New Learning Path 146
Adding Courses to a Learning Path 148
Duplicating a Learning Path 154
Individual Credential Management (All Credentials) 159
Manage Existing Credentials – All Credentials 163
Managing Individual User Credentials 164
Managing License Credentials 164
Managing Certification Credentials 164
Self-Enrollment CE Courses 166
Self Enrollment CE course: 168
Adding Drop Down Field Options: 172
Assigning Managers/Supervisors to User Groups 181
User Activity Sub Sections 183
Updating Users through Import 188
Creating a Smart Assigning Rule 191
Step Two: Create Your THEN 191
Step Three: Using Your Rule 192
Advanced: Multiple IFs/THENs 192
Adding Members to a User Group 199
Exporting User Group Activity 202
Viewing Individual User Quiz Results Details 207
Download Individual User Quiz Results 207
Viewing the Quiz Results Summary 208
Exporting the Quiz Summary 209
Adding a New Forum Category 217
Assigning User Access to a Forum Category 222
Unassigning User Access to a Forum Category 225
Assigning User Group Access to a Forum Category 226
Unassigning User Group Access to a Forum 227
User and User Group Reports 231
Viewing Student User Details 244
Exporting Student User Details 245
Exporting Completion Reports 246
Exporting Referrer Performance 251
Editing a Promotional Code 253
Deleting a Promotional Code 255
Support/Help Center and eLeaP™ Knowledgebase 255
Introduction
How do you improve performance, reduce costs and strengthen compliance? Give your team the knowledge they need to excel at their jobs. Training is perhaps the greatest source of untapped value and competitive advantage available to any organization. Training, however, can be expensive, complicated, and frustrating. When arranging training, your organization can come up against all manner of logistical difficulties, which can cost both time and money. With training budgets shrinking and expectations rising, finding cost-effective yet feature-rich solutions should be your objective.
eLeaP eliminates any such problems. The eLeaP learning management system (LMS) takes the headache out of organizing training and enables your organization to make big financial savings. eLeaP gives you exactly what you need at a price that you can afford and with a level of support and accessibility unparalleled in this industry.
The eLeaP LMS empowers you to create intuitive online learning courses rapidly and easily from your own existing files. With eLeaP online learning software, you can incorporate PowerPoint, PDF, pictures, audio, video, Microsoft Office, SCORM, and many more file types into your own personalized courses. Or if you find that your busy schedule leaves you unable to find the time to create your courses, you can even send us the files, and we'll use our vast course creation experience to build courses for you to your specifications.
The eLeaP learning management system can save you a vast amount of both time and money while enabling you to create sophisticated training packages custom-built for the precise needs of your organization.
The purpose of this document is to describe all of the functionality within the eLeaP system that an administrator has access to and how the administrator can easily configure this functionality to have the system up and running quickly and efficiently.
Logging into the System
Entering the URL for the eLeaP application (your specific account URL) into your browser’s address bar displays the Login screen, illustrated below. Simply enter your email address within the Name field, enter your password in the Password field, and then click to access the system. If you get an error message or [THIS ACCOUNT HAS BEEN DISABLED] message, check your account website URL to make sure it is correct. Contact eLeaP if necessary.


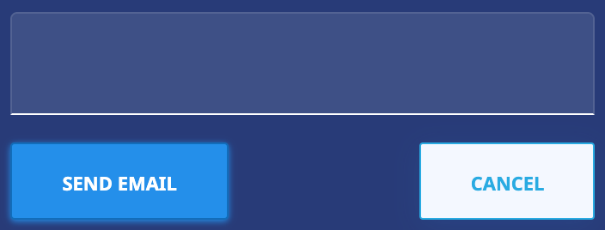
Click the I can’t access my account link if you forget your password. The Login screen expands, displaying a field into which you can enter your email address for retrieval of your password. Once you have entered your email, click the [Send Email] button. The system will send you your password reset email.
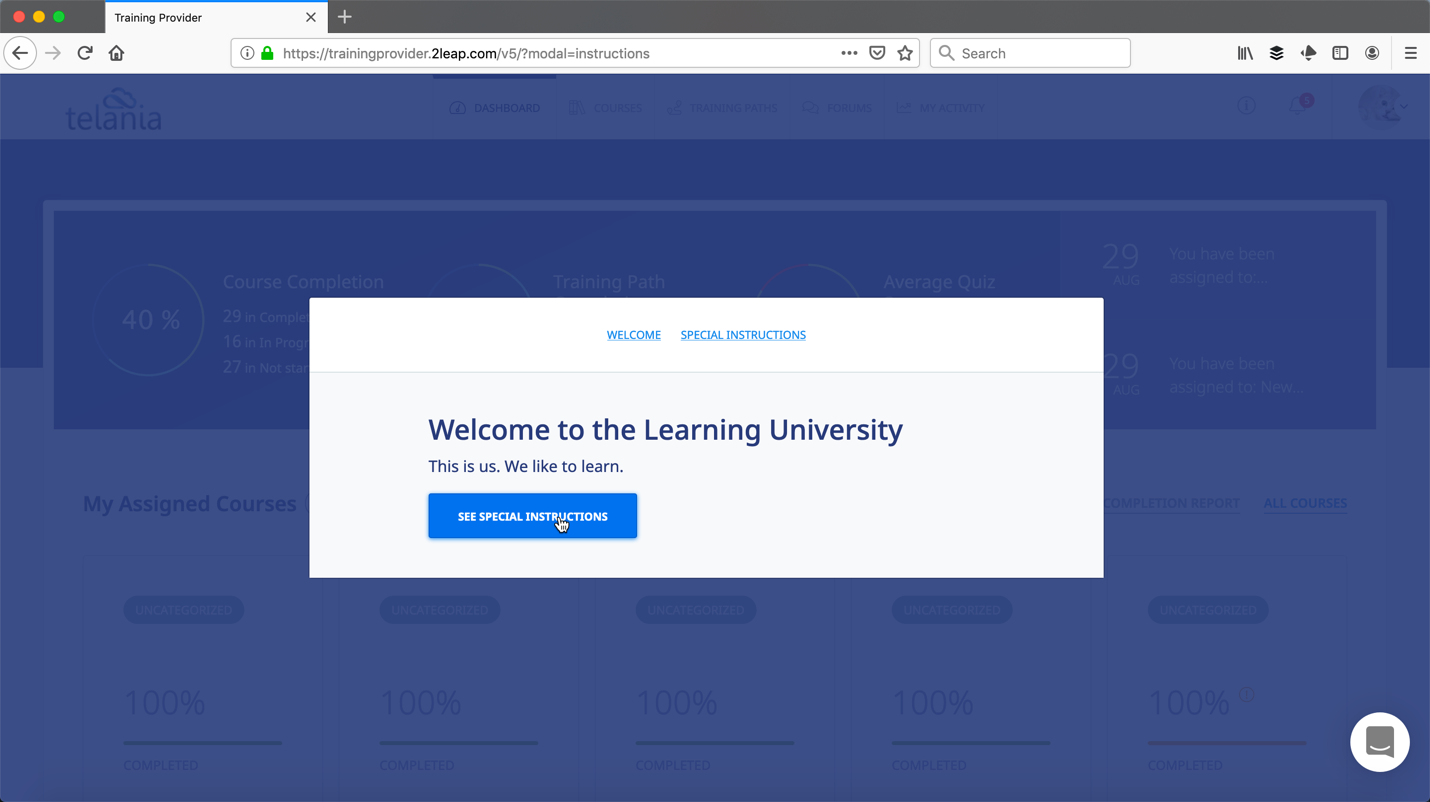
Dashboard and Special Instructions
If logging into the system for the first time, you can see a ‘Special Instructions’ page if your organization has added specific company-related instructions or information for the company. If special instructions do exist, you might see a page like this:
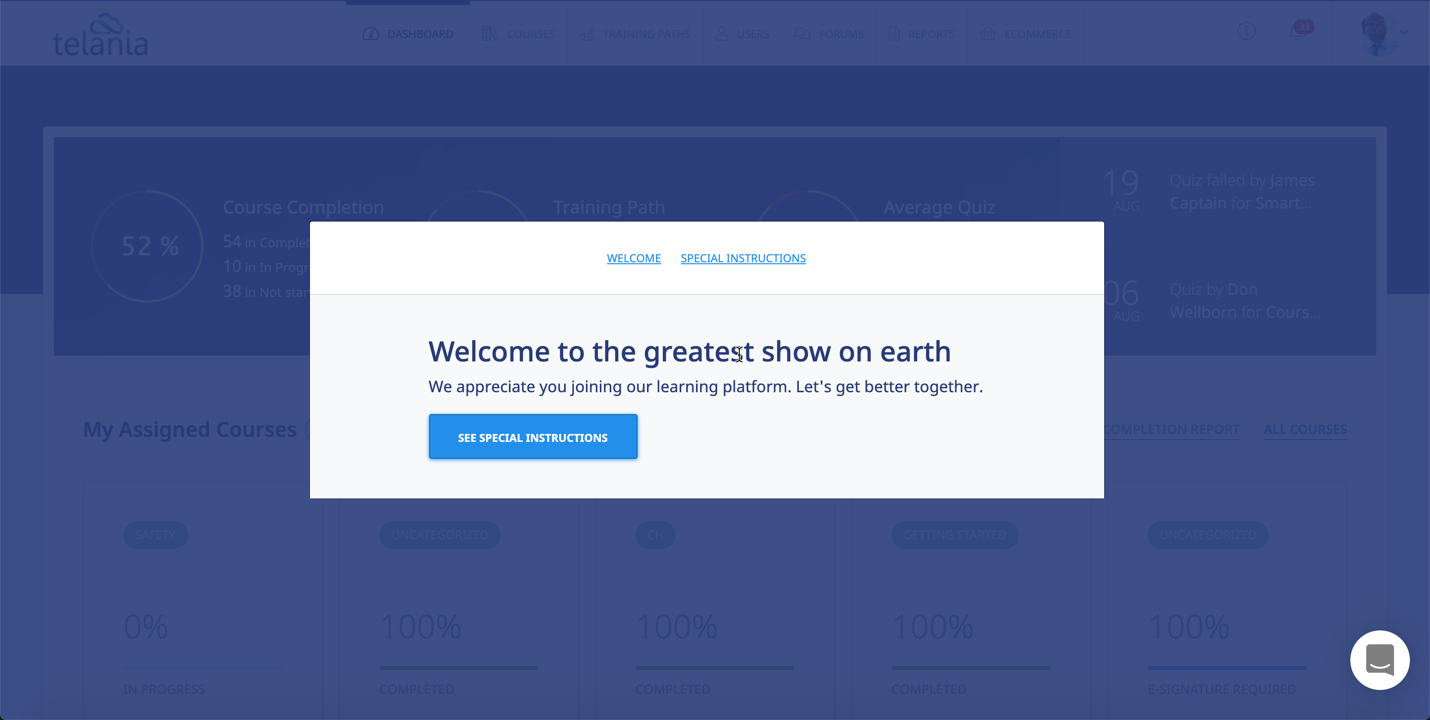
Note: Users will not be able to close this “Special Instructions” page until they click the [See Special Instructions] button and scroll to the bottom of the page. They will see the option to click to go to their account dashboard.
If your organization does not have any special instructions, users simply login directly to their dashboard.
Primary Menu
eLeaP’s primary menu items are:
- Dashboard
- Courses
- Learning Paths
- Skills (if activated)
- Credentials (if activated)
- OJT (if activated)
- Users
- Reports
- eCommerce
- Forum
- Inbox
- Account settings
- Profile
- Gamification
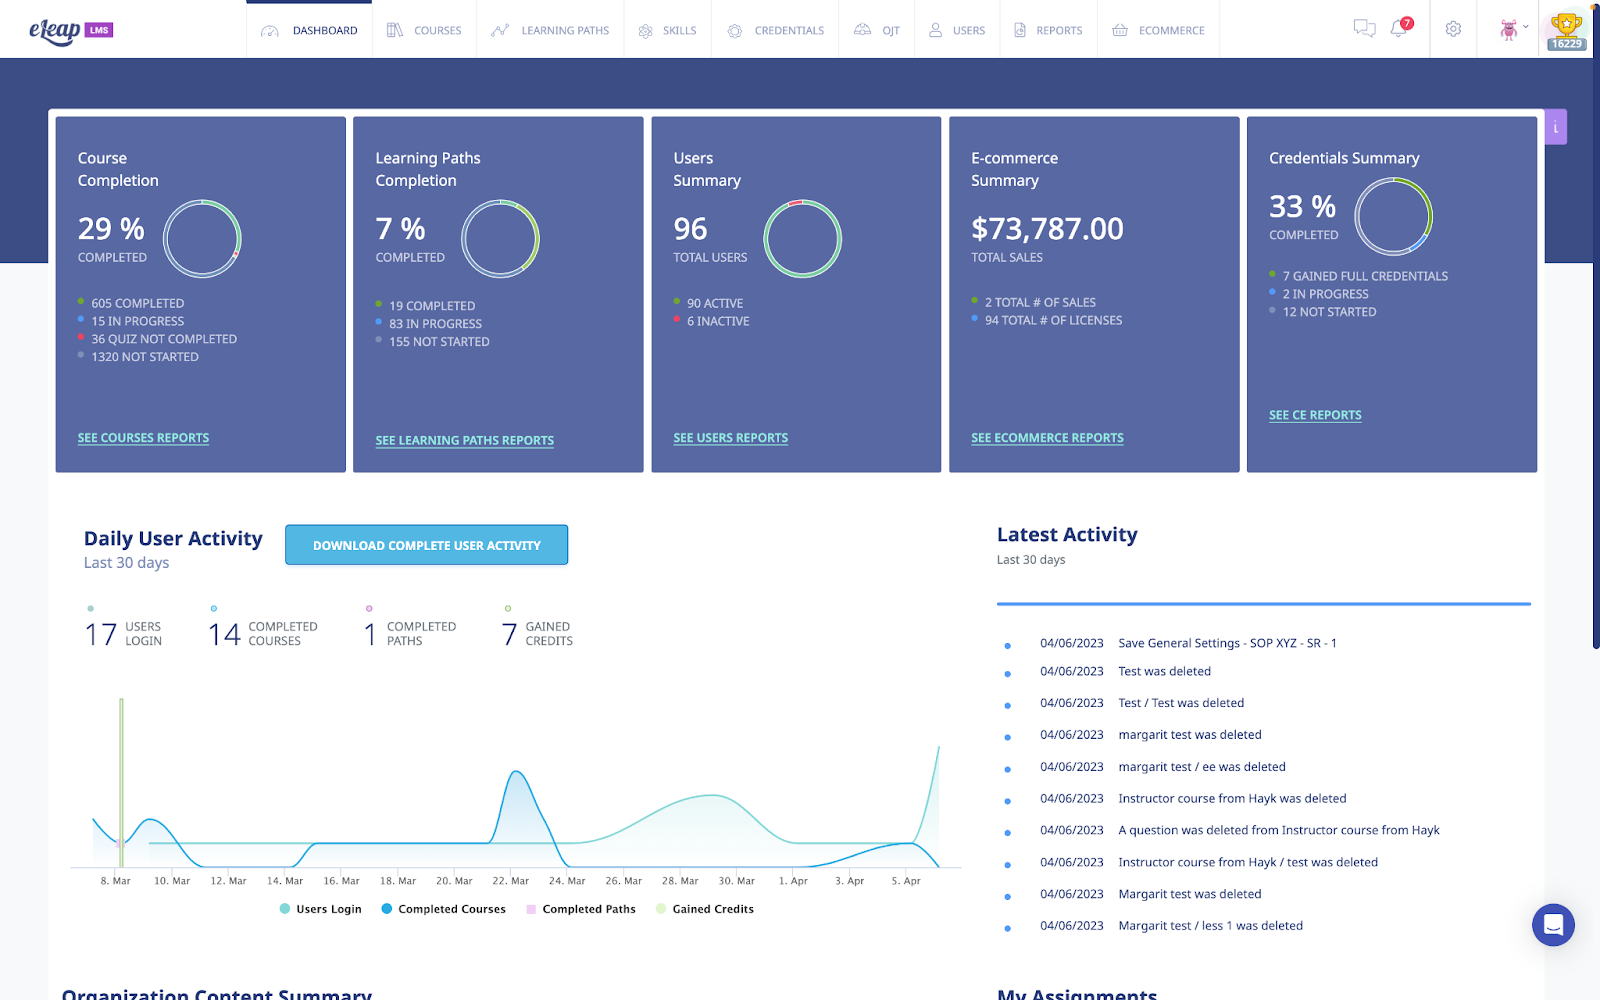
Dashboard Sections
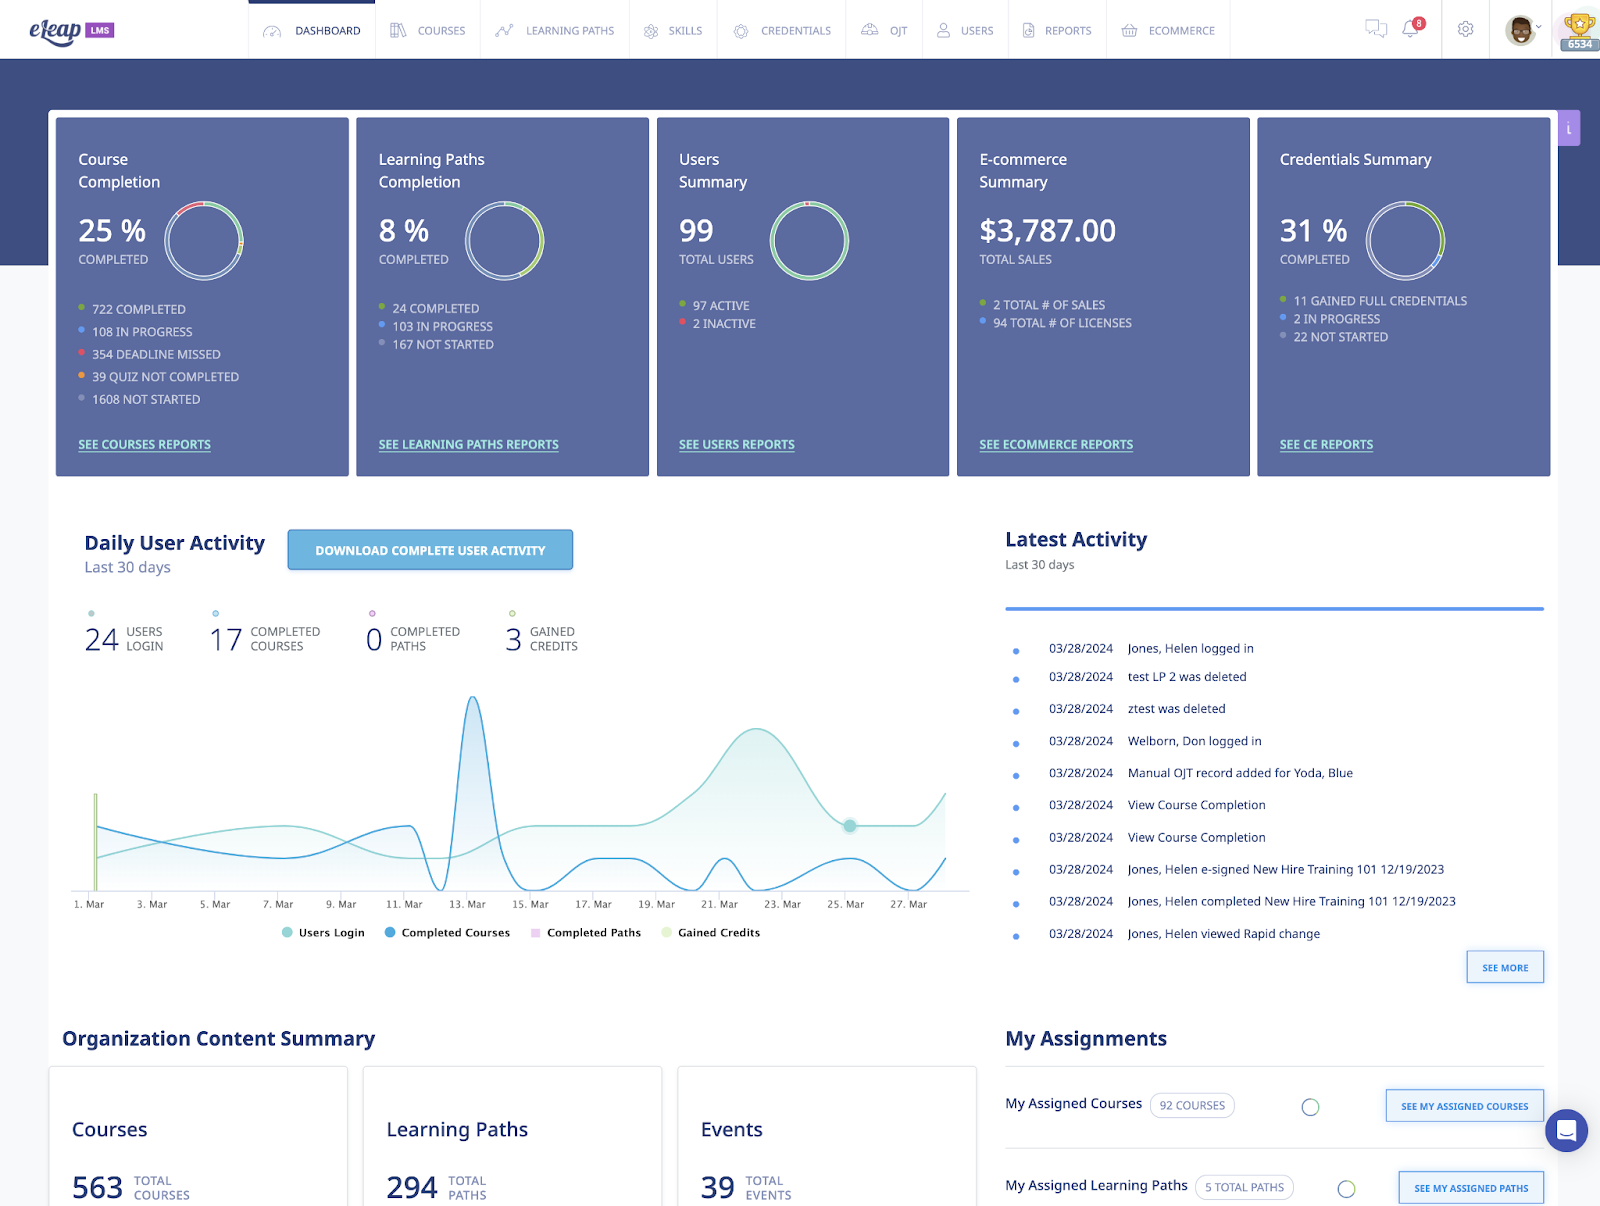
The Dashboard is 5 sections in one. The various dashboard sections are:
Status Tiles
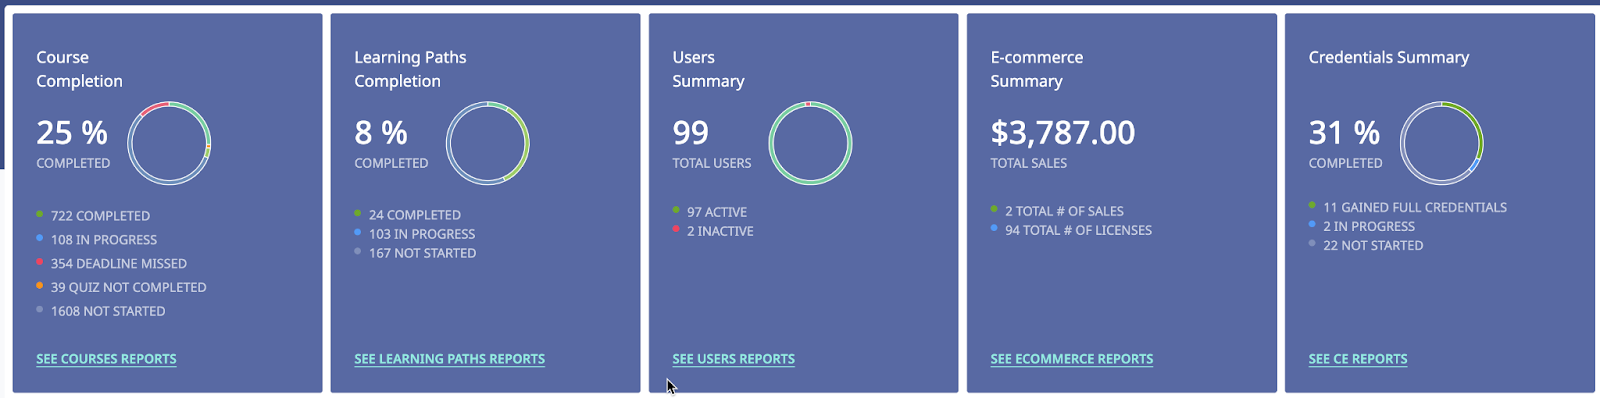
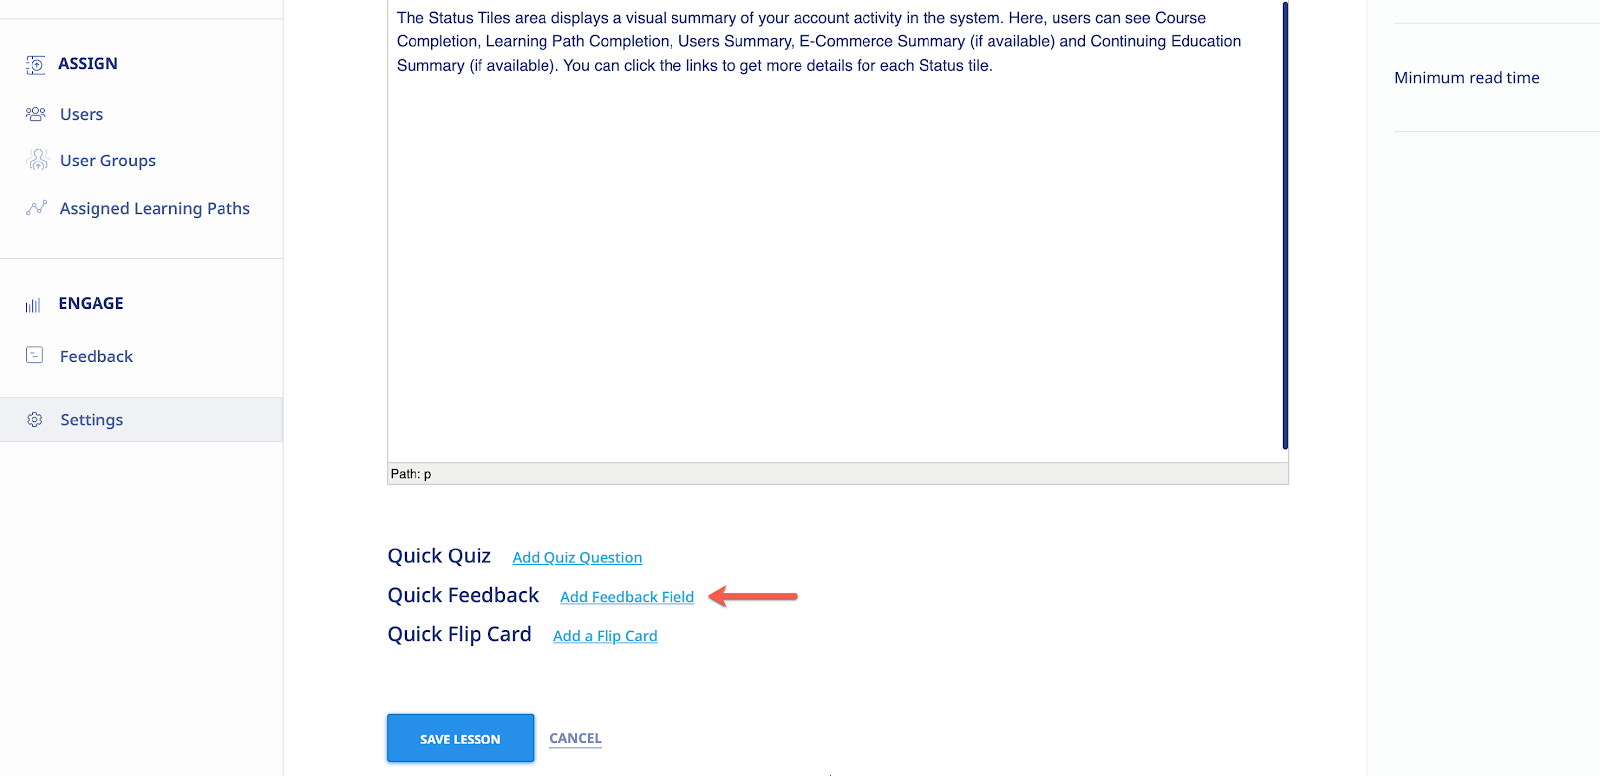
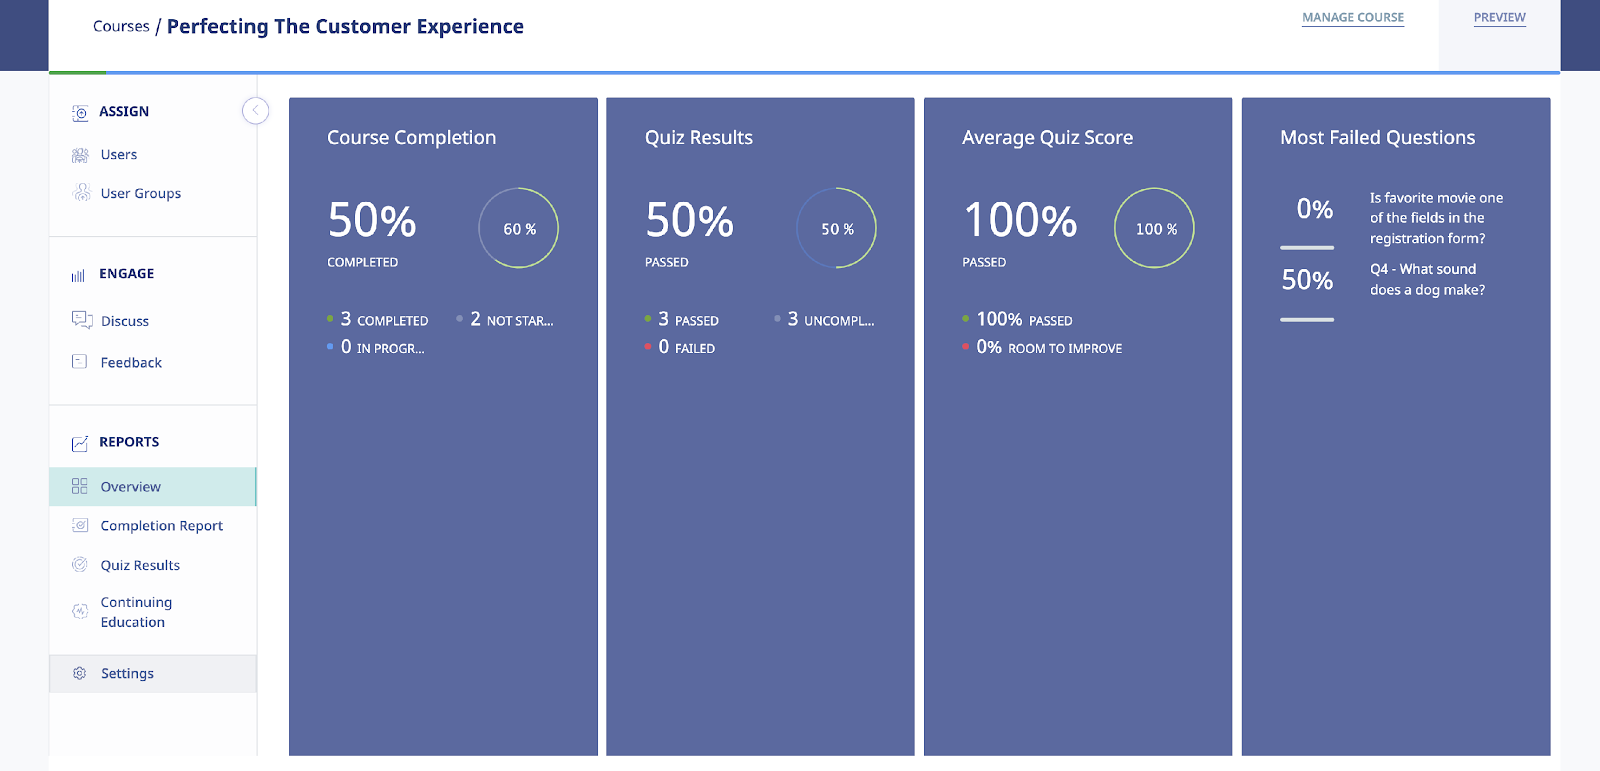
The Status Tiles area displays a visual summary of your account activity in the system. Here, users can see Course Completion, Learning Path Completion, Users Summary, E-Commerce Summary (if available) and Continuing Education Summary (if available). You can click the links to get more details for each Status tile.
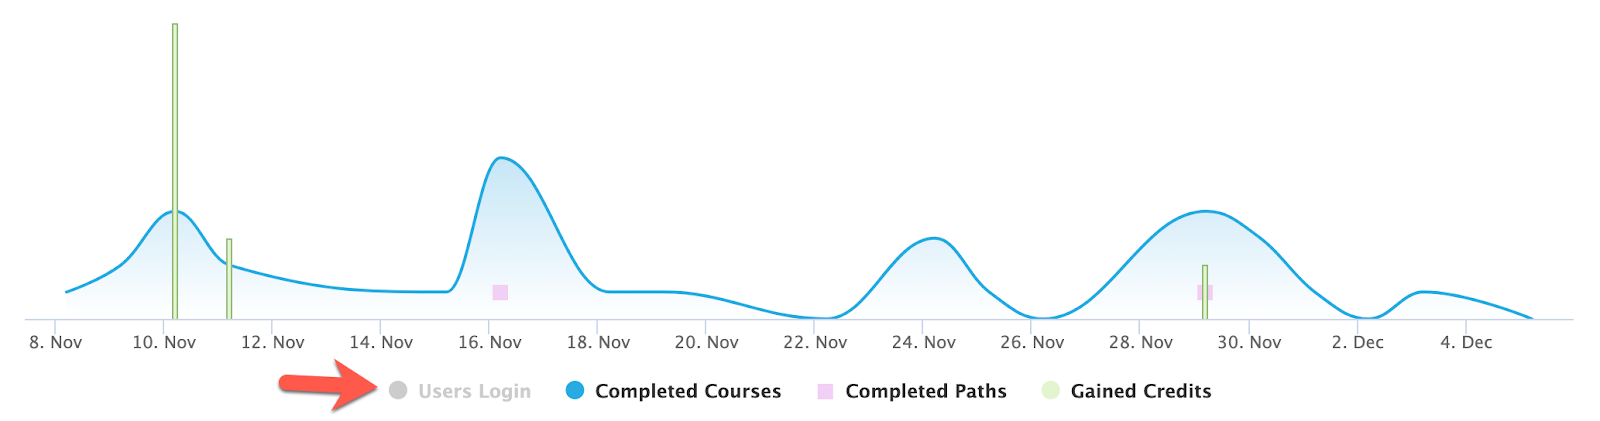
Daily User Activity
The Daily User Activity section includes the [Download Complete User Activity] button for quick account activity downloading. The Daily User Activity section shows 4 vital activities tracked –

- Daily User Logins
- Daily Course Completions
- Daily Learning Path Completions
- Daily Continuing Education Credits gained
You can suppress each of these individual activities so you can focus on specific daily user activities. Simply click on the activities you want to suppress to turn them gray and non-visible in the chart area.
Latest Activity
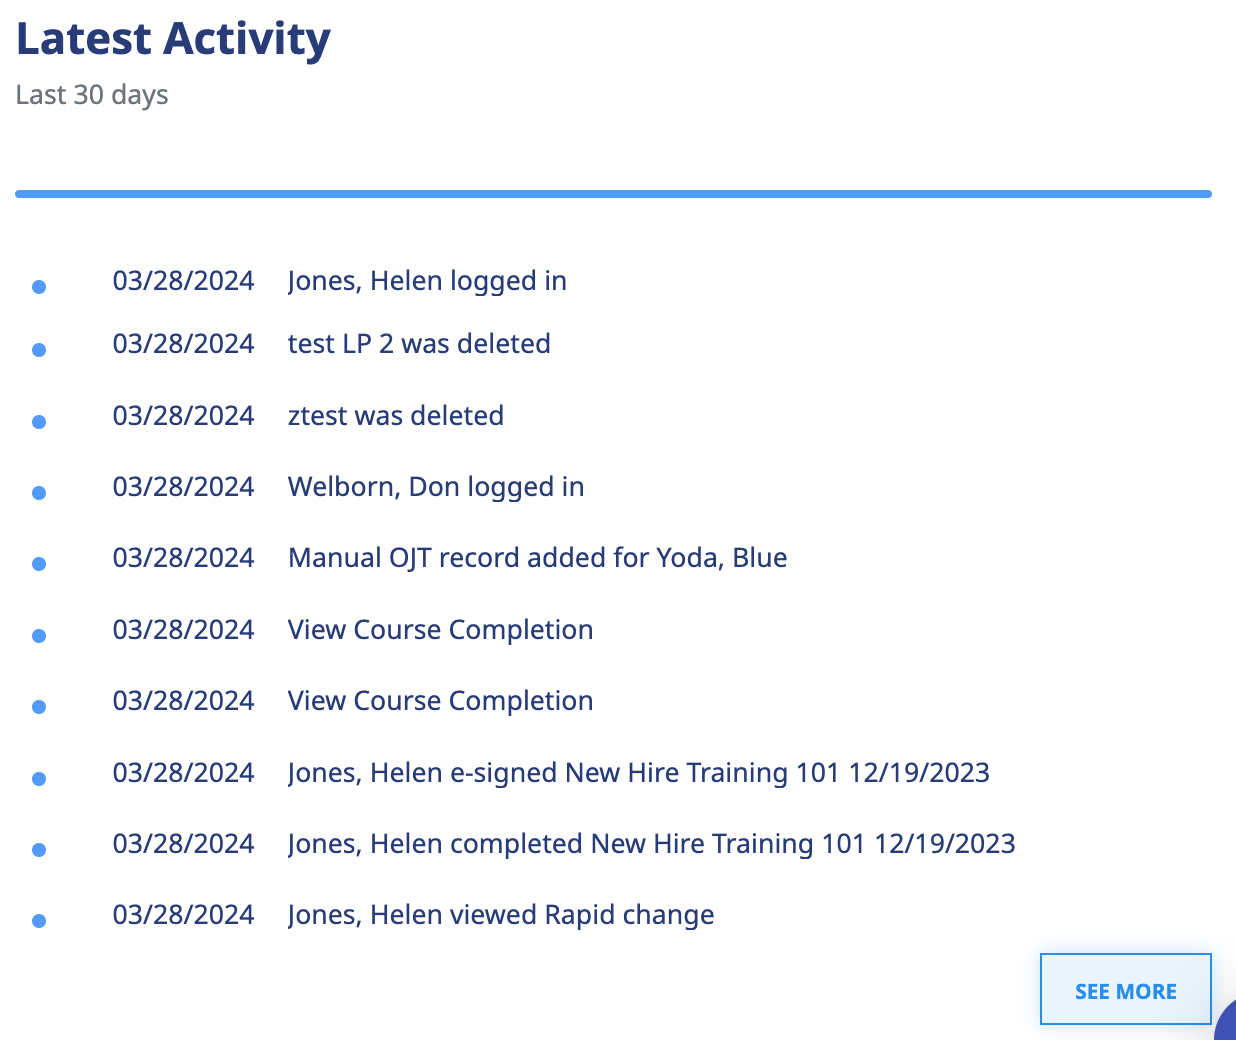
The v5+ also includes the latest account activity logs right on your dashboard. This activity is pulled from your Audit Trail so you can go to your Audit trail to get more details.
Organization Content Summary
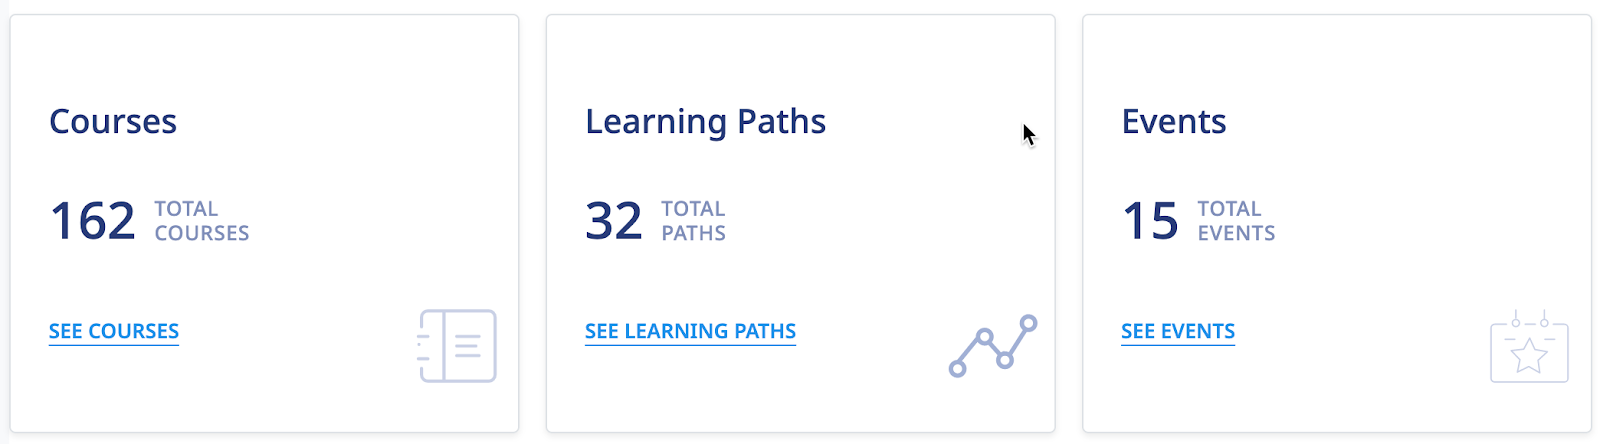
The Organization Content Summary section gives a high-level summary of your content assets created in the system. This summary includes the total number of Courses, Learning Paths as well as Events created. Click the links to get additional information.
My Assignments
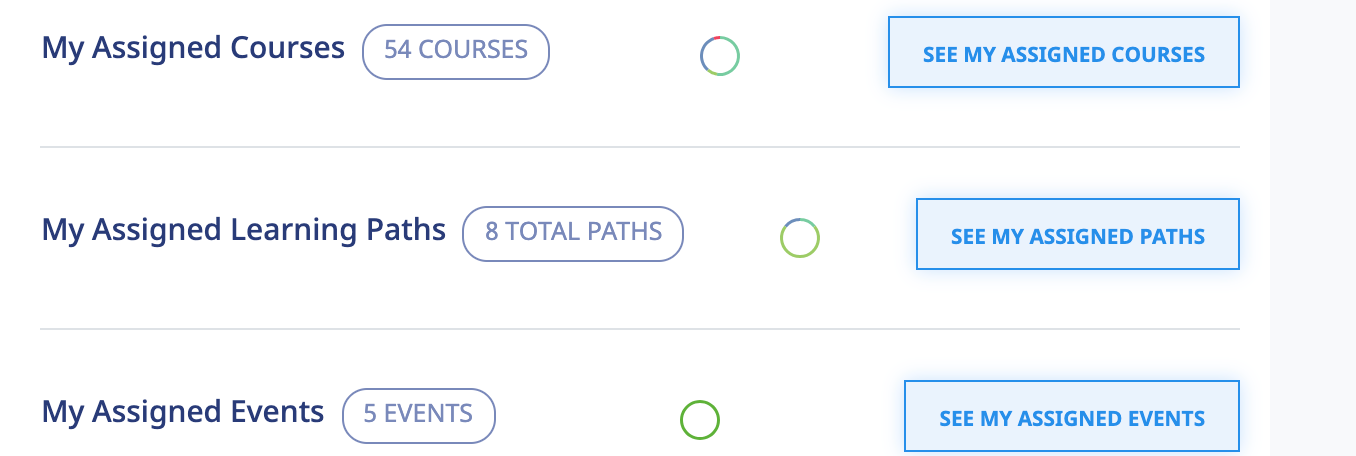
The My Assignments shows your personal assignments as a user in the system. You can also get your course, learning path, or Events assignments from the various sub-menu sections of the system.
Click the links to get more details on your assignments. The charts also indicate assignment status.
Forum & Inbox (Communication)
The Forum text link is now an icon . Clicking this icon takes you to the Forum section where you can manage your organization-wide Forums as well as participate in assigned Forum categories.

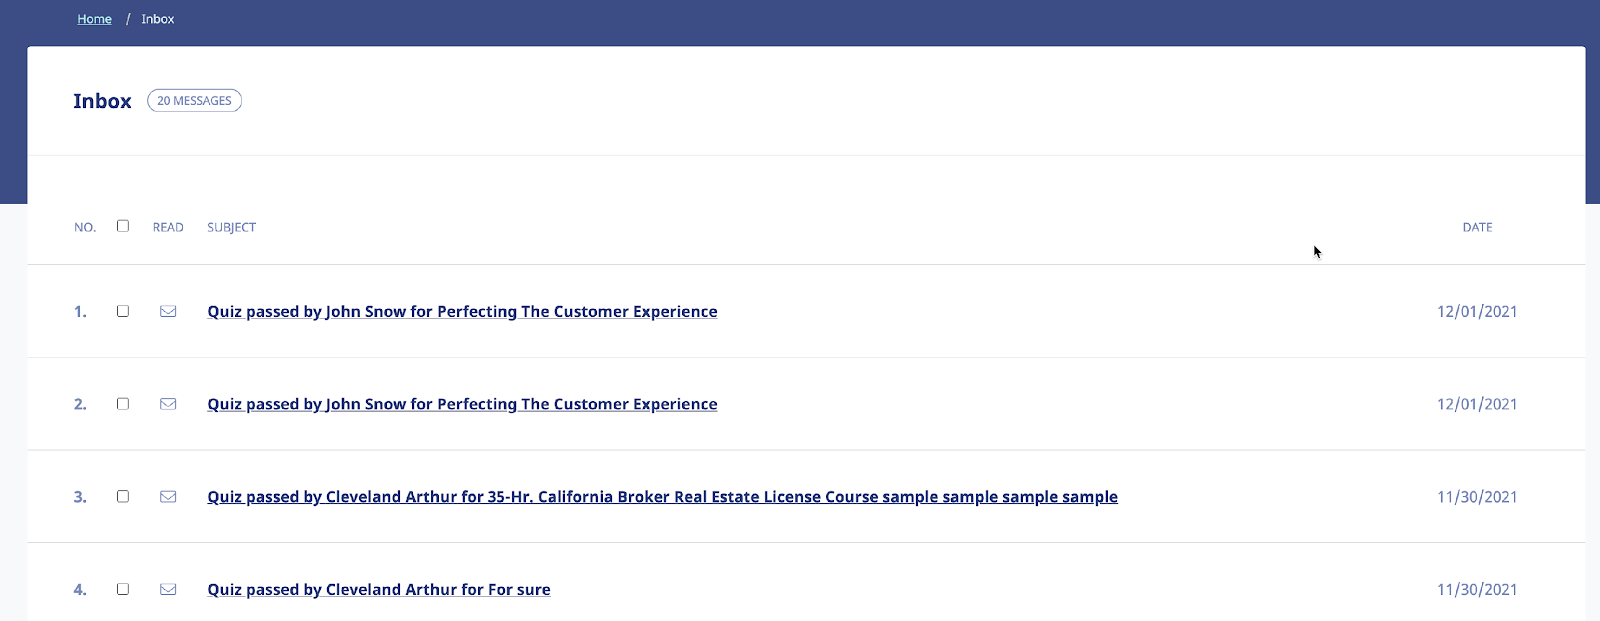
As a System Administrator, you can also access your Inbox to receive updated email notifications and communications regarding various activities in your eLeaP account. You can receive Quiz completion notifications, notifications on Course Assignments, and Pending Deadline notifications.

When you receive a Notification Email, the Email icon to the left of your User Name will indicate that. As shown in the following illustration, clicking on that icon displays the messages in your Inbox. You can select a message and click the remove selected messages link to delete those Emails. Inbox messages are automatically deleted after thirty (30) days. Remember that notification emails also do get sent to your regular email.
Account Settings
Clicking the gear icon from your main menu enables you to access your account settings. You can also access this from the dropdown arrow and then click the Company Profile option from there.

Modifying Your Personal Profile
Selecting the PROFILE option on the drop-down menu at the upper right-hand corner of the screen, as shown in the following illustration, allows you to modify your Personal Profile information.
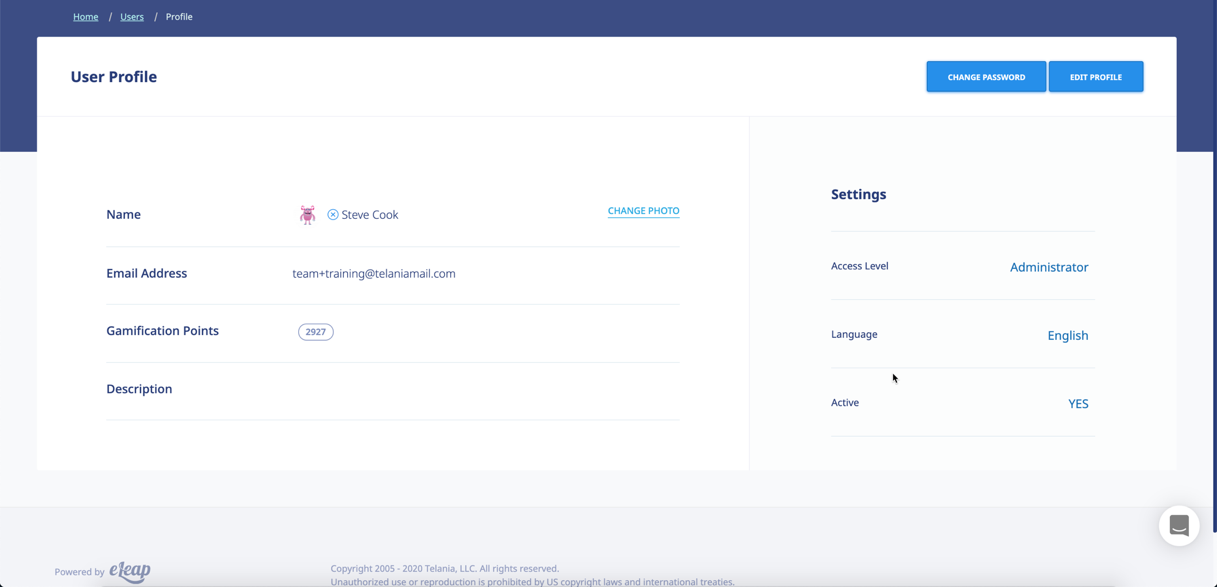
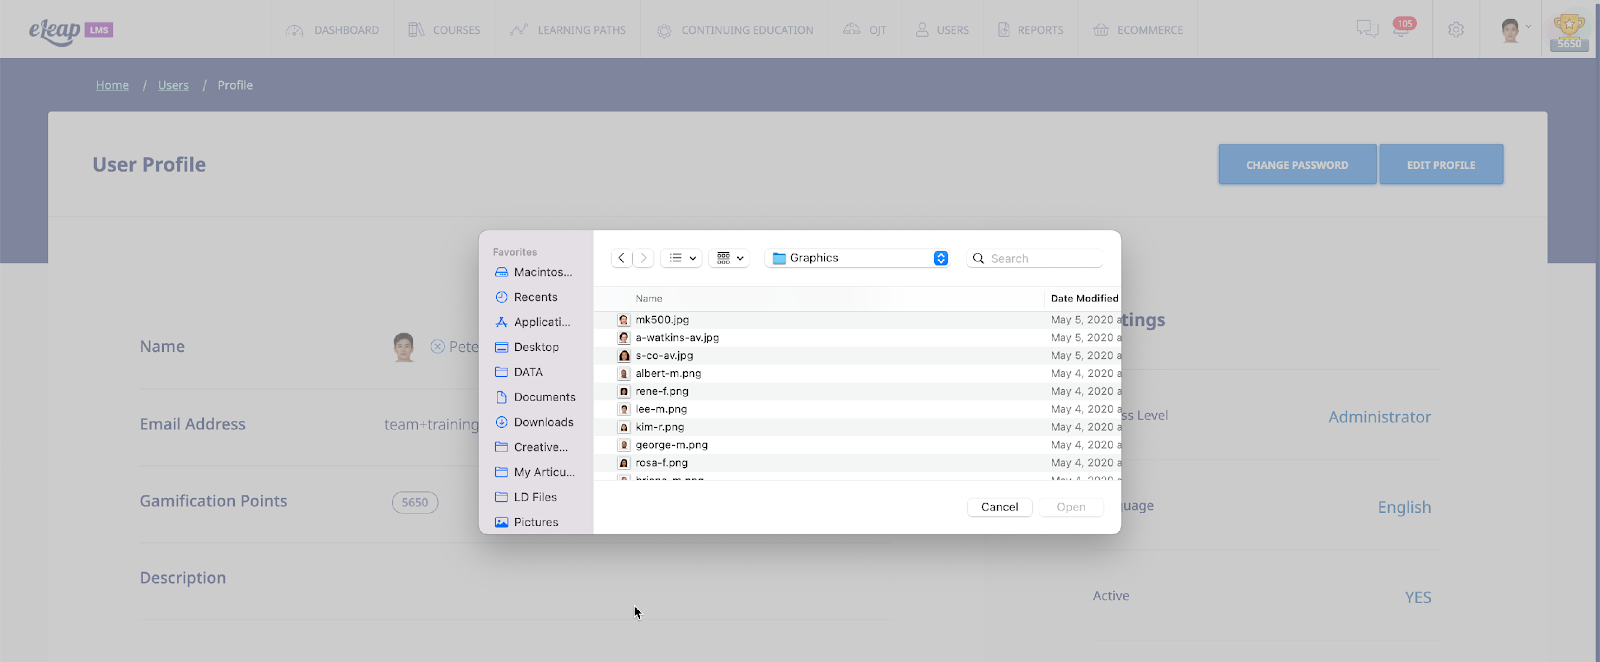
The User Profile screen, illustrated below, is displayed. To associate a picture with your Profile, click the CHANGE link next to the Name, as shown in the illustration.
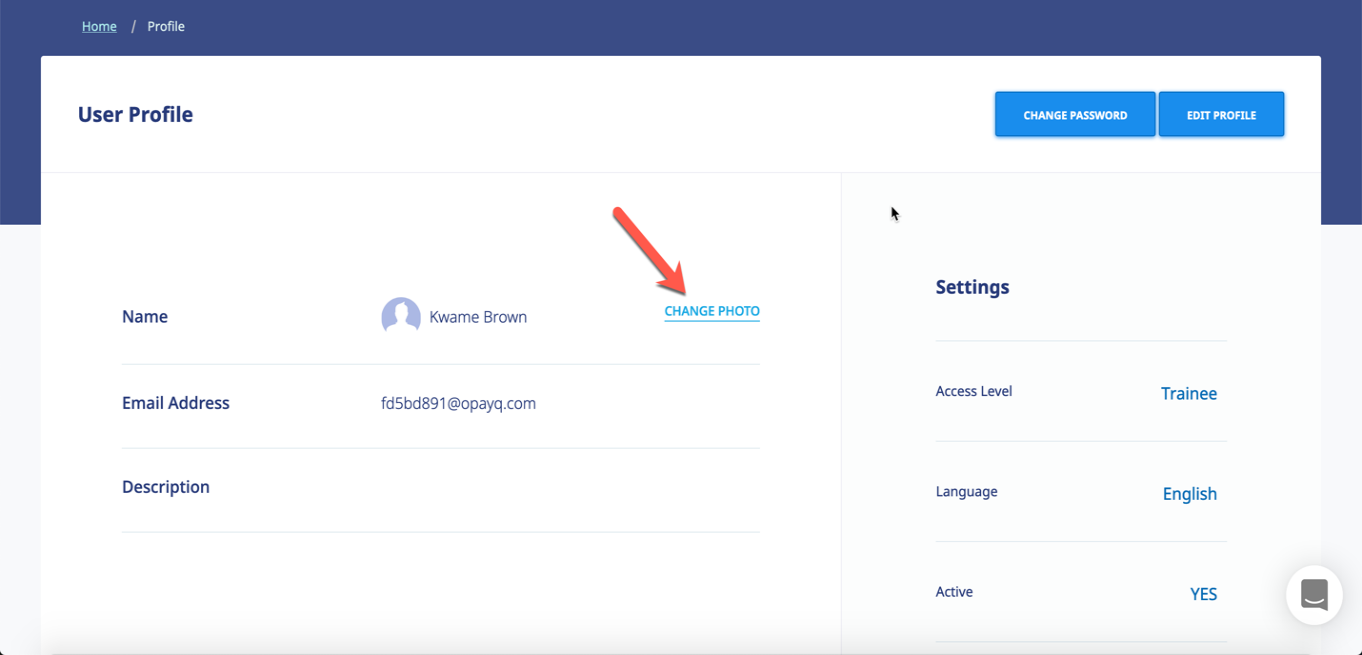
The screen expands, allowing you to navigate to a location on your computer where the picture that you want to associate with your Profile is stored.
Edit Profile
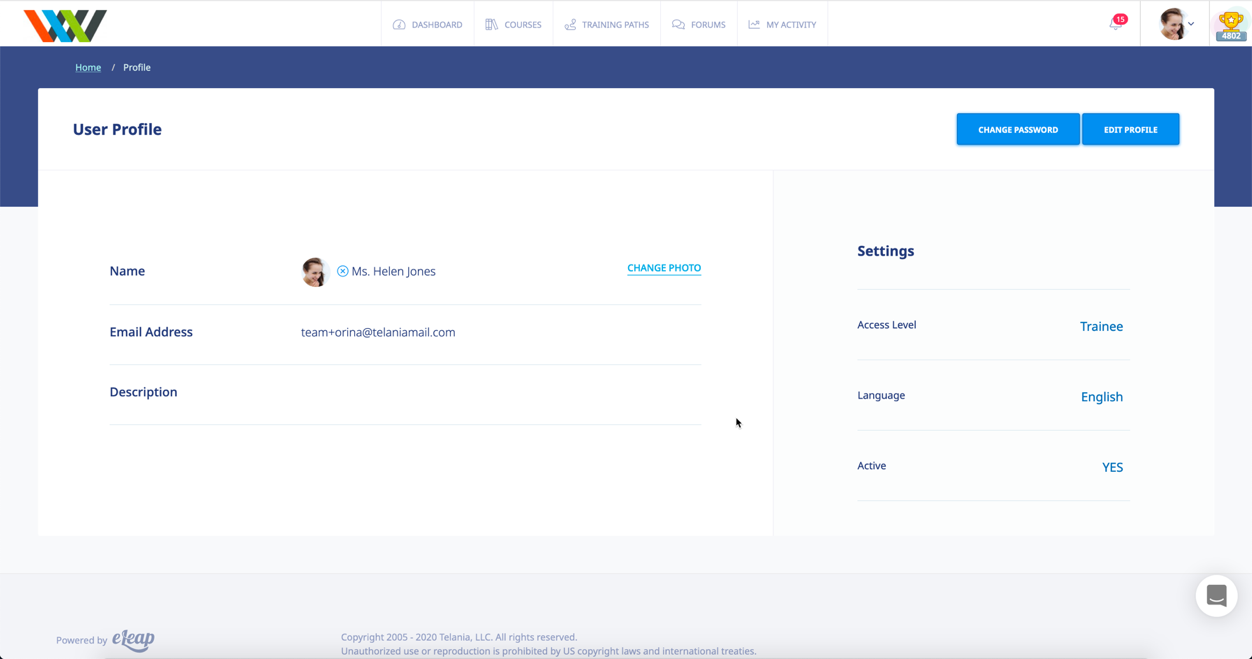
To edit your Profile Details, select the EDIT PROFILE button located in the right-hand section of the screen. The Edit User Profile screen, illustrated below, is displayed. Make any modifications necessary within the Title, First Name, Middle Name, Email, Description, Access Level, Language, and Active/Inactive settings.
Changing Your Password
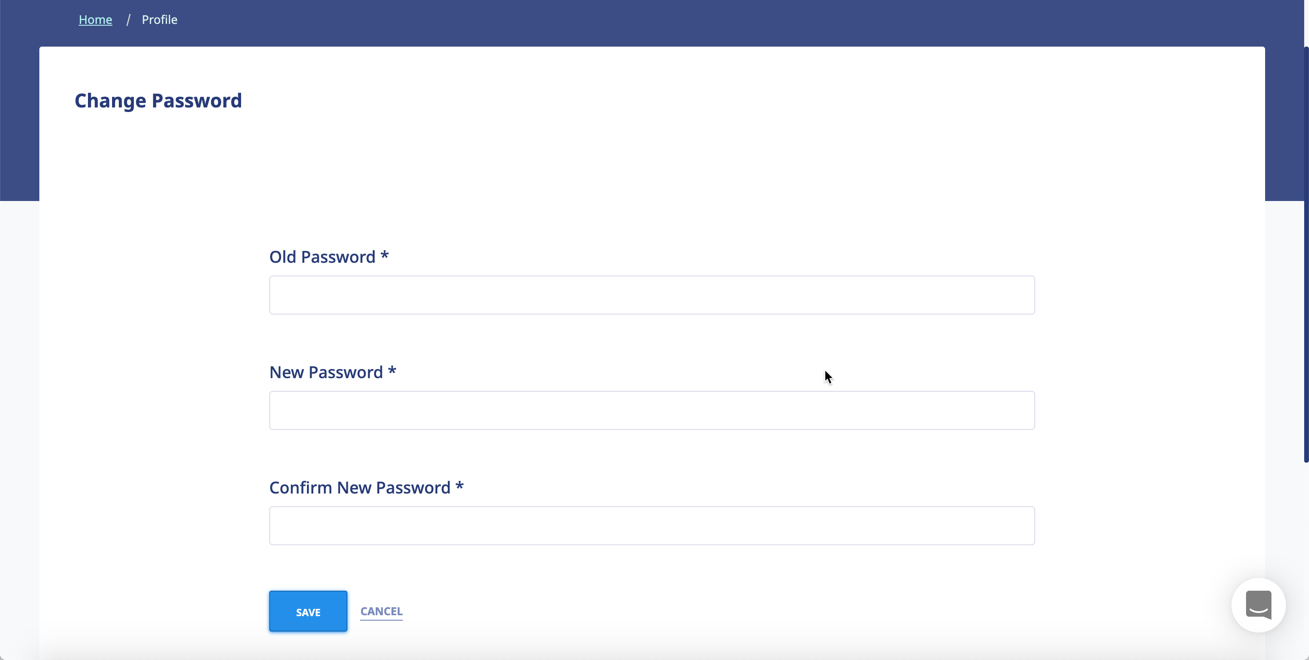
Clicking the CHANGE PASSWORD button allows you to reset your password. As shown in the following illustration, the Change Password screen is displayed. Enter your old password in the Old Password field, enter your new password in the New Password field, re-enter the new password in the Confirm New Password field, and then click .

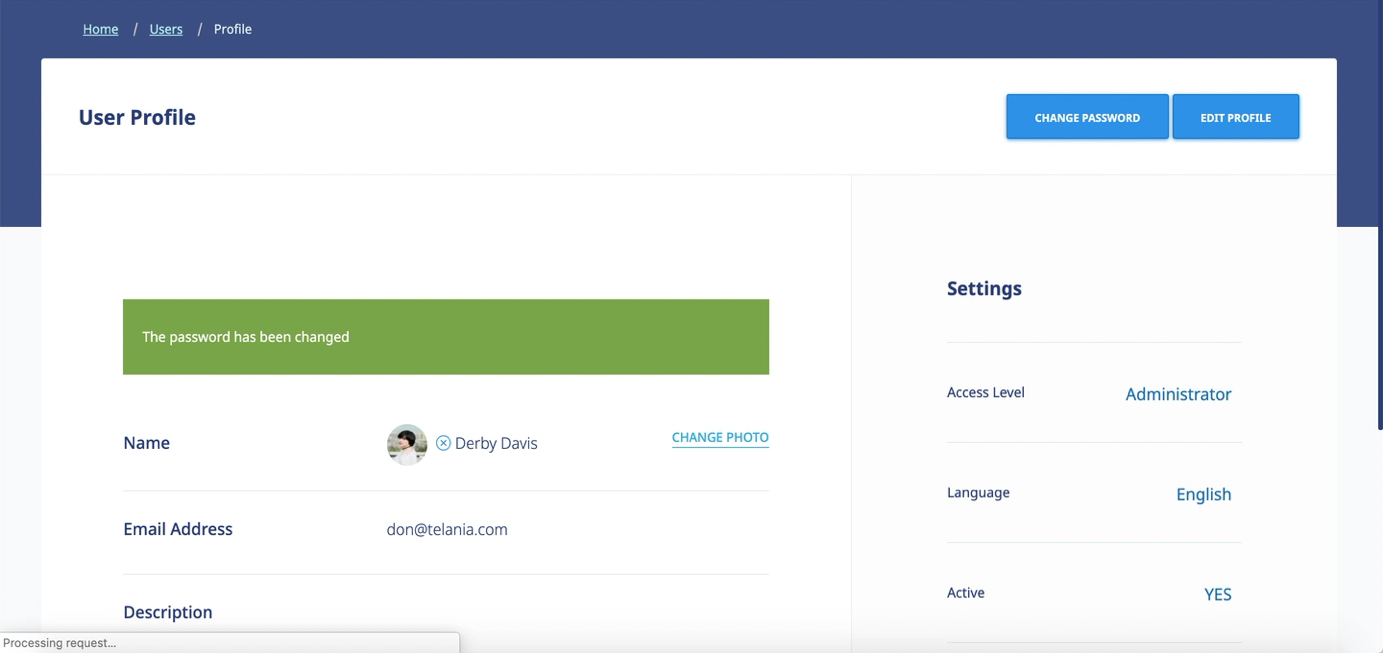
As shown in the following illustration, the system confirms that the password has been changed.
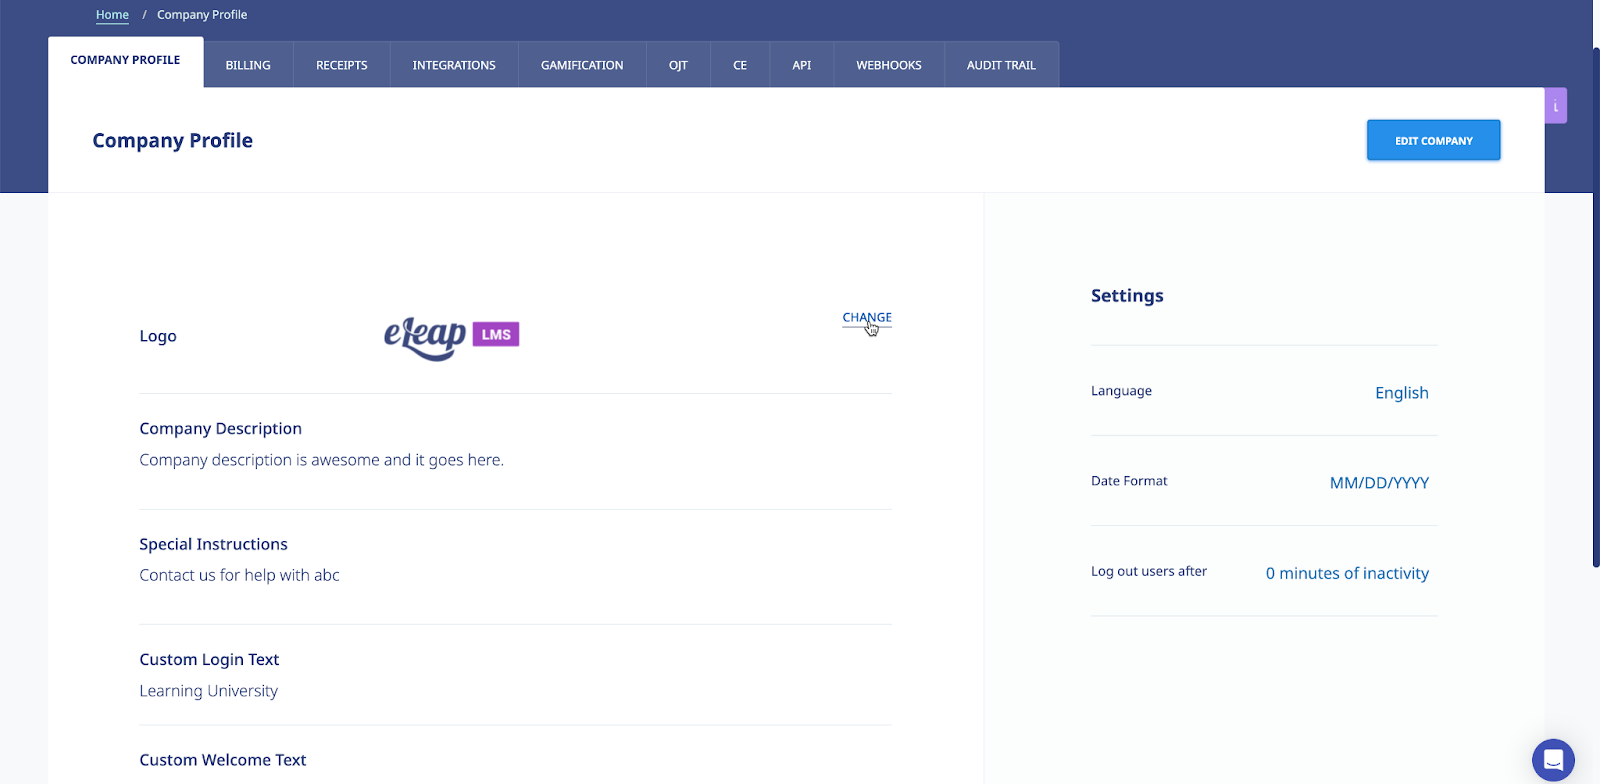
Modifying Your Company Profile
Selecting the COMPANY PROFILE option on the drop-down menu at the upper right-hand corner of the screen, as shown in the following illustration, allows you to modify your Company Profile information. You can also click the gear icon in the primary menu section to access this page.
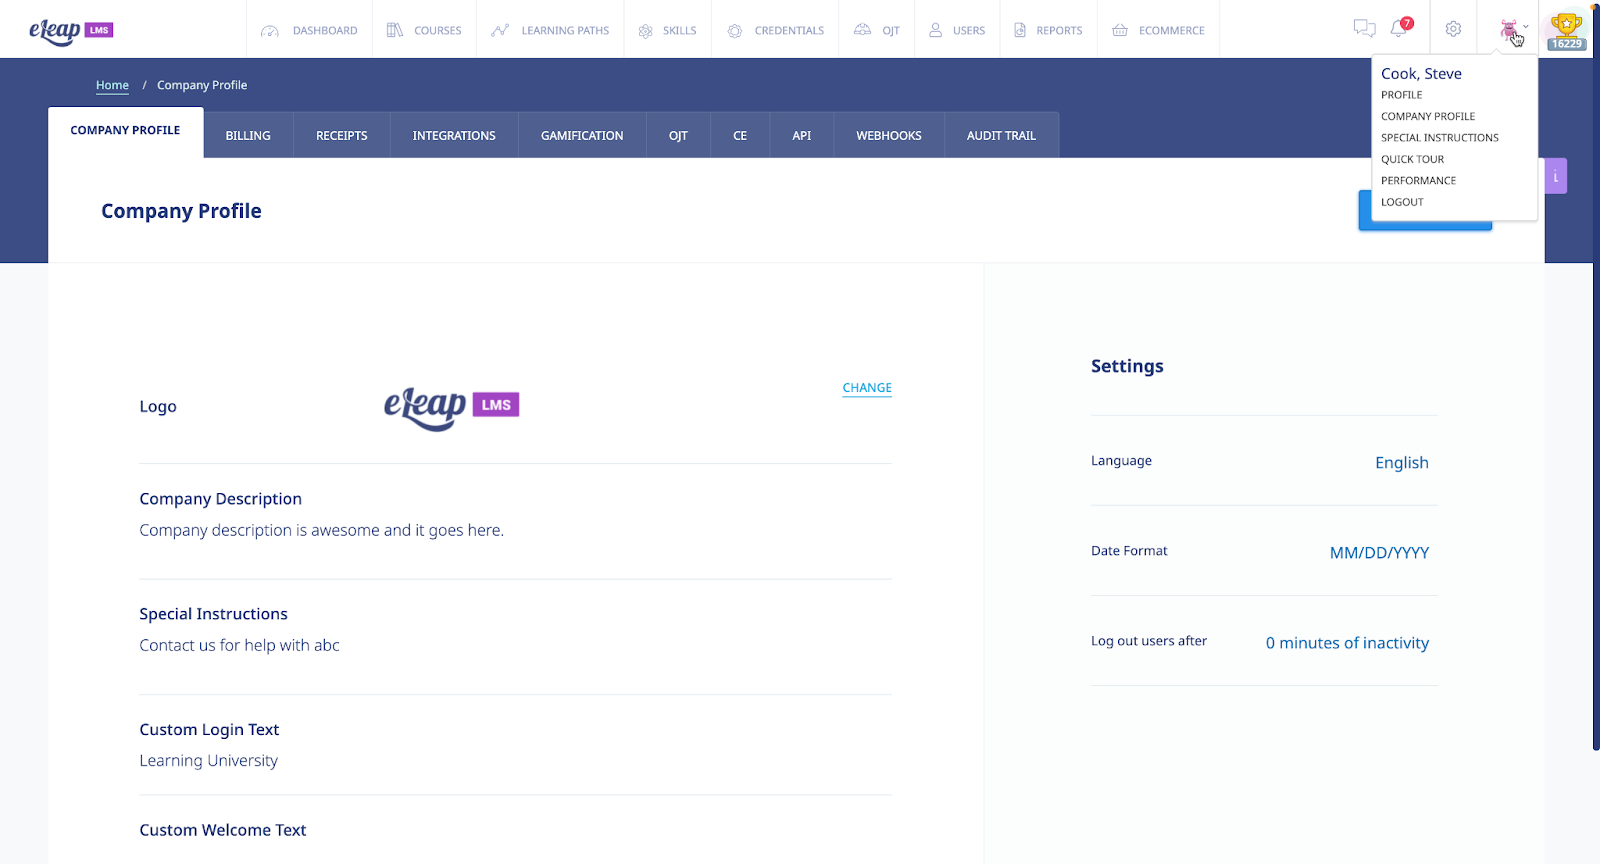
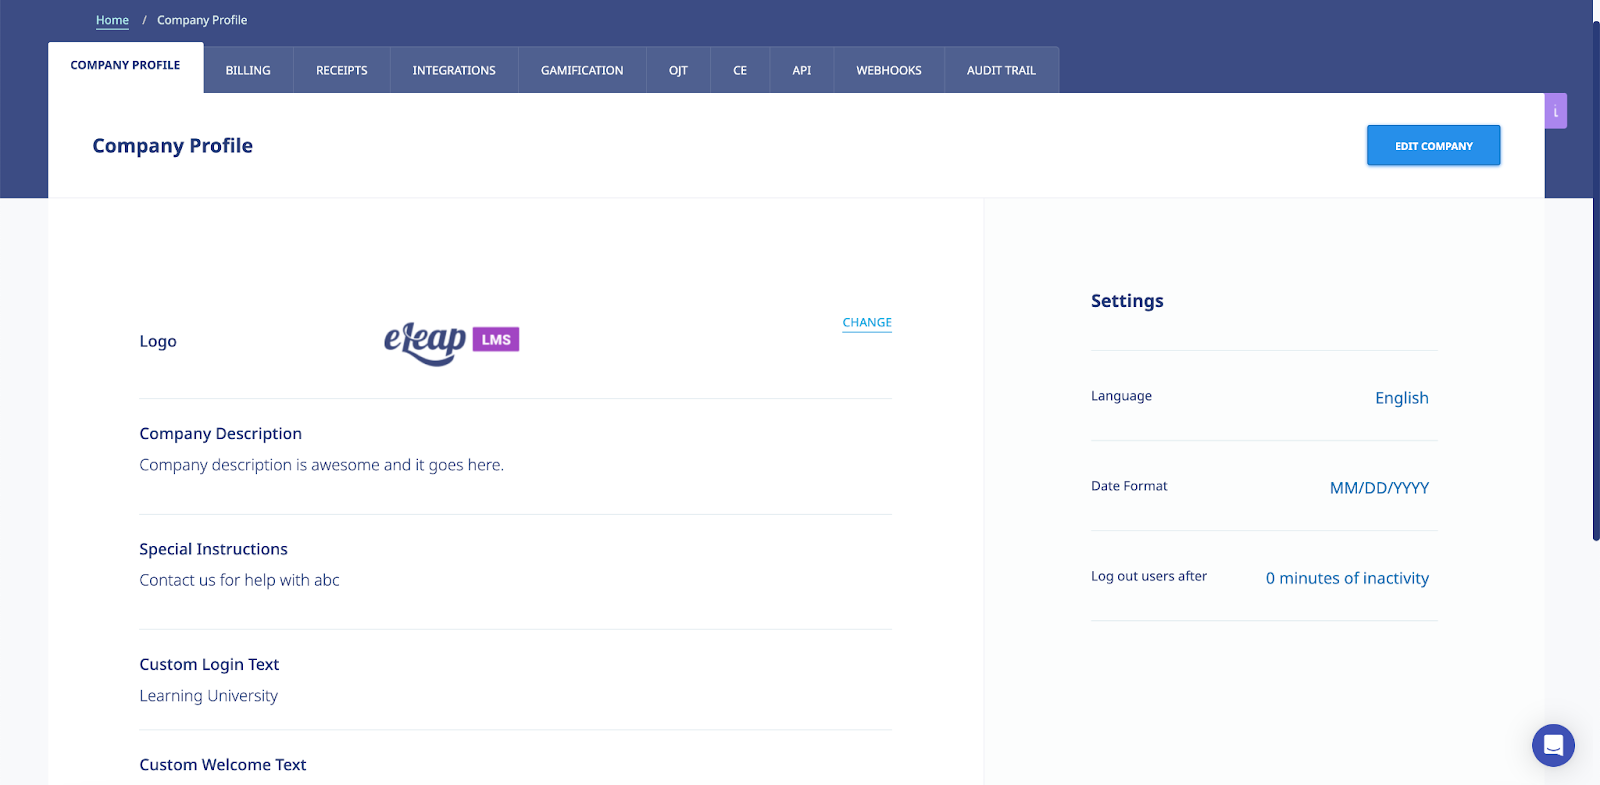
The Company Profile screen, illustrated below, is displayed. This screen consists of five or six tabs (depending on account type): Company Profile (displayed by default), Billing, Payment Profiles, Receipts, Invoices, Integrations, Gamification, OJT, CE, API, Webhooks and Audit Trail. Clicking the EDIT PROFILE button, located in the right-hand side of the screen, allows you to modify the Company Info, Instructions, Notification email, Language and Date format settings for your account. Clicking the Upload logo link allows you to upload your company’s logo, which will be displayed in the upper left-hand corner of the screen.
Editing Your Profile Fields
As mentioned above, clicking the button on the Company Profile screen allows you to make changes to your Company Profile’s settings using the Edit Company Profile screen, as shown in the following illustration. Use the steps below to successfully make changes to your Company Profile using this screen.

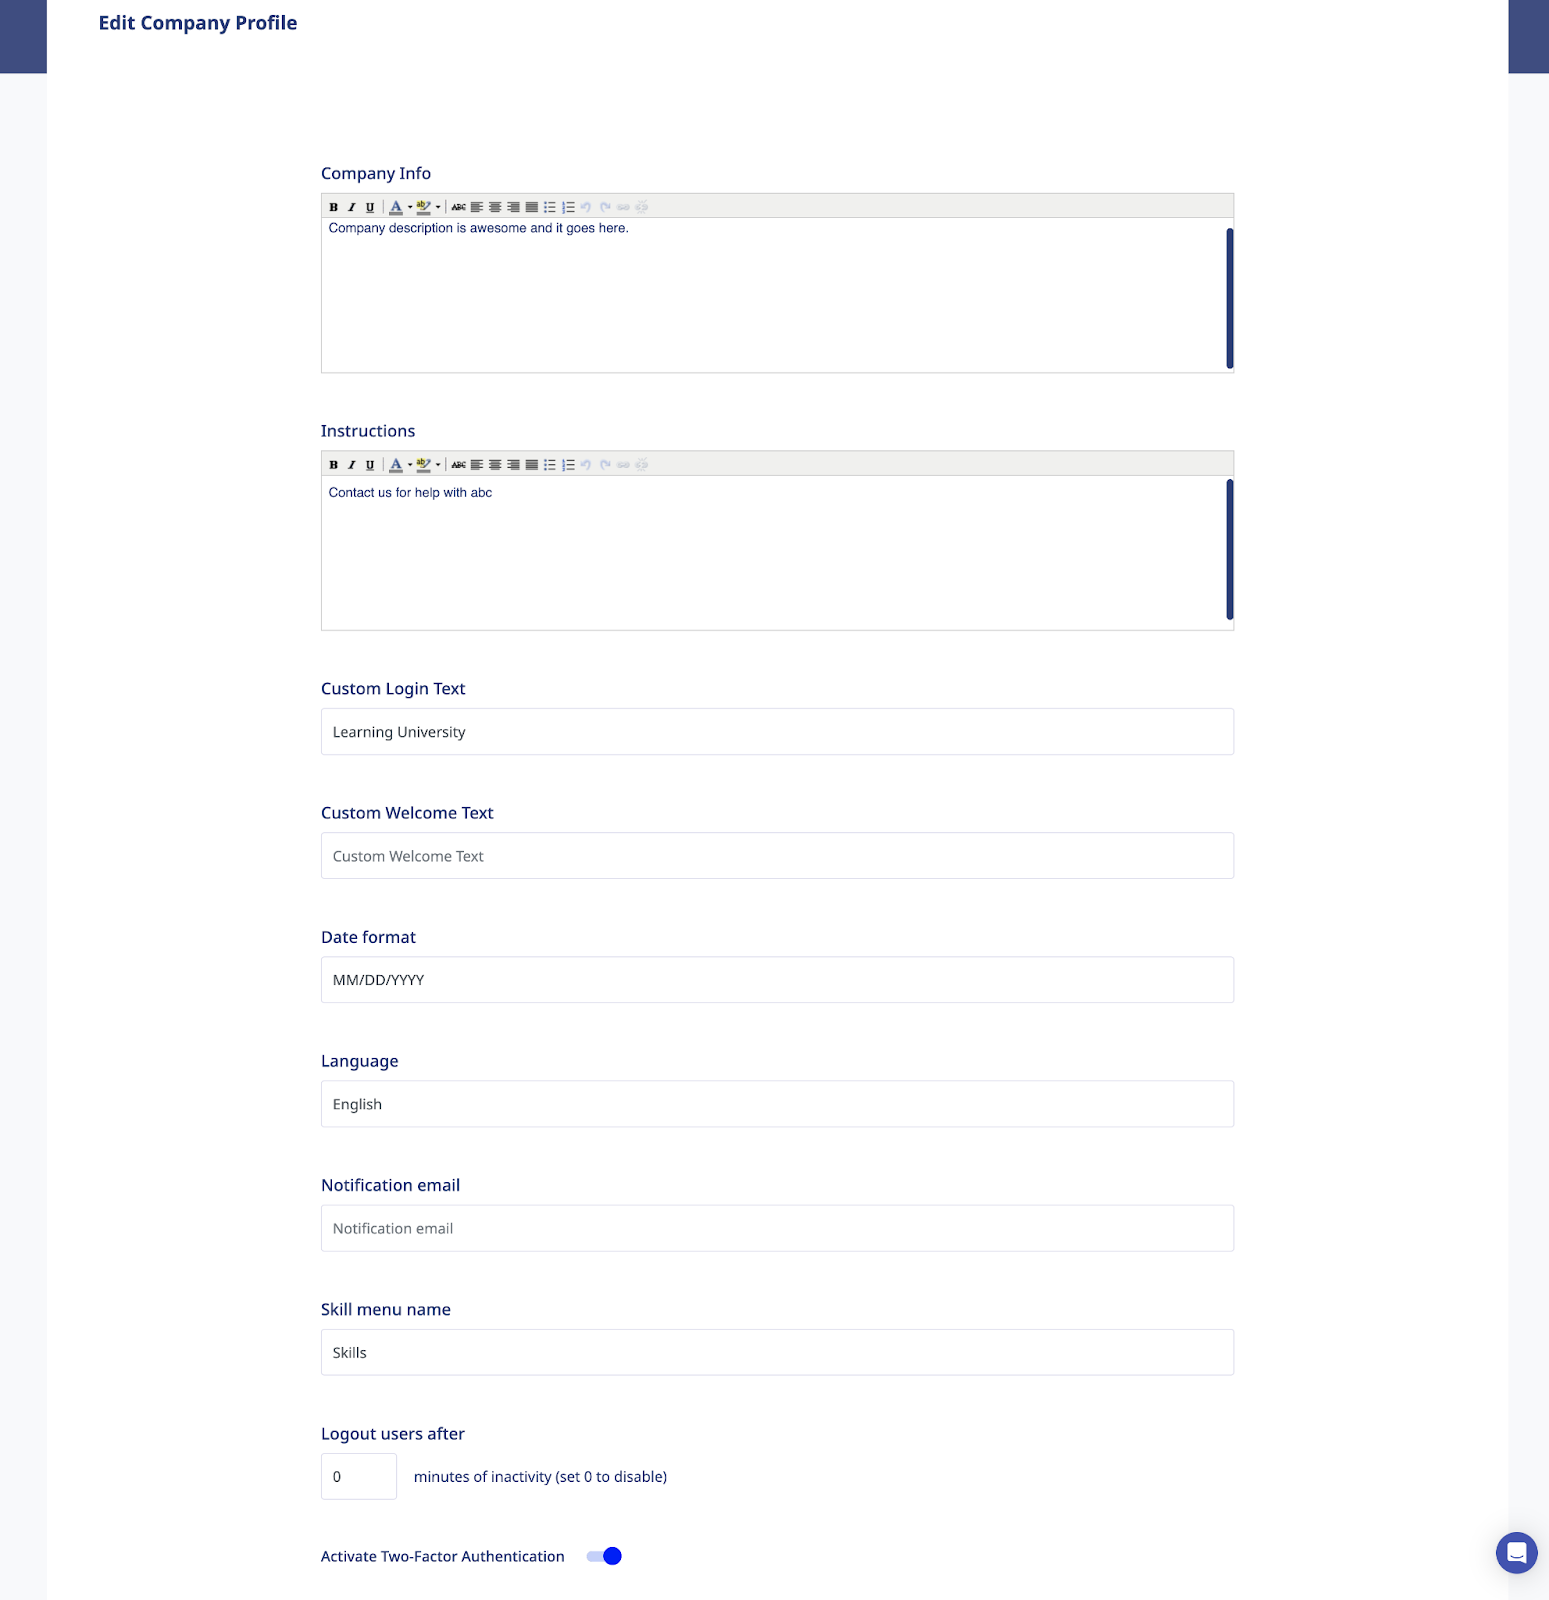
- Use the Company Info Editor to add information about your Company.
- Use the Instructions Editor to add Instructions.
- Make a different selection on the Date format list to use one of the other available date formats.
- Use the Language dropdown to select the default language for your account.
- Change the Email Address within the Notification email field to change the address to which Notification Emails will be sent.
- Customize [Skills] menu name for your main menu section.
- Auto Logout for inactivity can also be set using the Logout users after field. Simply indicate the number of minutes of inactivity the system should set before it logs inactive users out.
- Activate Two-Factor Authentication for your account.
- Click to save your changes to the system.

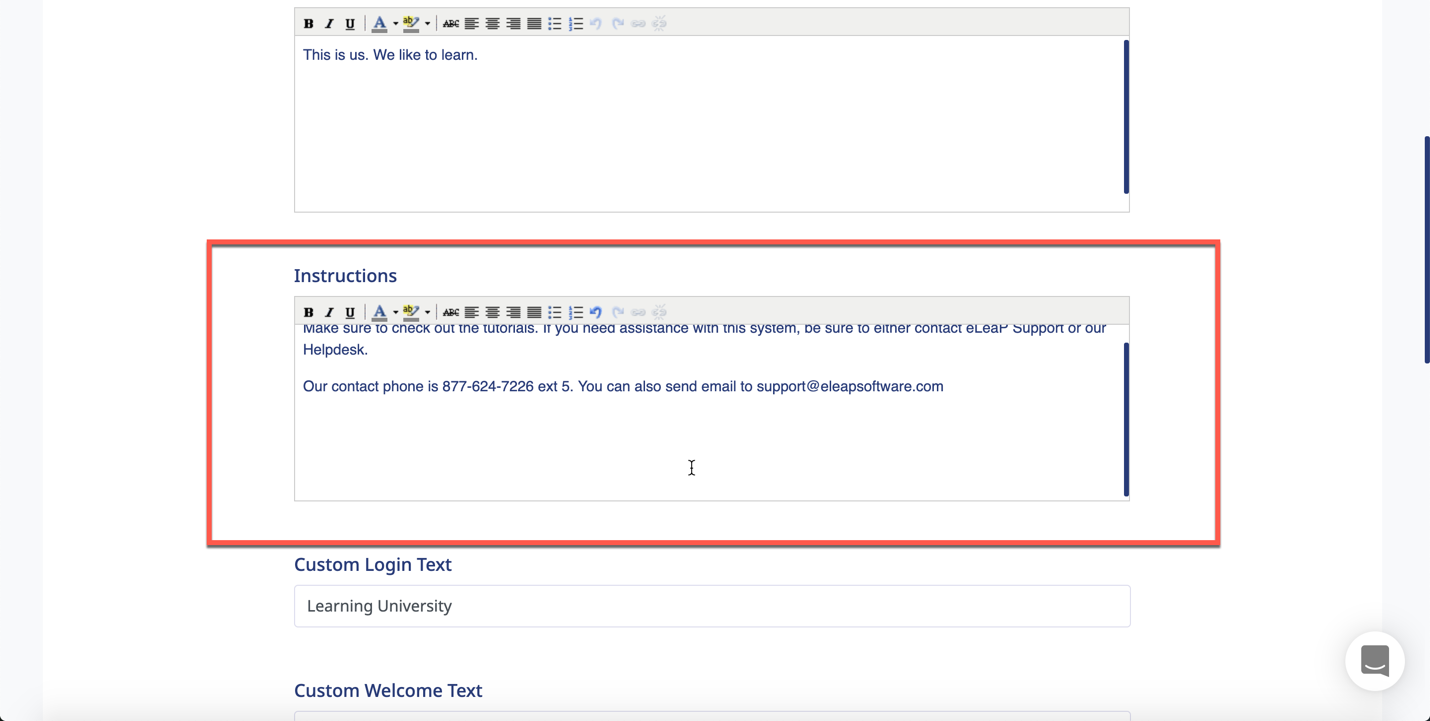
Special Instructions
eLeaP V5 has an option to show important company instructions to users when they first log into the system as well as when they click on the dropdown from their profile area.

To add Special Instructions, click the button and go to the [Instructions] section
From the Trainee’s view, the Special Instructions looks like:
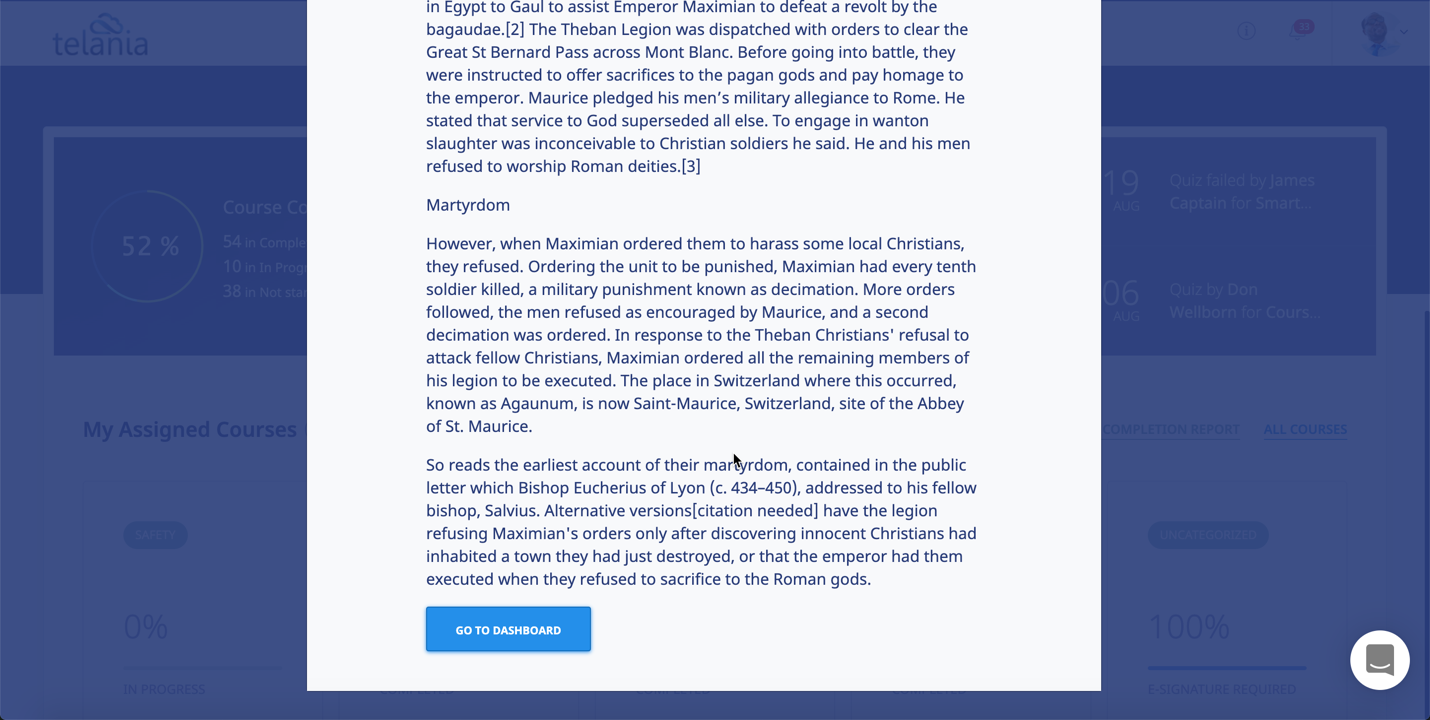
Clicking on the displays this screen
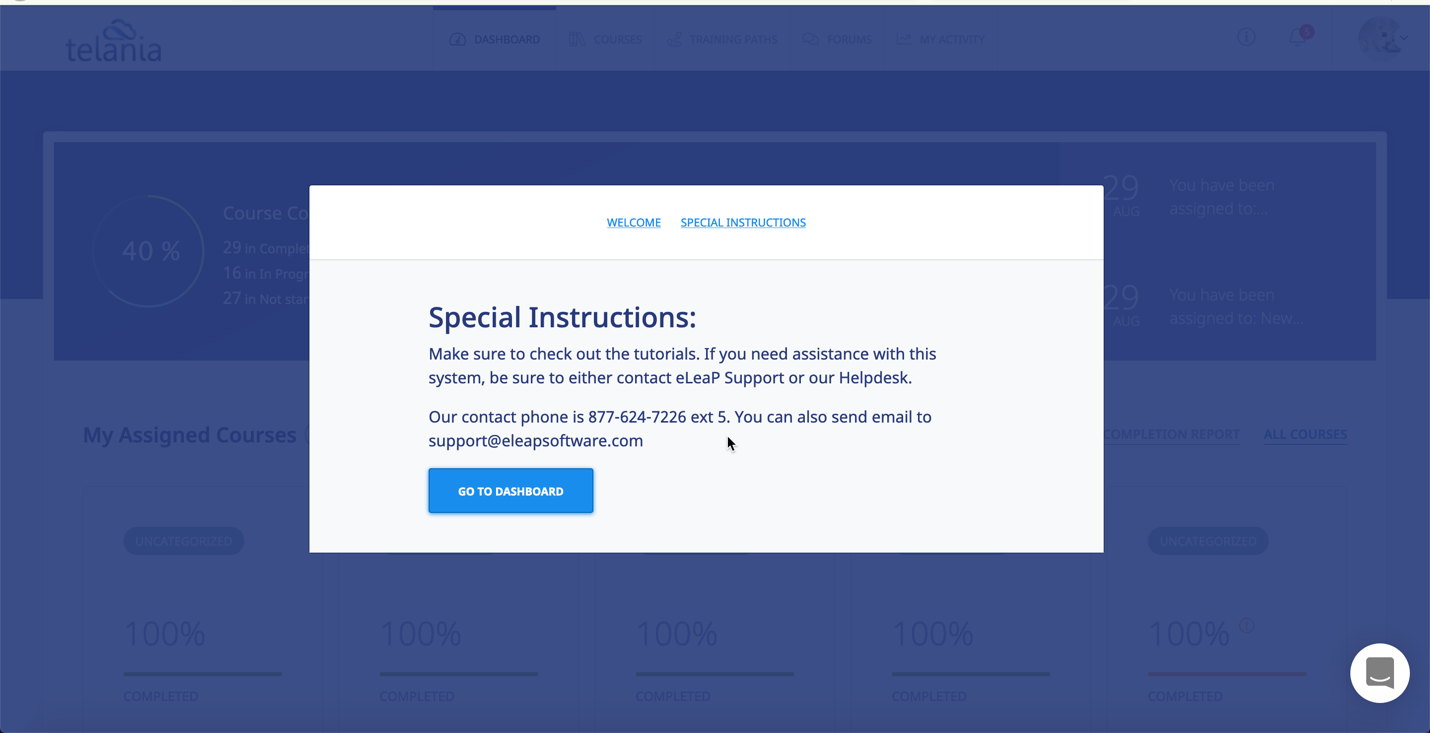
Clicking on take the user to their dashboard
Auto Logout Time
eLeaP has an auto logout feature for companies who need to comply with 21 Part 11 and other compliance regulations. By default, the auto logout is set at 0 or unlimited. Changing this number activates the auto logout feature.
For example, if you want to set an auto logout setting for 60 minutes, this is how:

Note that for auto logout to work, the users must maintain inactivity for the duration of the auto logout time frame. Moving their cursor resets the clock.
Uploading your Company Logo
Clicking the CHANGE button on the Company Profile screen allows you to incorporate your company logo into your instance of the eLeaP application.
As shown in the following illustration, the Company Profile screen expands to include an Upload File portion of the screen.
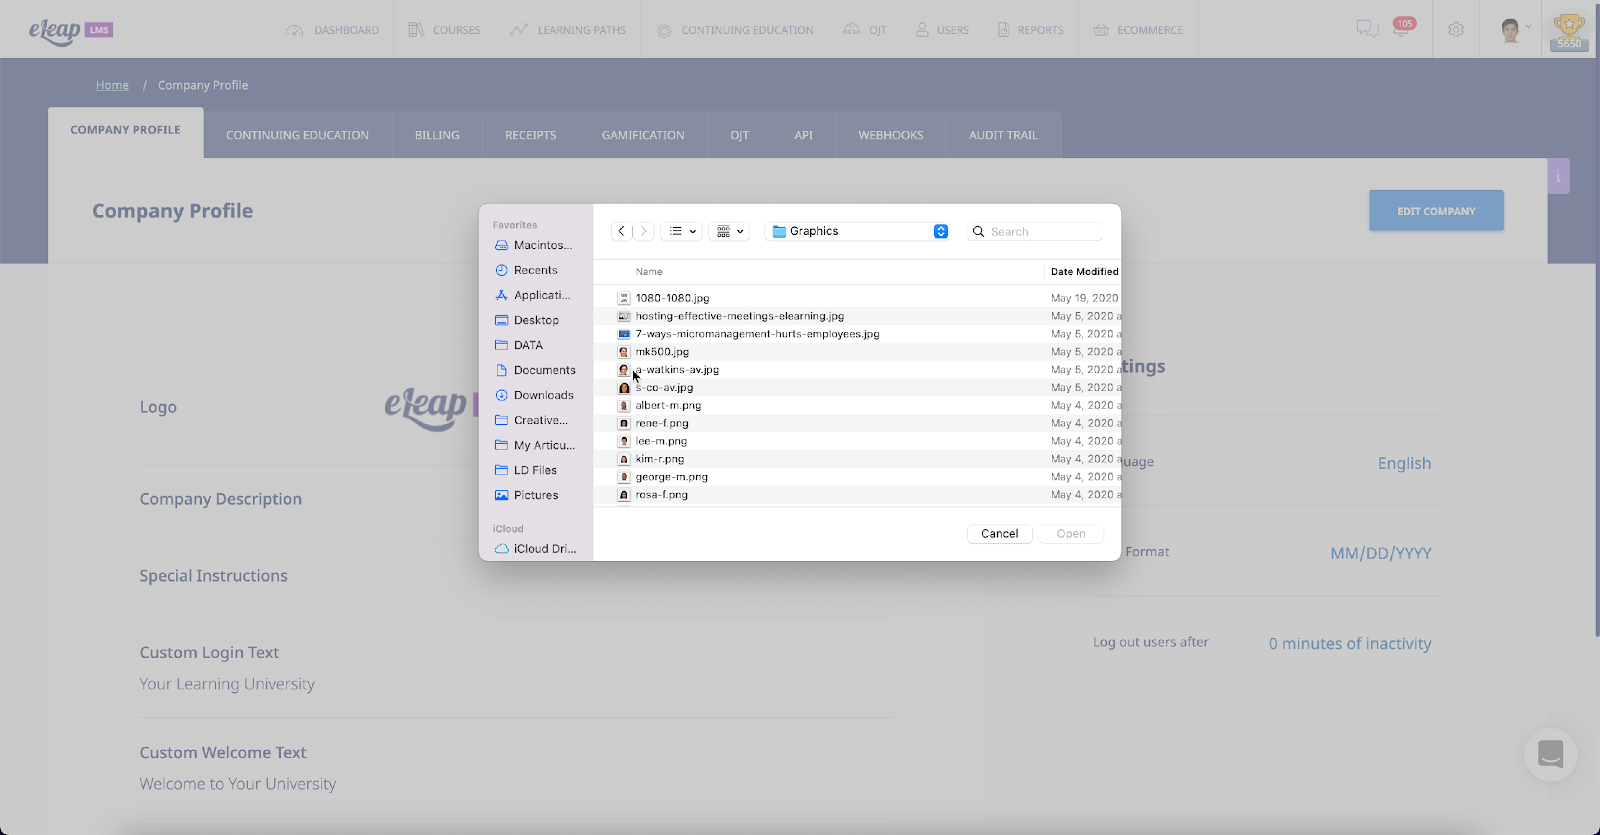
Simply navigate or browse to the location of your organization’s logo file on your computer. Select the logo file and click .

Credentials [Management]
Selecting the [CE] tab in the Company Profile area will enable you to manage the various types of CEUs available to your organization and users.
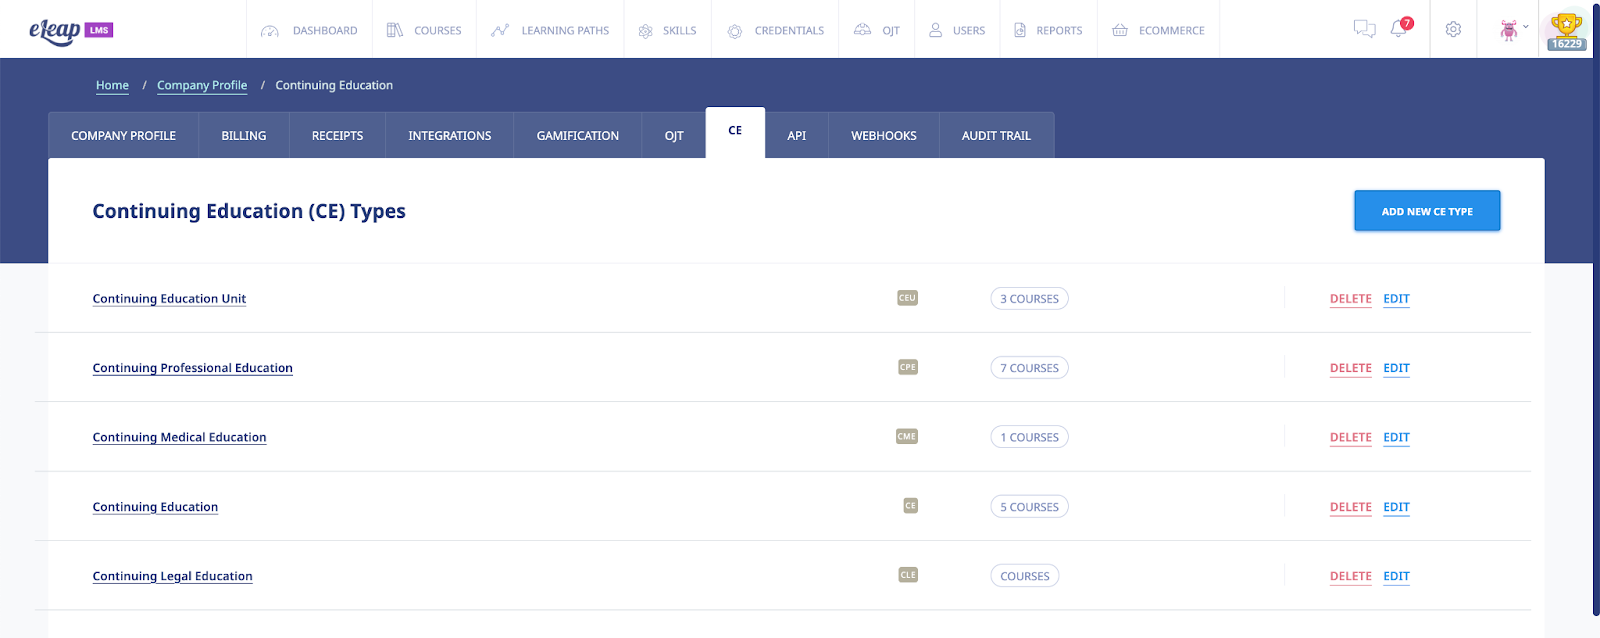
Your account will be pre-loaded with the 5 types of CEUs above. However, you can edit, delete, or add more CE types to your account. You can also see how many CE courses you have associated with each type of CEU.
Once you have your CE types set up the way you want, go to your [COURSES] menu to add or associate specific courses with the various CE types.
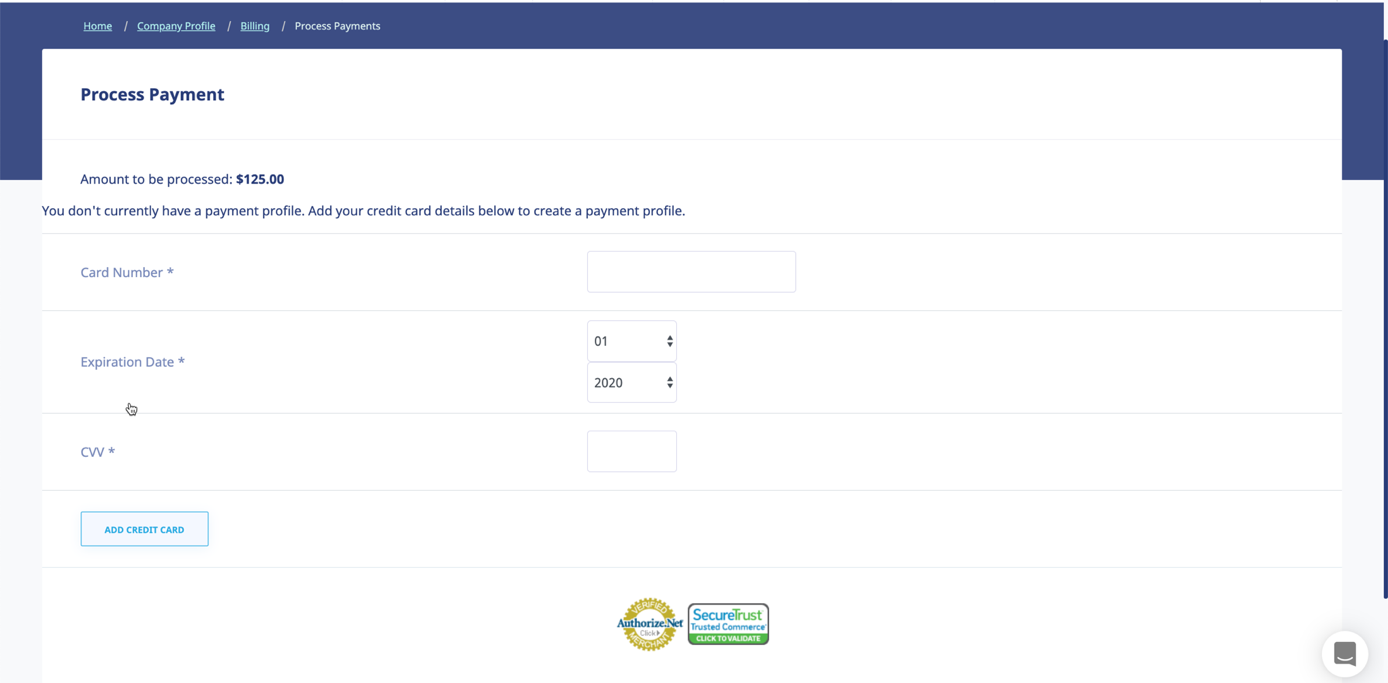
Billing
Selecting the BILLING tab on the Company Profile screen displays the Billing screen, as shown in the illustration below. Select the appropriate billing level to suit the needs of your organization.
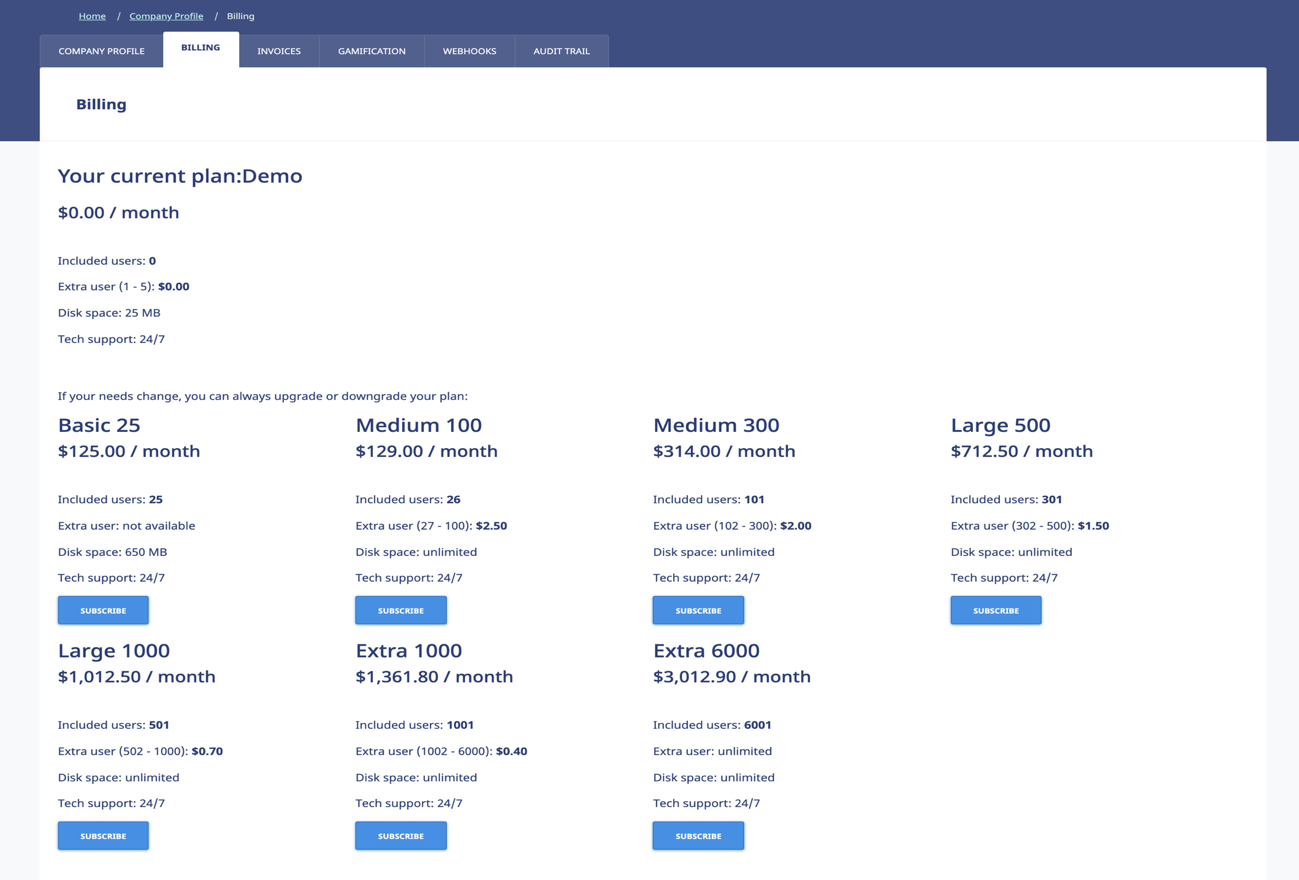
Once you select the appropriate usage level, you will be able to process payment online and send offline payment in the form of a check or another means. In the example below, I selected the [Basic 25] level and got this credit card payment screen.
If you would like to download a price list, click here. Feel free to use the Bookmark function in your browser to bookmark this location to always have access to this information.
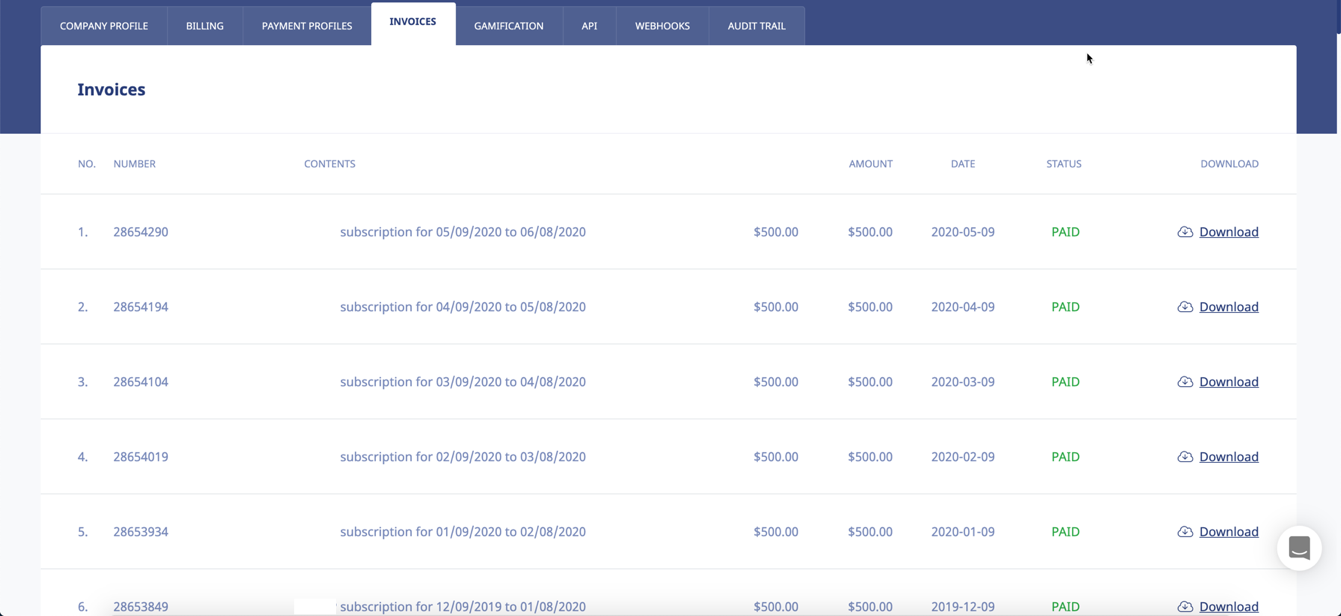
Invoices/Receipts
Selecting the INVOICES (or RECEIPTS) tab on the Company Profile screen displays the Invoices/Receipts screen, illustrated below. This screen will show all of your payments received on the Invoices/Receipts list. To download your invoice or receipt, click the associated Download link.
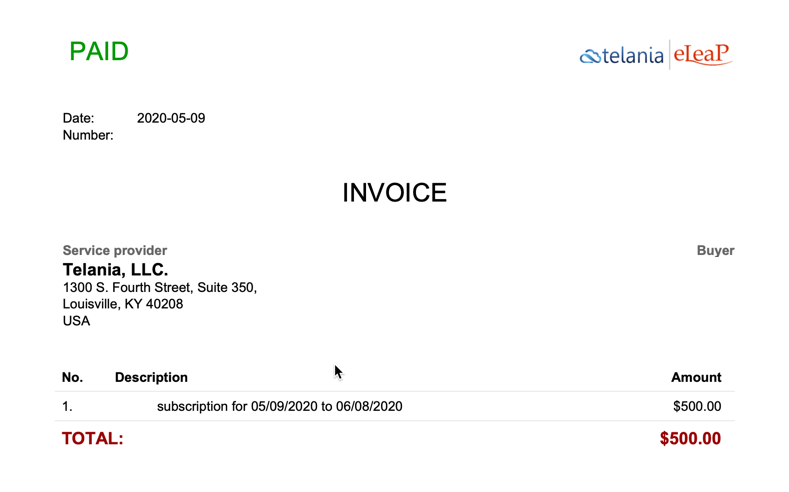
Upon payment, the Customer will receive a Receipt similar to the following example.
Gamification
What is gamification?
The application of typical elements of game playing to other areas of activity to encourage engagement with a product or service.
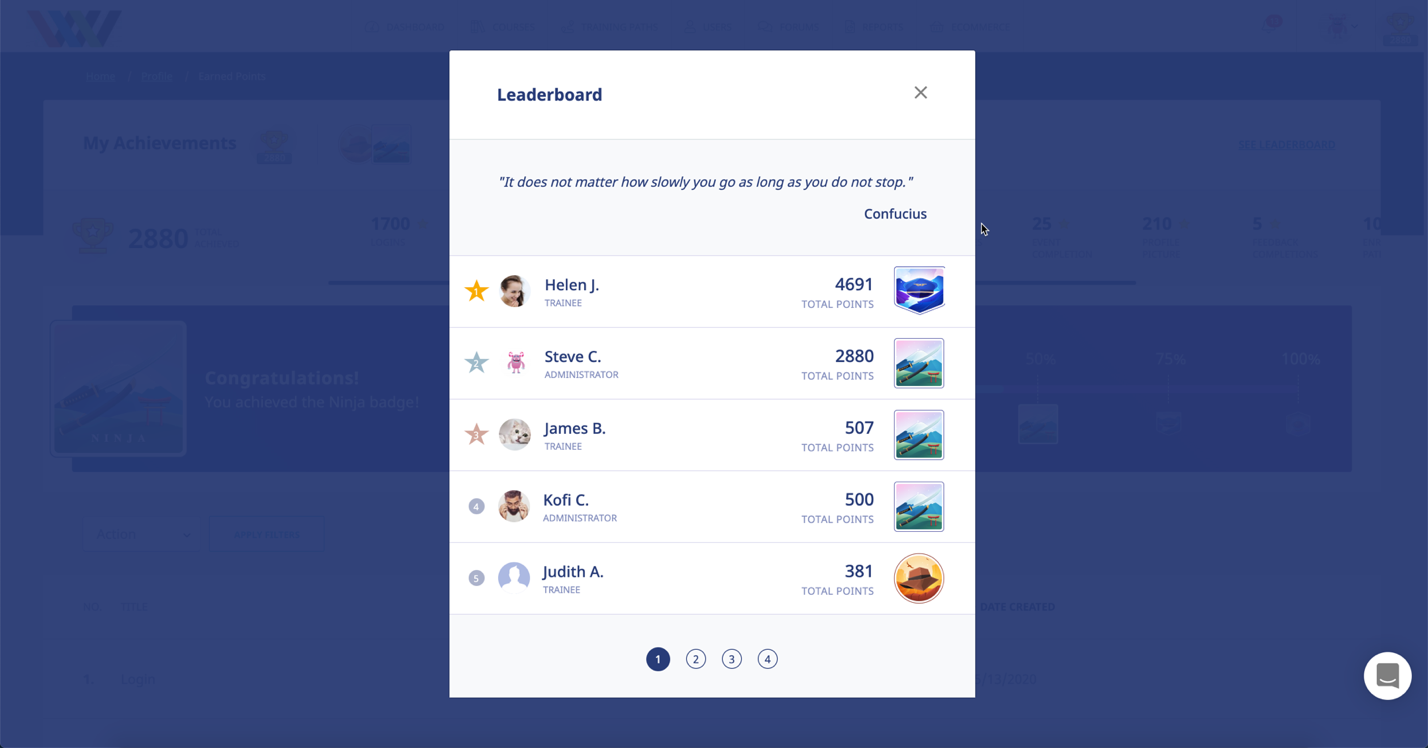
You can activate/deactivate the Gamification options from your Gamification tab.
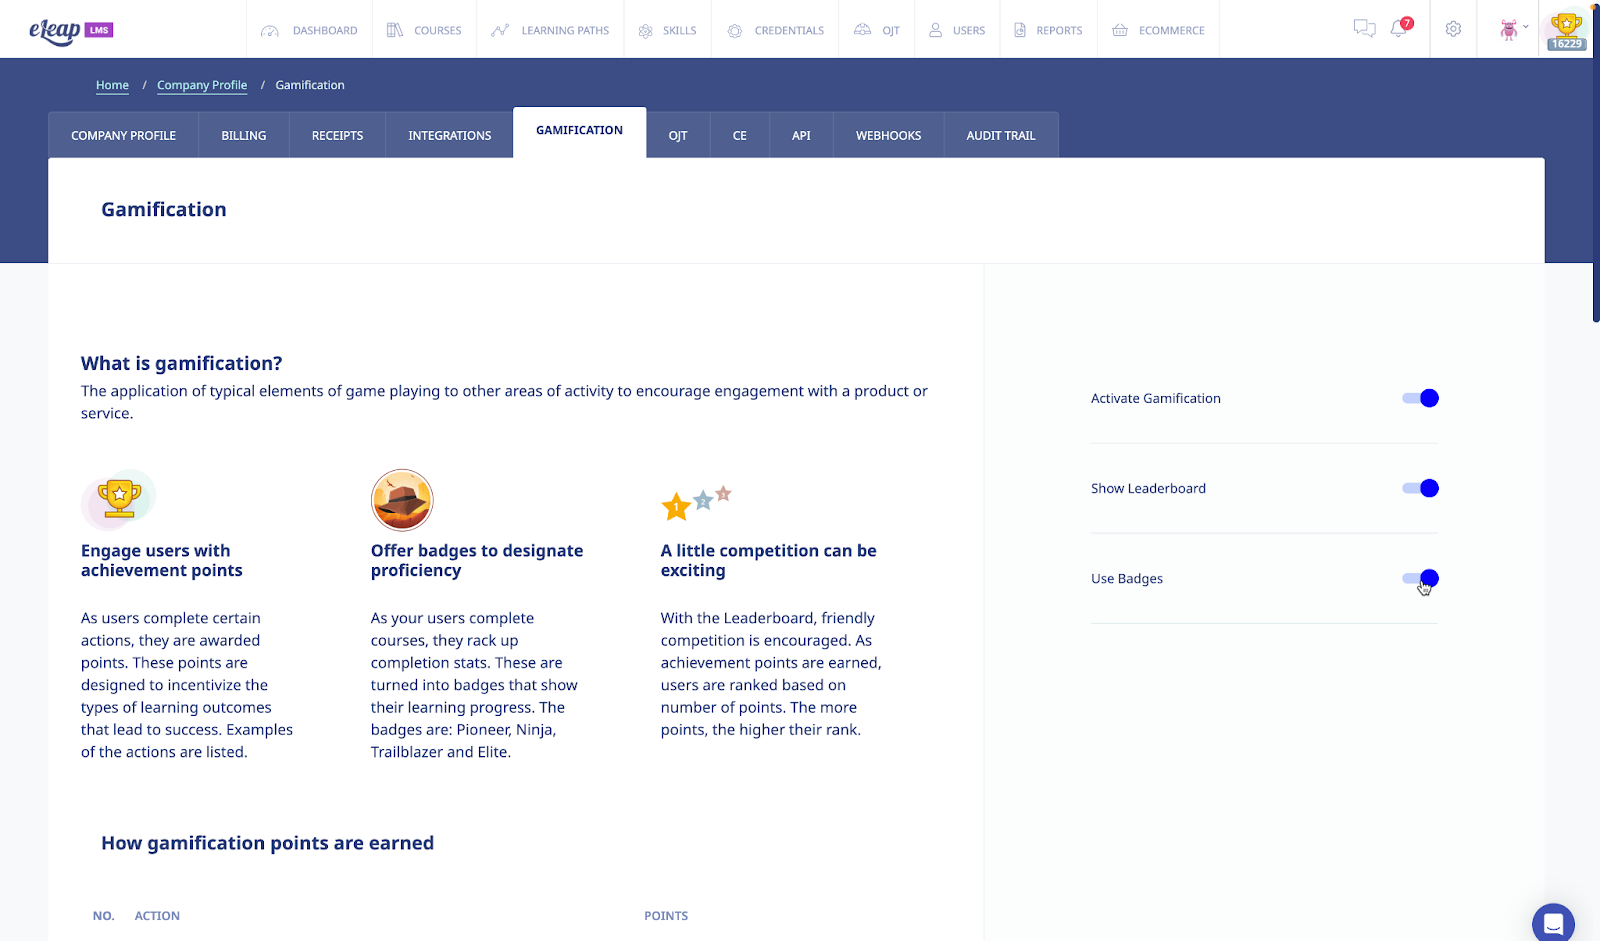
Leaderboard: Toggle the Leaderboard setting to enable the Leaderboard to be displayed to all users.
Badges: Badges are optional in Gamification. You can toggle the badges option to enable users to earn badges.
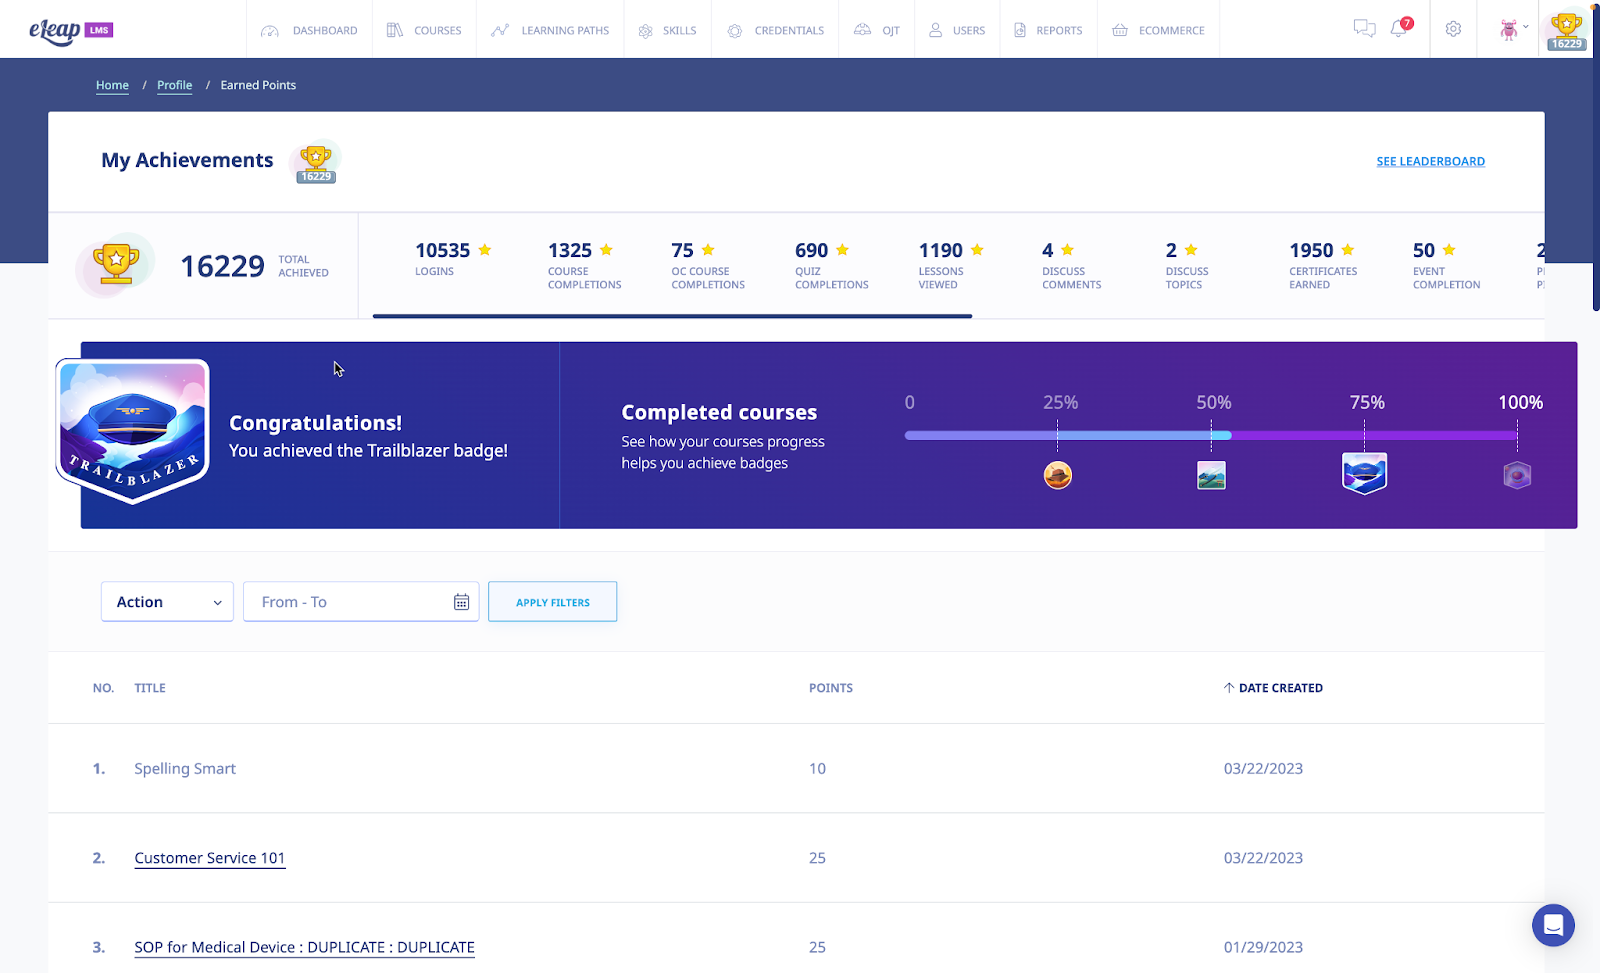
How gamification points are calculated is also available on this page.
OJT (On-the-Job Training)
Selecting the OJT tab in the Company Profile screen enables you to set up and manage your OJT module.
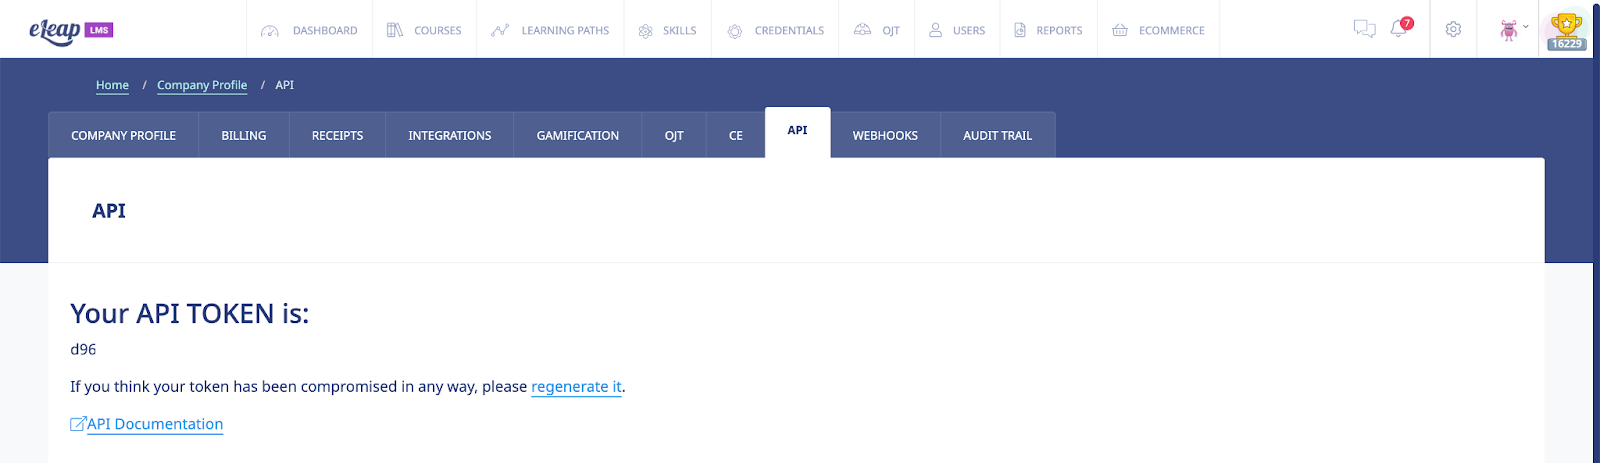
API
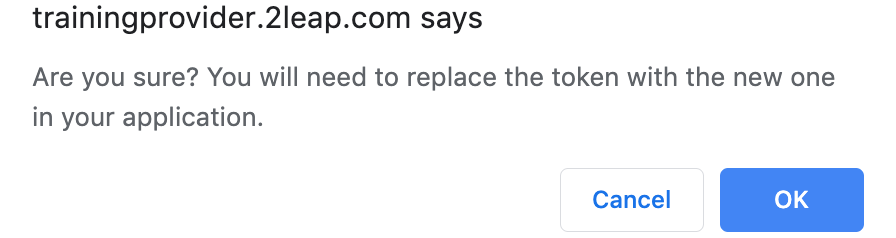
Selecting the API tab on the Company Profile screen displays the API screen, illustrated below. This screen shows the API Token associated with your account. If you feel that your account has been compromised in any way, click the regenerate link to regenerate this Token.
The system displays a warning message, illustrated below, before performing this action to ensure that is your intention. Click to proceed with the regeneration process or click to cancel it. Please note that if you proceed, you will need to replace the existing token with the new one in your application.

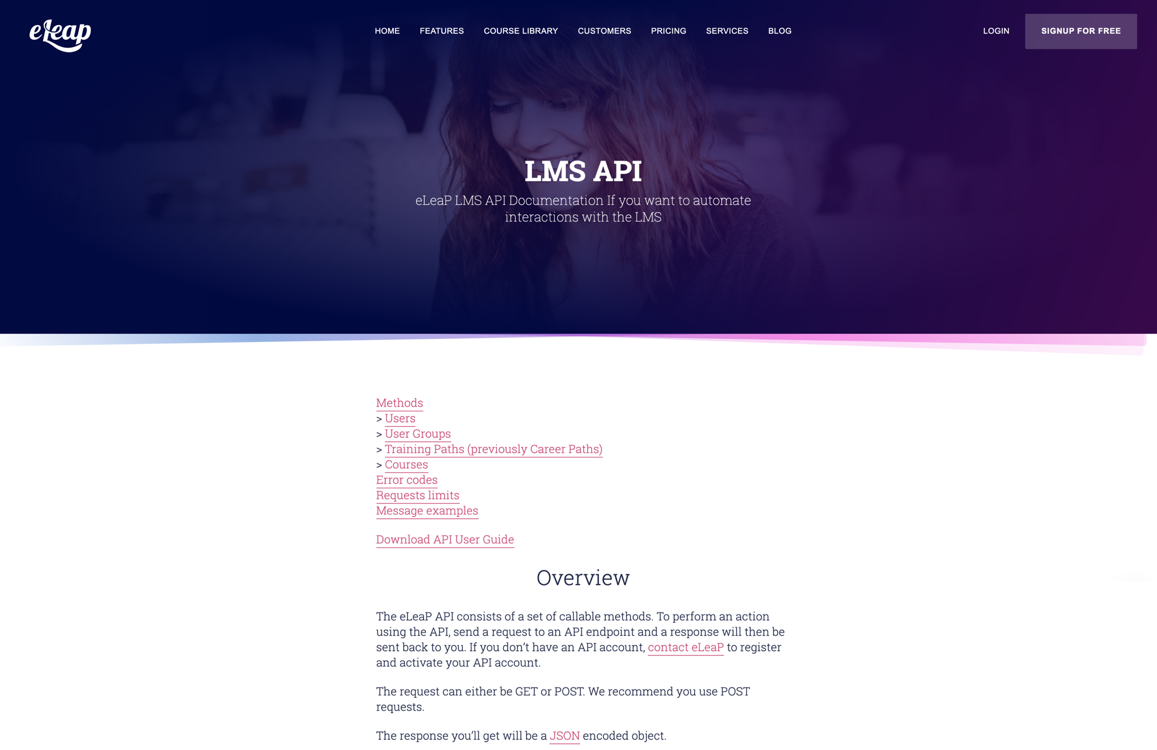
Clicking the API Documentation link takes you to eLeaP’s online API documentation at http://www.eleapsoftware.com/api/, as shown in the following illustration, which you can either read online or click the DOWNLOAD API USER Guide link to download it to your computer.
Webhooks
Webhooks are one of the ways web applications can communicate with each other.
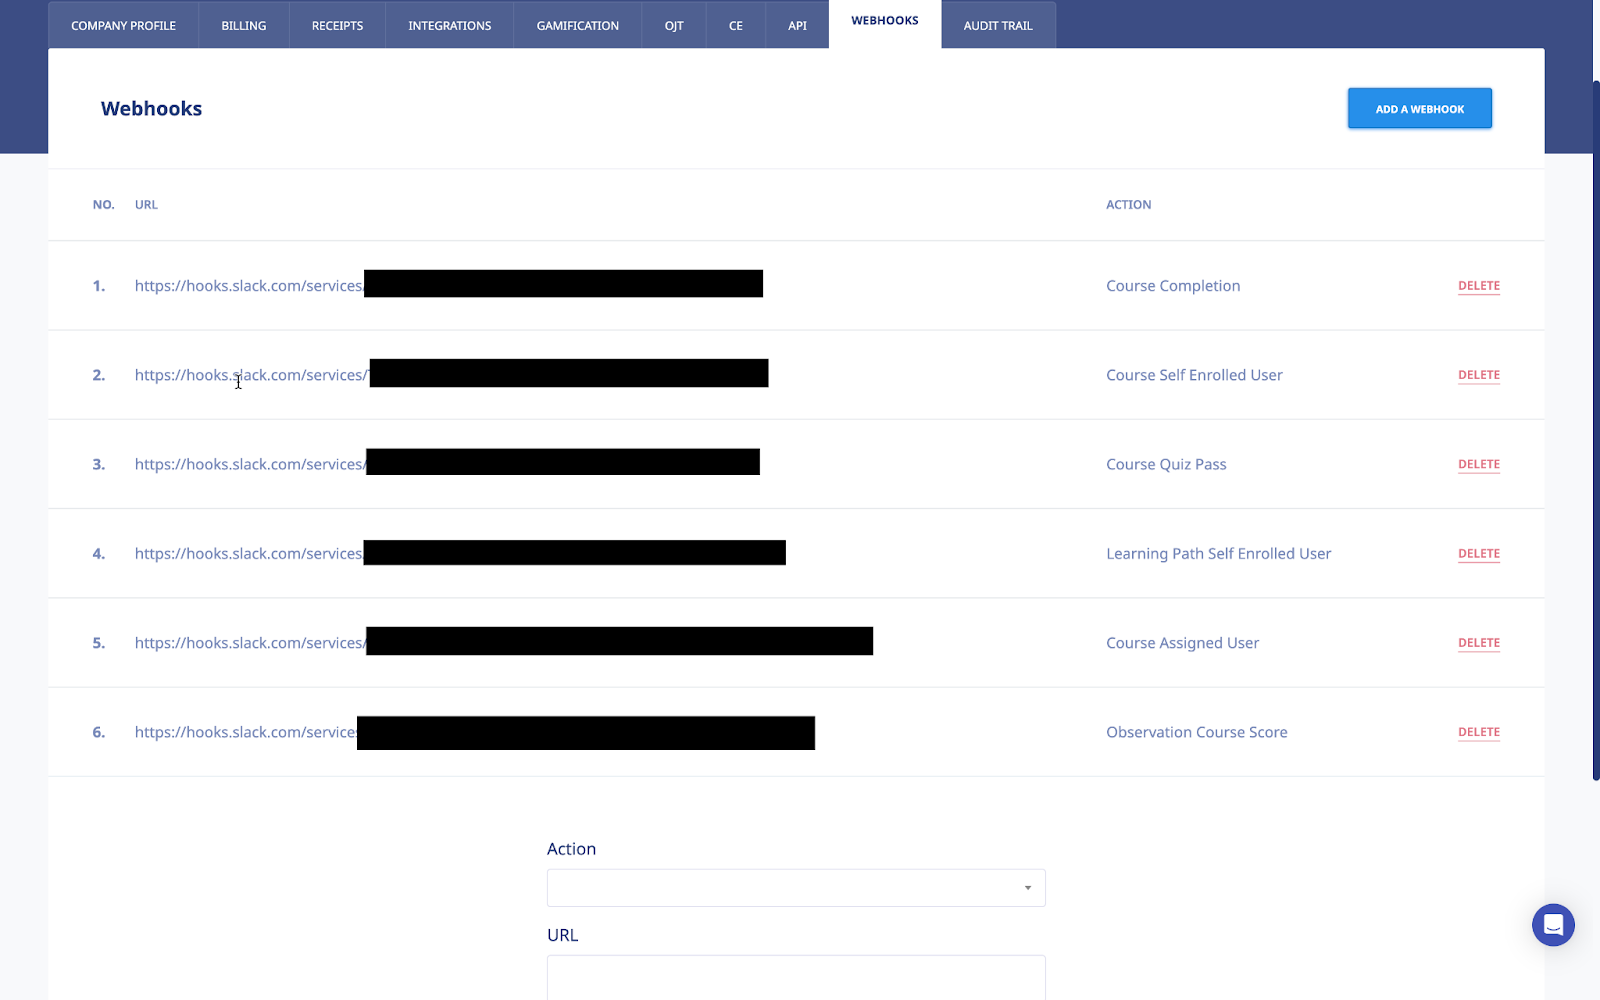
The eLeaP™ Learning Management Software system has webhook integration which allows sending real-time data as a notification or message from one application to another whenever a given event occurs or action is performed.
You can now create, configure, and manage more than one Webhook in eLeaP™. This means any actions captured on your eLeaP LMS page can be sent off to multiple custom integrations (including Slack)
How to set up webhooks on eLeaP LMS
Go to the COMPANY PROFILE from the dropdown next to the user’s avatar which is at the top- right side of the page.
Click the WEBHOOKS tab
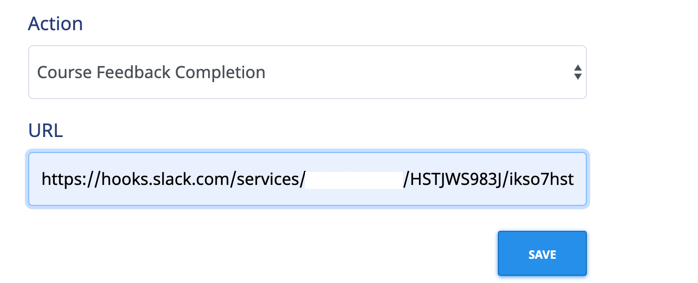
To create a new webhook notification the admin needs to choose an action from the dropdown and add the Webhook URL
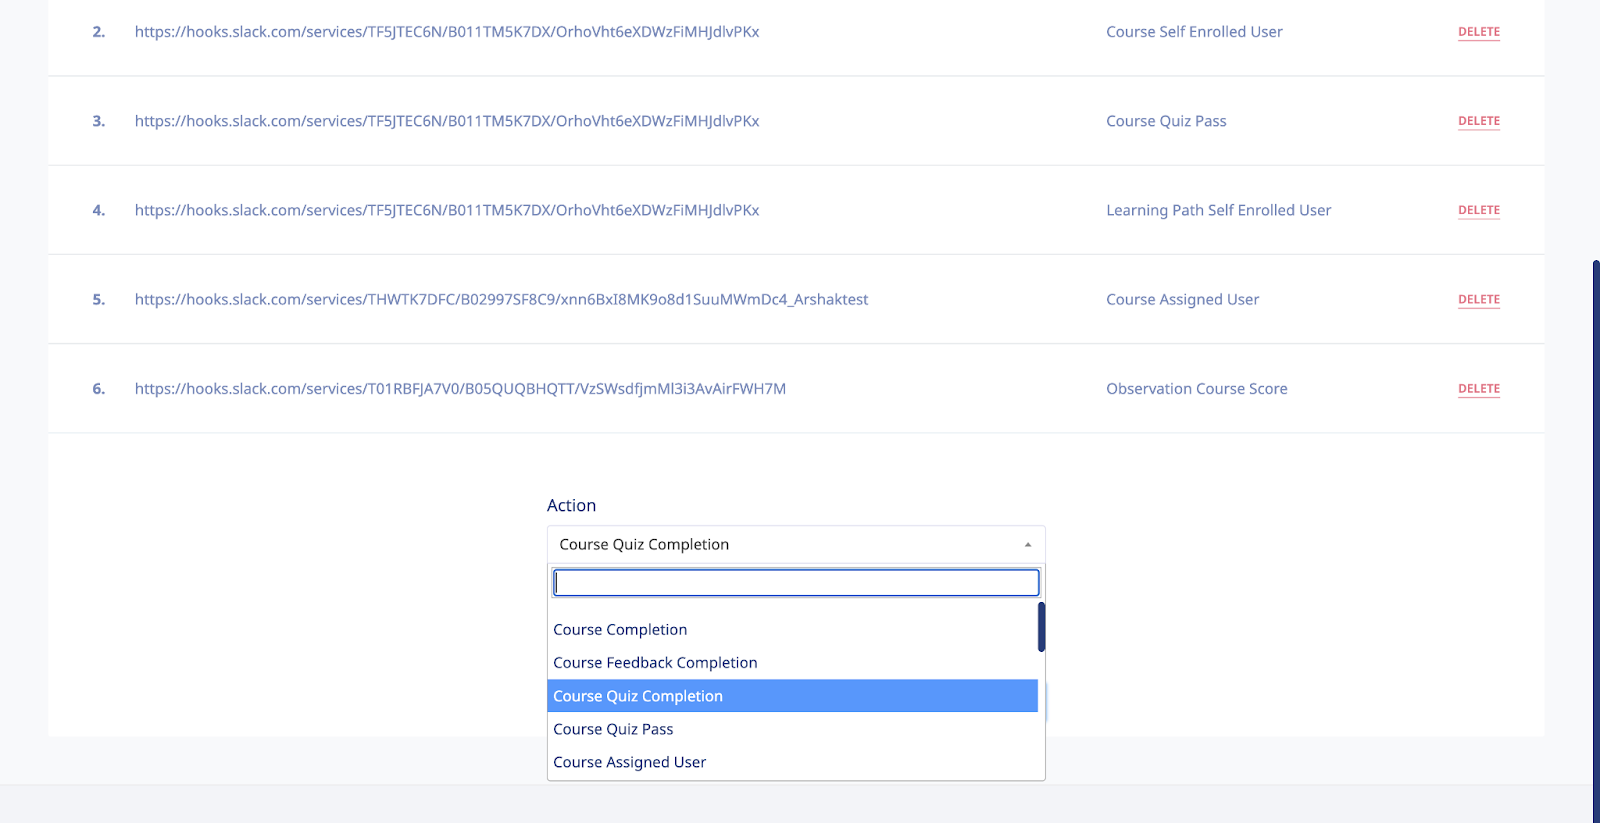
In the example below, we want our webhook to notify our Slack channel when one of our assigned users has submitted a feedback form for the assigned course.
Note: You get the action URL from the application. In this example, I am using my Slack integration URL.
Generating Slack Webhook URL
The Webhook URL mentioned in is generated differently on different apps. On Slack, it may be created in the following way (https://api.slack.com/messaging/webhooks#getting-started):
- Set up Incoming Webhooks
- Create a new Slack app in the workspace where you want to post messages.
- From the Features page, toggle Activate Incoming Webhooks on.
- Click Add New Webhook to Workspace.
- Pick a channel that the app will post to, then click Authorize.
- Use your Incoming Webhook URL to post a message to Slack.
Deleting Webhooks
If you no longer need a webhook, simply click the [Delete] button to remove it. Once deleted, the eLeaP system will not send any more actions to your application.
Audit Trail
The Audit Trail tool is a log that keeps a record of important actions occurring in your account. You can use the Audit to investigate certain changes and actions performed by you and your team.

You can filter your Audit Trail logs by Module, ID of Item, Action (performed) or IP (address).
Note that the ID’s shown for specific items can be added to long form URLs to identify the specific records. For example:
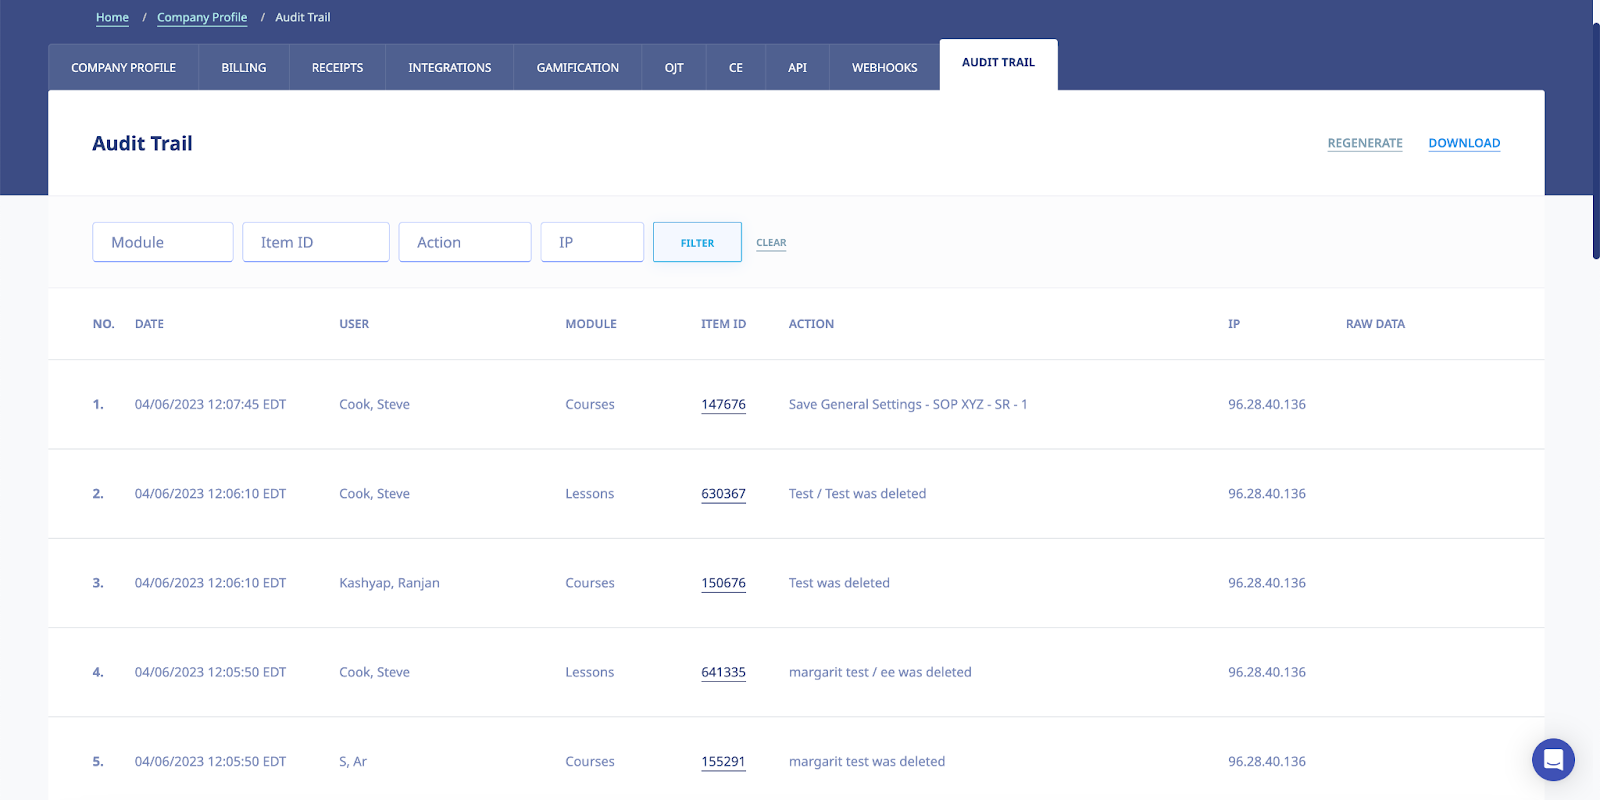
The above screenshot indicates ITEM ID's for the various items in the audit trail. Click on the Item ID to get more details. Note that eLeaP opens a new tab when an item is clicked. For example, clicking on the course id will open this page.
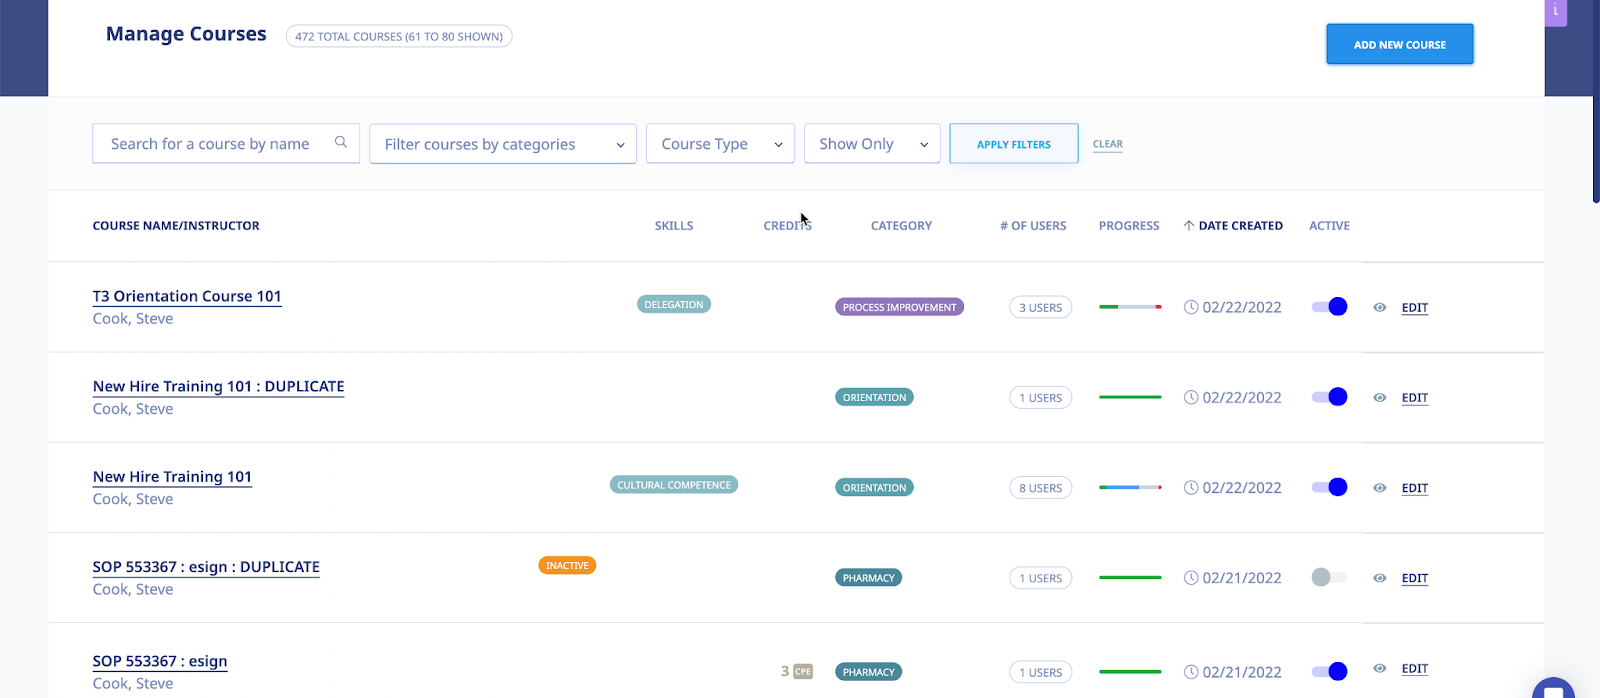
Courses
Selecting tab on the main menu bar displays the Manage Courses screen, illustrated below. The MANAGE COURSES tab displays the Courses that you have created with the Name, Category, Instructor, and Date Created details shown for each Course on the Courses list. You can change a Course’s Status to Inactive by clicking the icon within that Course’s Active column.

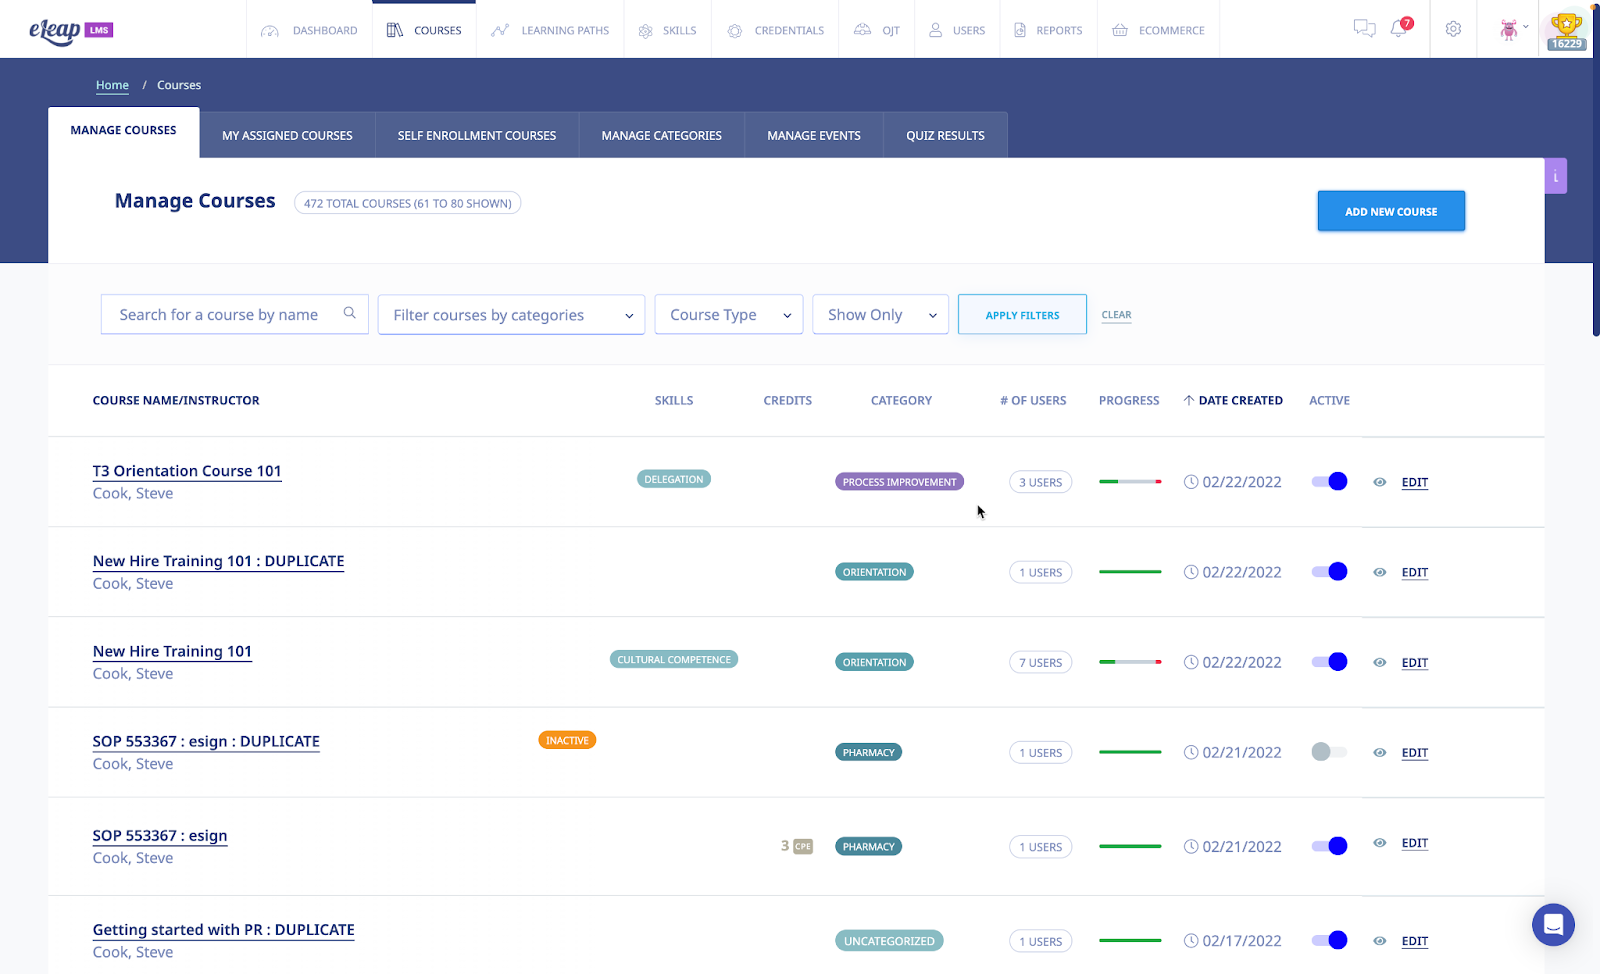
You can filter the Courses displayed on the Courses list by selecting either a Course Name from the Course Name list or a Course Category from the Course Category list, or both, and then by clicking the button.

You can also do additional filtering using the [Course Type] or [Show Only] drop-down
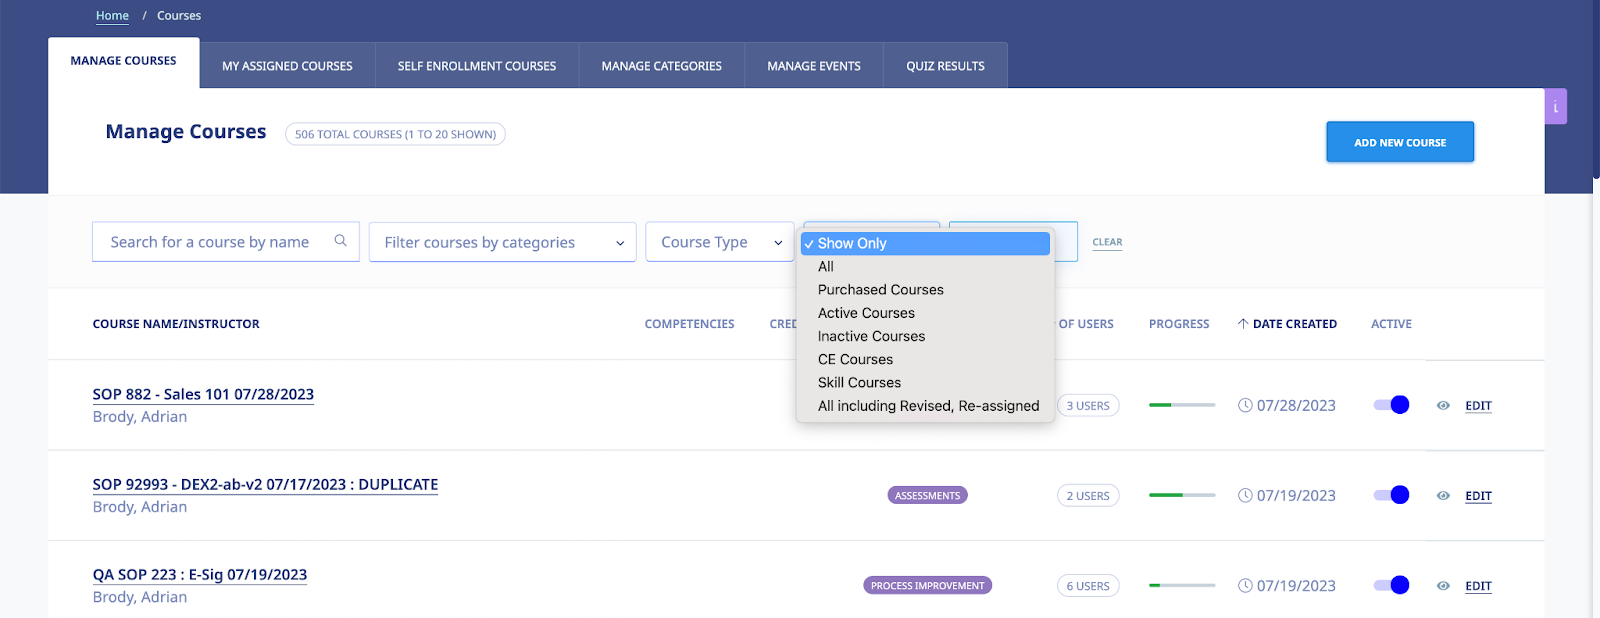
Options are
All: Show all courses in your account
Purchased Courses: Show only courses you have purchased from the eLeaP Network
Active Courses: Show only active courses
Inactive Courses: Show only inactive courses
Note that you can also use the [HIDE/SHOW INACTIVE] option at the bottom of the page.
Progress Bar – Legend
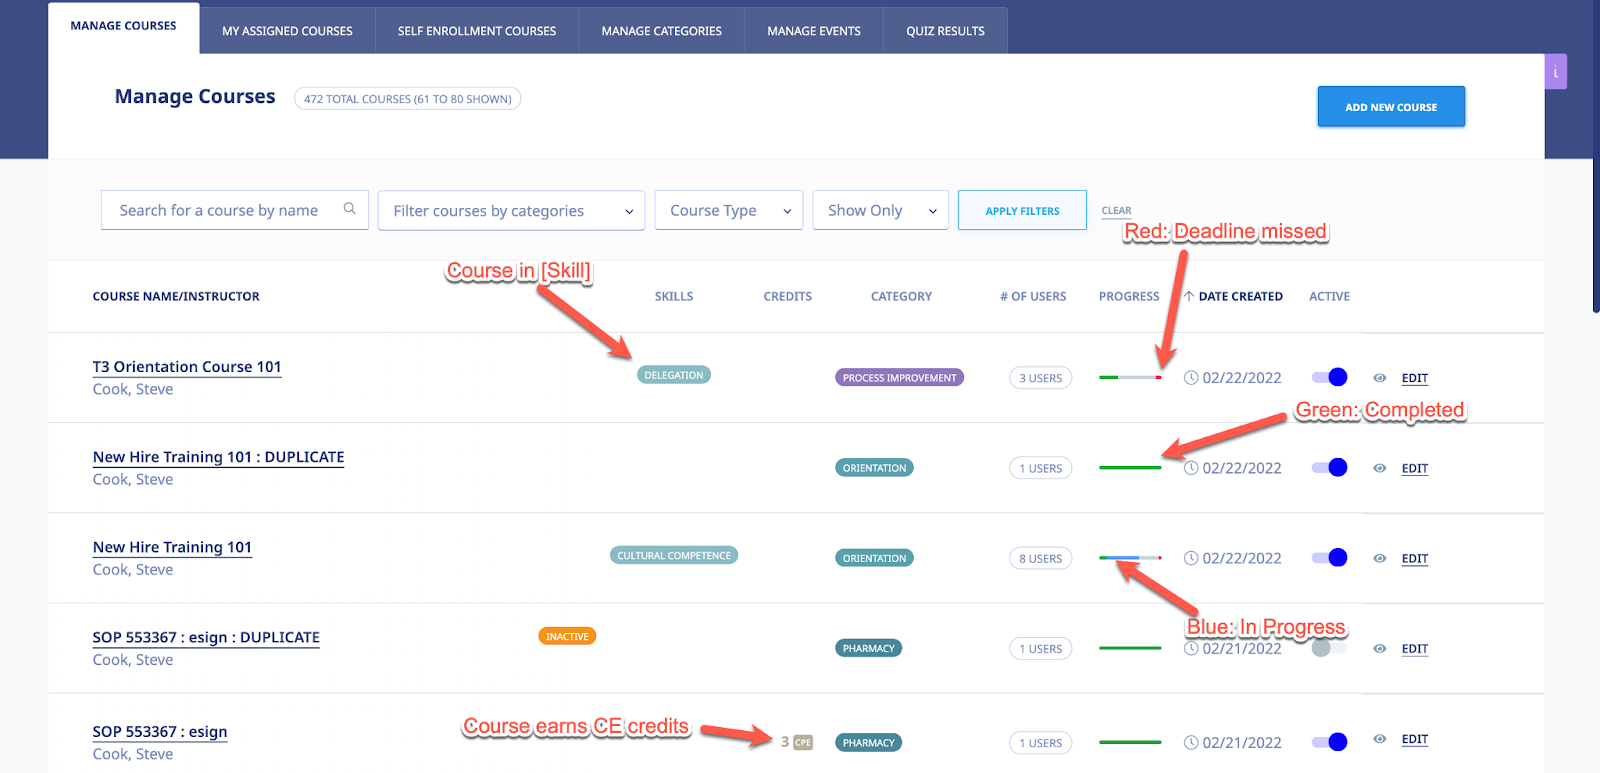
- Red = Users have missed deadline
- Blue = Users in progress
- Green = Users have completed course
- Gray = Users have not started course
Adding a New Course
Selecting the button on the Manage Courses screen displays the Add Course screen, as shown in the following illustration. Use the steps below to successfully add a new Course to the system.

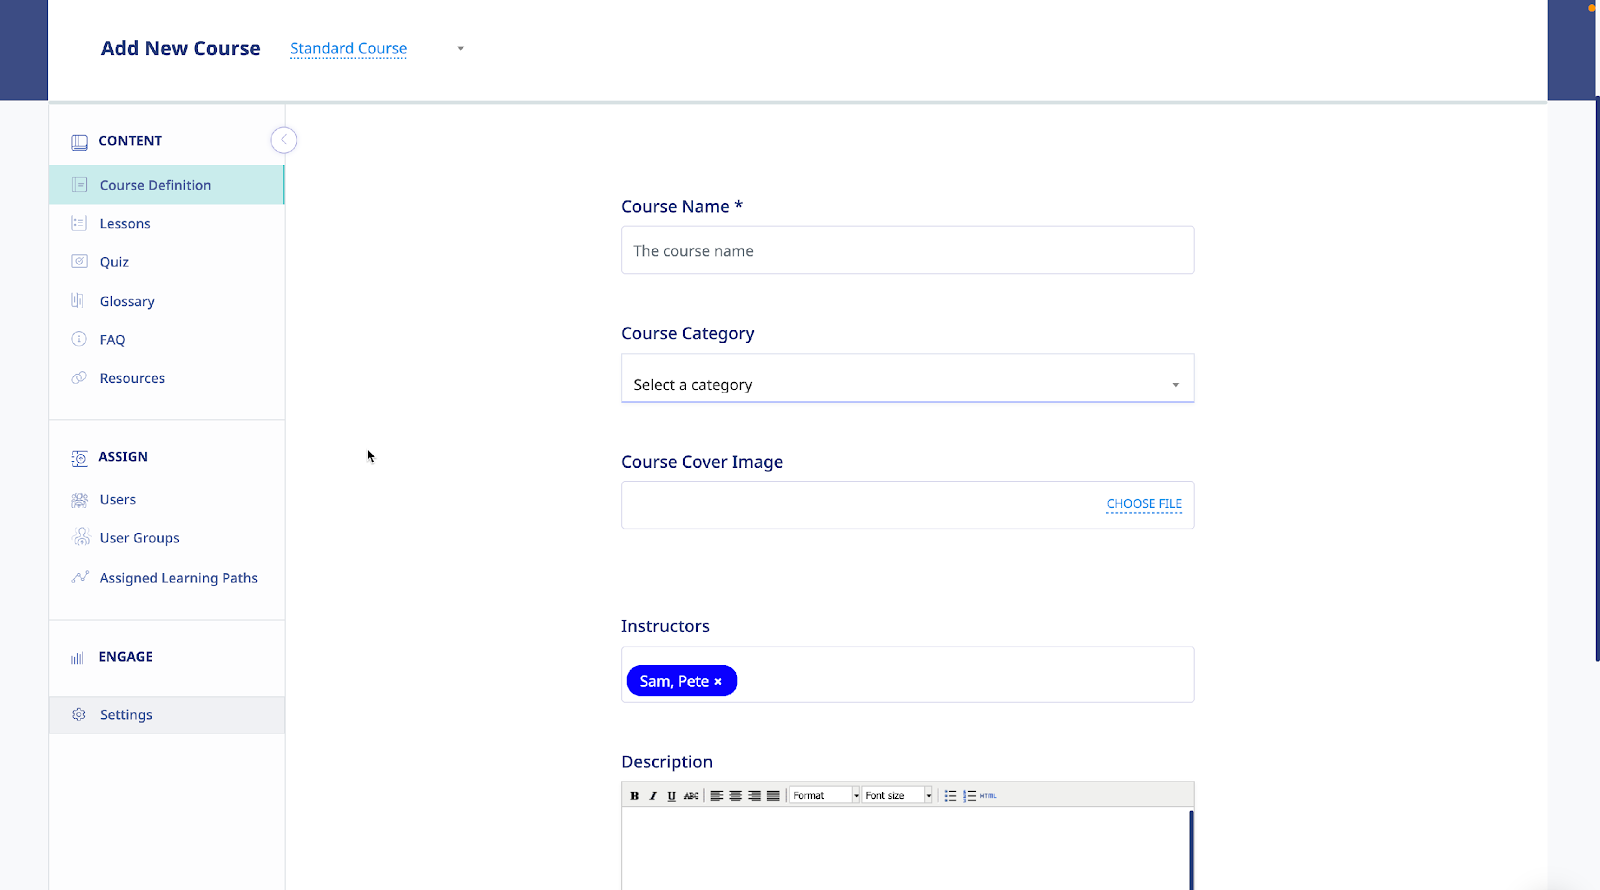
- Select for a regular course or for an Observation Assessment course.
- Enter a Name for the new Course in the Name field.
- Select a Category with which to associate the new Course from the Category list.
- You can select a course cover image by using the [Choose File] option
- Add additional Instructors to help manage your course
- Enter a Description (optional) for the new Course within the Description editor.
- Enter the Objectives for the new Course within the Objectives editor.


Once you click , the new course definitions will be saved, and you can proceed to adding lessons to your newly created course. The course will also be listed in the Courses list on the Manage Courses screen.
The Course Details screen for the newly created Course is displayed, as shown above. Click the submenu item to make any modifications necessary to the Course.

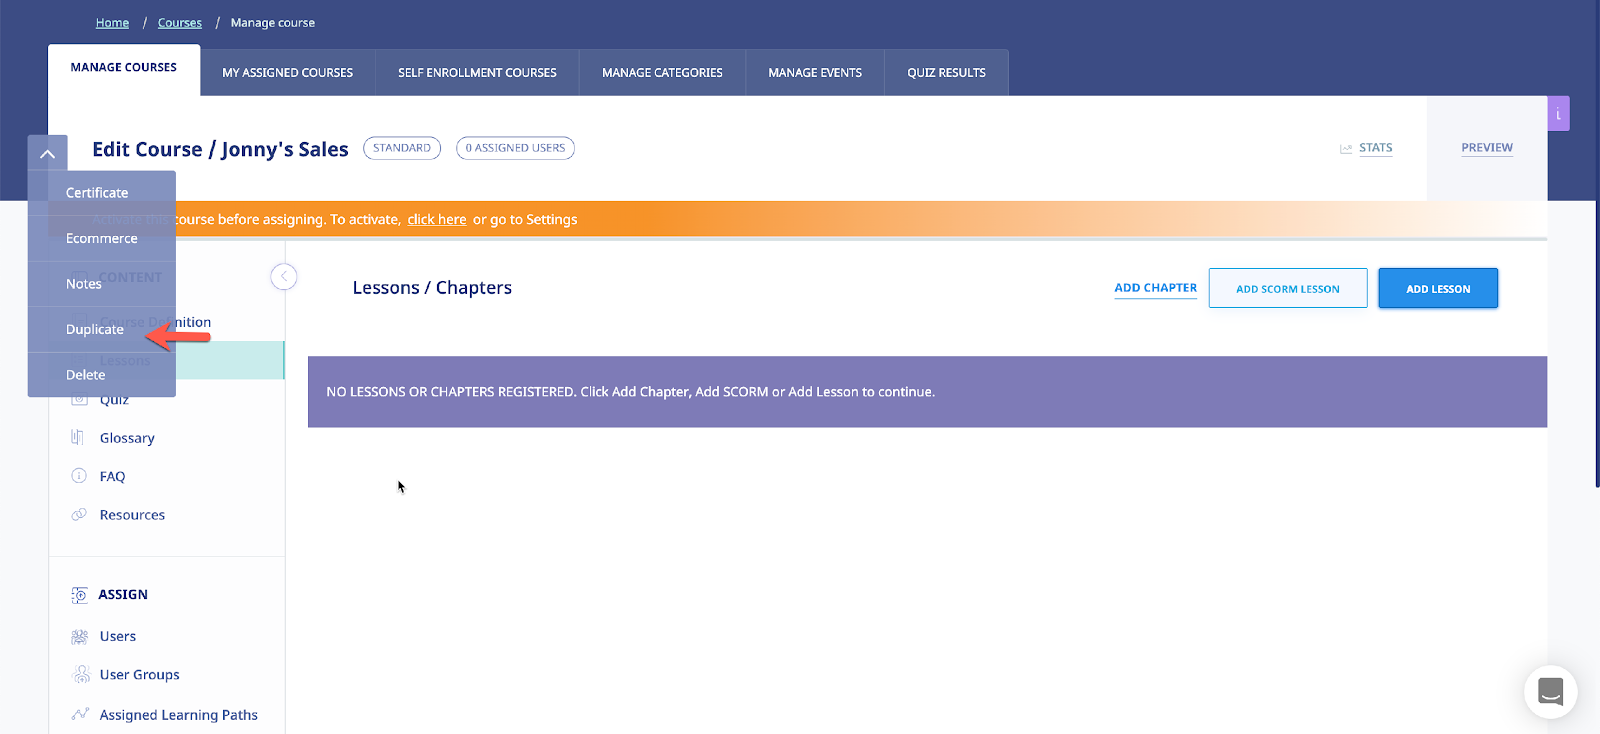
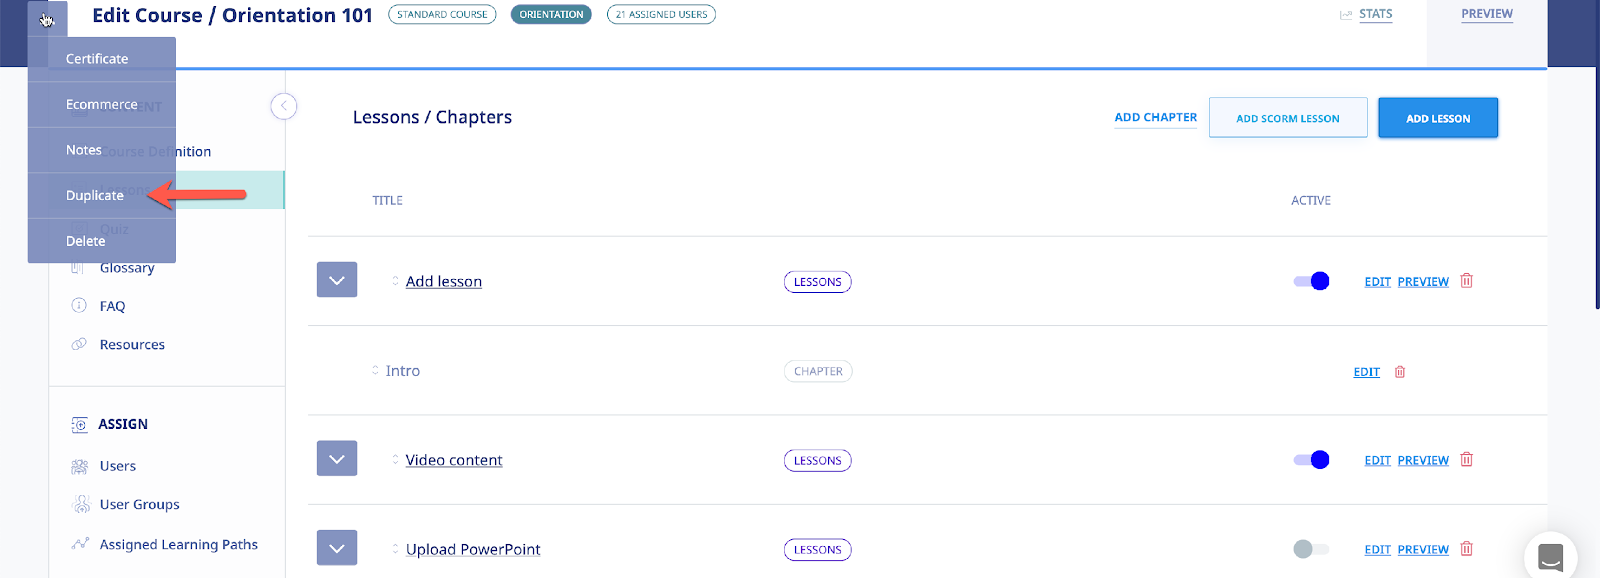
You can also click the [Duplicate] option in the course submenu drop down to make a copy of the Course, which is especially useful if a majority of the Course’s details will be similar to any additional Courses that you want to create. The course submenu dropdown also provides additional menu items.
Course Settings:
The course settings are in a dedicated section. Click to access course settings:

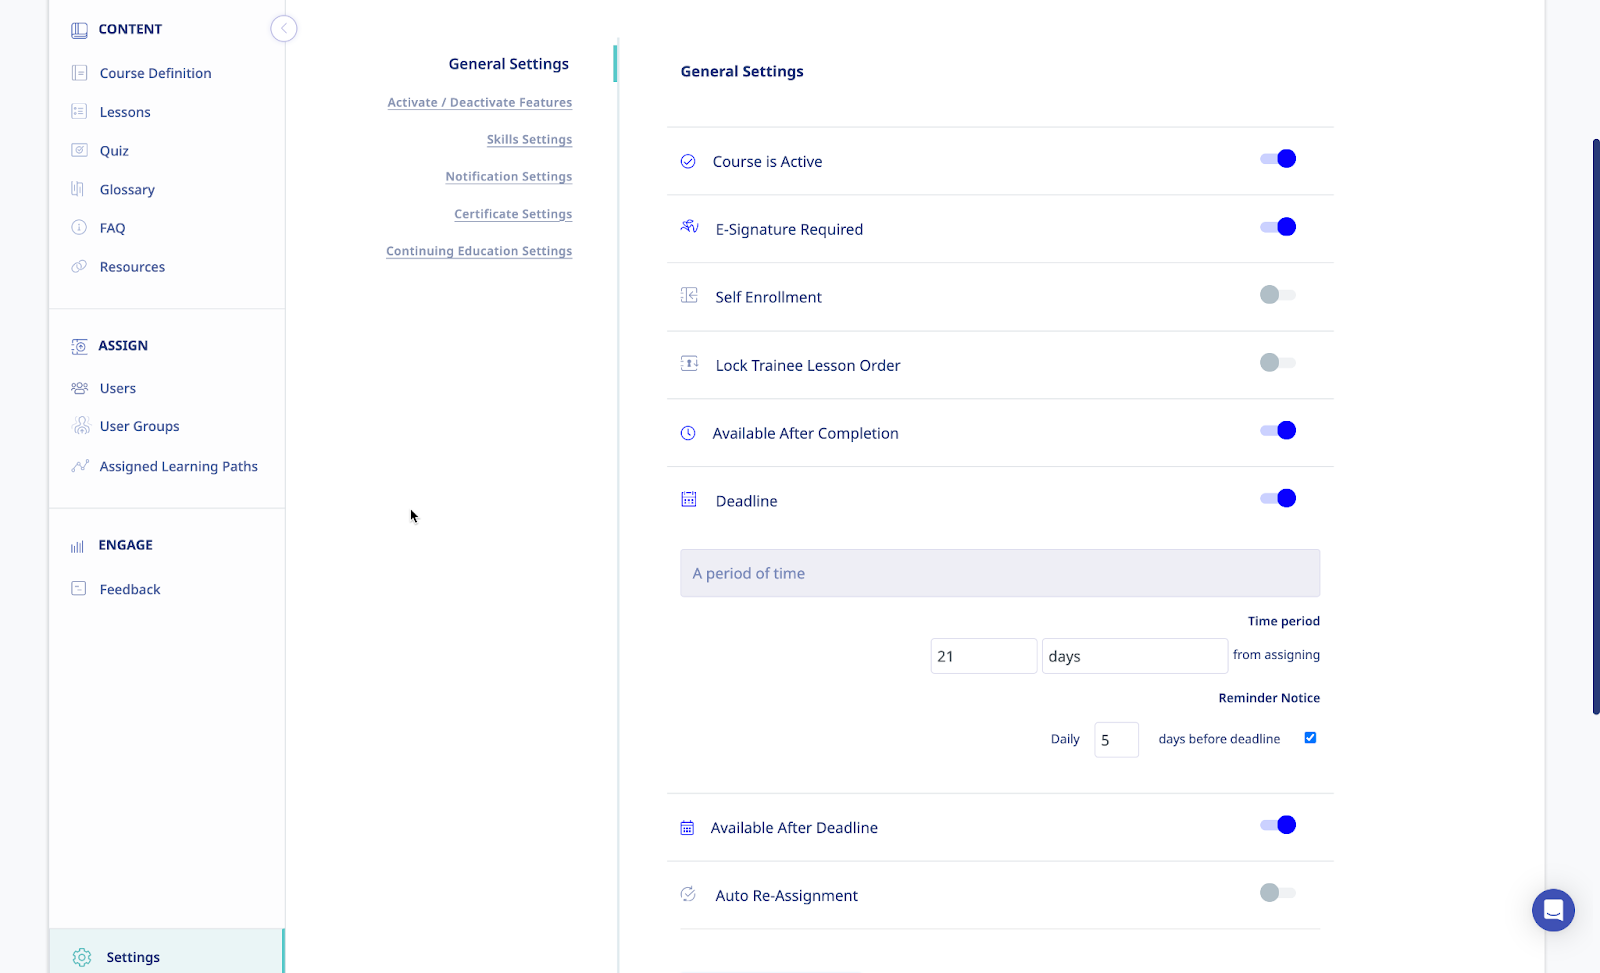
General Settings:
In the General Settings section of the Course Settings section, you can
- Activate or deactivate the course by toggling the course status switch On/Off.
- Toggle the E-Signature Required to ON if you want to enforce a digital signature for Course completion; otherwise, leave it as OFF.
- Toggle the Self Enrollment to ON if you want to give users the chance to enroll in courses you create.
- Self-Enrollment restriction:
- All Users: Any user in your account can self-enroll in this course.
- Specific User Groups: Only users in selected user groups can self-enroll in this course.
- Lock the order of your lessons so your trainees are required to view the course in the order it was created.
- Toggle the Available After Completion option to OFF if you don’t want to allow Users who have completed the new Course continued access to it; otherwise, leave it as ON.
- Toggle the Deadline to ON if you want to impose a deadline for completion of the new Course; otherwise, leave it as OFF.
- Available After Deadline: If you toggle this to ON, your assigned users will not be able to complete quizzes, feedback forms or completions after the deadline passes.
- Toggle the Auto Re-Assignment to ON if you need to re-assign your course sometime in the future – like annual training. Use the calendar to select the re-assignment date.
Auto Re-assignment:
Toggling the [Auto Re-assignment] on gives the option to use a [Fixed Date] auto re-assignment or a [Recurring Time Period] auto re-assignment option.
[Fixed Date] auto re-assignment:
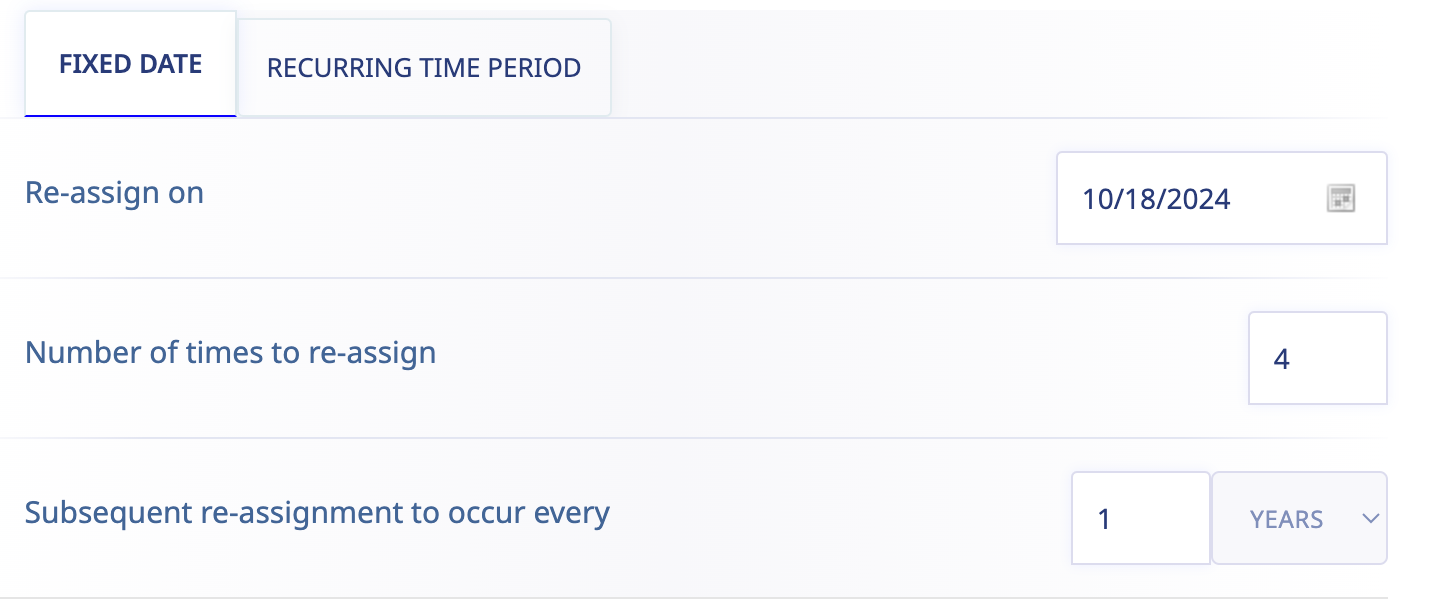
Re-assign on:
- Use the [Fixed Date] auto re-assignment option to select the date for the first auto re-assignment. If your organization launches your annual training and re-trainings, say October 18th each year, you can select October 18th of the next year as your first date for the auto re-assignment.
Number of times to re-assign:
- This lets us know how many cycles you want to re-assign the course. If you want 4 cycles, you simply input that number.
Subsequent Re-assignment to occur every:
- This lets us know the length of time between recurring cycles. For example, you want the recurrence to be every 1 year in the above illustration.
To see how we present re-assigned course completion data, see the completion report section of this guide.
[Recurring Time Period] auto re-assignment:
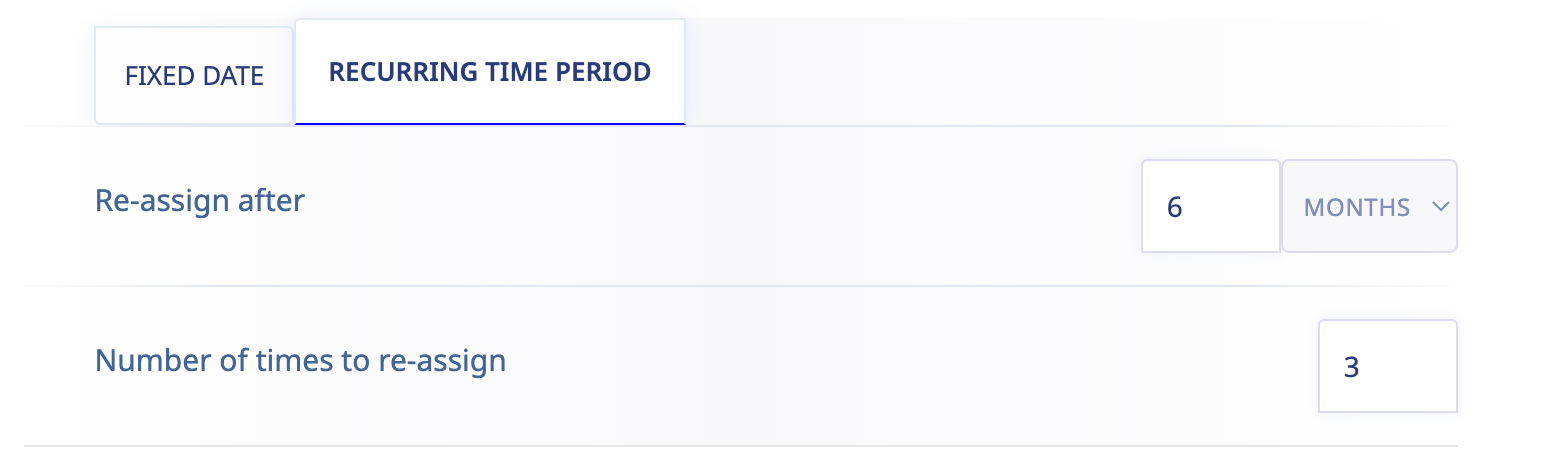
Re-assign after:
- Use the [Recurring Time Period] auto re-assignment option to select the period of time the system waits before re-assigning the course. If your organization has 6 months, you can select 6 months for when the first re-assignment is triggered.
Number of times to re-assign:
- This lets us know how many cycles you want to re-assign the course. If you want 3 cycles, you simply input that number.
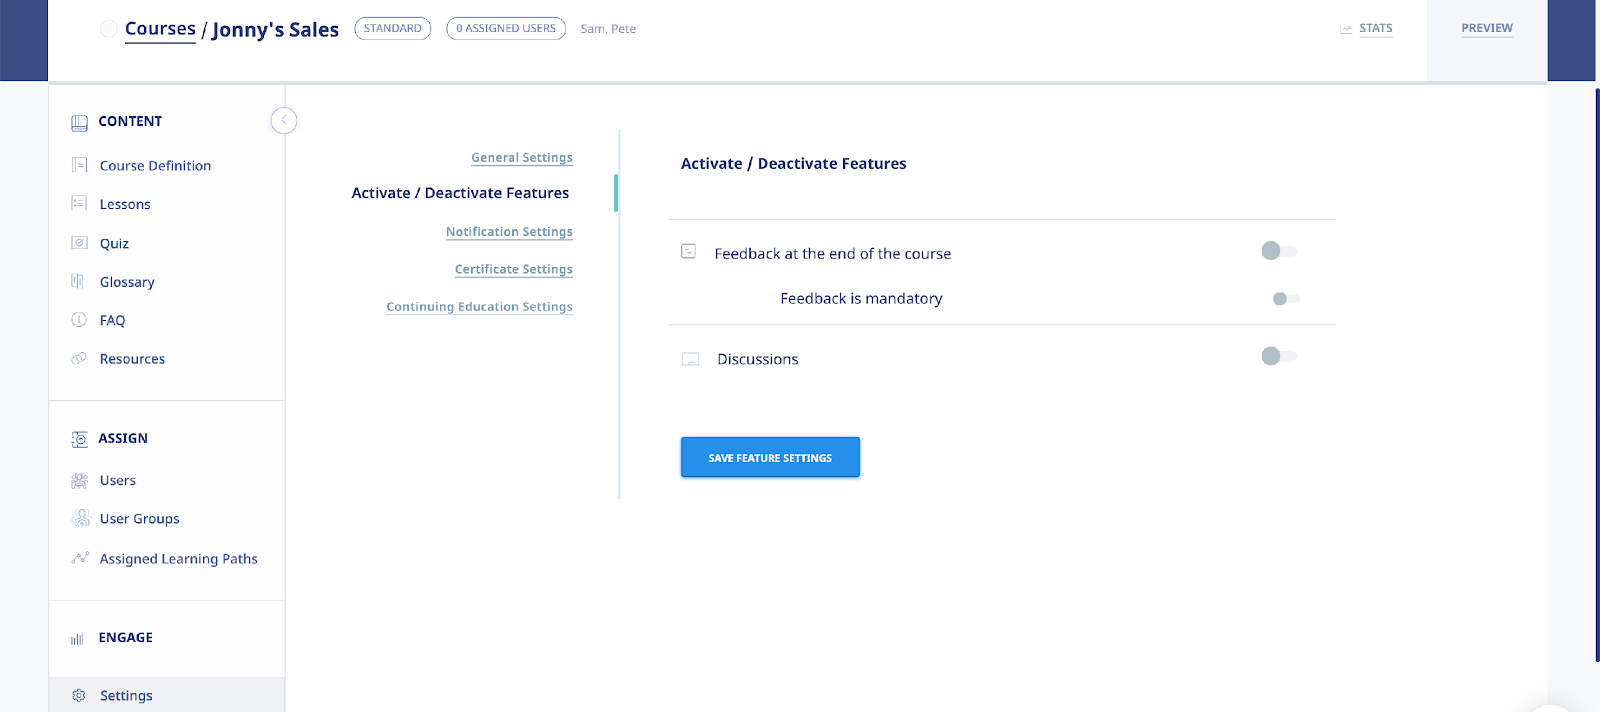
Activate/Deactivate Settings:
In the Activate/Deactivate Settings section of the Course Settings section, you can
- Toggle the Active Feedback to ON option if you want to enable the Active Feedback function; otherwise, leave it as OFF option.
- Toggle the Require Feedback to ON if you want to enforce a feedback form submission as a condition for course completion.
- Toggle the Active Discuss to ON if you want to add a Forum-specific Discussion board for the Course; otherwise, leave as OFF option.
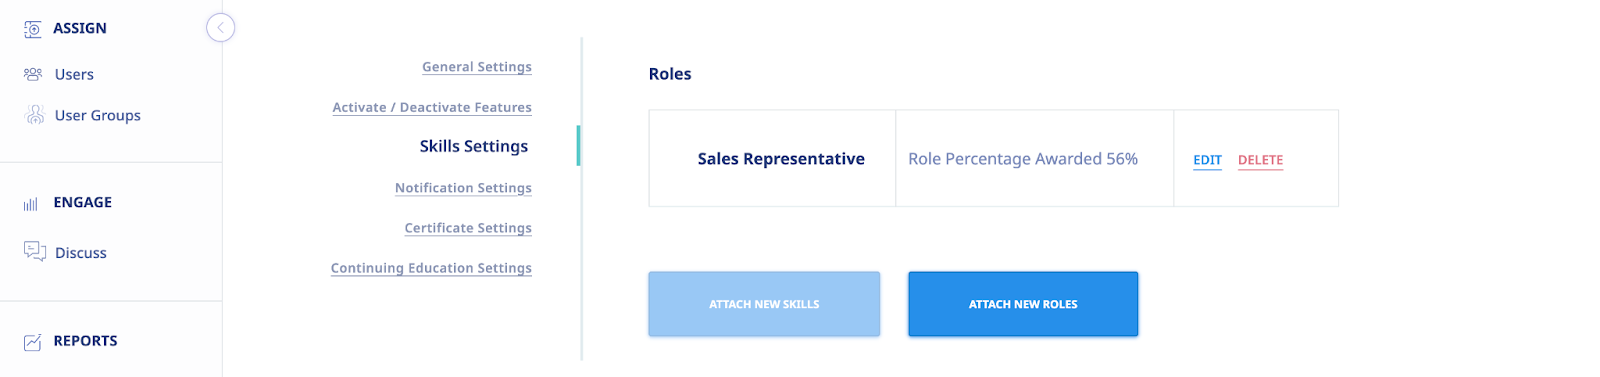
Skills Settings
From the [General Settings] section, click the [Skills Settings] link to see the current Skills Settings setup.

We have two options for Skill points attribution. You can attribute Skills points based on general course assignments. In this case, all assigned users earn Skill points upon completion. You can also attribute Skill points based on the specified roles of the assigned users. This means only assigned users who have the selected roles in the Skills settings will be able to earn skill points upon course completion.
Attach New Skills
Click the [Attach New Skills] button to add the Skill(s) that will earn skill points upon completion of the course by the assigned users.
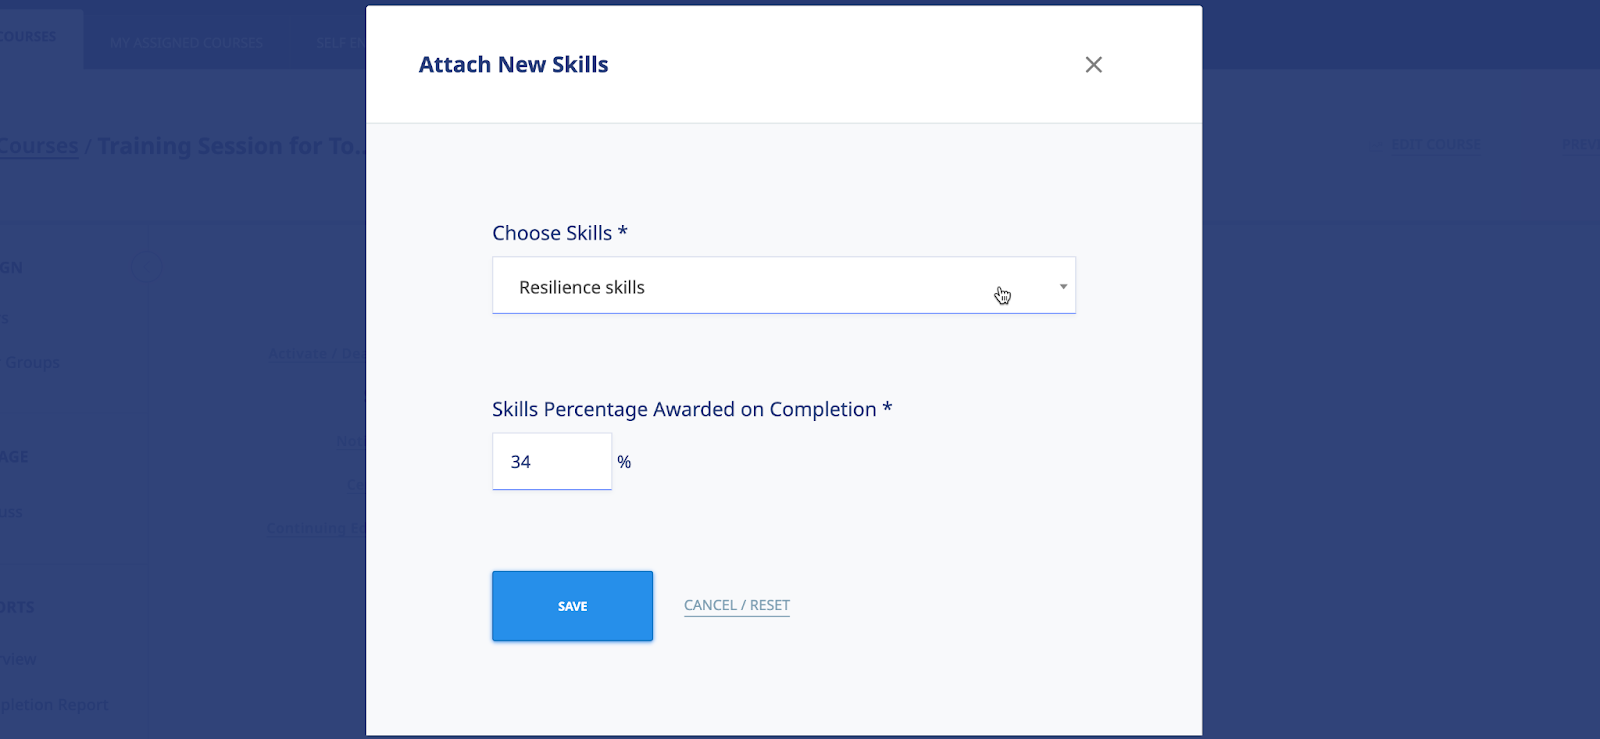
Select the right Skill from the dropdown list. If you don’t see your required Skill, it means it has not been created. Go back to the [Skills Overview] to add the skill before returning to the Skills Settings section. If your required Skill is present, select it and then enter the Skills Percentage Score to be awarded on course completion.
You can attach more than one skill to a specific course. If you need to attach more skills, click the [Attach New Skills].
Attach New Roles:
To limit Skill Points attribution to only specific assigned users, use the [Attach New Roles] option. This allows you to select the roles to earn skill points on completion.
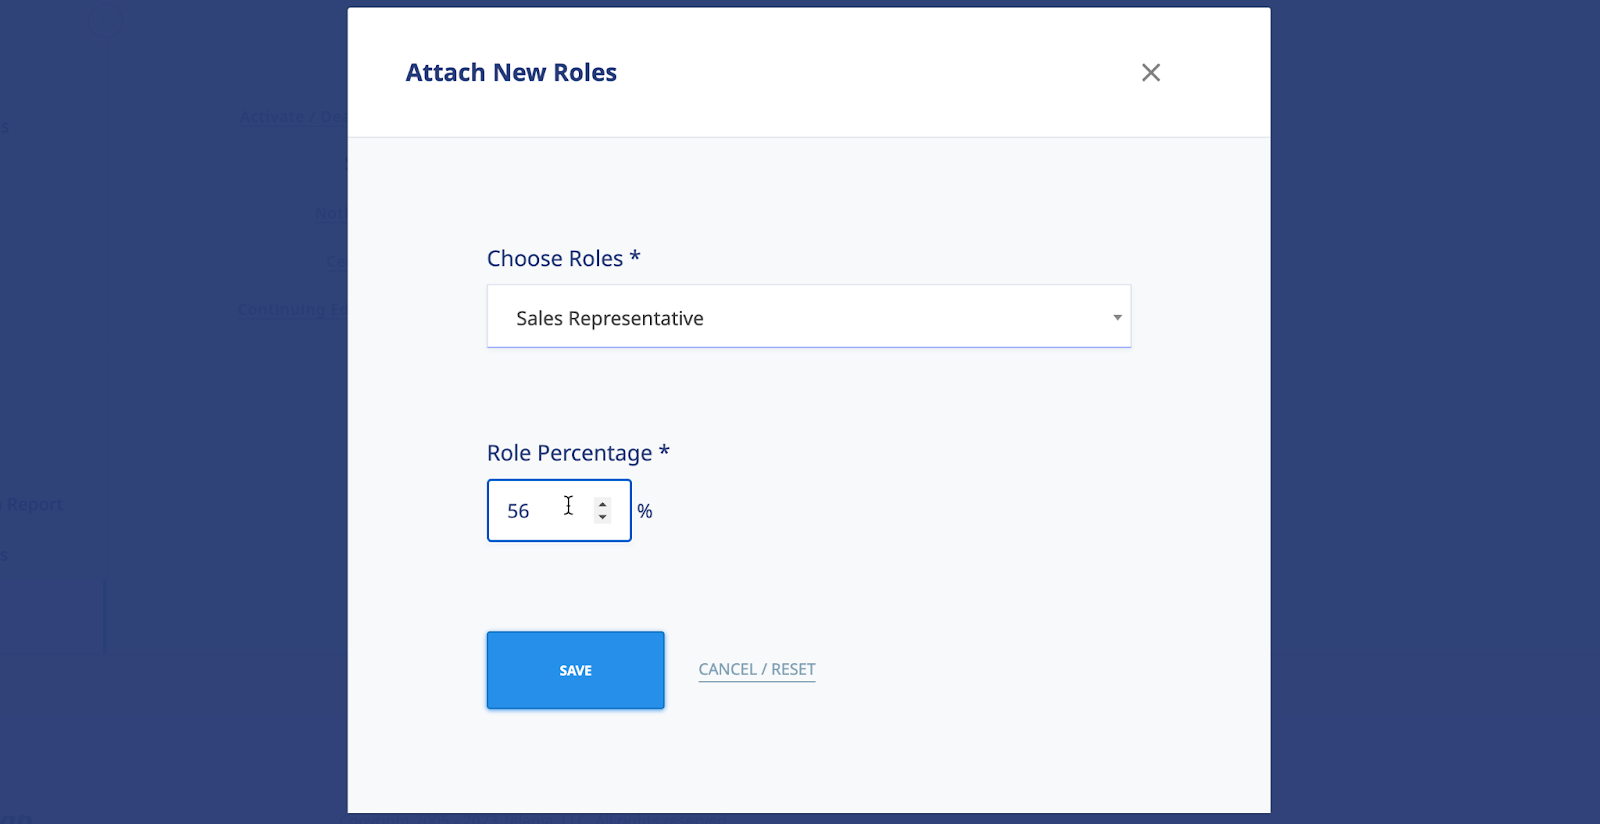
Select the right Role from the dropdown list. If you don’t see your required Role, it means it has not been created. Go back to the [Users] section to add Roles and assign the roles to the right users. If your required Role is present, select it and then enter the Role Percentage Score to be awarded on course completion.
You can attach more than one Role to a specific course. If you need to attach more roles, click the [Attach New Roles].
Note: You’re not able to combine Skills attribution and Roles attribution at this time. That is why, depending on which option you use, the other option is disabled.
Editing Skills Settings
To edit existing course-based skills settings, click the [Edit] link next to the relevant skill.
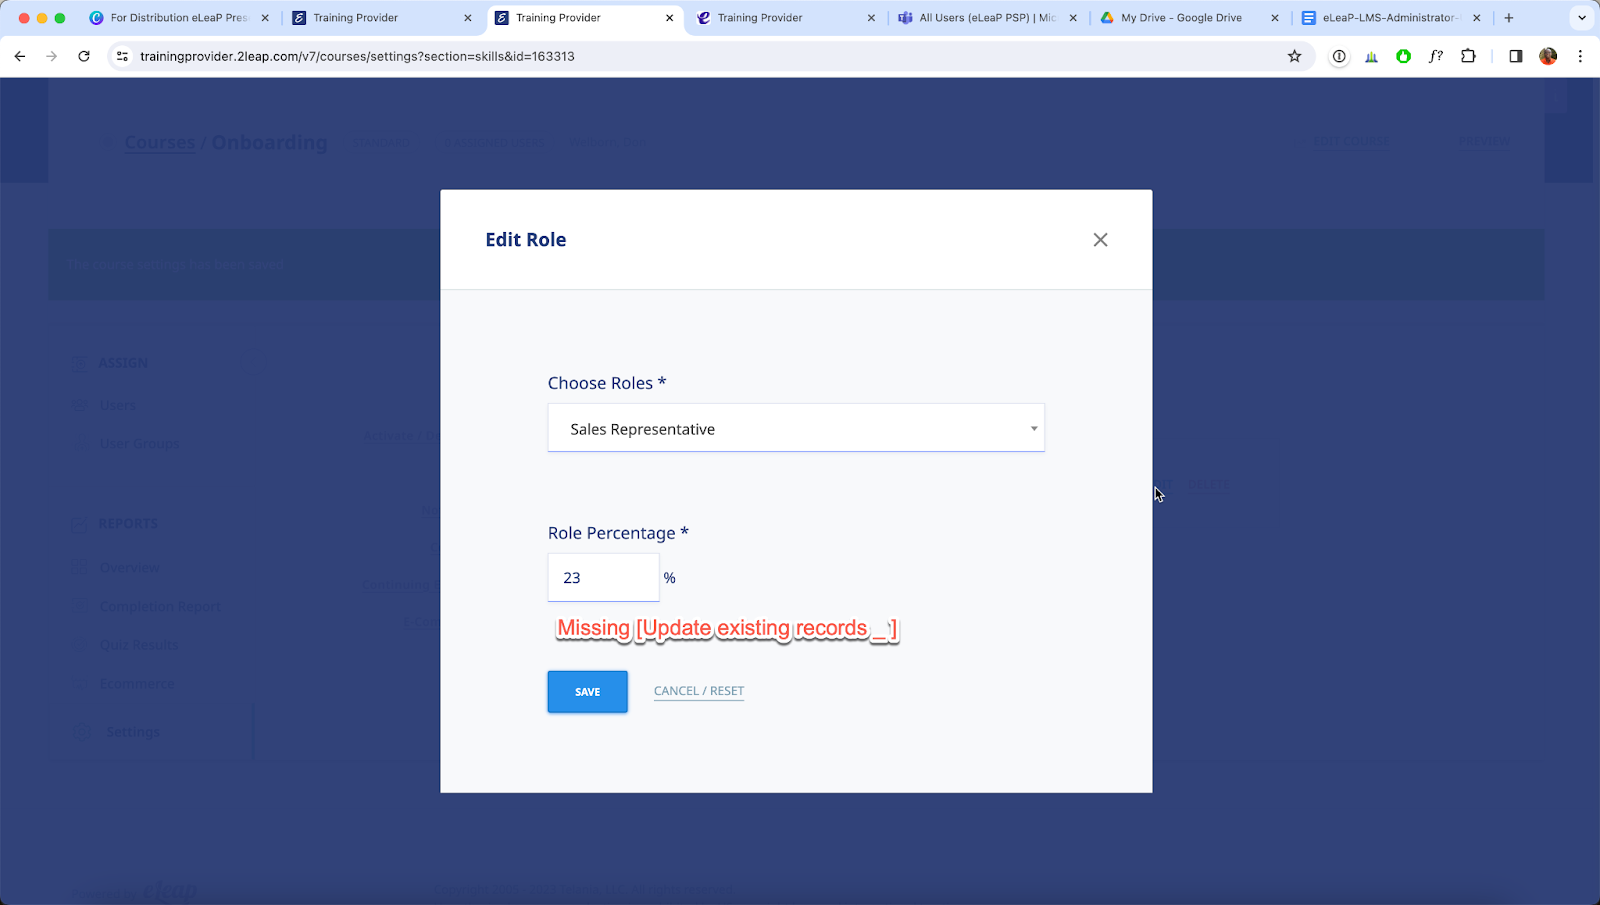
You can edit the selected skill, points percentage attribution and even opt to update existing skill records. Click [Save] to finalize.
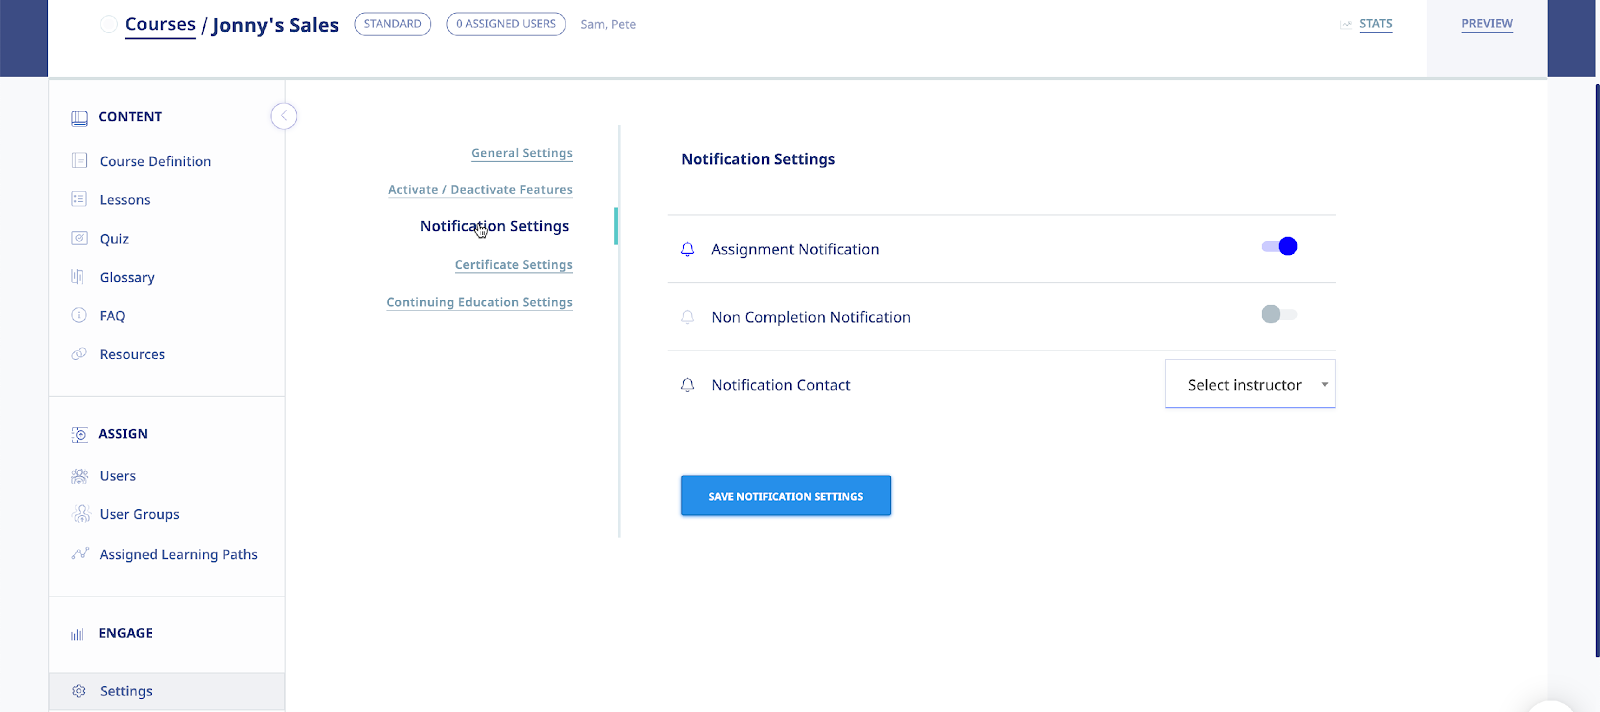
Notifications Settings:
In the Notifications Settings section of the Course Settings section, you can
- Turn the Assignment Notifications option to OFF if you don't want the system sending email notifications to Users assigned to the new Course; otherwise, leave it ON.
- Toggle the Non Completion Notification to ON if you want to send a course summary report showing individuals who have not completed the course by the due date.

Certificate Settings:
In the Certificate Settings section of Course Settings section, you can
- Set your certificate release option.
- Edit your certificate template to personalize it.
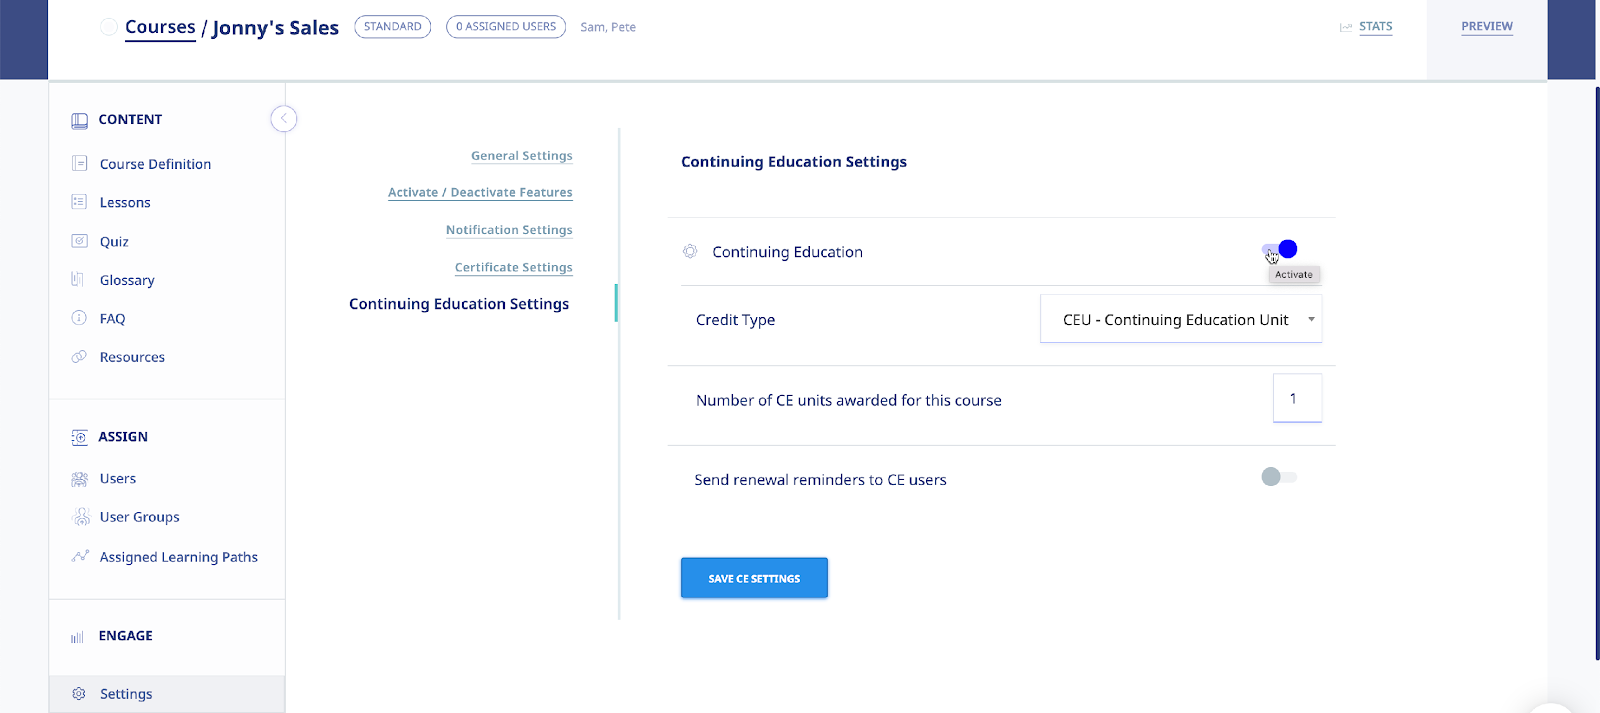
Continuing Education Settings:
In the Continuing Education Settings section of Course Settings section, you can
- Toggle the Continuing Education option for the course you’re managing.
- Select the Credit Type for the course. You can edit/manage credit types from your company account settings page.
- Set the number of credits units the course will award.
- Set renewal reminders for users who have taken the course.
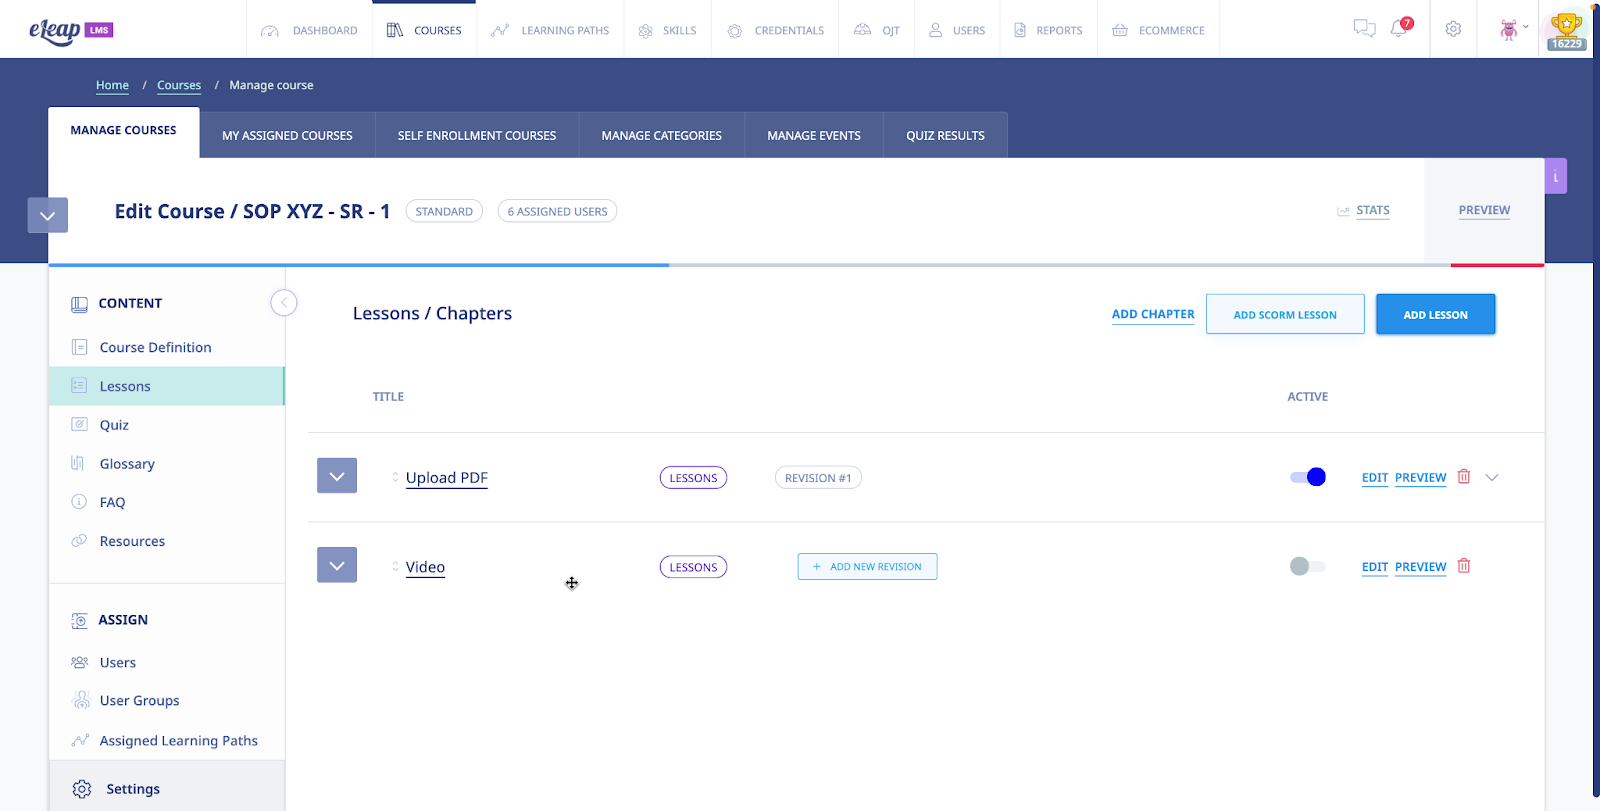
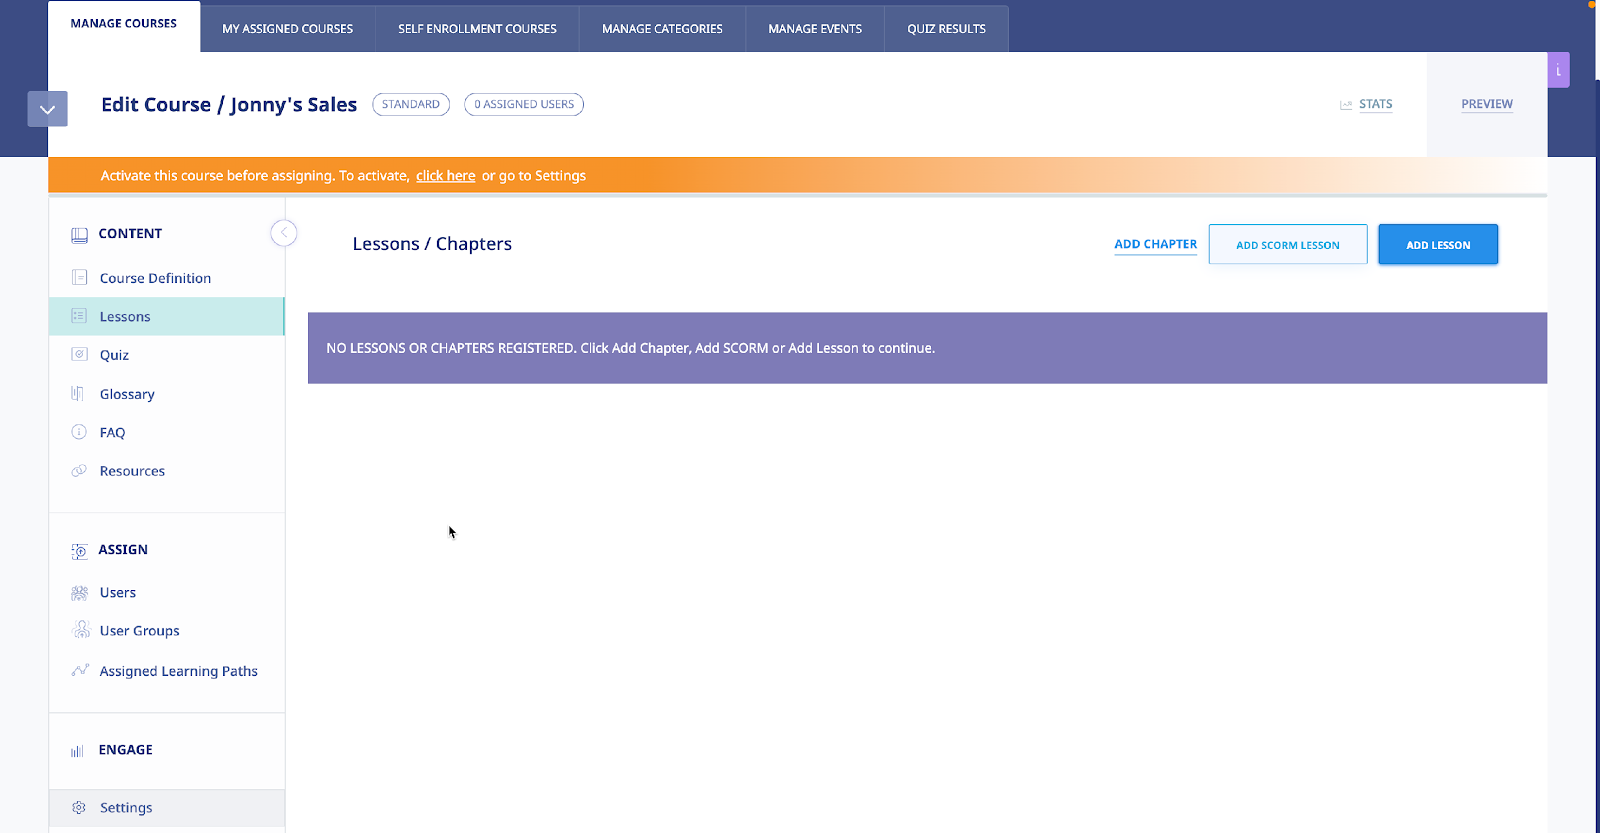
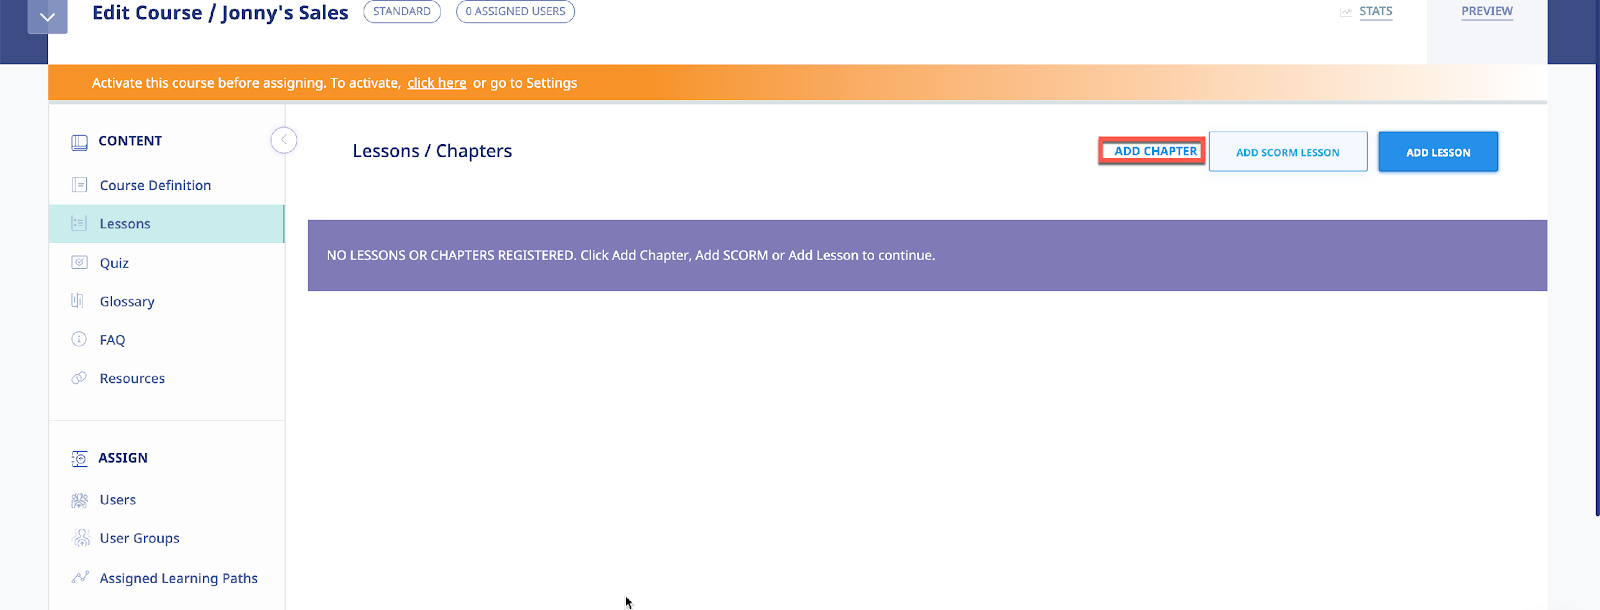
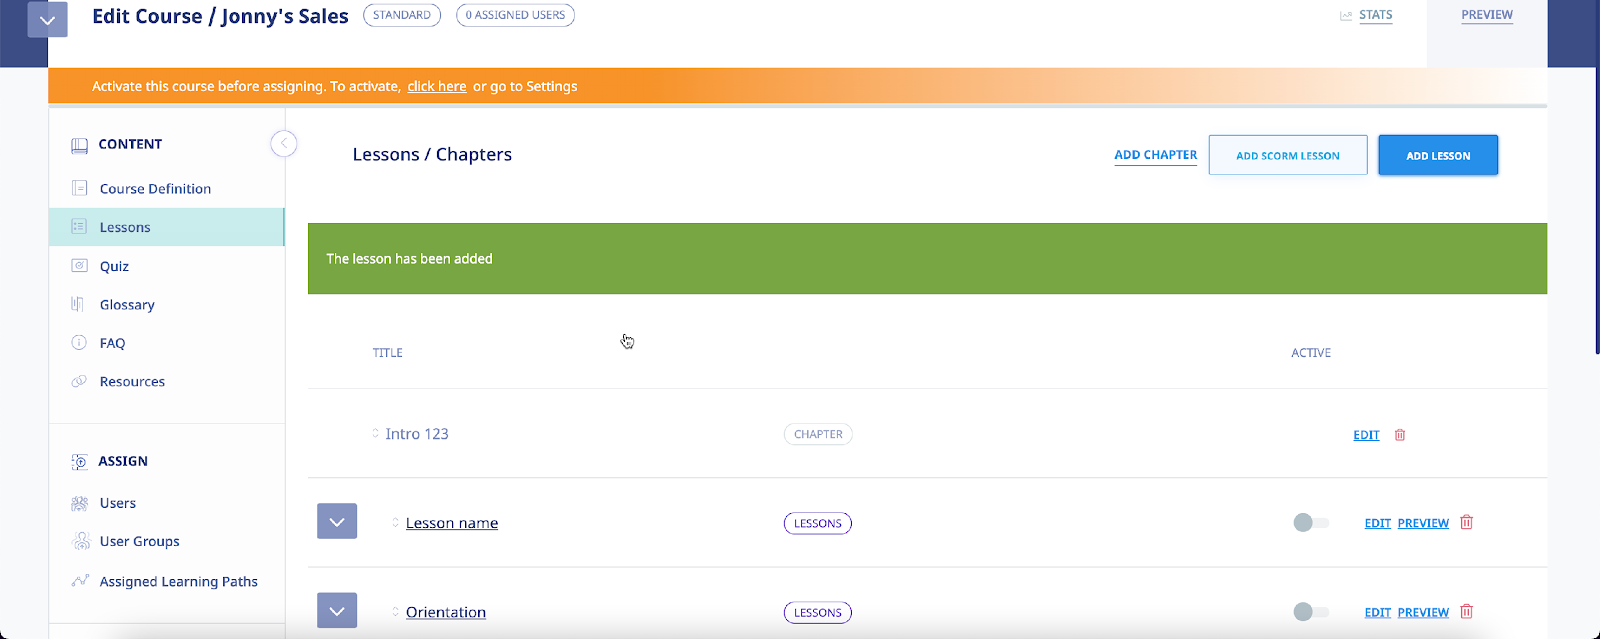
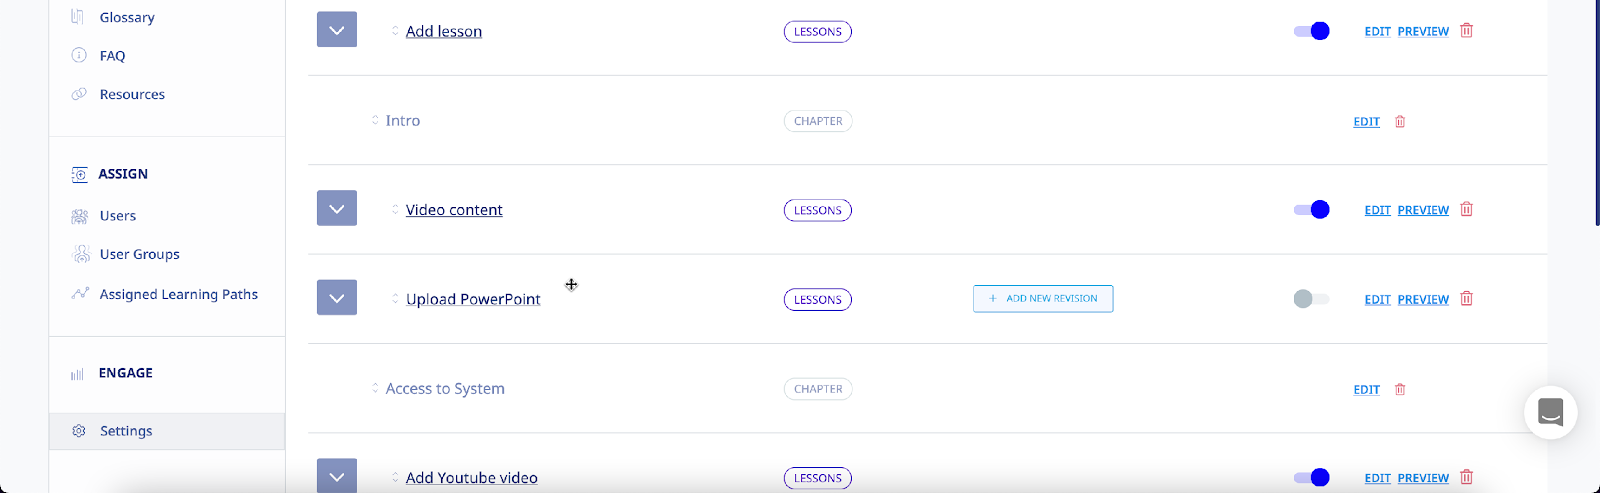
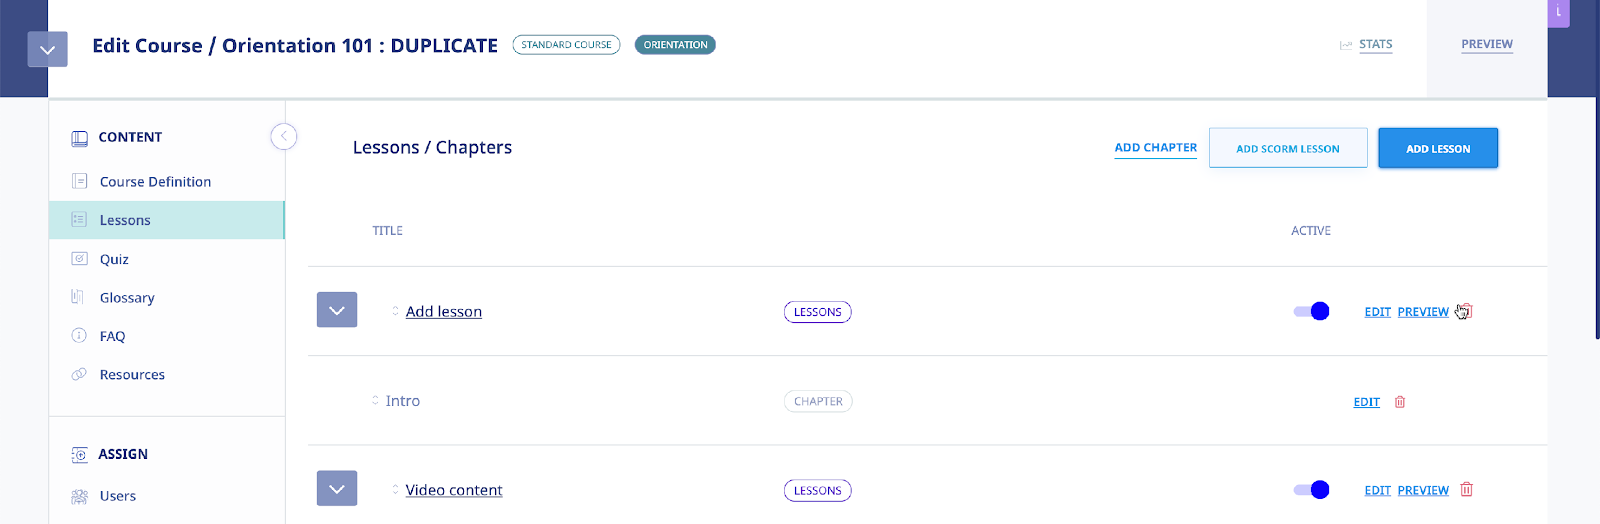
Adding Chapters and Lessons to a Course
Any courses that you create need to consist of Chapters and/or Lessons. Chapters serve as a table of contents or outline, for the Course, while Lessons contain the Course’s content. Adding Chapters and Lessons is accomplished using the Course Details screen, described above.
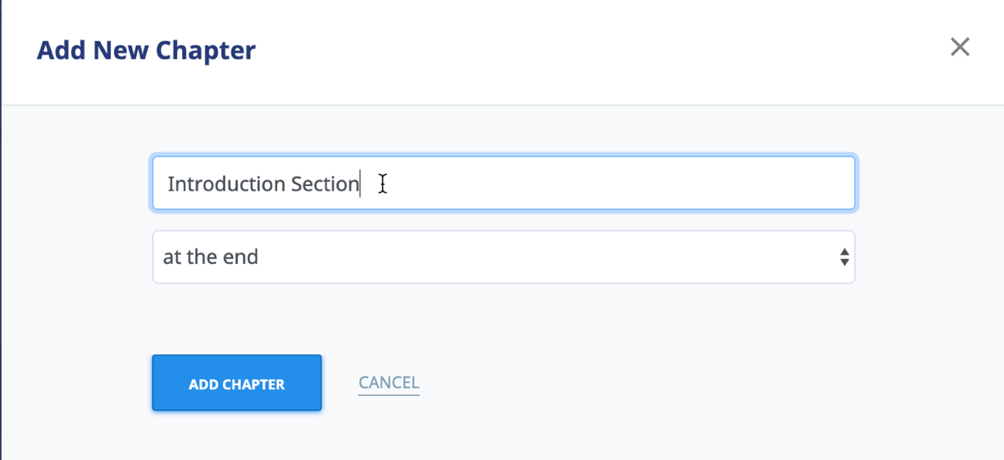
Adding a Chapter to a Course
To create a Chapter, click the ADD CHAPTER link, enter a Title for the Chapter in the Title field, select whether to place the Chapter at the beginning or at the end of the Course and then click , as shown in the following illustration.

Add Chapter Screen:
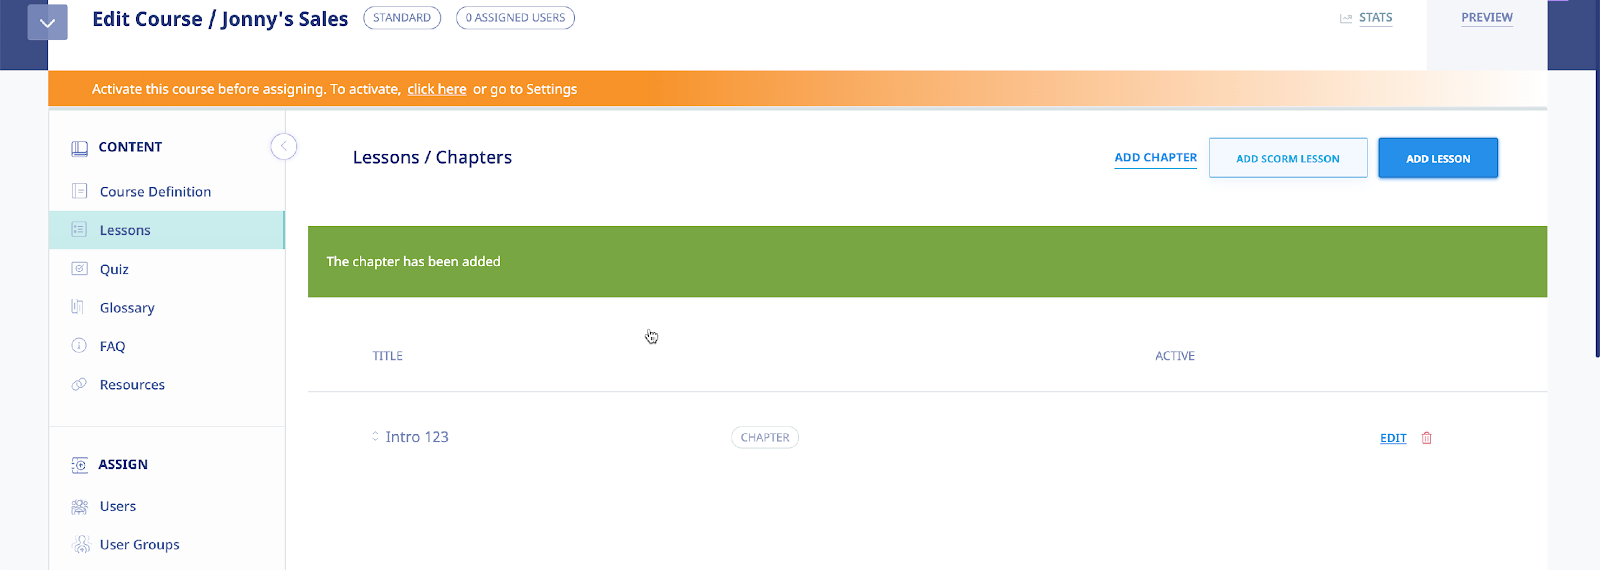
As shown in the following illustration, the Chapter has been added to the Course.
Editing a Chapter
You can edit the Title of any Chapter that you created by clicking its edit title link as shown in the following illustration. Simply make any modifications necessary to the Chapter Title and click .

Deleting a Chapter
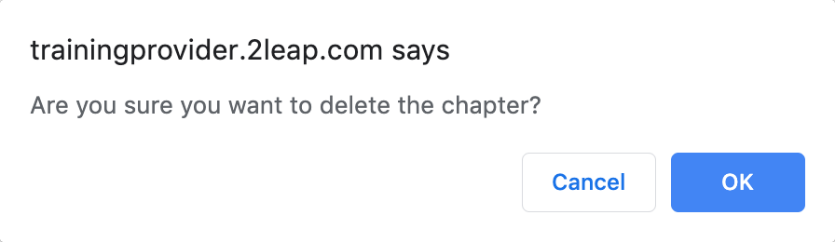
You can delete a Chapter from a Course by selecting its delete link. As shown in the illustration below, the system displays a warning message before performing the deletion to ensure that this is your intention, before proceeding. Simply click to proceed with the deletion or click to cancel the deletion process.

Adding a Lesson to a Course
Any courses that you create need to consist of Chapters and/or Lessons. Creating a Lesson is also accomplished using the Course Details screen, described above. To create a Lesson, click the button, enter a Title for the Lesson in the Title field, select whether to place the Lesson at the beginning or at the end of the Course, and then click , as shown in the following illustration.

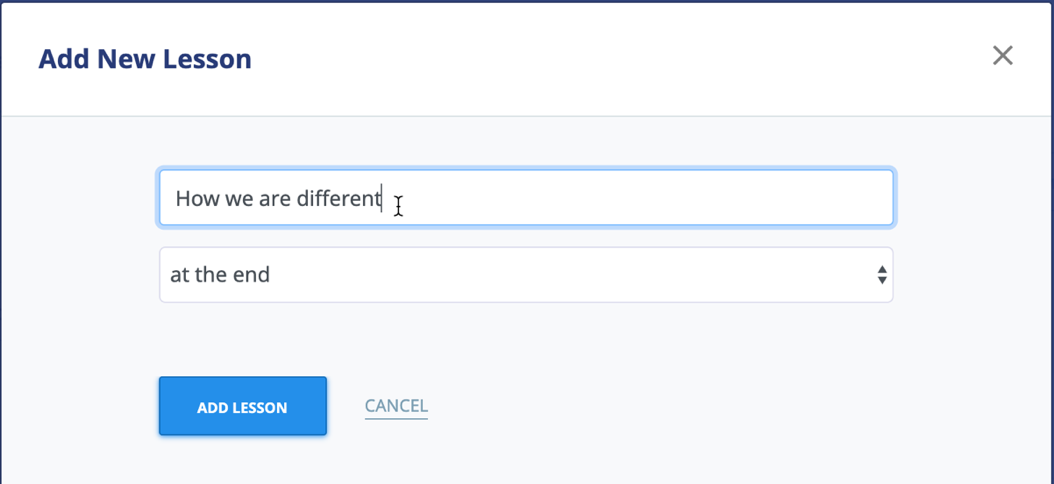
As shown in the following illustration, the Lesson has been added to the Course.
Adding Content to a Lesson
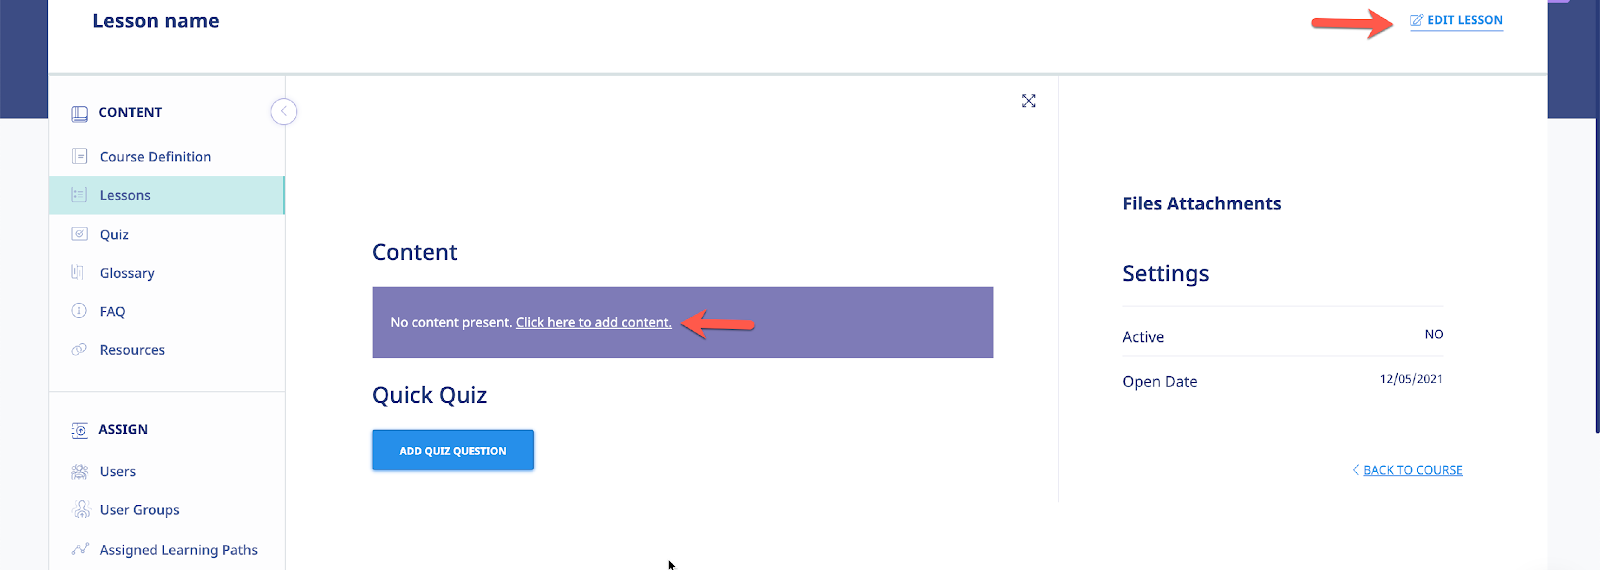
Selecting a Lesson Title within the Chapters & Lessons portion of the Manage Course screen displays the View Lesson page, illustrated below. You can click the [Click here to add content] or [EDIT LESSON] button to add pre-existing content to the Lesson. You will be using the system’s Content Editor to manage this.
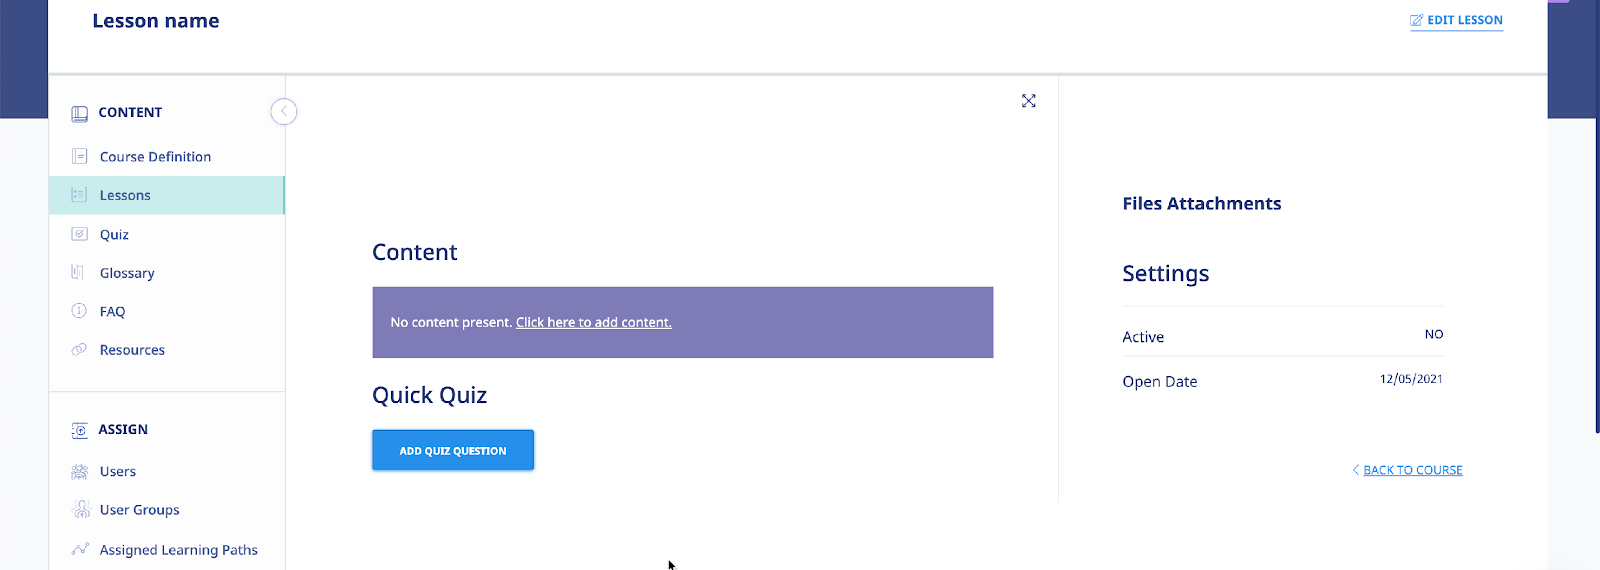
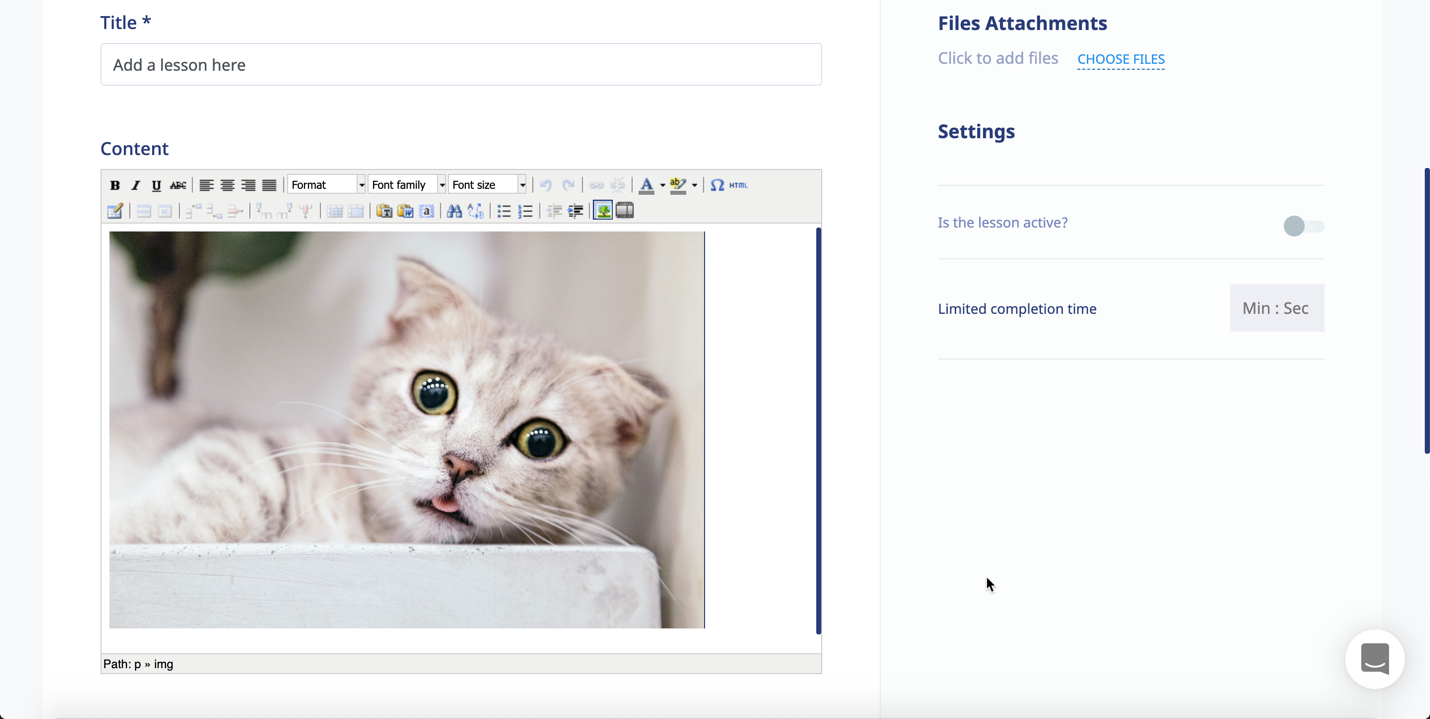
eLeaP Content Editor
Click the Click here to add content link to add a synopsis or overview of the content contained within a Lesson. As shown in the following illustration, the eLeaP Content Editor is displayed, allowing you to create this content. You can also toggle the [Is the lesson active?] option to activate or deactivate the lesson within the system. You can also activate/deactivate lessons in the lessons.
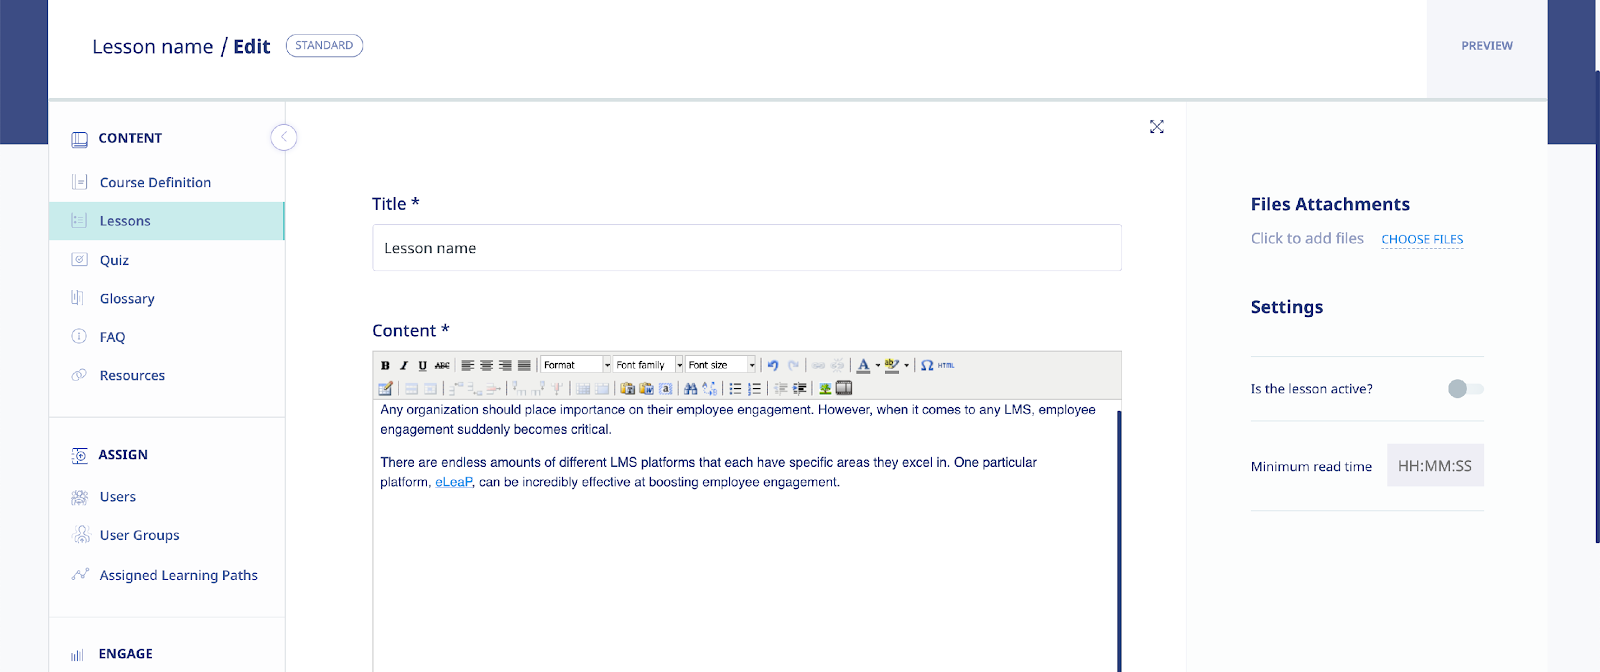
You are now in the heart and brain of the eLeaP™ Course Content Management System. Some of you will recognize a familiar Microsoft Word or other CMS menu items layout. Insert your text or content anywhere in your Content Creation space. For example, to paste the content you have already created in Microsoft Word, click the icon. Remember, you can format your layout to your exact specifications.

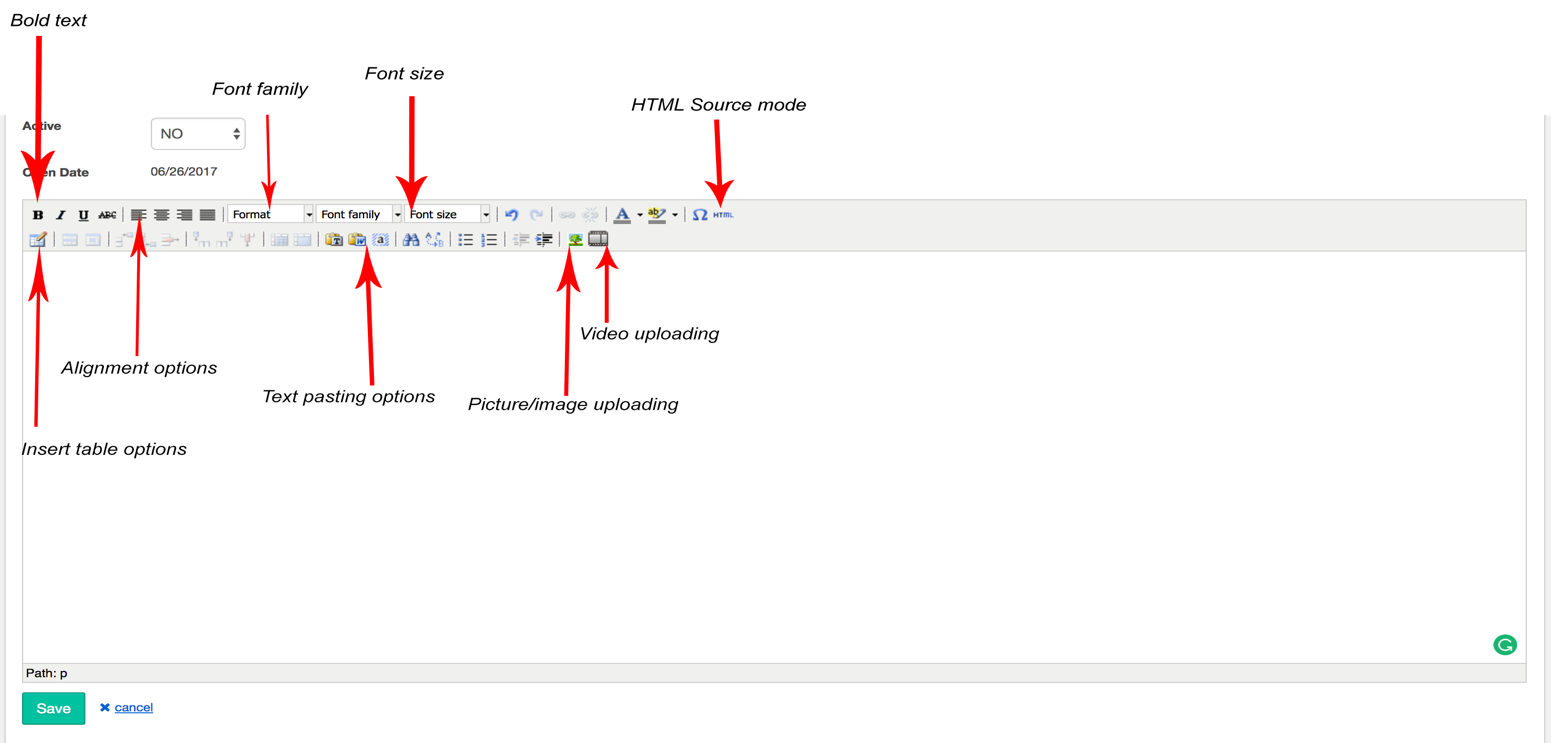
The illustration below shows the available functions on the Editor’s Toolbar:
Complex Course e-Learning Objects:
In today’s e-learning and training environment, using multimedia-rich presentations can greatly enhance your trainees’ learning experiences. eLeaP™ supports various multimedia formats including Video, Audio, Flash, HTML, PDF, Microsoft objects, SCORM 1.2, and SCORM 2004.
To add Graphics or Pictures
To add graphics or pictures to your learning content object, click . The Insert/edit image dialog, illustrated below, is displayed.

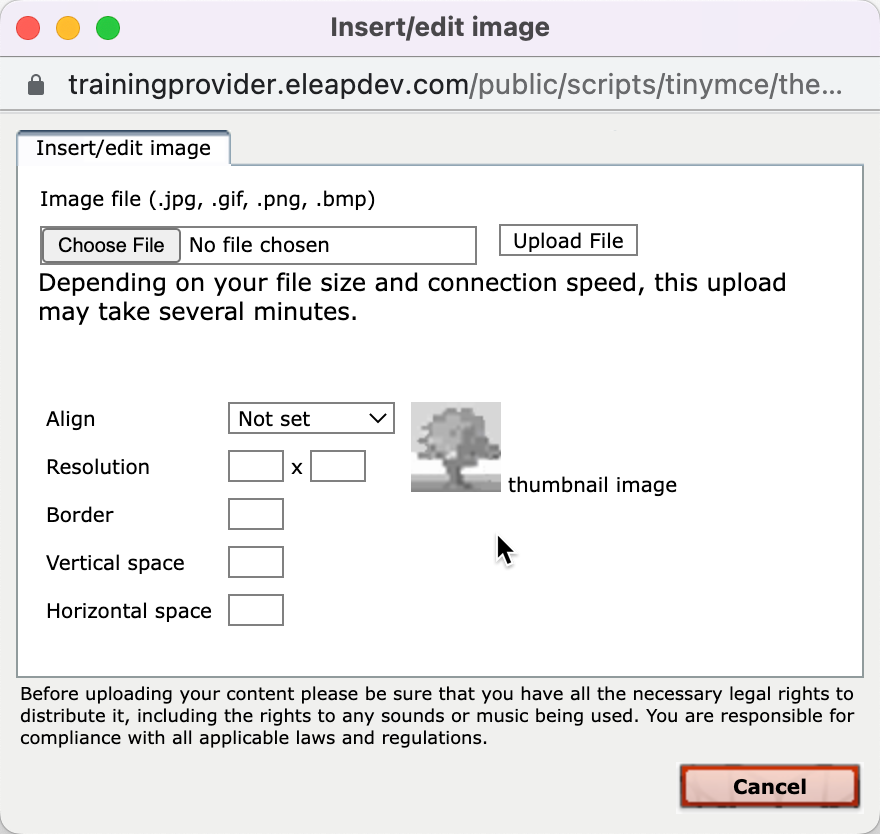
Browse your computer to locate the relevant picture or graphic, click to upload the graphic. As shown in the following illustration, you will see a preview of your graphic in your upload window.
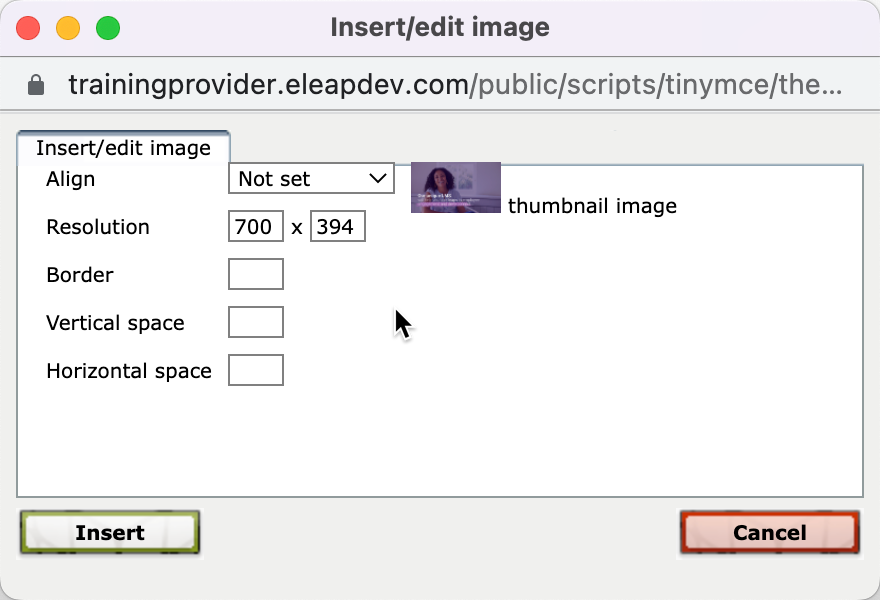
Next, set your alignment if needed, add a border if necessary or even define your resolution, and horizontal or vertical spaces, if needed. Then click Upload File to insert your graphic. As shown in the following illustration, the image is inserted within the editor.
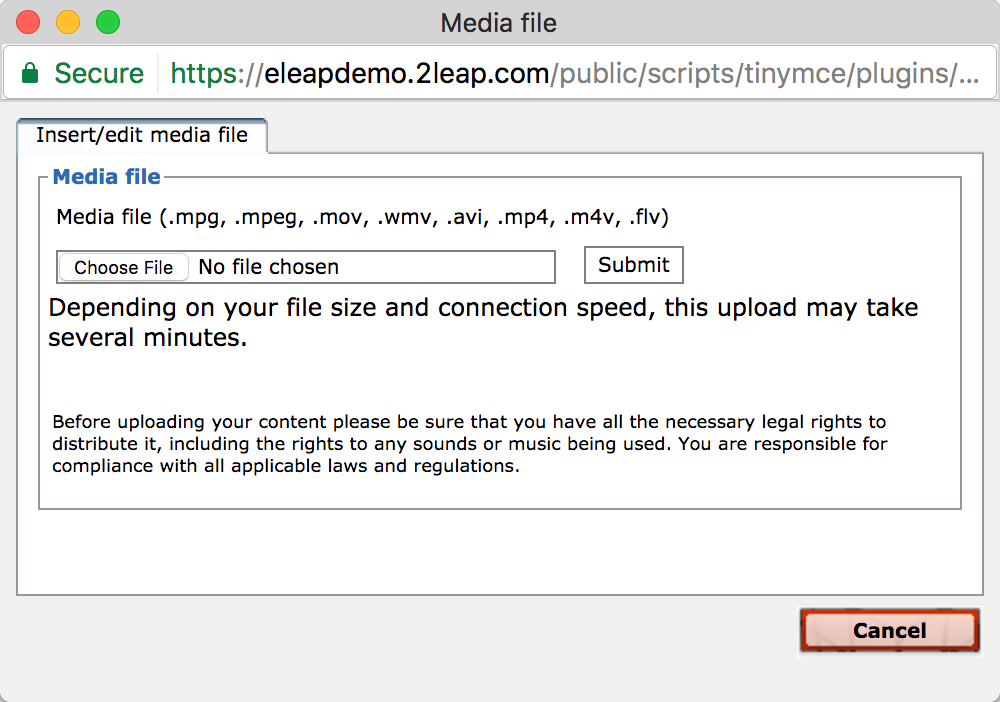
To add Video to your Course:
While in the Content Creator window, click the [Video Media] button ( to add Video to your course. You would need to have pre-created your video in one of the following formats: .mpg, .mpeg, .mov, .wmv, .avi, .mp4, .m4v, .flv. The Media file dialog, illustrated below, is displayed. Browse your computer to locate the relevant picture or graphic, click to populate the Media file field, and then click Upload File.

Once the Upload Process completes, you will see the option to [Insert] your new video into the lesson.
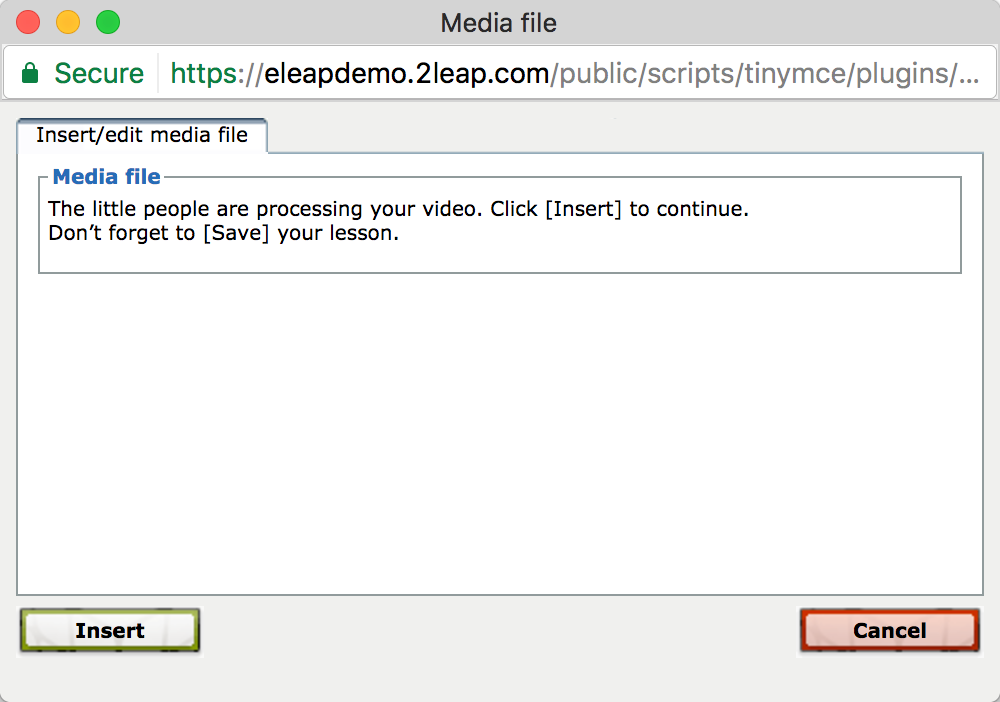
From time to time, when you click [Insert], you might get our ‘video processing’ notice.
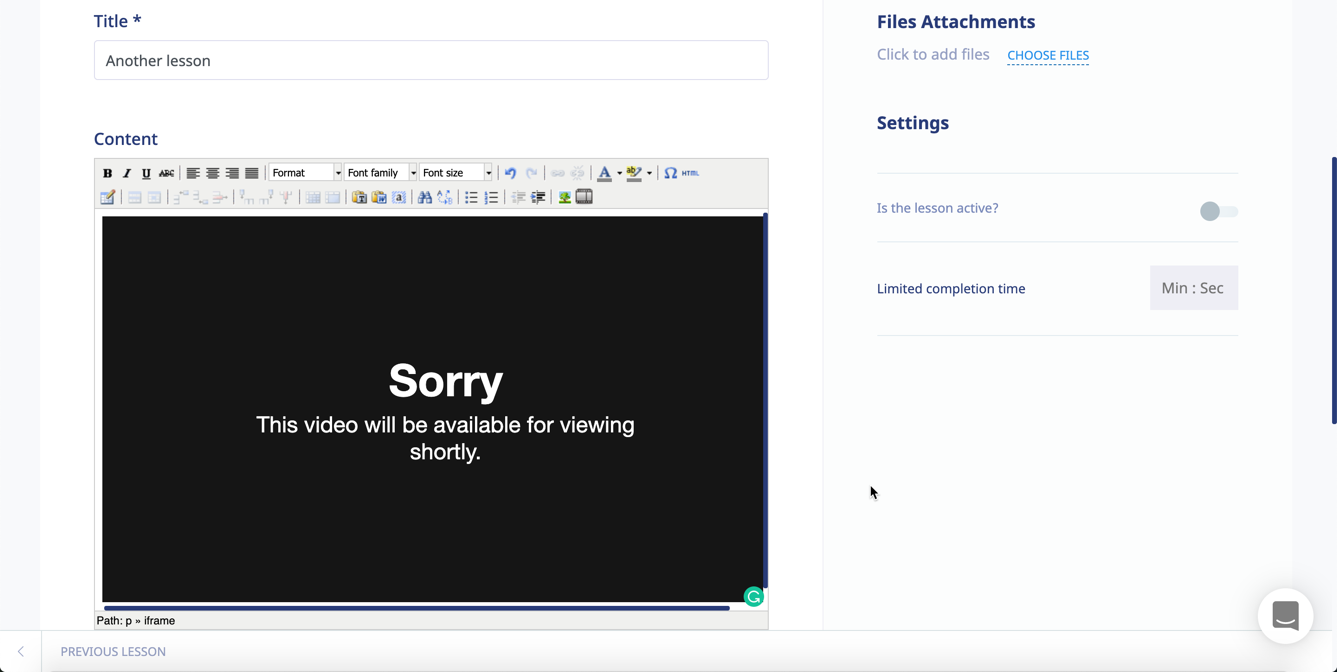
No need to worry. The system simply needs a few seconds to process your video and have it ready for streaming live. Refresh your page to see your uploaded video.
As shown in the following illustration, the video file is added to the Content Editor.
Note: You can easily import FLV videos into eLeaP using the video upload icon.
YouTube or Vimeo
Got YouTube or Vimeo videos you want to add to your course? Simple. Click the video embed icon illustrated below:
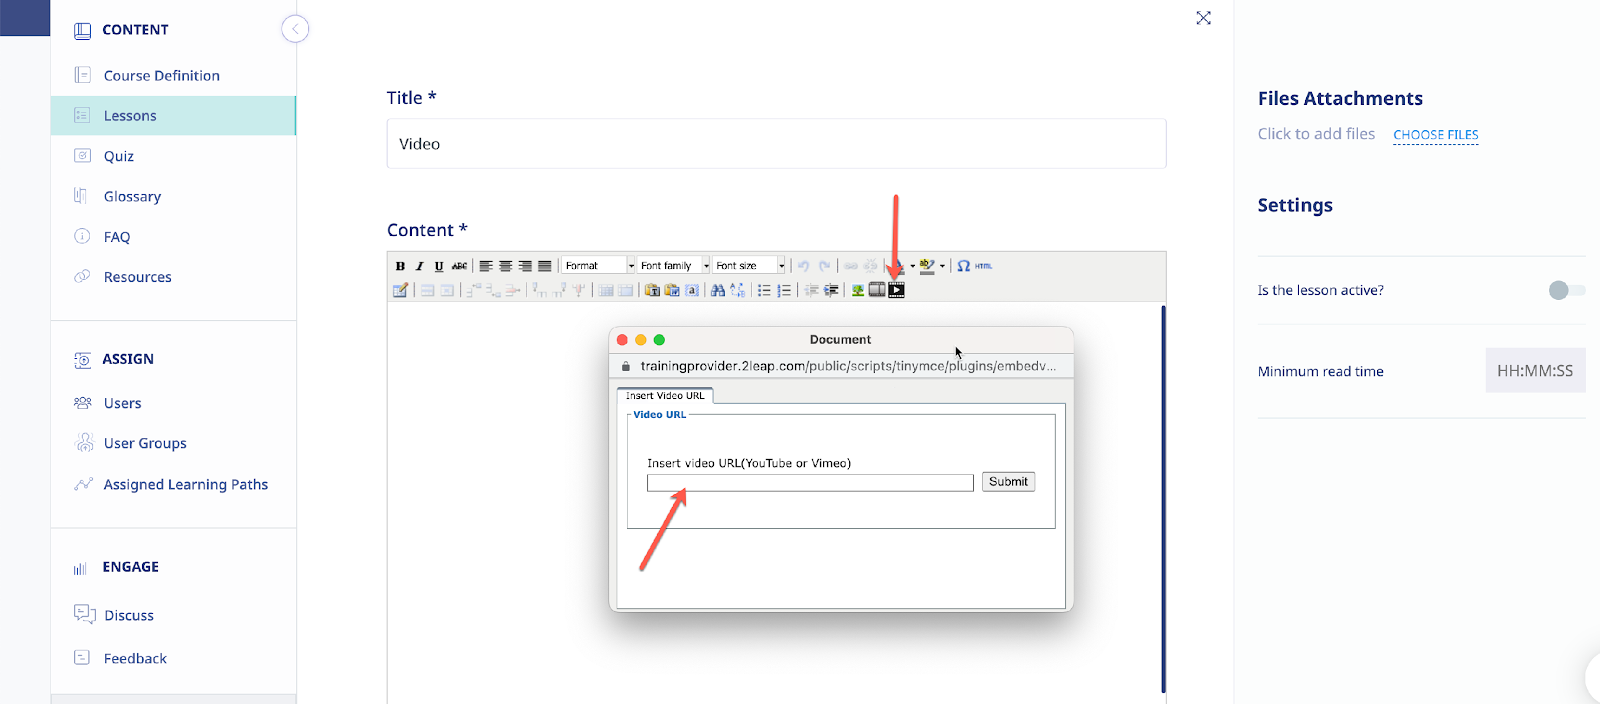
Then copy and paste the video URL from Vimeo or YouTube and click [submit] to add the video.
Note: Do you want to use PowerPoint files in your course? Check out tools for converting PowerPoint to SCORM and then importing your file into eLeaP. Some Converters we have checked out include Articulate 360, Storyline or Articulate Presenter, Camtasia, and Adobe Captivate. See the eLeaP Support website for more information. There are numerous benefits from converting your PowerPoint files to SCORM formats for web-based training. Check our eLeaP™ Knowledgebase in our Support Center to learn more or email help@eleapsoftware.com .
Once you have added all the media files that you will need, use of as many of the editor’s other functions, as necessary, to add additional content, and then click to save this content to the Lesson.

As shown in a simple example in the illustration below, the content is added within the Content portion of the View Lesson screen. You can now also click the edit lesson link to modify this content at any time, or click the print link to print the screen.
Uploading & Embedding Files
Clicking the link expands the screen, as shown in the illustration below so that you can navigate to the location on your computer where the existing content that you want to add to a Lesson is stored.


A Choose File dialog, as shown in the illustration below, is displayed. Simply navigate to the location on your computer where the file is stored, select it, and then click .
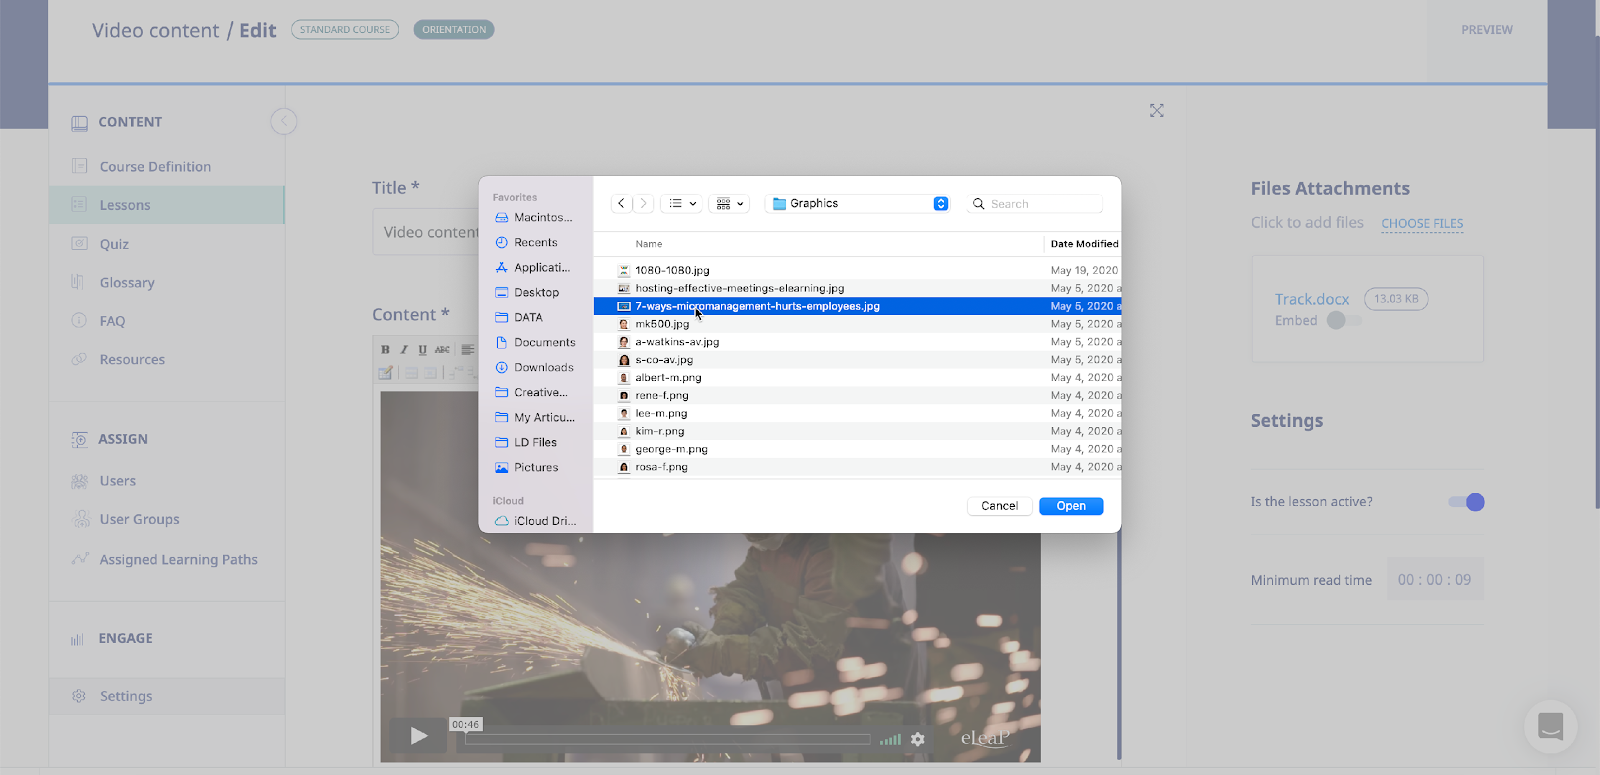
As shown in the following illustration, the file you’ve selected now populates the File to Upload field. Click [Open] to upload the file to the system. You can toggle the embed option to have your file available to be viewed via the learner’s web browser.

If you chose to embed your file, you will see a temporary processing message like this:
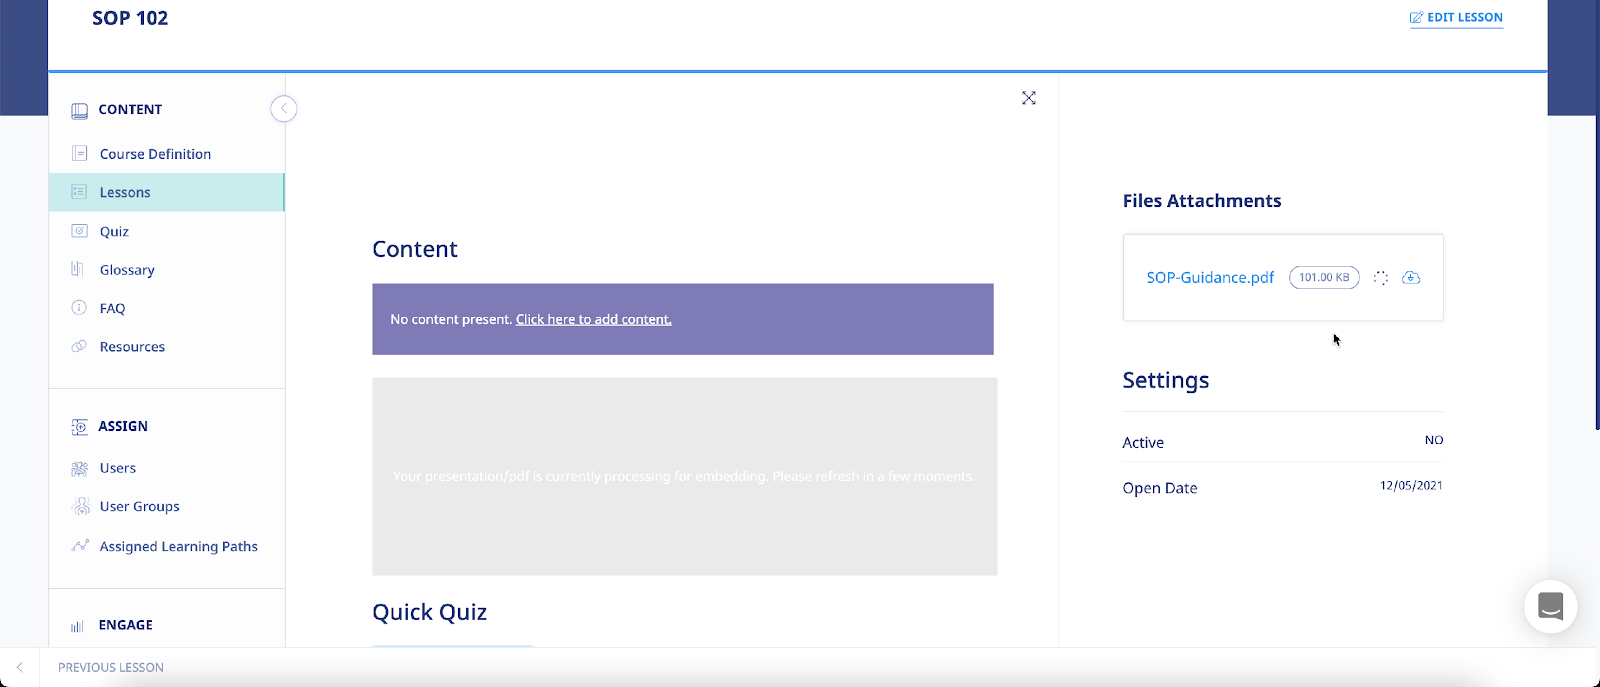
Simply give the system a few seconds to process your file. You can refresh your browser to see when the file has been processed.
Your uploaded and embedded file will look something like this:
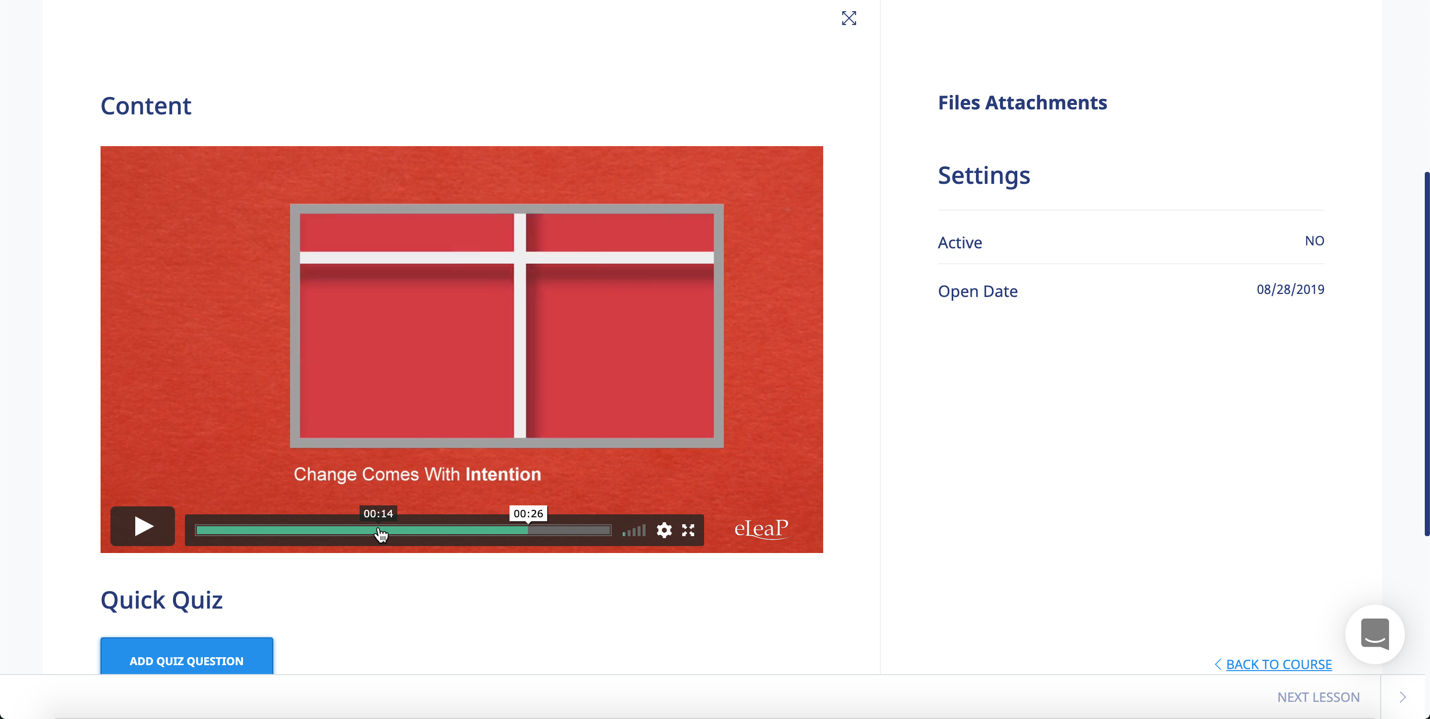
Quick Quiz
Quick quiz is a tool which enables content creators to add in lesson assessments for learners. These quick quizzes are not graded. They are simply meant to help reinforce comprehension. To add a quick quiz, the add quiz question button. Clicking the add quiz question link displays any quiz questions that you have already added to the system, which you can then use as part of the Lesson. Please refer to the Quiz section of the document for details on creating Quizzes and Quiz Questions.
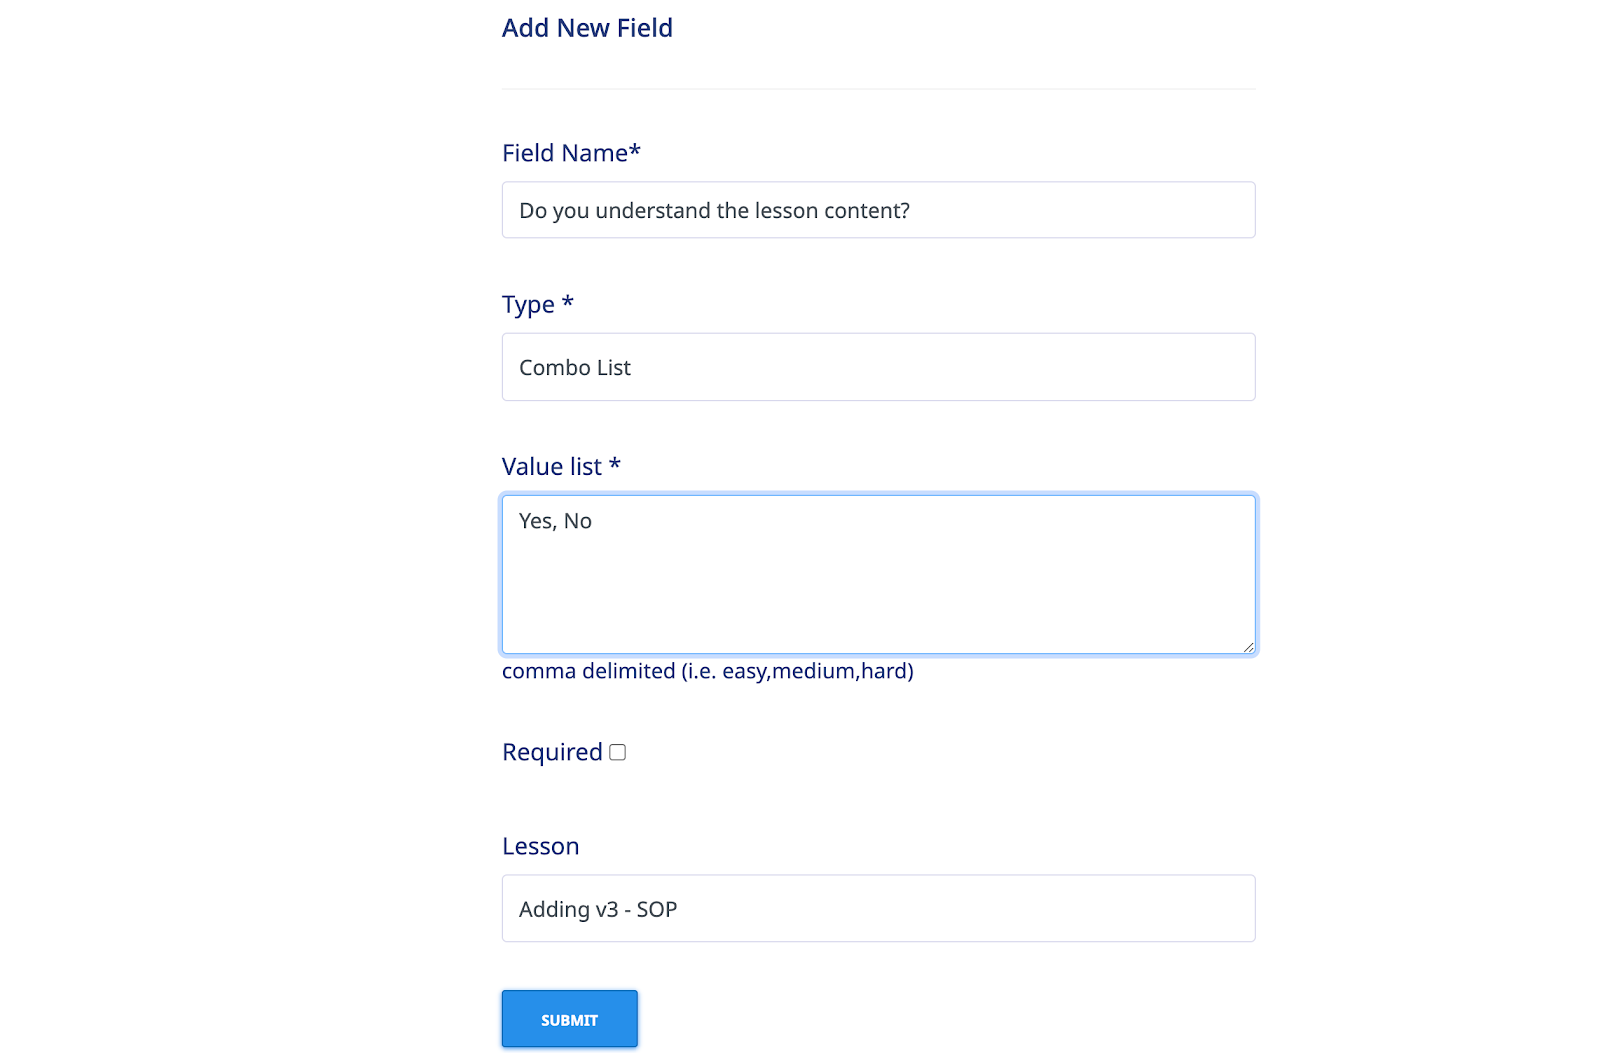
Quick Feedback
To add quick in eLeaP, go to the edit mode of your lesson and click the [Add feedback field] link (you can also add quick feedback in lesson view mode):
You can then select an existing feedback field to add or create new feedback for your lesson. Click [Submit] to add to the current lesson.
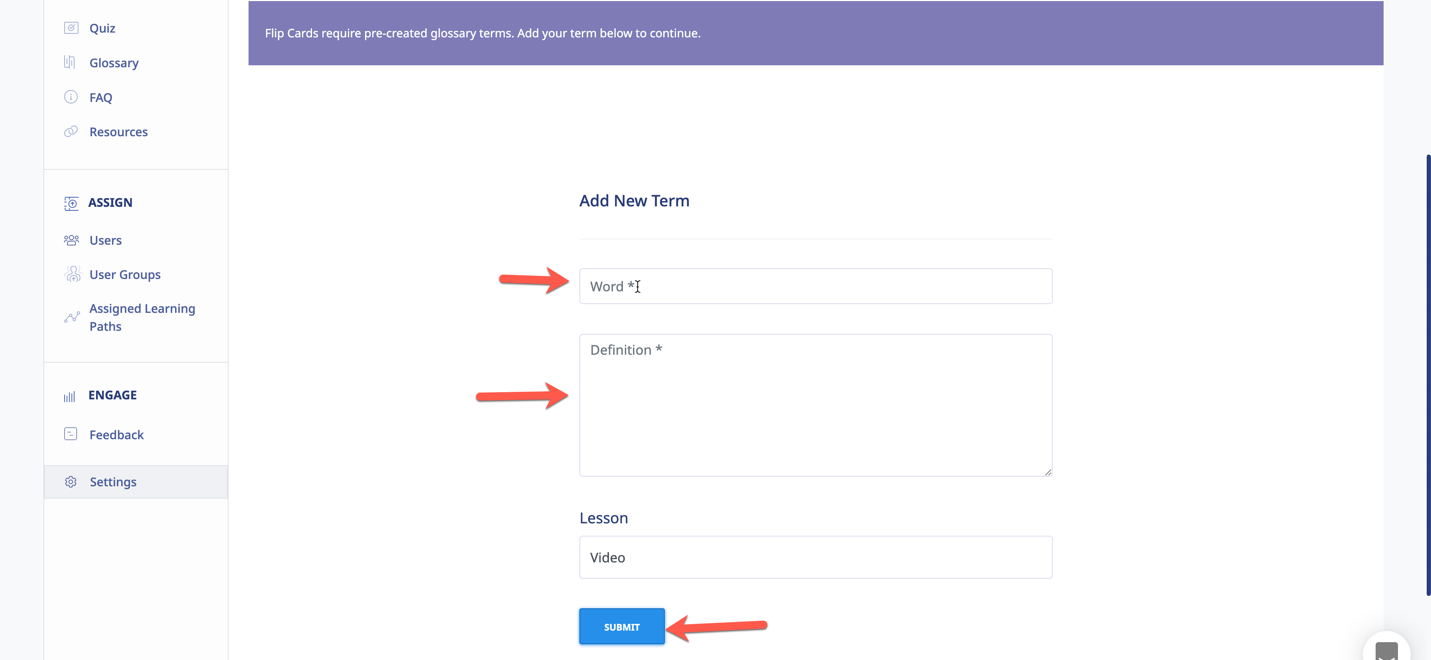
Quick Flip Card
To create a flip card in eLeaP, go to the edit mode of your lesson and click the [Add a flip card] link (you can also add a flip card in lesson view mode):
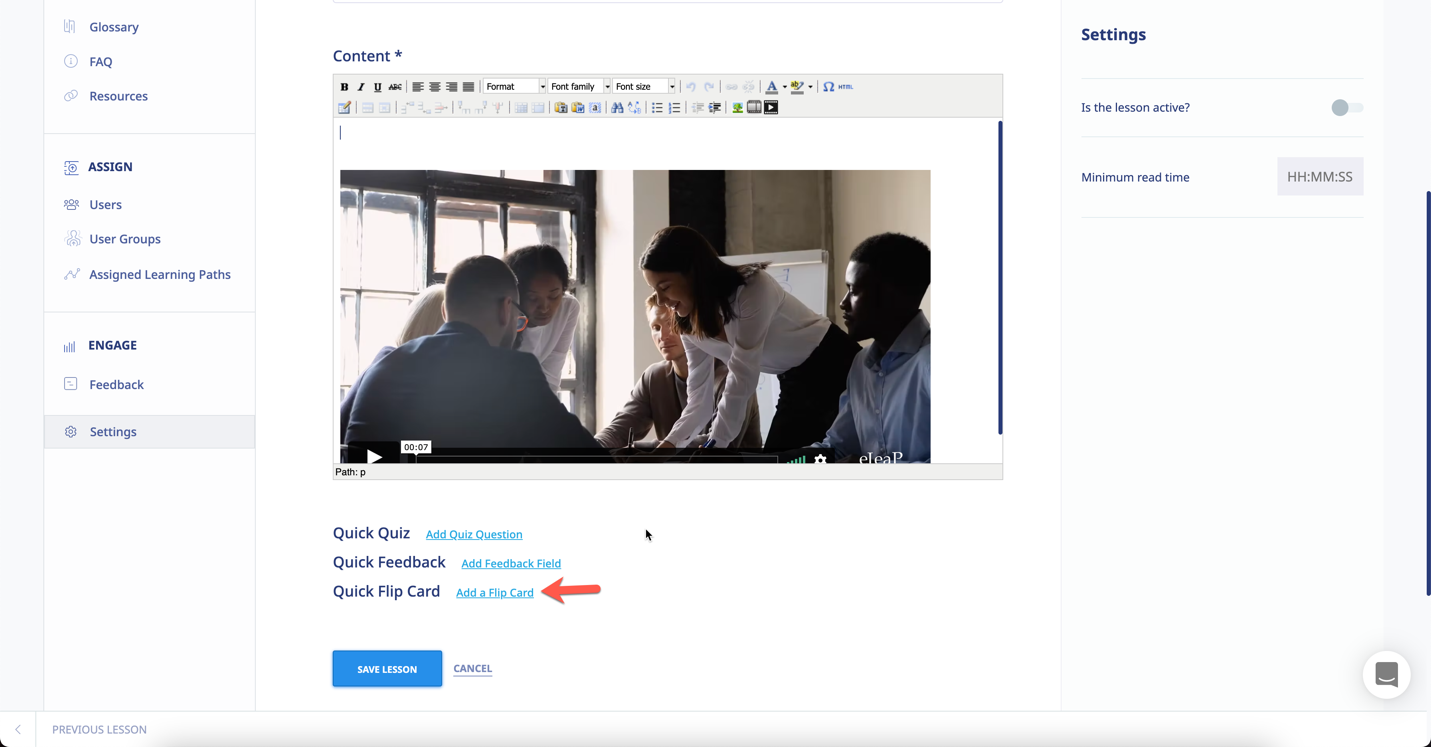
Next, enter the word or term and the definition and click [Submit]
Once everything looks good, click [Save Lesson] to finalize the Flip Card.
Editing a Lesson
Selecting the edit title link for a Lesson allows you to modify its existing Title. When you have changed the title, click , as shown in the following illustration.

Deleting a Lesson
You can delete a Lesson by clicking its DELETE link. As shown in the following illustration, the system displays a warning message before proceeding with the deletion. Simply click to proceed with the deletion or click to cancel the deletion process.
Importing SCORM Content
Sharable Content Object Reference Model (SCORM) is a collection of standards and specifications for web-based e-learning. It defines communications between client-side content and a host system (called "the run-time environment"), which is commonly supported by a learning management system. SCORM also defines how content may be packaged into a transferable ZIP file called "Package Interchange Format.”
To add a SCORM lesson, click . Clicking the [ADD SCORM LESSON] link expands the screen, so that you can navigate to the location on your computer where the existing SCORM content in zip format is stored. A Choose File to Upload dialog, as shown in the illustration below, is displayed. Simply navigate to the location on your computer where the file is stored, select it, and then click .
As shown in the following illustration, the file you’ve selected now populates the File to Upload field. Note that when your SCORM import is completed, your new lesson will automatically be created.
Re-Ordering Lessons
You can reorder the order of your lessons by using the drag-and-drop feature. To reorder a lesson, simply left-click on the lesson and drag it to the appropriate location.
Adding an Observation Checklist Course
An Observation Checklist course is a type of course which allows Administrator and Supervisor level users to perform in-person assessments of learners in order to document skills and proficiency.
To create an Observation Checklist course, click the button and enter in the name of the course. Then select the type of course by clicking the dropdown arrow and selecting [Observation Checklist].

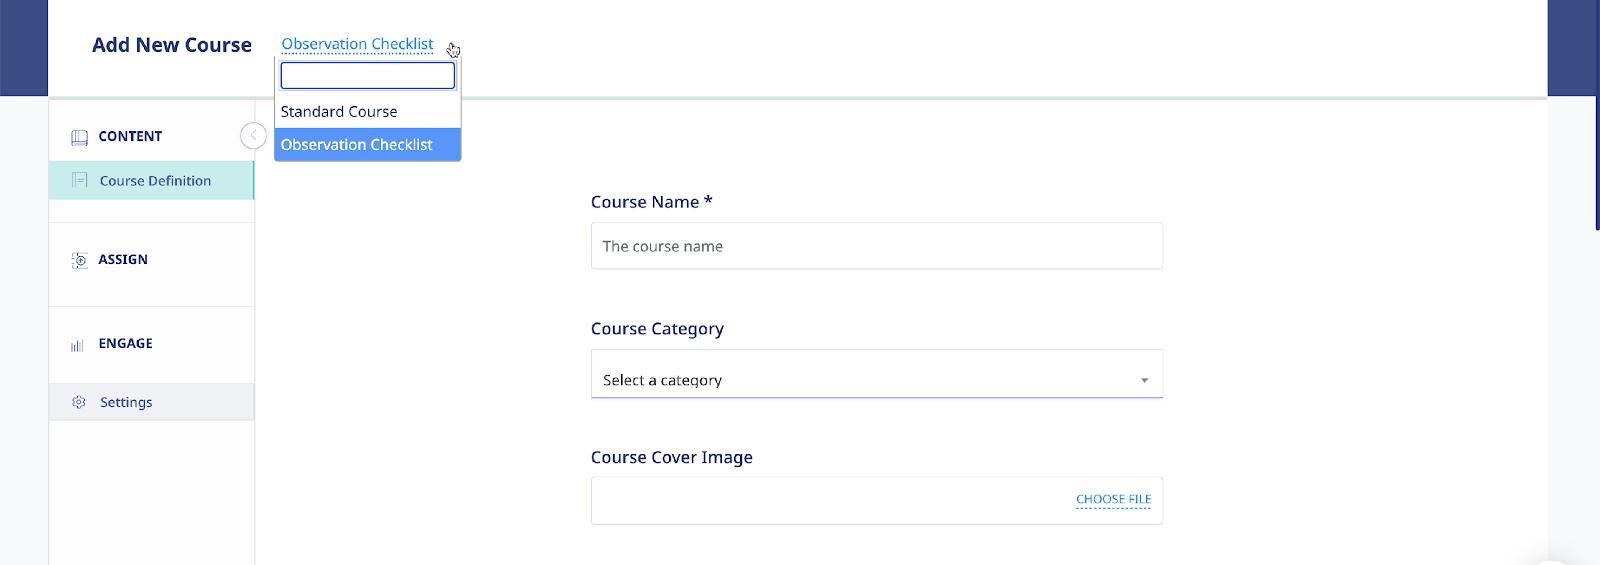
Once selected, simply click the button to begin creating your assessment statements.

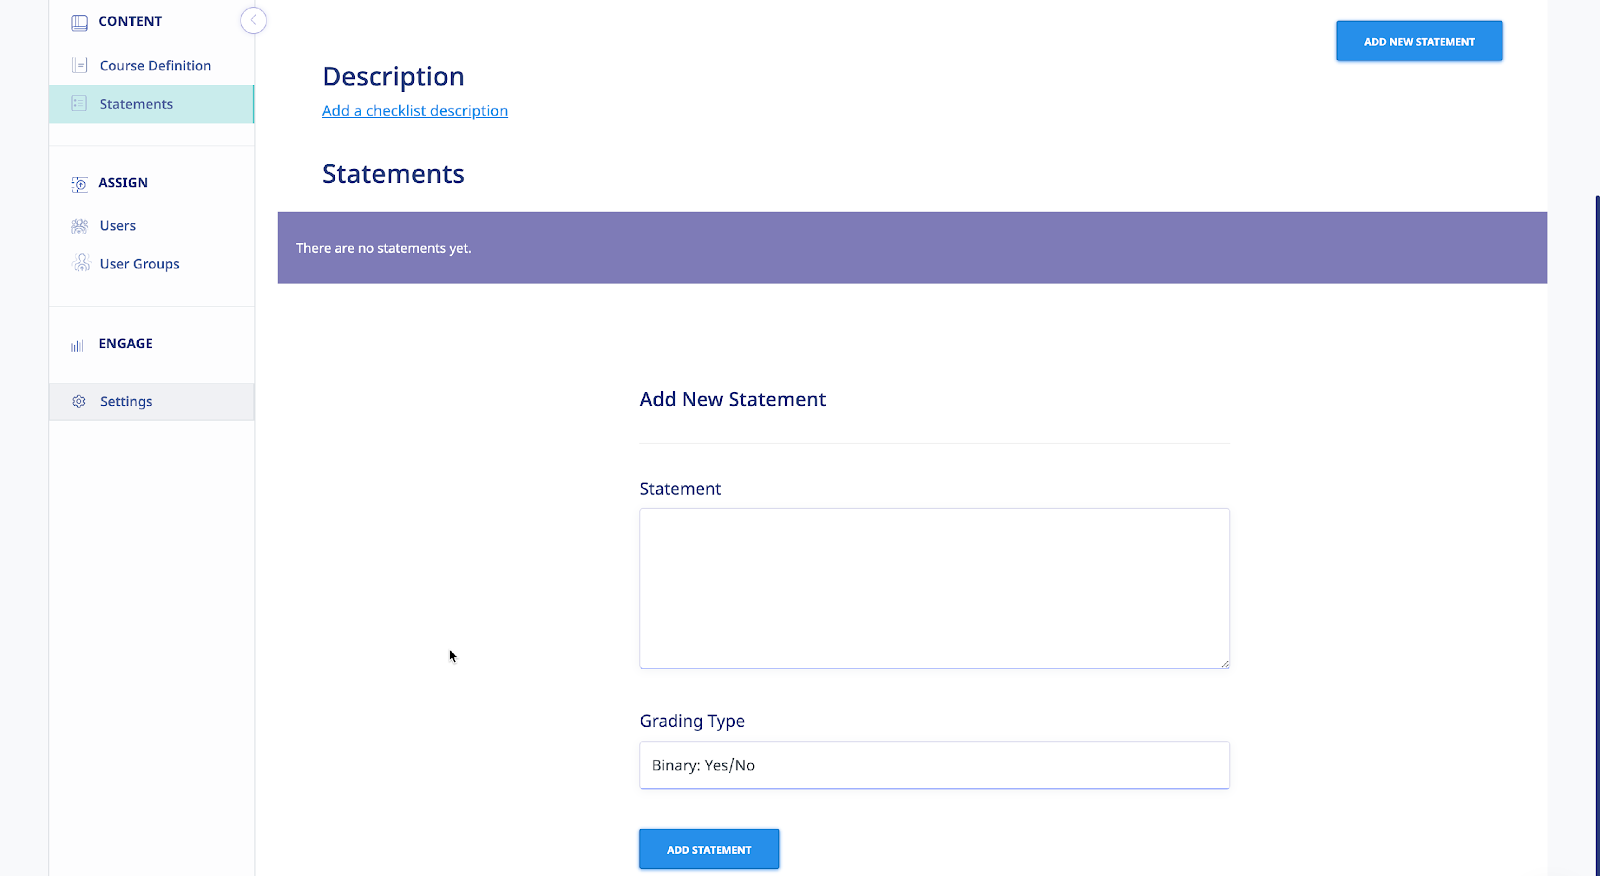
Add/Edit Observation Checklist Statements
Once you add your Observation Checklist course, you should be on the Observation Checklist Statements page. If you are not, click the tab to begin adding or editing your Observation Statements.

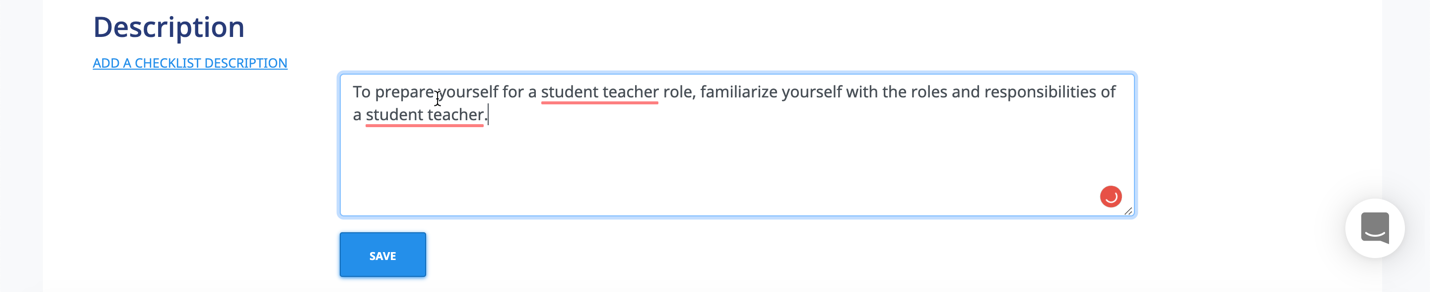
Add a description
Adding a description will help the assessor performing the assessment understand and communicate to the learner the “what” and “why” for performing this assessment. To add a description, click the link, then enter your description and click .


Remember, you can always come back and edit the description. To edit the description, click the [Edit] link next to the description.
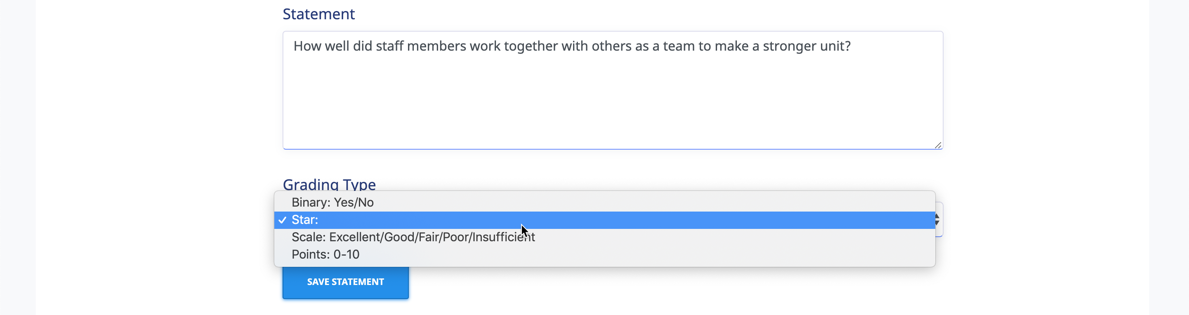
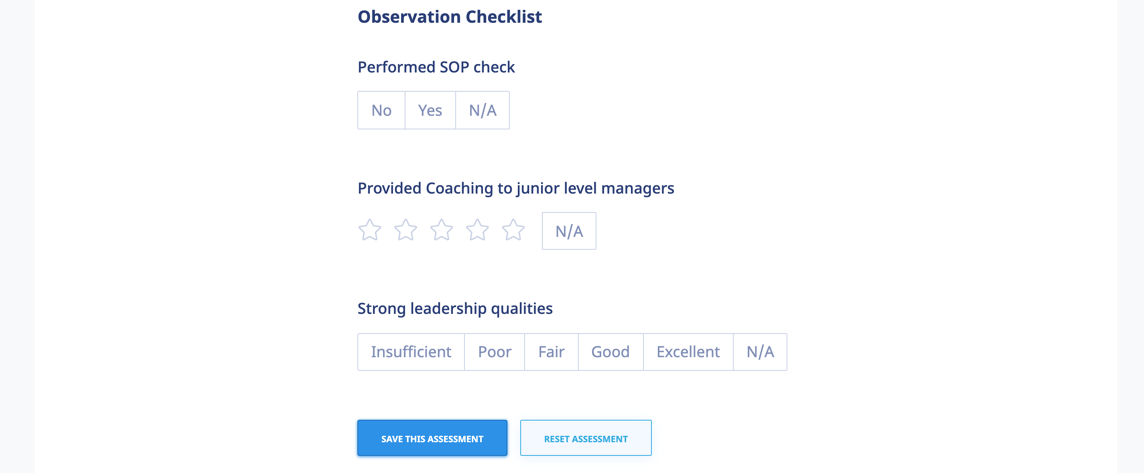
Add an Observation Checklist Statement
To add a statement for your Observation checklist, simply select if you want to enter a [Gradable] or [Non-Gradable] statement.
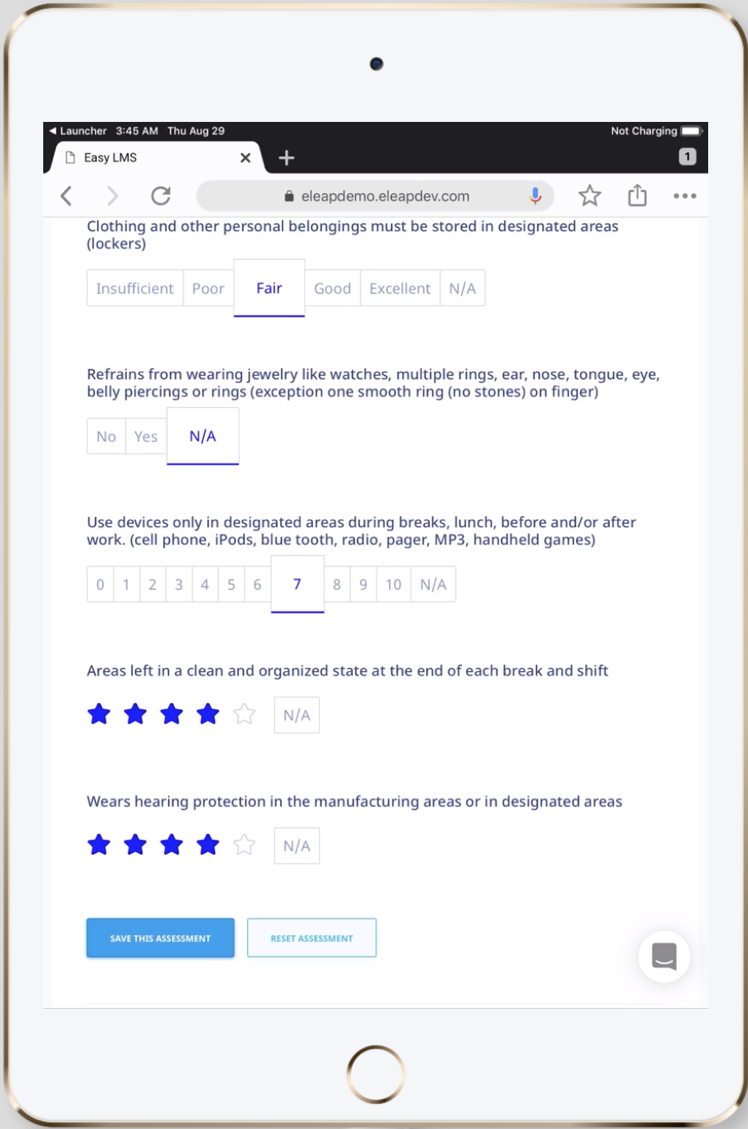
Gradable Statements:
If you select a Gradable statement type, your options are: Binary, Star, Scale, or Points.
Once you determined your grading type, enter the statement into the box, select the Grading Type, and click the button.
Here’s an example:
Active Listening - Giving full attention to what other people are saying, taking the time to understand the points being made, asking questions as appropriate, and not interrupting at inappropriate times.
To assess this statement using a Yes/No grading type, simply select that grading type and click .
Observation Checklist Gradable Statement Types
There are four (4) grading types for Observation Checklist statements:
- Binary (Yes or No): The binary grading type is for when you simply need a yes or no assessment result for a statement, i.e., can the learner do this action or not?
- Star: Star assessments are useful if you want to award an increasing level of proficiency for an assessment. This is simple and almost universally understood. The Star grading starts at 1 star to a maximum of 5 stars. Typically, the higher the number of stars, the higher the value of the assessment.
- Scale: The scale grading type is like the Star grading type, except you now have specific descriptions for what each level or proficiency equates to. The Scale ranges from “Excellent” to “Poor”. It also includes “Good”, “Fair” and “Insufficient” levels.
- Points: The points grading type is designed to allow you to customize your own level or values for the assessment. If you prefer to award specific points for each statement, the Point grading type works best.
Observation Checklist Non-Gradable Statement Types:
Non-gradable statements allow you to collect input-type data or even upload documents or files as part of the assessment. eLeaP currently has three types of non-gradable observation statements:
- Text Field: This is simply a text input box where data can be entered. An example of this type of statement can be, “what do you think about the new equipment?’
- Custom Dropdown: A custom dropdown enables you to create predetermined answer options for the assessment statement. For example, “what department do you work?” and the custom dropdown options being “Engineering,” "Sales,” “Customer Service.” Enter the Custom Dropdown statement and use the [+] button to add the dropdown selector options.
- Upload File: The upload file statement type is used if you want to upload a file or document as part of the assessment. An example of this could be a signed employee policy or other documents.
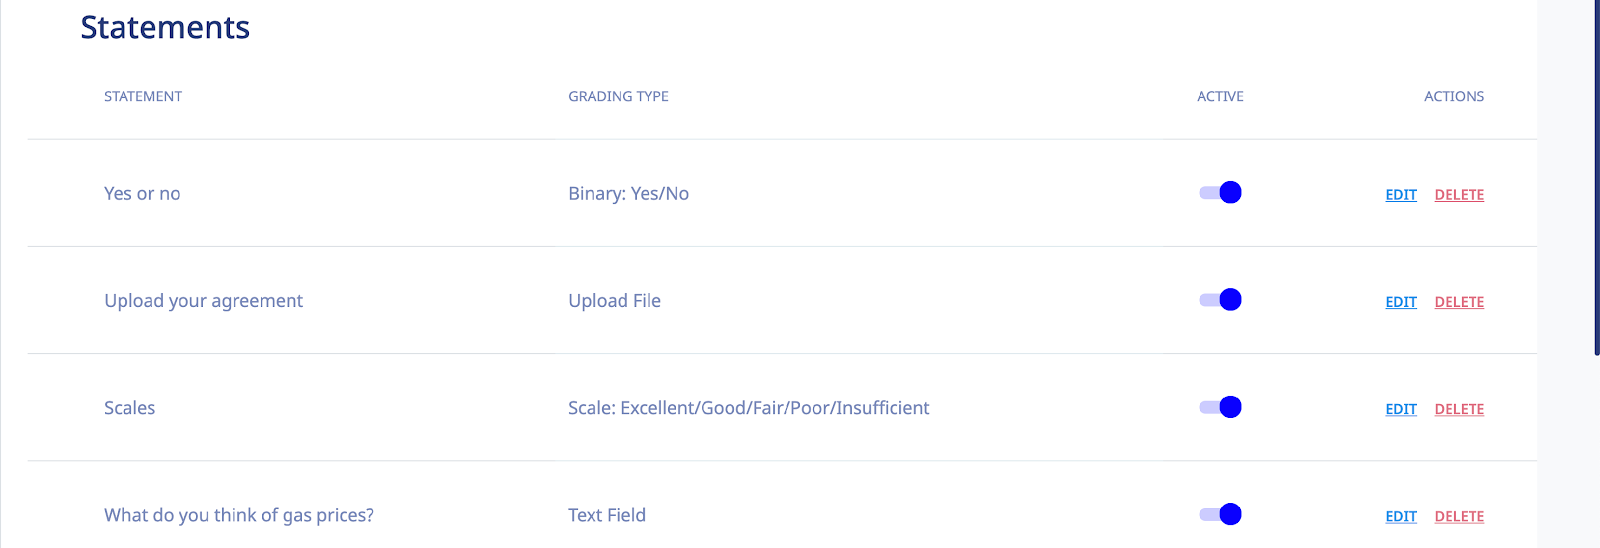
Activating/Editing/Ordering Statements
Your observation checklist statements are in inactive status by default. This is to give you the choice of selecting which statements end up being used in your live assessments.
- To activate a statement, simply toggle active/inactive .
- To edit or delete an existing statement, click the links.


Here’s an example of my list of active and inactive statements:
OC Course Settings
Assigning an Observation Checklist Course
Note: Observation Checklist courses are to be used for performing physical assessments of skills and proficiencies. This means they are going to be performed by a system administrator or a designated Supervisor level user.
Assigning to users:
Observation checklists can be assigned to specific users. Simply click on the submenu item under the section of the course submenu. (You will need to activate your course prior to the assignment).


Then click the button. Select the users you want to assign to be assessed.
Note: No emails are sent to individual users regarding Observation Checklist courses.
Assigning to user groups:
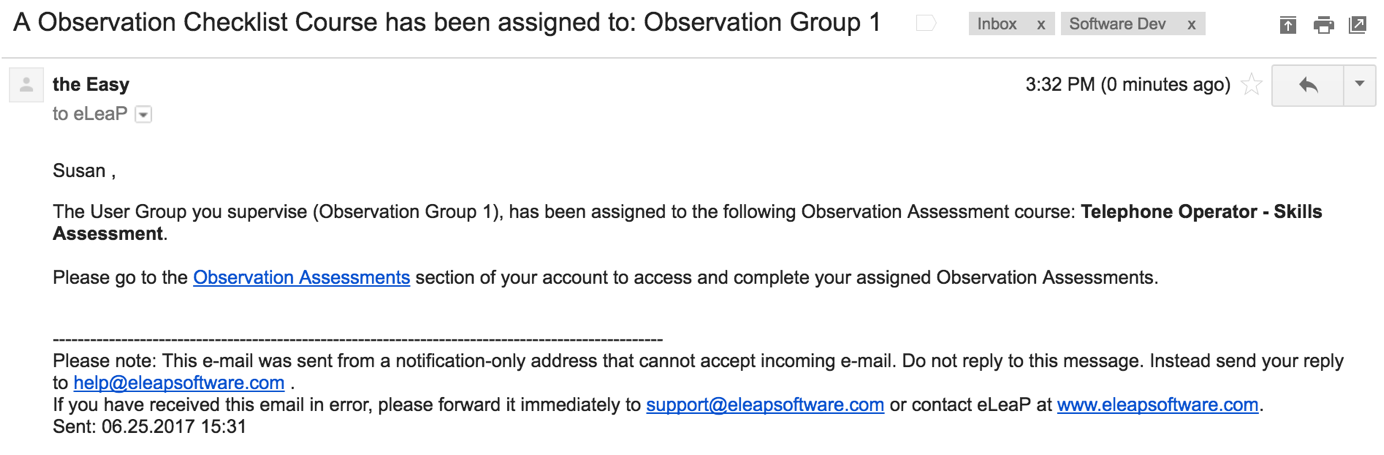
To assign an Observation Checklist to user groups, click the submenu item under the section of the course submenu. Then click the link and select the relevant user groups to be assigned and assessed.

Note: While no emails are sent to individual users within the assigned user group regarding this Observation Checklist course if a Supervisor is assigned to manage the assigned user group, the supervisor will receive a notification regarding a pending assessment.
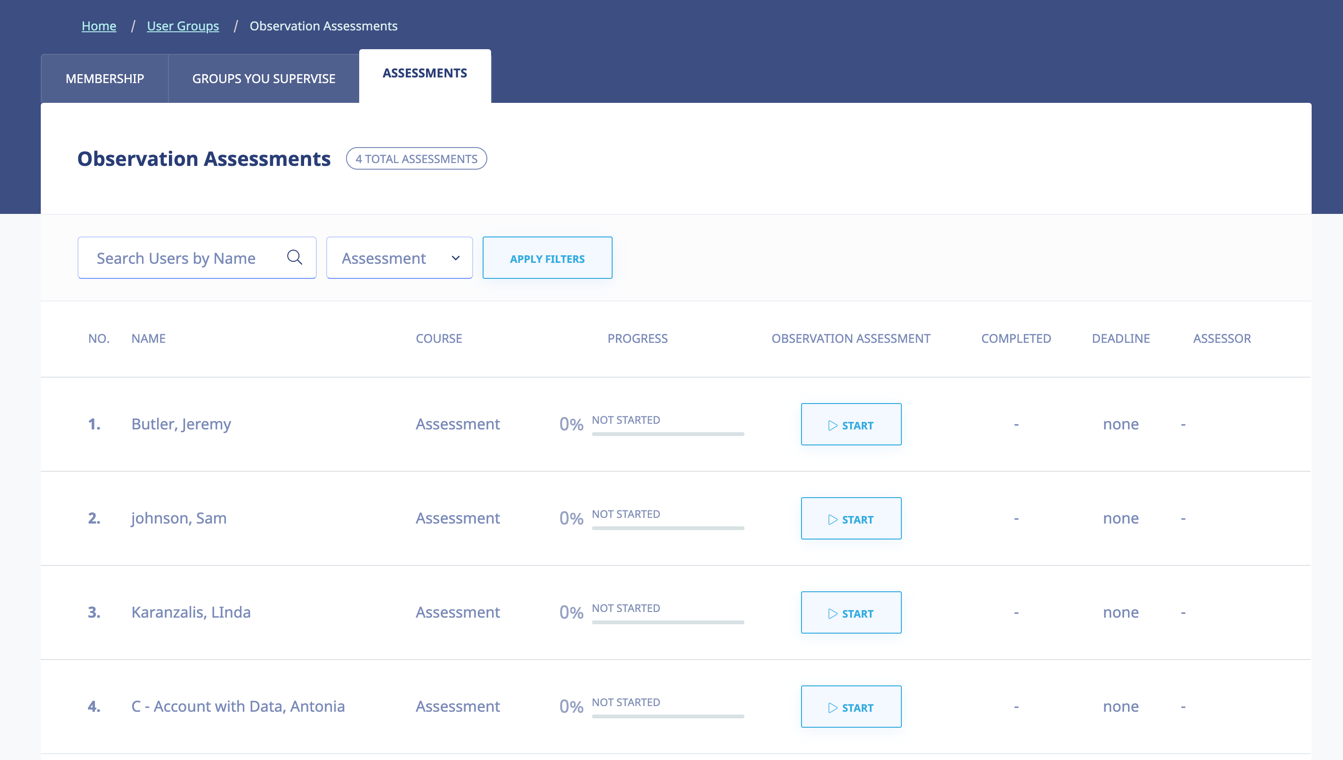
How to perform an Observation Checklist Assessment
Administrator performing assessments:
As an Administrator, you can perform an Observation Checklist assessment. Once an Observation Checklist course has been assigned to individual users or user groups, click on the tab to begin performing your assessment.

Click the button next to each assigned user to begin your assessment.
Click or, if on a mobile device, tab the various assessment grading options. For example, if you agree with Yes as the appropriate assessment for the binary statement, select or tab the [Yes] option.

If you need to save the current assessment and come back later, you can. Simply click the button. This button also works to finalize the assessment and move on to the next learner to be assessed.

An assessment that is completed will show an assessment score () in the Completion Report tab. An incomplete assessment will show an status.


To continue assessing an incomplete checklist, click the link.
Supervisor performing assessments:
Supervisors can help Administrators manage and perform Observation Checklist assessments. However, for a Supervisor to view and perform assessments, two conditions need to be met:
- The Supervisor must be assigned to manage the assigned User Group(s)
- The supervisor-managed user group must be assigned to the Observation Checklist course using the tabs. This means that even if members of a user group that is managed by a supervisor are assigned individually to an Observation Checklist course, the associated Supervisor will not be able to view and perform that assessment.

If the two conditions above are met, the assigned Supervisor will receive an email notification regarding a pending Observation Checklist course.
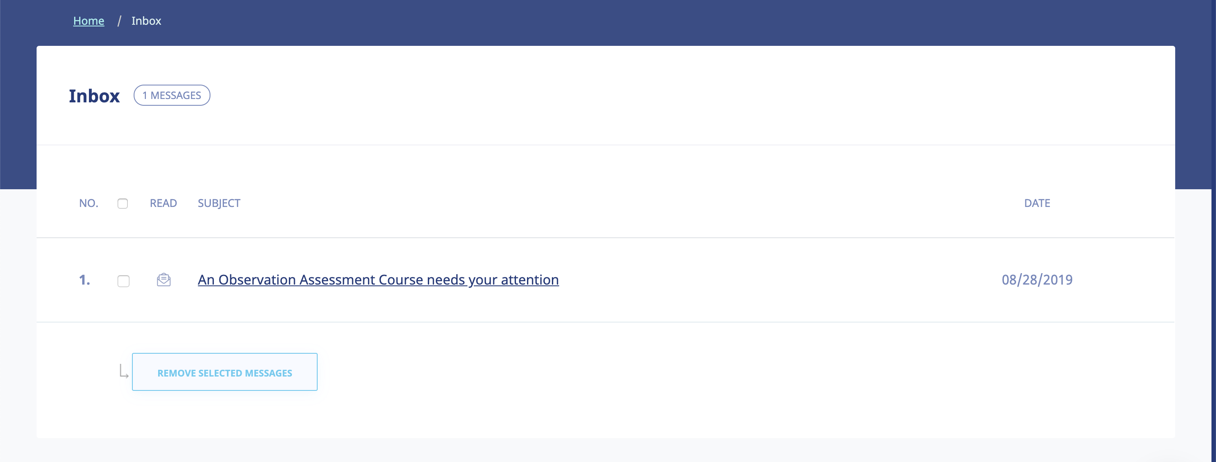
The supervisor can click on the link to go directly to the assigned and pending assessment.

Supervisors should also check their INBOX section of their accounts for additional notifications.
Once on the relevant Observation Checklist course to be assessed, the Supervisor can begin by clicking the button next to the learners’ name.
The Observation Checklist tool is designed to be used on any device any time anywhere. We encourage you to access and perform assessments on mobile devices, laptops and other devices. Once the Supervisor clicks the button next to each assigned user, they see a mobile responsive version of the tool to enable them to easily perform their assessment.
Click or, if on a mobile device, tap the various assessment grading options. For example, if you agree with Yes as the appropriate assessment for the binary statement, select or tap the [Yes] option.
If you need to save the current assessment and come back later, you can. Simply click the button. This button also works to finalize the assessment and move on to the next learner to be assessed.
An assessment that is completed will show an assessment score () in the Completion Report tab. An incomplete assessment will show an status.
To continue assessing an incomplete checklist, simply click the link.
Selecting Additional Observation Checklist Courses:
To select additional Observation Checklist courses to assess, use the drop-down selector to select the relevant course:
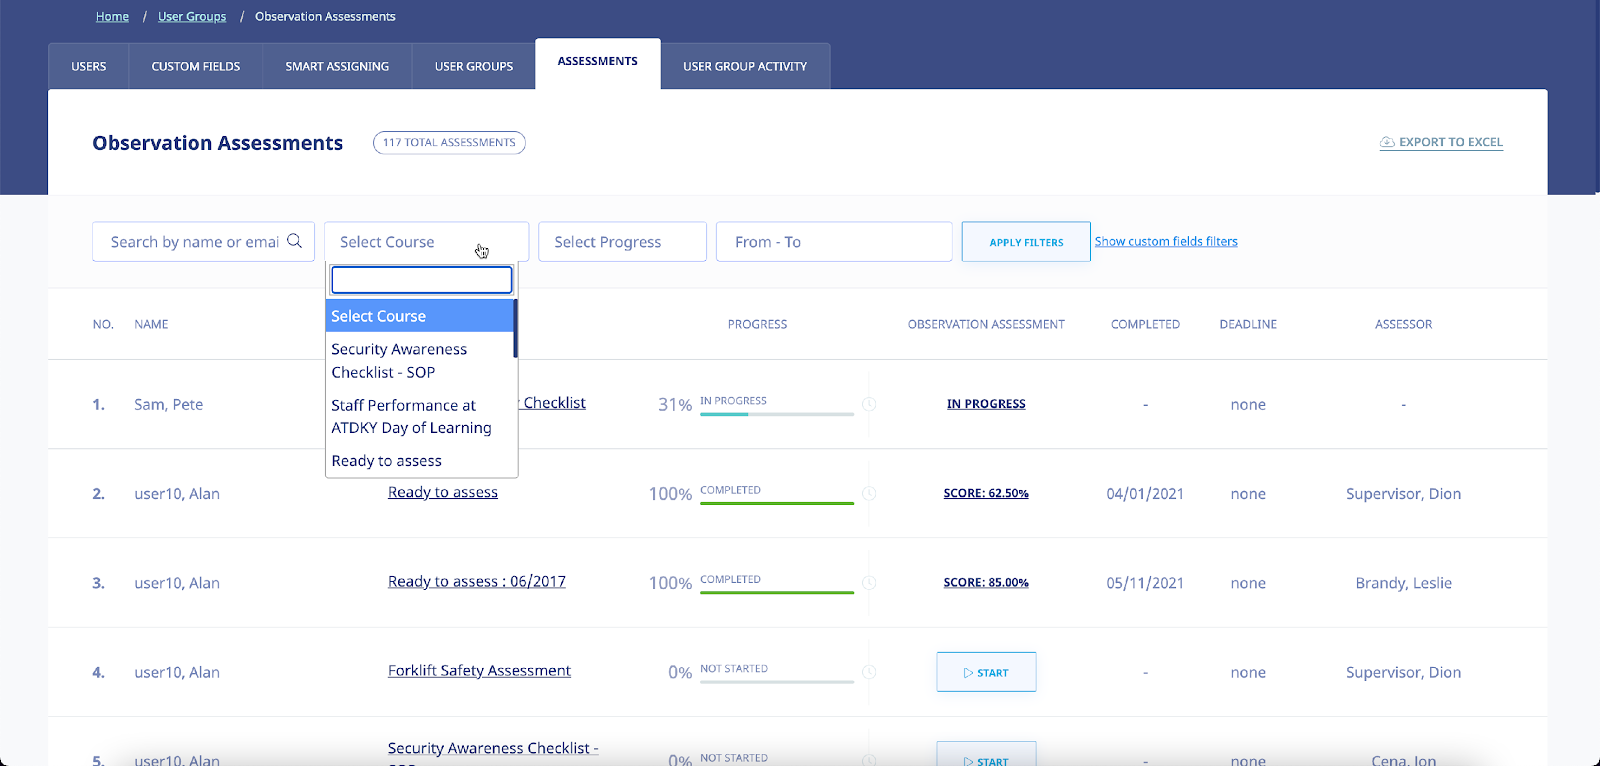
Once you select the relevant course, click the to see the assigned users to be assessed. Use the button to begin performing your assessment.

Note: As a supervisor, you can also perform assessments from the User Group Activity report page for the user groups you supervise. Simply, select the relevant course and if there are pending users to be assessed you will see the button next to their names.
Observation Assessment – Reports & Files
To access and download Observation Checklist(OC) type courses data, you have several options:
Stats Overview:
The Stats Overview gives you a summary of your OC course including Course Completion, Average Assessment Score, Lowest and. Highest Scored Statements.
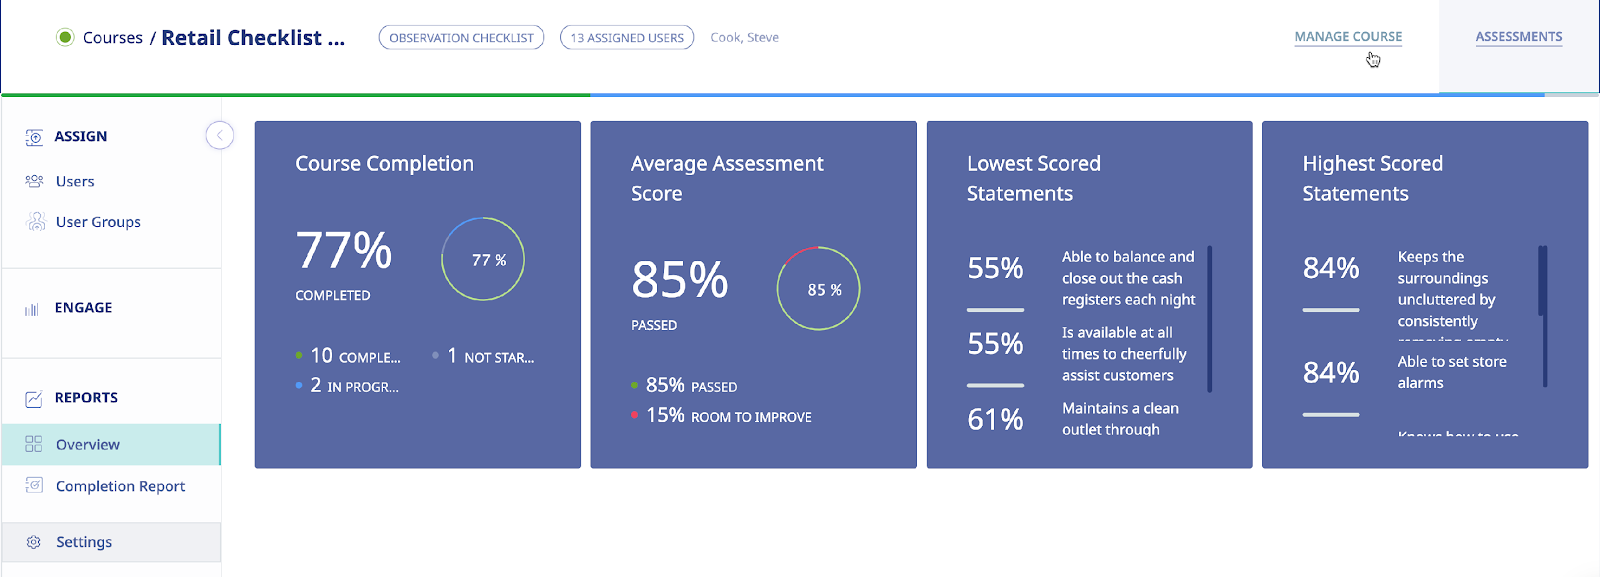
Completion Report
See details of your OC course completion by going to the [Completion Report] section of your Stats. From here you can see individual user reports, progress status, scores as well as date completed.
Use the filtering options to drill down into your report data.
Downloading Reports
To download reports from your OC course, you have several options:
Click the button to get the download options below.
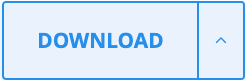
- Completion Report as XLS: Download this report to capture the on-screen data on completion.
- Completion Report as PDF: Download a PDF version of the completion report summary data.
- Assessment Data as XLS: Download the assessment data details in an Excel format.
Additional Report Options
- [Reports] > [HDD Report] > Files in OC Assessments
- [Reports] > [Feedback Reports] > Observation Course Feedback
Other Course Meta Features
Duplicating a Course
There may be times when you want to make use of a Course’s Chapters and Lessons, but perhaps add additional content to it, or remove content from it, to create a new Course. The Duplication option makes this a much quicker process than creating an additional Course from scratch. To duplicate a course, click the Course Submenu dropdown arrow in the Course Management tab.

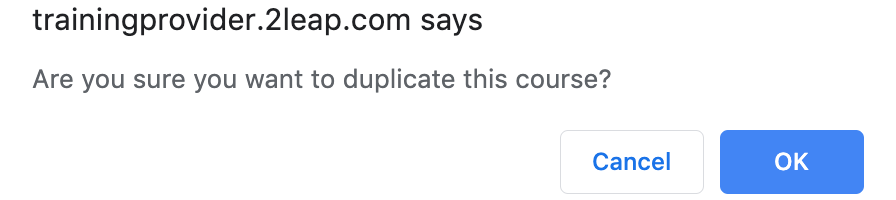
As shown in the following illustration, the system displays a warning message before proceeding with the duplication.
Click to proceed with the duplication or click to cancel the duplication process.
As shown in the following illustration, the system confirms that the Course has been duplicated, and you can click the View new course link to display the new Course.

As shown in the following illustration, the Manage course screen for the duplicated course is displayed, and you can now use any of the links and functionality available on this screen to modify the Course’s details and create an additional course.
Additionally, the duplicated Course is displayed on the Courses list within the Courses screen, as shown in the following illustration.
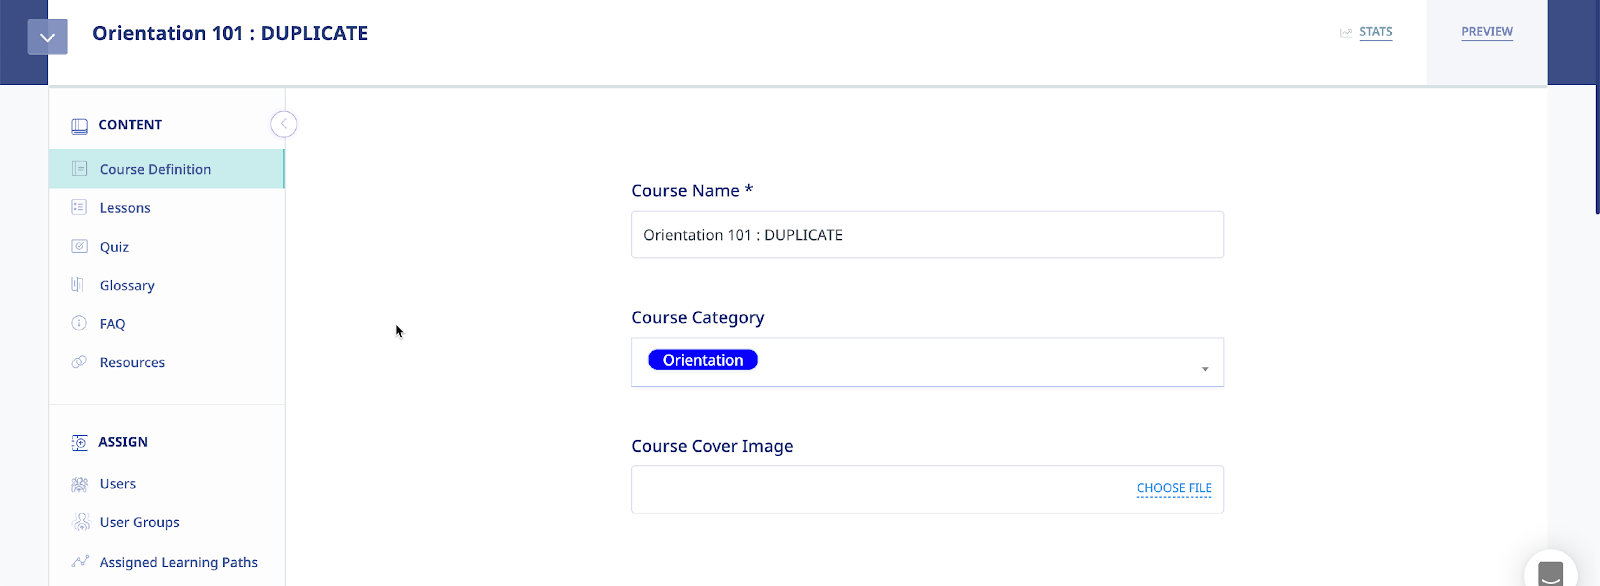
Editing a Course Title
Clicking a Course’s option on the Courses list allows you to make modifications to that Course including the title using the Course Definition screen, as shown in the illustration below.

Simply make any necessary changes to the Title within the Title field and click .

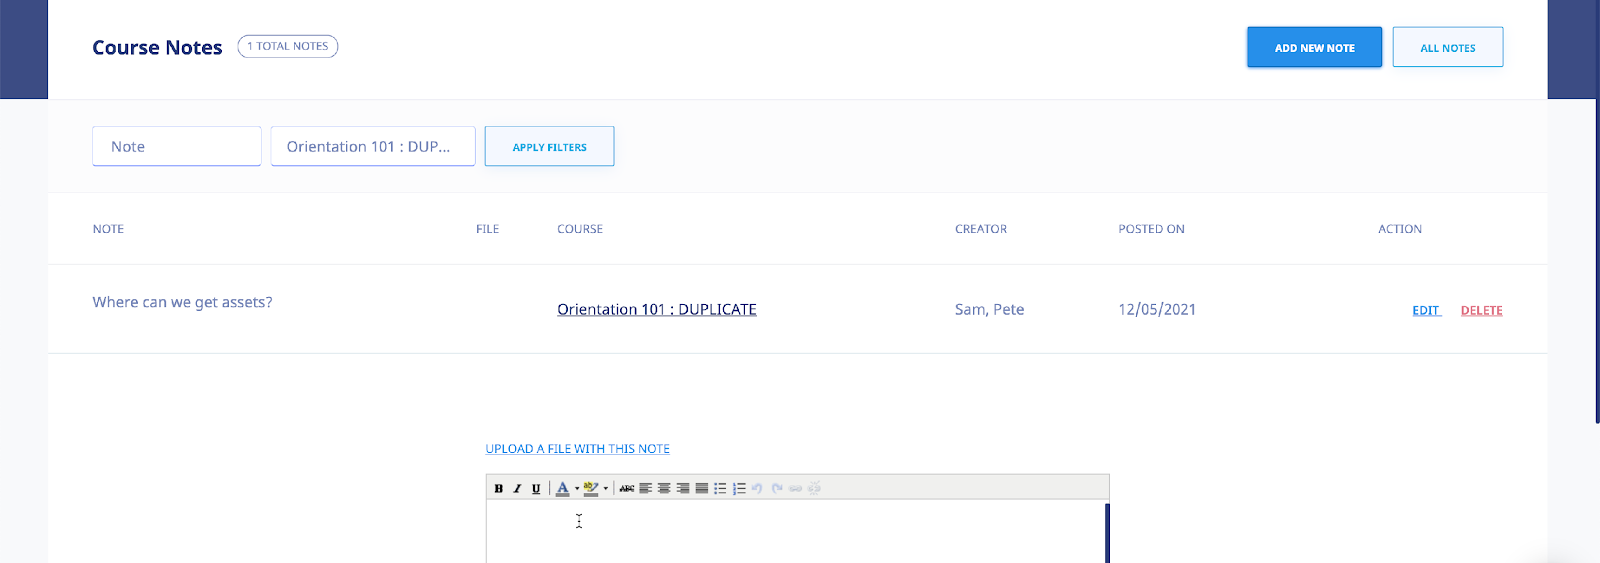
Course Notes and Memos
Add Course Notes which will only be visible to you (admins and to specific course instructors). Course Notes enable you to add version history and notes as well general or specific information pertaining to your training.
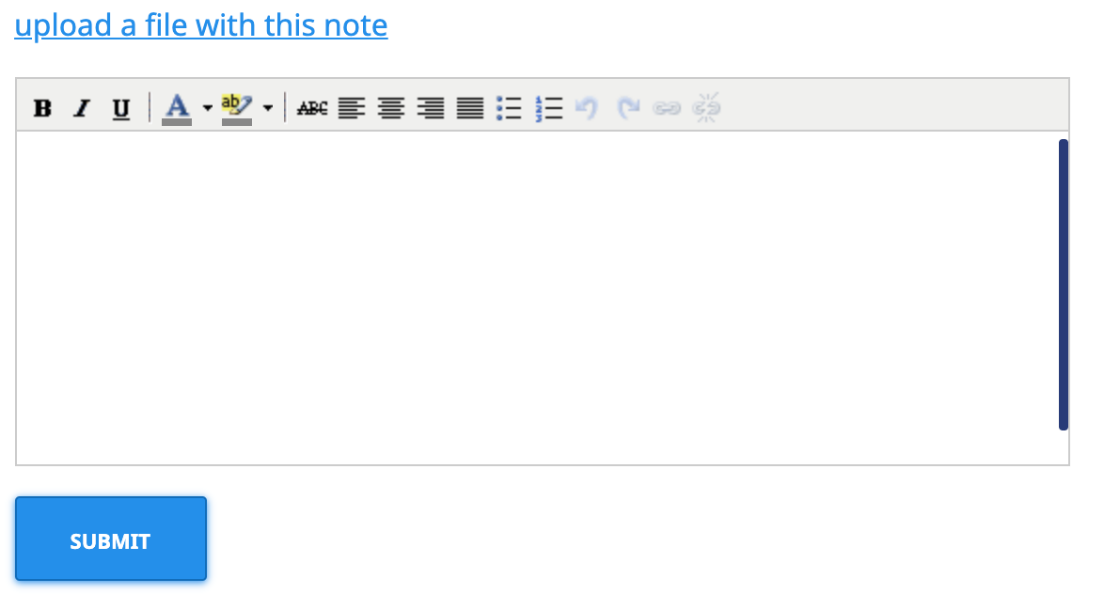
To add a Course Note, click the link from the Course Submenu dropdown. You can then click the link. You can now add your new Course Note including uploading Note files.


Search through course notes, one course at a time or search your entire collection of course notes.
Revise a Course
1. Starting a Course Revision:
- Accessing the Revision Feature: To revise a course, click on the downward arrow next to the course and select 'Revise'.
- Creating a Revision: Confirm the creation of a revised version of the course. This revision will be initially inactive, allowing you to make necessary changes without affecting the current version.
2. Making Changes to the Course:
- Editing Course Details: In the revised version, you can change various aspects such as the course duration, category, or course name.
- Adding Date Stamp: Every revision gets a date stamp based on the current date.
- Additional Modifications: Feel free to modify other elements like lessons, quizzes, including the number of questions.
3. Finalizing and Activating the Revised Course:
- Saving Changes: After making all the desired changes, save your progress.
- Activating the Course: To release the revised course, activate it by confirming that you have completed all changes.
4. Notifying Users:
- Course Notification: Decide whether to send notifications to users about the course revision.
- Email and Inbox Notification: Upon confirmation, the course gets activated, and users receive an email along with an inbox notification.
5. Course Completion and E-Signature:
- End-User View: Users will see the course revision update and can complete the revised course.
- E-Signature Requirement: Completion of the course requires an e-signature. Users can sign using their saved credentials.
6. Admin View and Completion Report:
- Accessing Completion Reports: As an admin, you can view the completion reports, which include both current and previous completions.
- Completion Status: The report shows completion dates and e-signatures for each completion.
- Downloading Reports: You can download these reports, which indicate the course name and version for easy identification.
Deleting a Course
Clicking the link from the Course Submenu dropdown, for a Course allows you to remove that Course from the system. Before performing the deletion, the system displays a warning message, illustrated below, to ensure that is your intention. Enter the word ‘DELETE’ and then click the [DELETE] button to proceed with the deletion or click to cancel the deletion process.

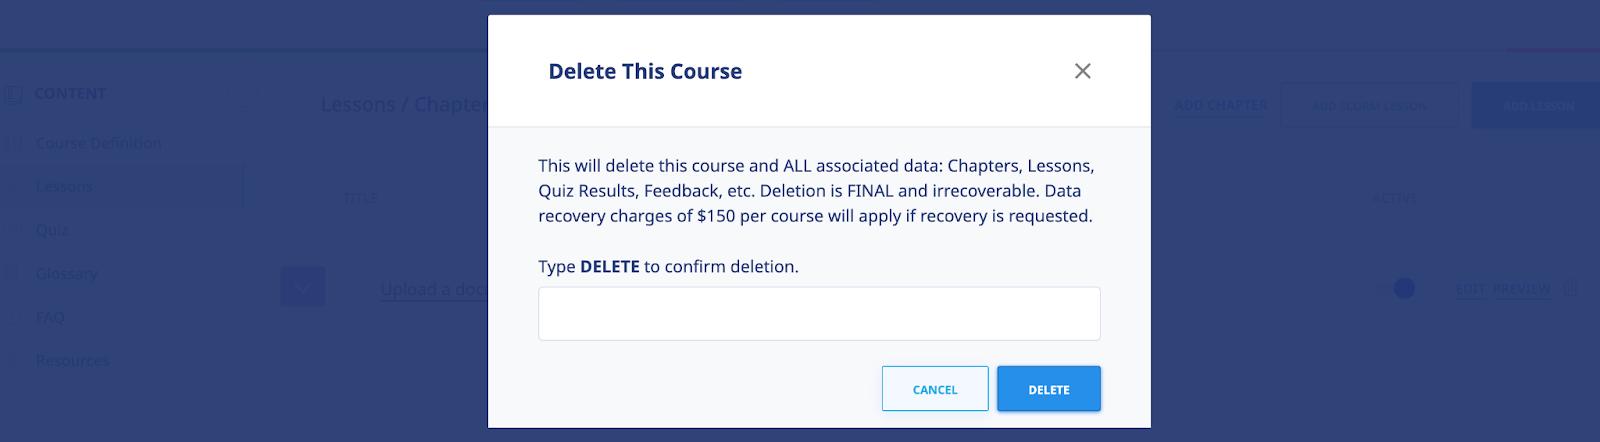
Please note that all data, including Chapters, Lessons, Quiz Results, Feedback, etc., will be removed and is irrecoverable.
Creating a Glossary
A glossary is a list of terms and definitions. Traditionally, a Glossary appears at the end of a book and includes terms within that book that are either newly introduced or are at least uncommon. Clicking from the Course submenu displays the Glossary screen, illustrated below, which allows you to add a Glossary of Terms to a Course. As shown in the illustration, click the button to add a new Glossary Term.

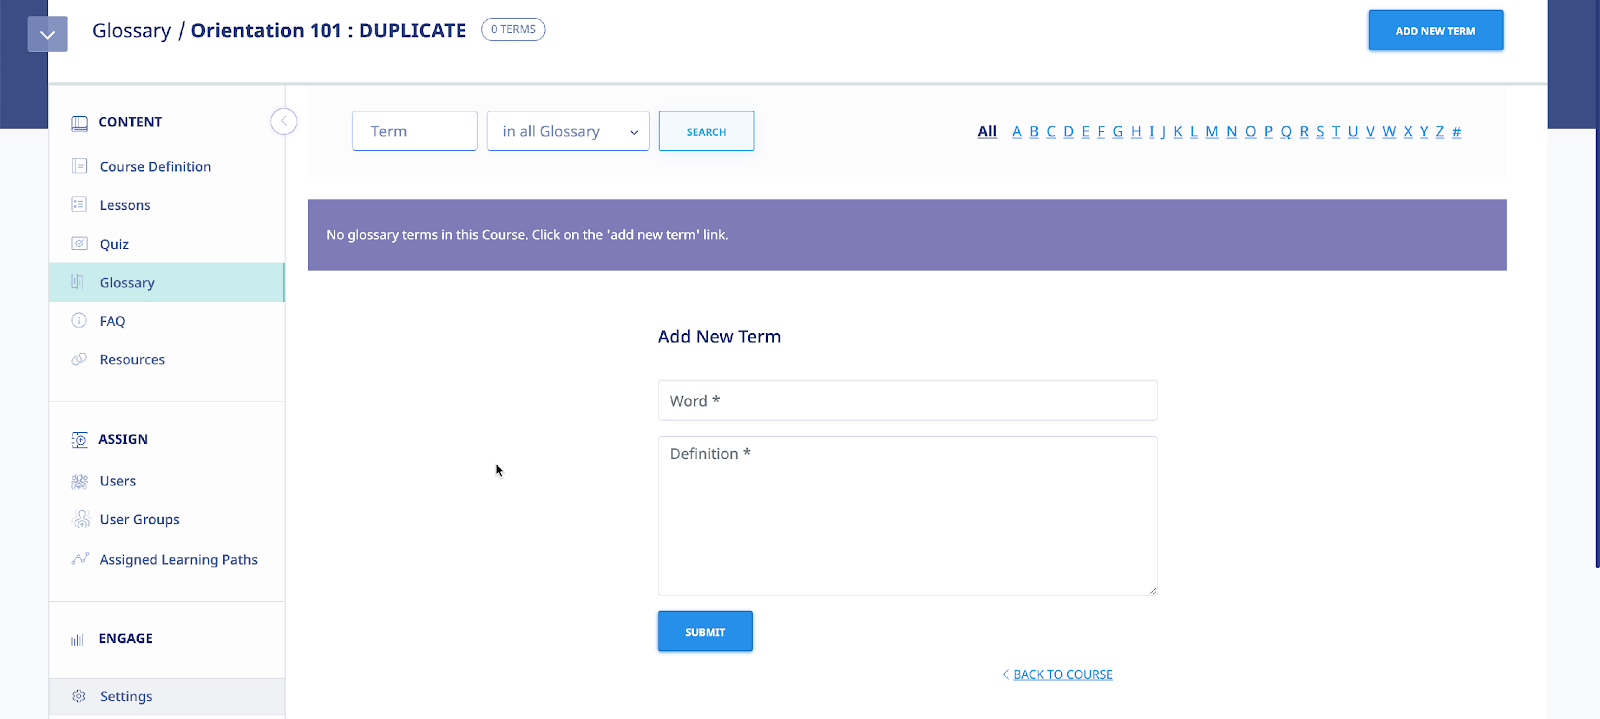
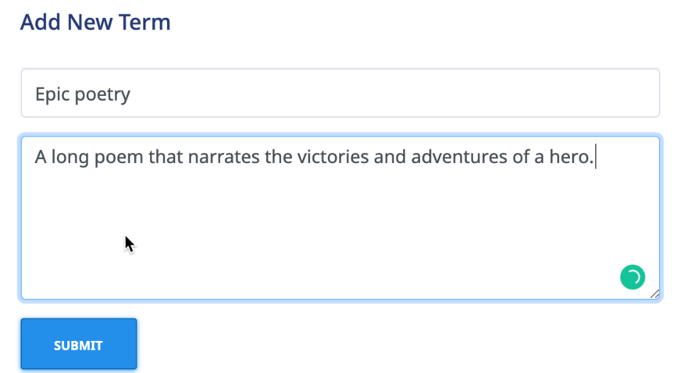
The Add New Term screen, illustrated below, is displayed. Enter the Glossary Term within the Word field, the Definition for the Glossary Term in the Definition field, and then click to save the Glossary Term to the system.

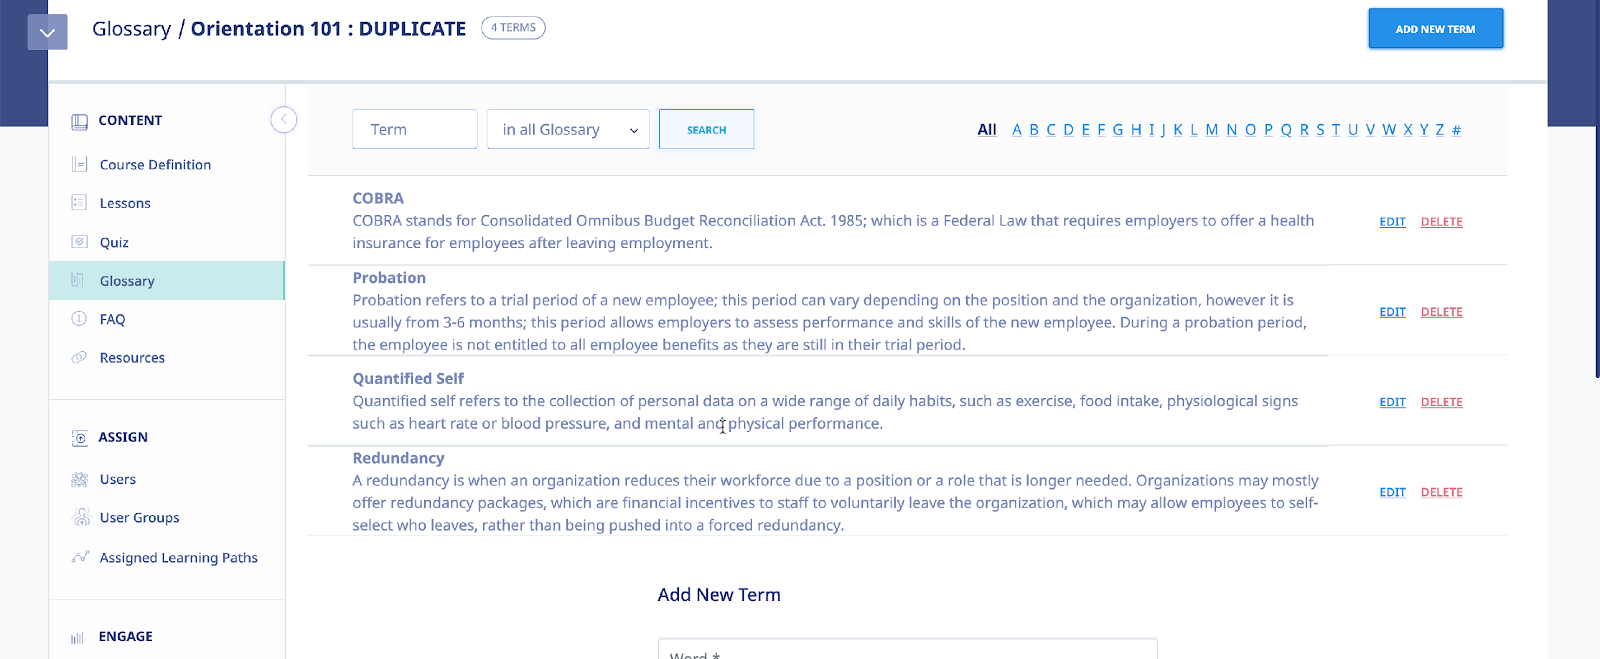
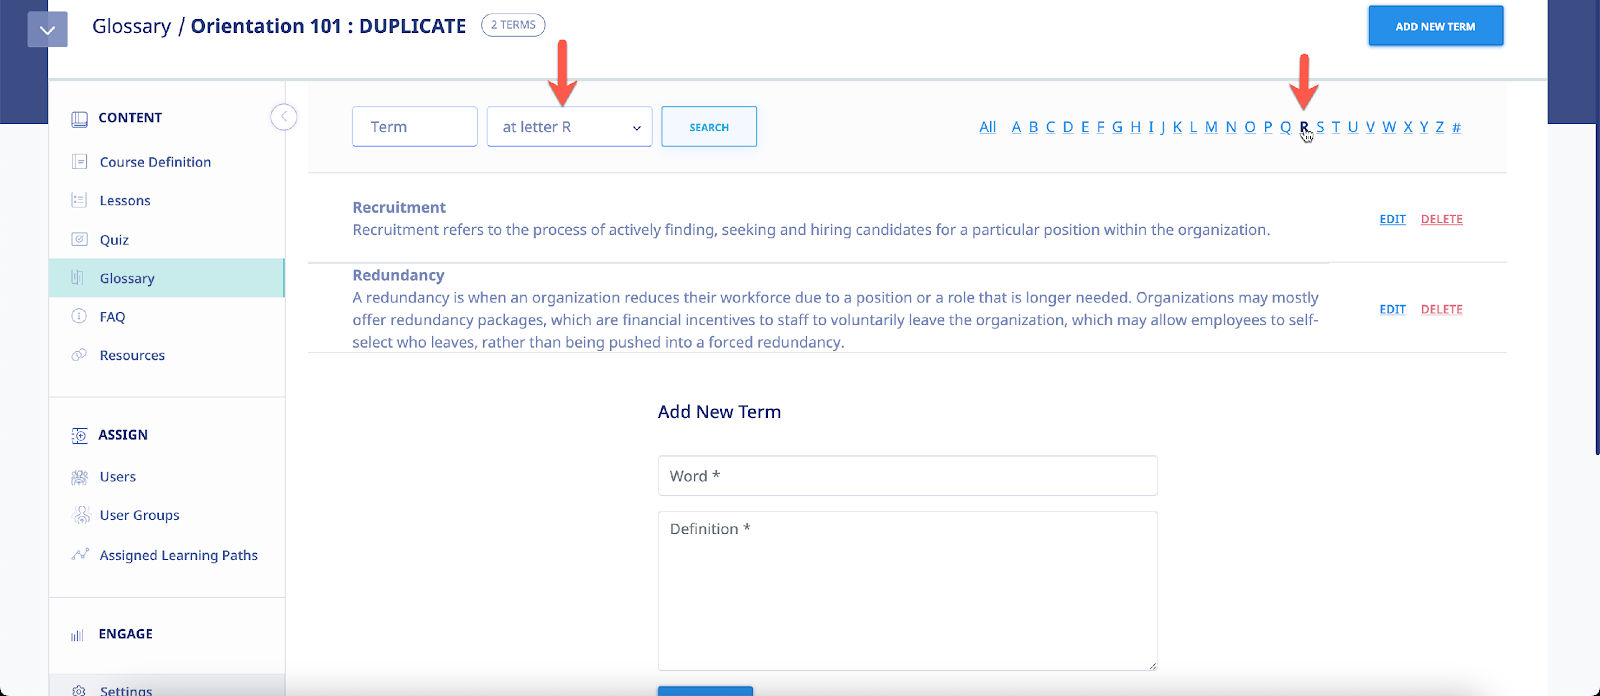
As shown in the following illustration, the Glossary Term is added to the Glossary associated with this Course. Once you have added more than one screen load of Glossary Terms, you can quickly locate specific terms for editing purposes by entering the term in the Term field and/or making a selection from the Search Parameters list, and then clicking .

You can also quickly locate all of the Glossary Terms that begin with the same letter by selecting that letter on the Letter bar. As shown in the following illustration, clicking the letter R displays the Glossary Term that we just added.
You can click add new term as many times as necessary to add additional Glossary Terms, and you can click the edit link for a line on the Glossary Terms list to modify a term’s Word or Definition, or click the delete link to remove that term from the Glossary.
Creating an FAQ Database
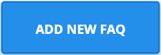
Clicking from the Course submenu allows you to create a database of FAQ information associated with the Course using the FAQ screen, illustrated below. As shown in the illustration, this screen is blank as you begin to create your FAQ material. Click the button to create a new Frequently Asked Question.

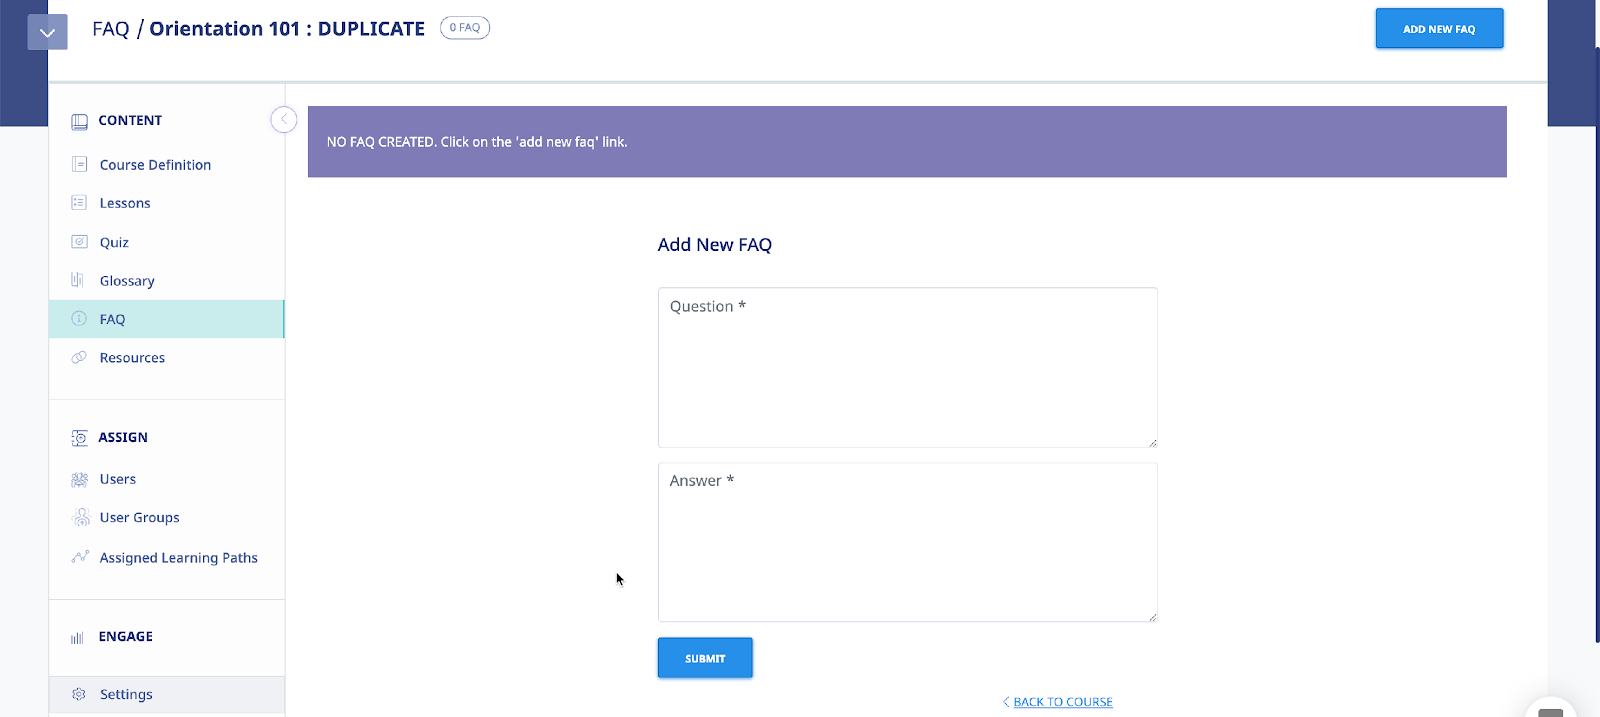
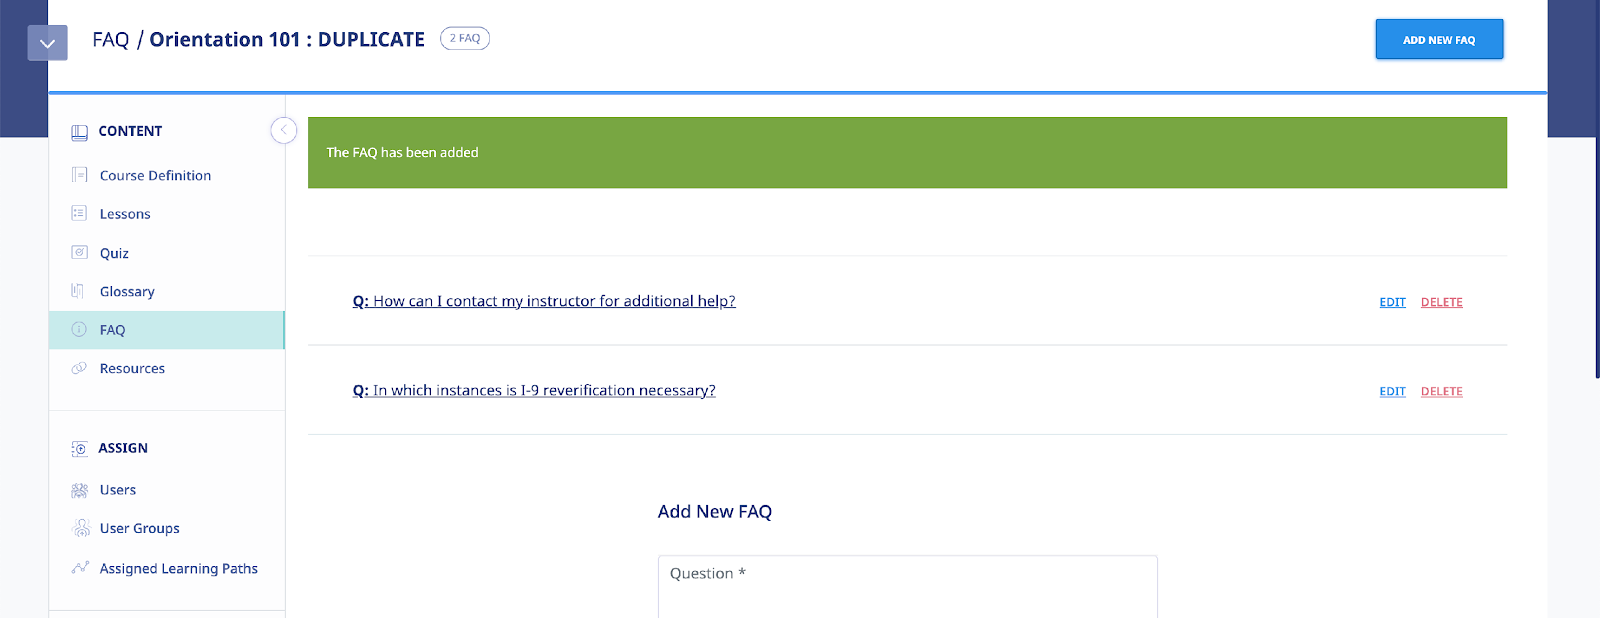
The Add New FAQ screen, illustrated below, is displayed. Simply add your question in the Question box, enter the answer to that question in the Answer box, and then click .
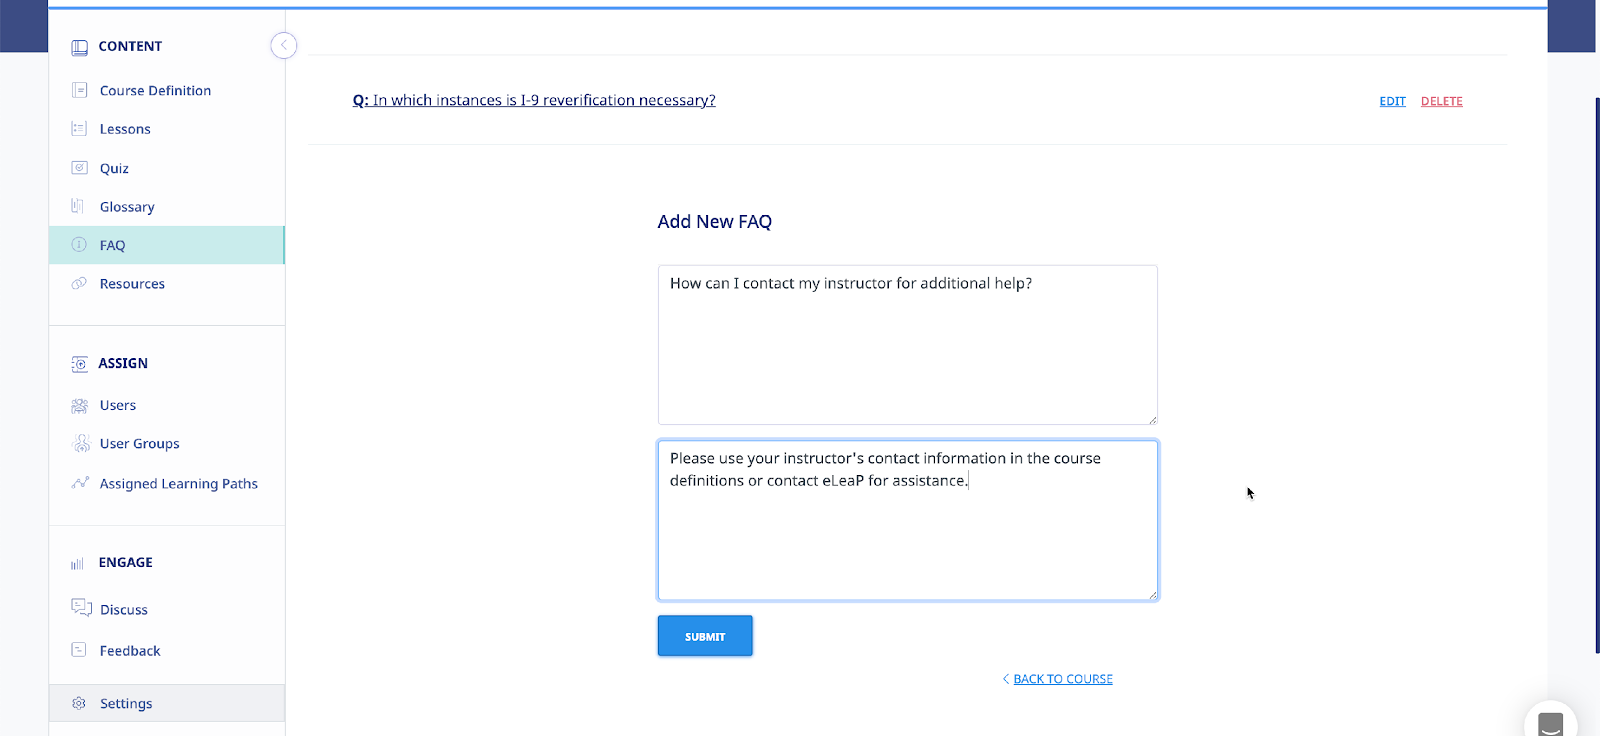
As shown in the following illustration, the system confirms that the FAQ has been added and displays it on an FAQ list.
Clicking the Question on the FAQ list displays the answer beneath it, as shown in the following illustration.
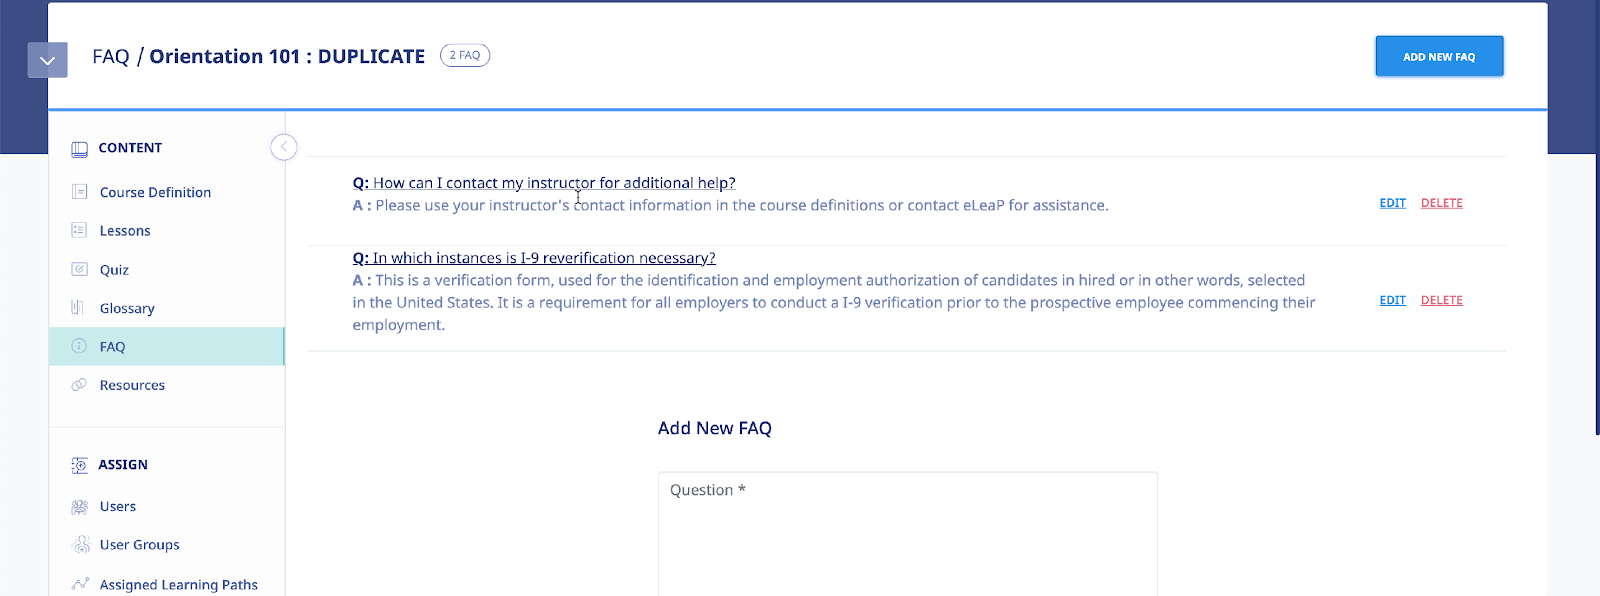
You can now click the button to add additional FAQs, click the edit link to edit the currently selected FAQ, or click the delete link to delete the currently selected FAQ.
Adding Web Resources
Clicking from the Course submenu displays the Resources screen, illustrated below, which you can use to associate various Resources with a Course via that Resource’s URL. This screen will be empty the first time that you access it. You will need to click the button to add Resources to a Course.


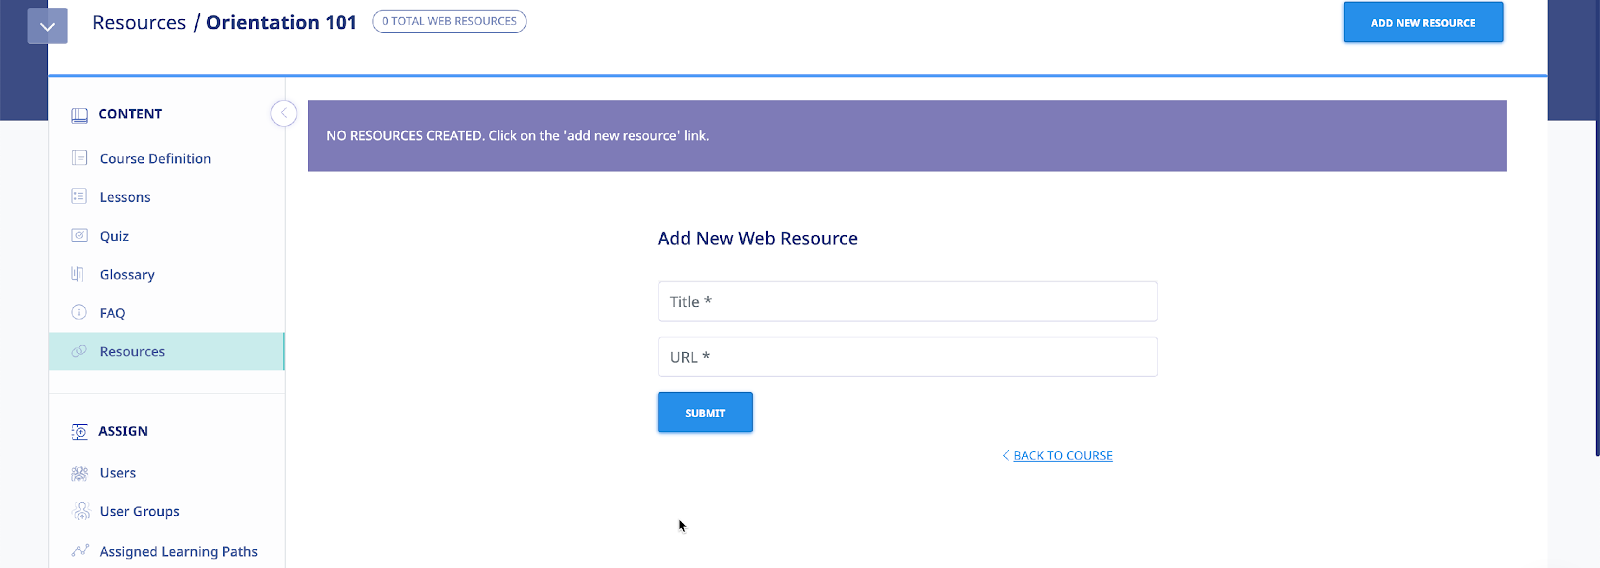
The Add New Web Resource screen, illustrated below, is displayed. Enter the Resource’s Title in the Title field, its URL in the URL field, and then click .

As shown in the following illustration, the system confirms that the Resource has been added to the Resources list. You can now click the button to add an additional resource, click the edit link for the Resource to make modifications to its details, if necessary, or click the delete link to remove the Resource.

Feedback Assessment Tool
When the Feedback function is activated , the tab will appear in the assigned course submenu, as shown in the illustration below, providing you with access to the Feedback Assessment Tool.


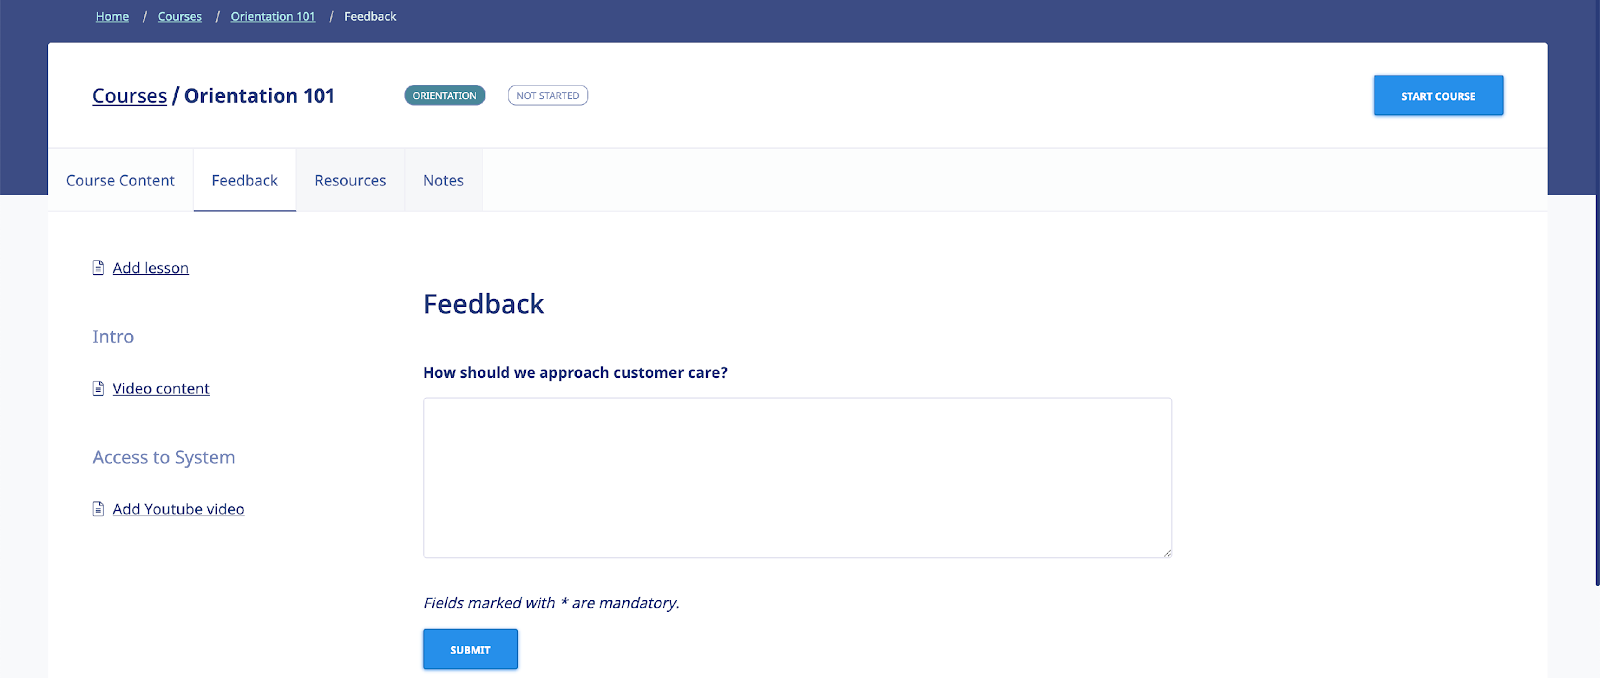
Post-Course Assessment or Feedback is a great tool to measure how well your e-learning or training program is achieving its objectives. Do you want to know which areas of your course need improvement? How about how effectively you are training and testing your trainees? Can you improve your use of multimedia presentations?
These are important questions. Use the eLeaP™ system feedback option to gather critical intelligence that will enhance your e-learning and training program.
eLeaP™ wants you to succeed so we have created this simple yet powerful Post-Course Feedback assessment tool.
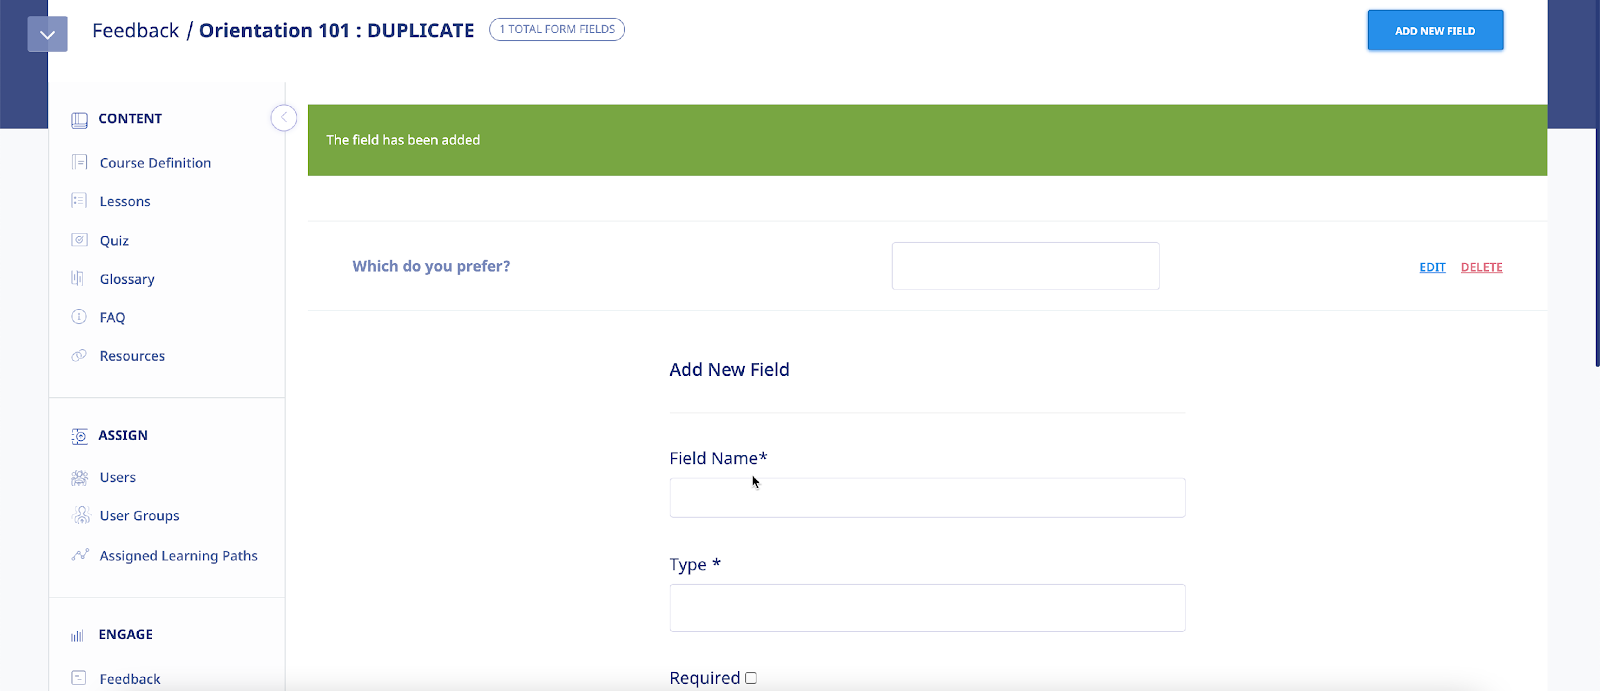
Add Feedback Form Fields
Clicking from the Course submenu will display the Feedback Form screen, illustrated below. To construct a Feedback Form, begin by clicking the button, as shown in the following illustration.


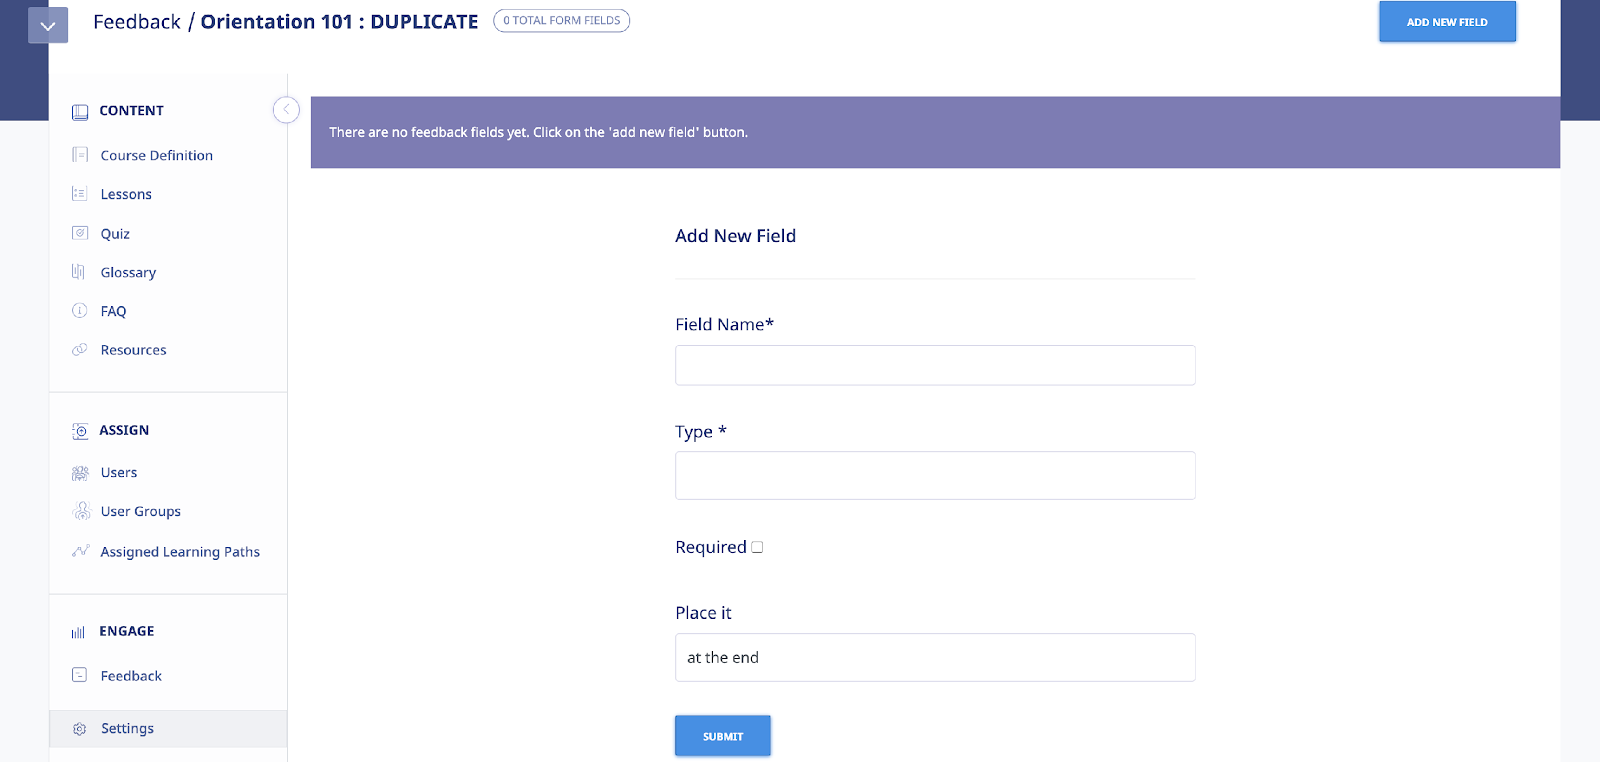
The Add Field screen, illustrated below, is displayed.
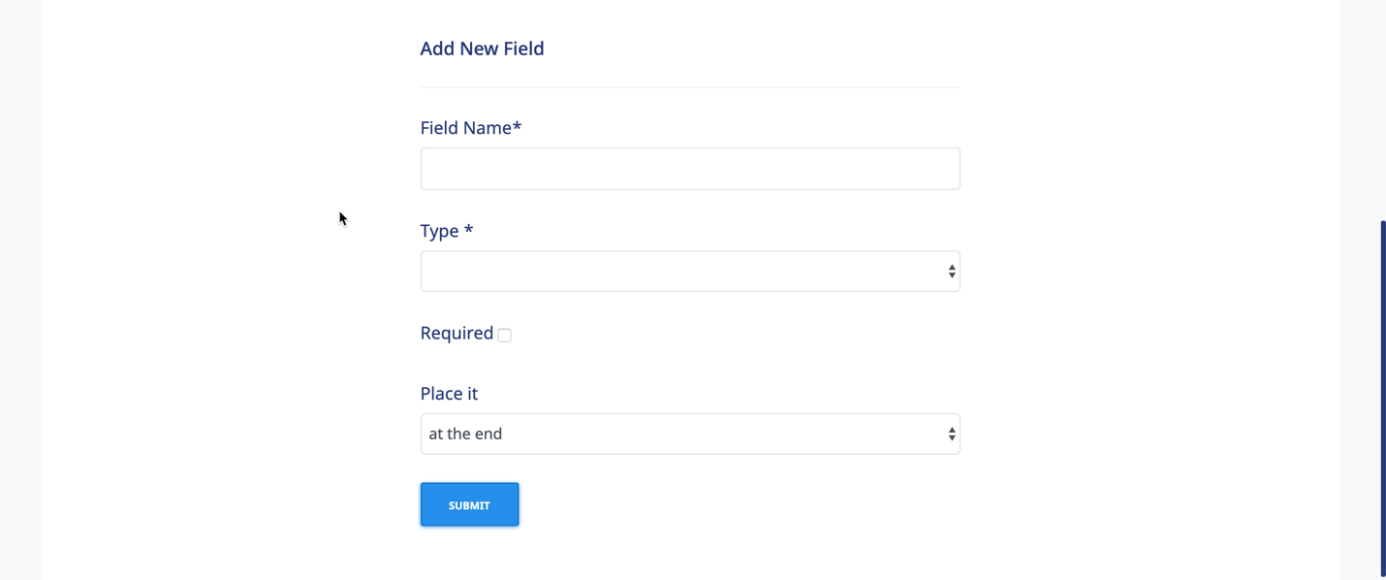
- Enter a name for the new Field in the Field Name field.
- Select a type for the new Field from the Type list.
Types of Feedback Form Fields
- Title: for user titles such as Mr., Mrs., Ms., Dr., etc.
- Text Area: for comment or short essay-type feedback
- Check Box: if you want your users to be able to check the relevant option(s). Example of feedback options include: Yes or No, True or False, Will you take this course again, Which of these answers apply to you?
- Combo List: To allow your users to select from several options. Simply separate the various options using comma (,). For example, if you want your users to rate your course:
- Field name: Please rate your experience with XYZ course.
- Type: Combo List
- Required: Checked
- Value list: I really loved it, Not bad, Ok I guess, Horrible, Don’t want to ever take this course
- Place it: Wherever you like!
- [Add Field]
- Select the Required check box to make the new Field a required field.
- Make a selection from the Place it list to indicate where the new field will be placed. Additional options will be available here once you have added a number of fields. Let’s say you have created 20 feedback fields and then you realized you needed to ask for some more demographic information in field number 5; simply create the necessary new field, use the [Place it] tool to insert the new feedback question or field in the relevant position.
- Click . The system confirms that the new Field has been added. You can now re-use the add new field link to add as many additional fields as you need to complete the Feedback Form.
Note: Make sure you have (in your Course Settings page) toggled [Active Feedback] to ON. This will make your feedback assessment available to your users.
Discuss/Course-Specific Forum
When the Discuss function is activated in the Course Settings screen during the creation of a Course, the icon will appear in the assigned course submenu, as shown in the following illustration, providing you with access to a course-specific discussion board for the Course. Informal learning is a powerful yet under-appreciated asset. Many organizations can benefit from providing a forum for discussions and the exchange of ideas. Why don’t you set the ball rolling, and break the ice so to speak, by creating a topic of conversation?


To work with the Discuss feature, begin by clicking the button, as shown in the following illustration.

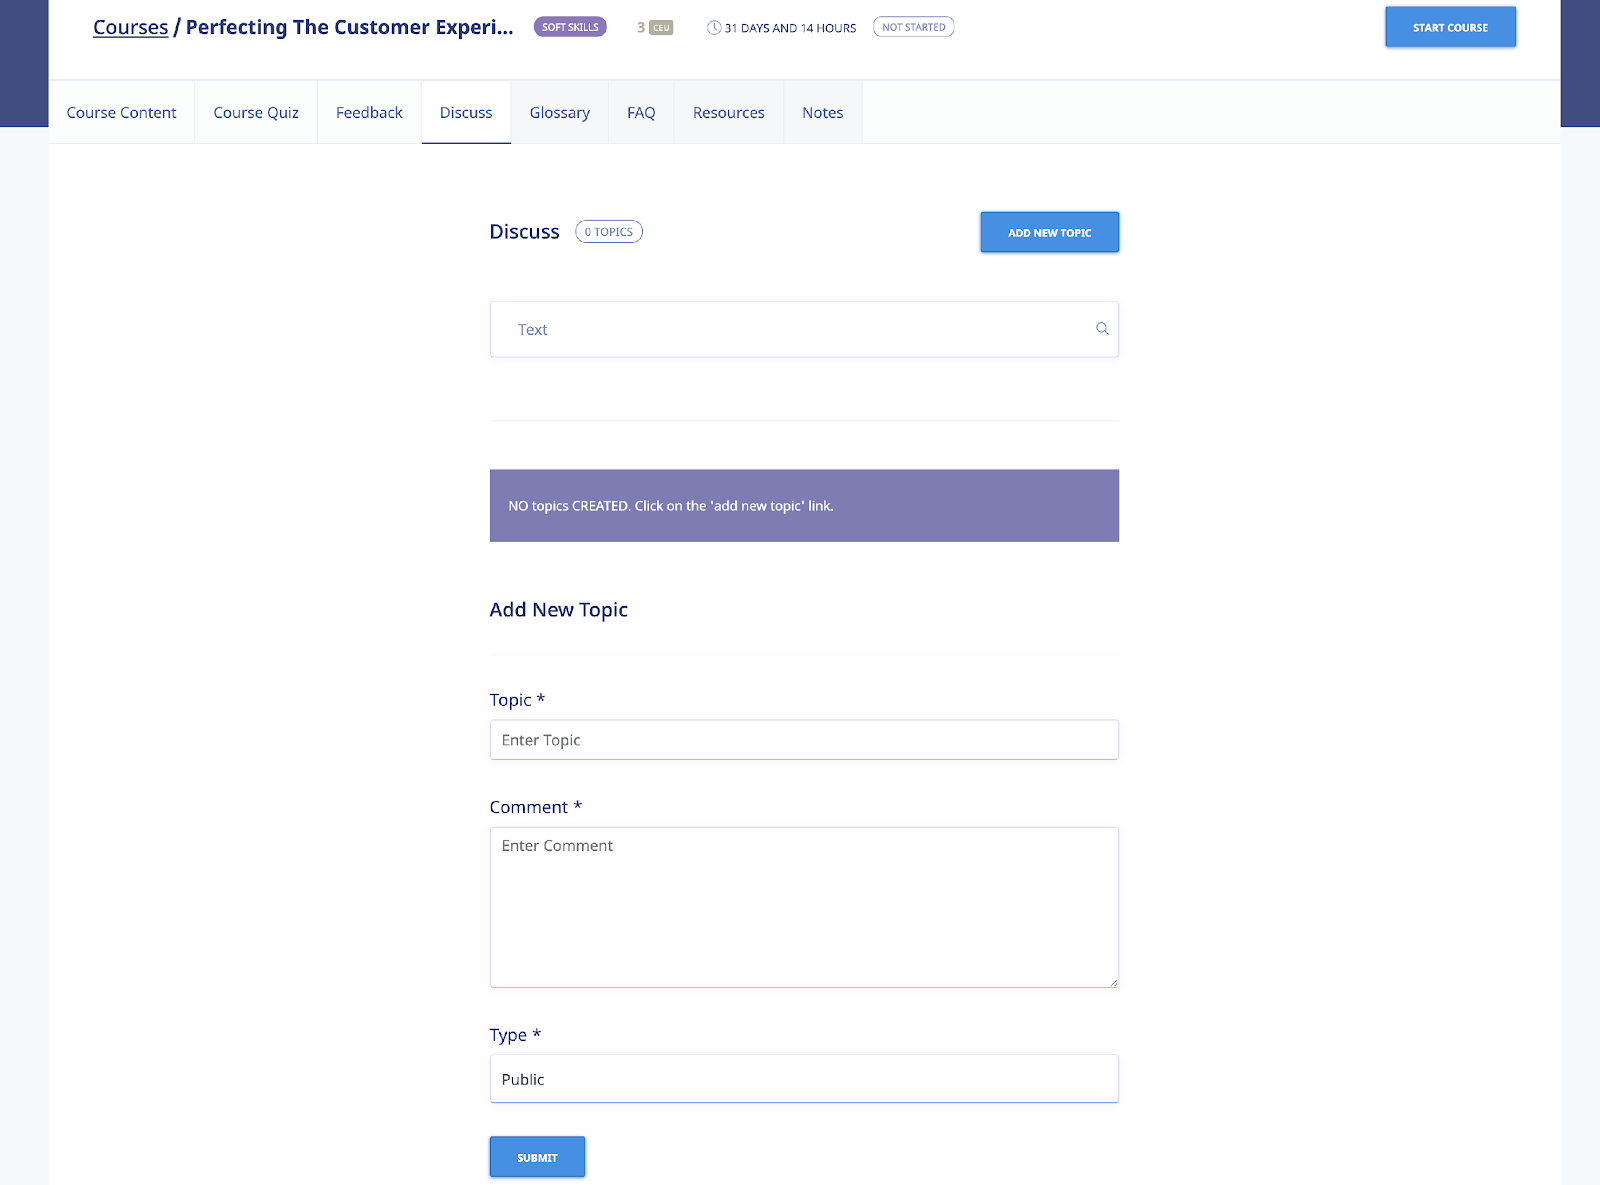
The Add New Topic screen, illustrated below, is displayed.
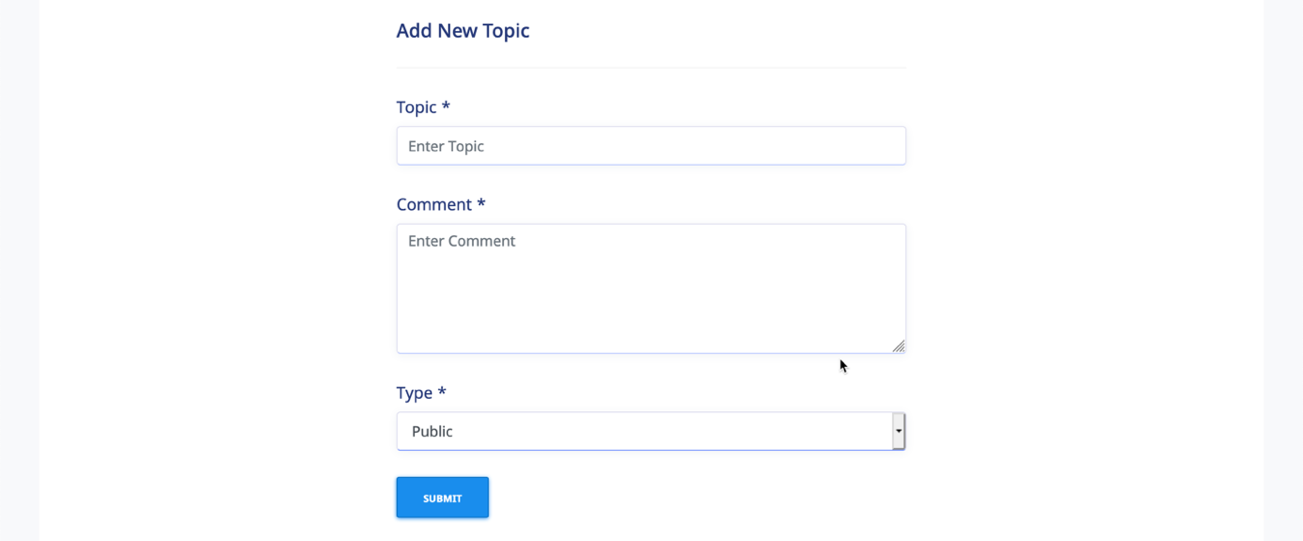
- Enter the new Topic’s name in the Name field.
- Enter a Comment pertaining to the new Topic in the Comment field.
- Select a Type for the new Topic from the Type drop down. Available options are Public (access to students and the instructor(s) or Private – goes to your instructor only.
- Click . This will get your users started on sharing ideas, strategies, and best practices. This is how to get your informal learning system started. The system confirms that the new Topic has been added to the Whiteboard, as shown in the following illustration.
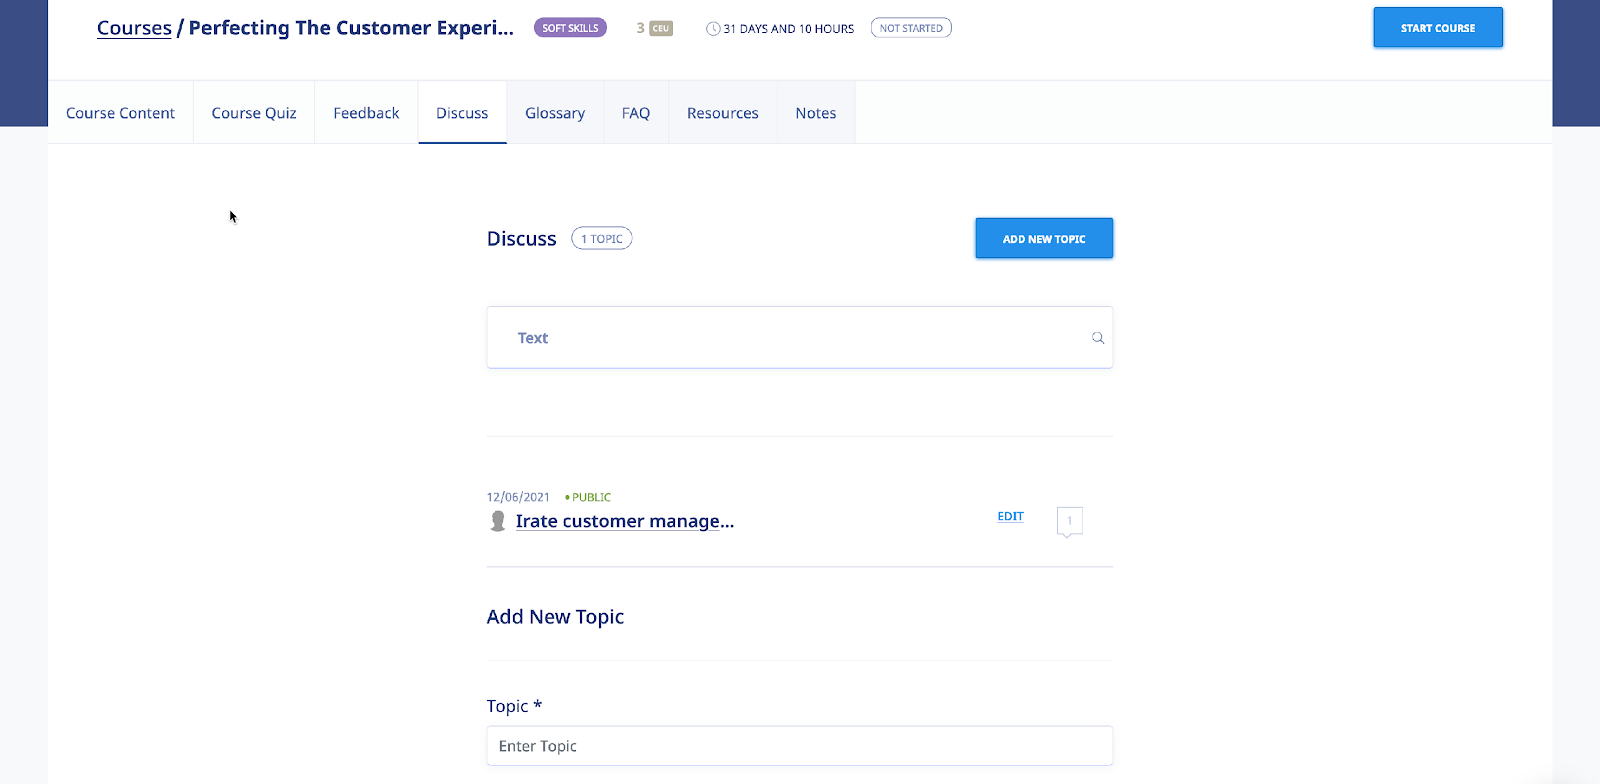
As shown in the following illustration, the Topic is now on the Topic list and you can continue to add additional Topics, as necessary, by re-using the add new topic link.
Additionally, clicking on the Topic Name displays the Topic Details screen, as shown in the following illustration.
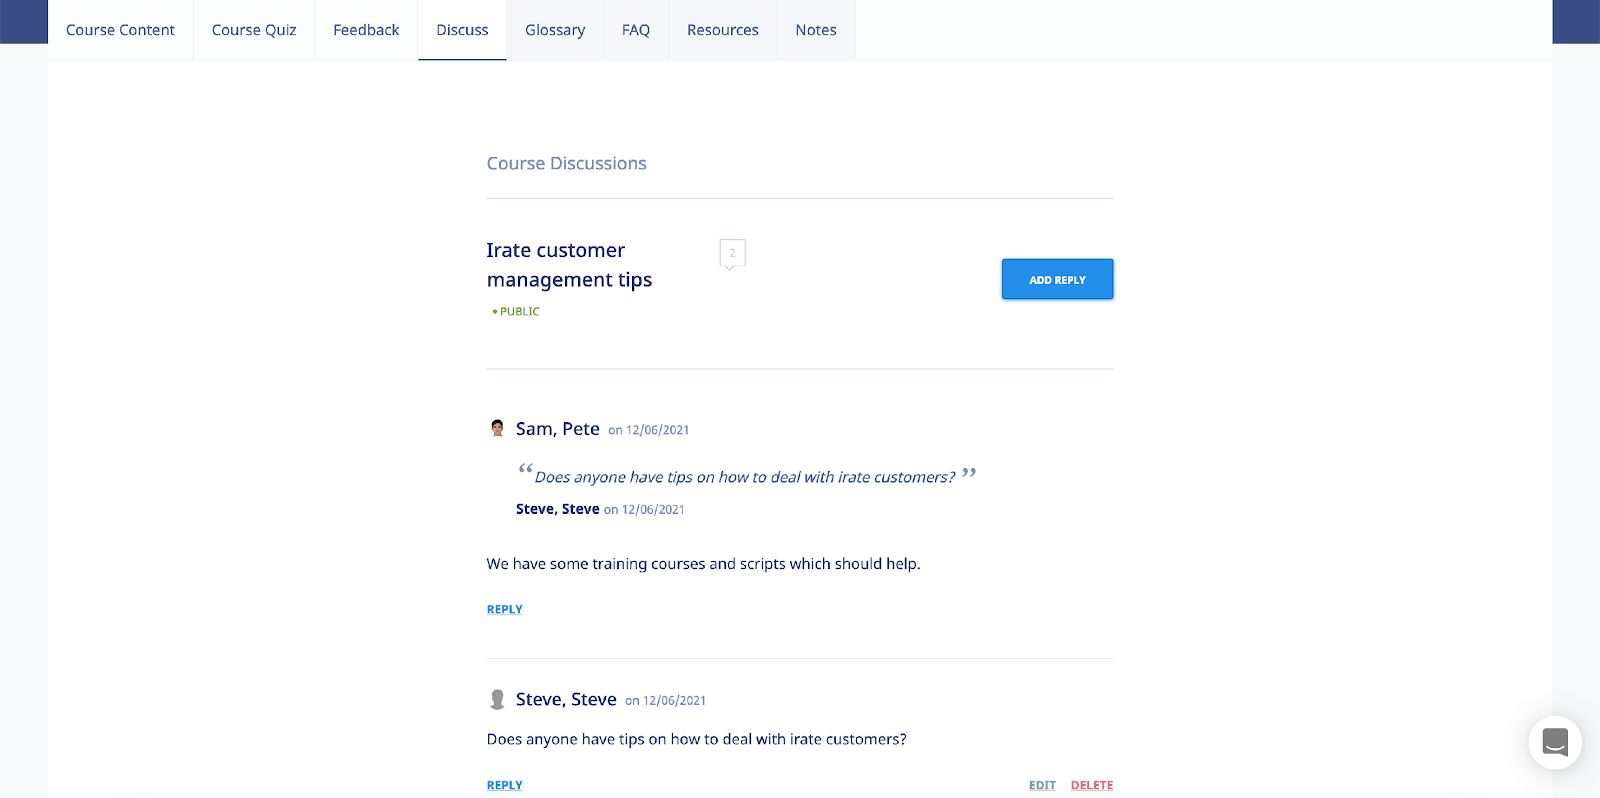
Now your users can select the add your comment link to add their comment(s), and other Users and/or the Instructor can use the reply link to respond, expanding the dialog between those with access to the Topic.
eLeaP™ wants to help you succeed. Use these powerful tools to enhance the learning experience of your users or trainees.
Instructors
Selecting the INSTRUCTORS line in the Course Definitions screen displays any additional Instructors that can be added to the current course.
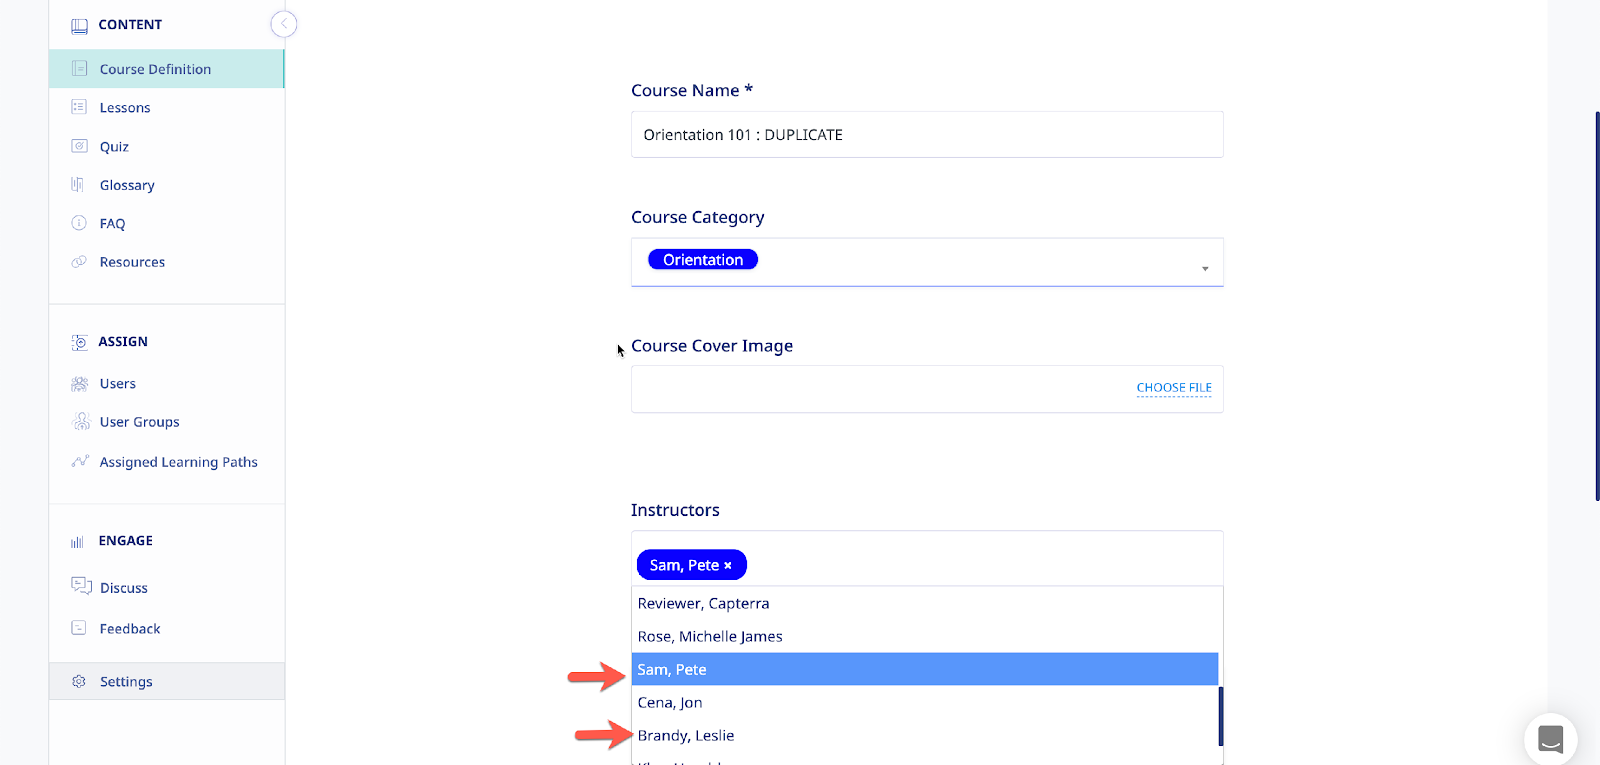
Adding an Instructor
To add additional instructors to the current course, click anywhere in the Instructors box and select the specific name you wish to add to the course. You can also remove any existing instructors by clicking the [x] next to their names.

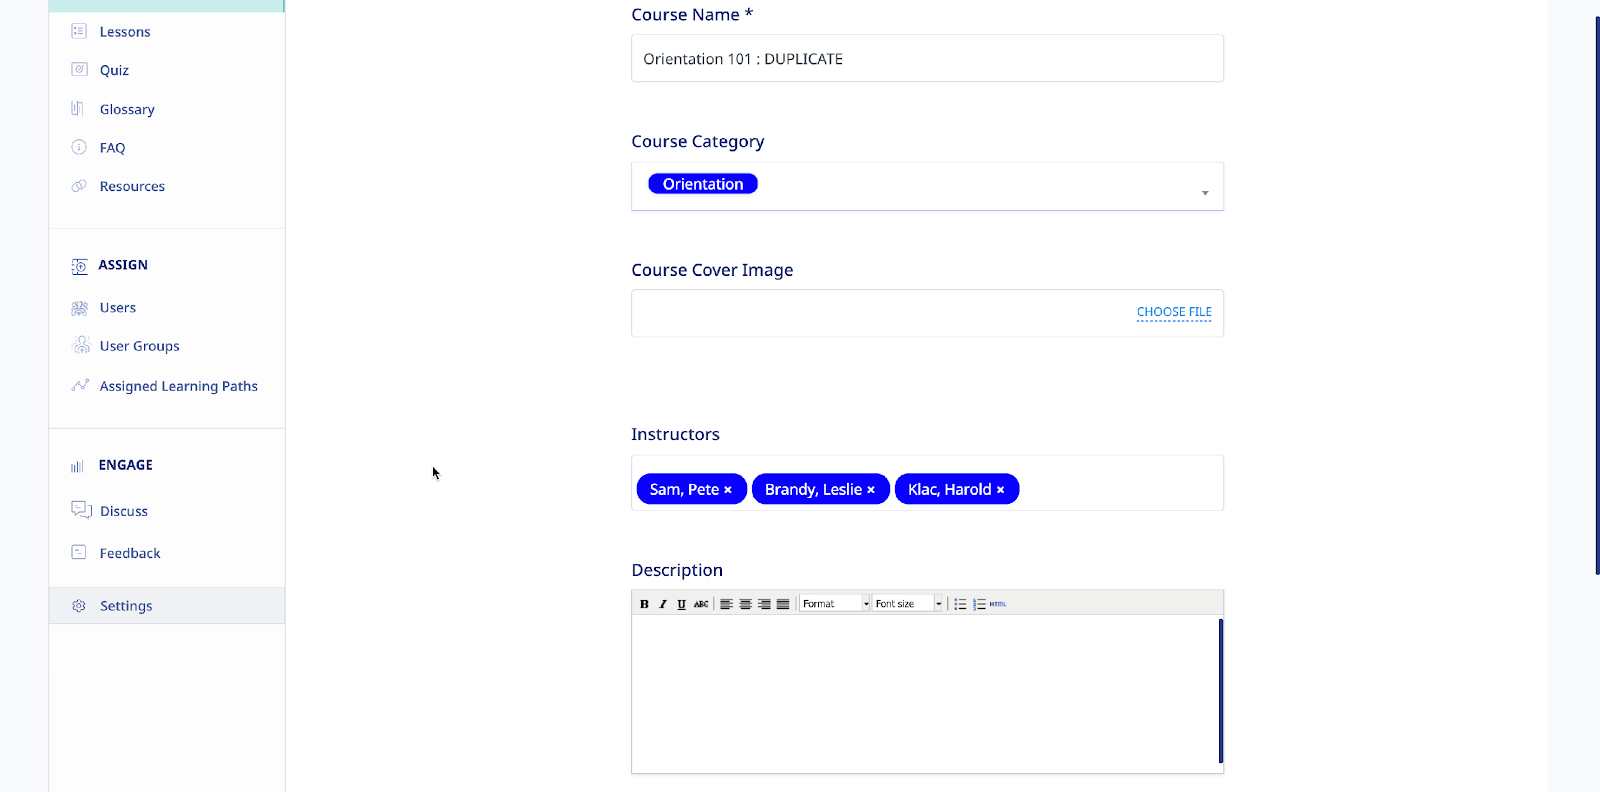
The new Instructor will be added to the Instructors list on the Instructors screen, as shown in the following illustration.
Deleting an Instructor
Clicking the [x] next to an existing course Instructor’s name will remove that instructor from the current course. Please note this does not delete the instructors’ account; merely removing from co-managing the current course

If you are satisfied with your change, click the to lock in your changes.

Assigned Users
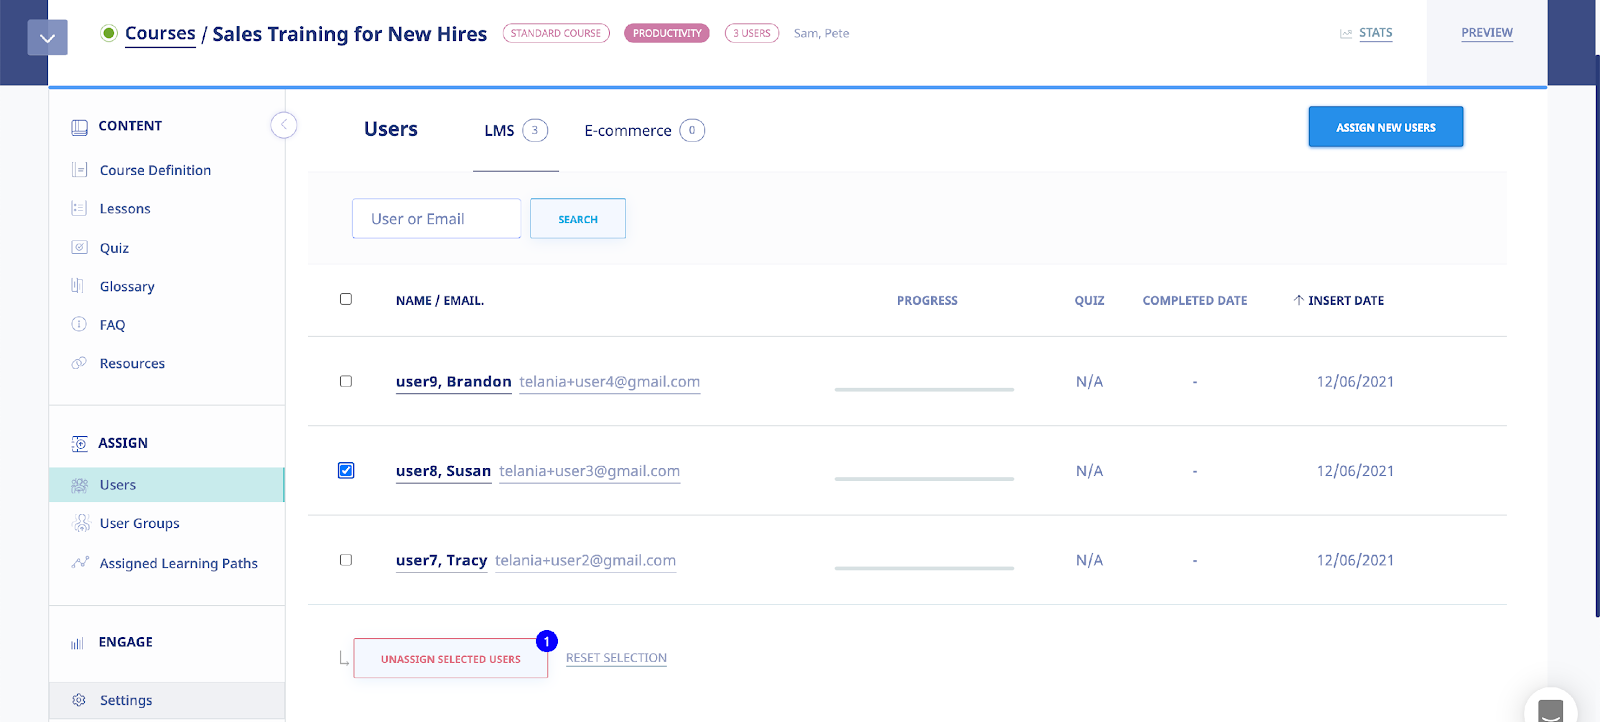
Selecting the submenu item from the section in the Manage Course screen displays the Assigned Users screen, illustrated below. This screen is used to assign Users within the system to a Course. To begin the process, click the button.

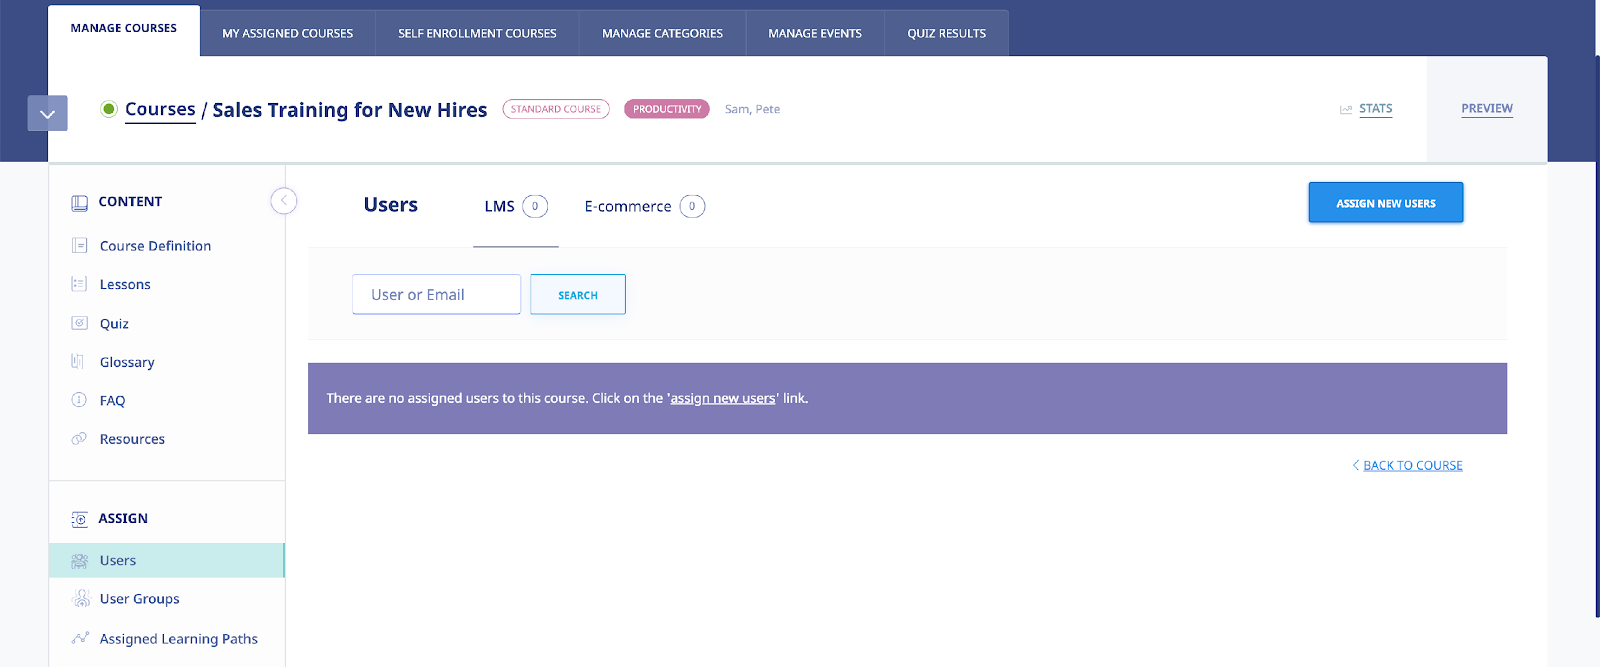
The Assign Users screen, illustrated below, is displayed. You can filter the Users displayed here by entering a Name in the Name field, selecting a User Type from the User Type list, and/or selecting a User Group from the User Group list, and then clicking .

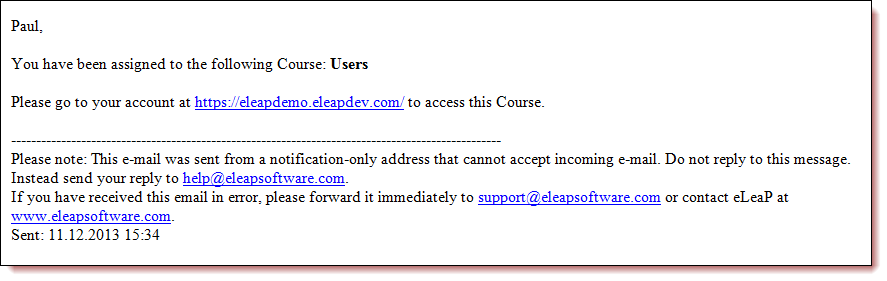
To assign Users to the Course, select their check box on the Users list, and then click . As shown in the following illustration, the system confirms that the Users have been added. You can click a User’s Email link to send them Notification Emails pertaining to the Course at any time. Additionally, you can once again select the assign new users link to add additional Users or select Users on the Users list and click unassign selected users to remove them from the Course.
The User who has been assigned to the Course will receive a Notification Email similar to the following example.
Assigned User Groups
Selecting the submenu item from the section in the Manage Course screen displays the Assigned User Groups screen, illustrated below. As shown in the following illustration, the Assign User Groups screen is displayed. To begin the process of assigning User Groups to a Course, click the button.
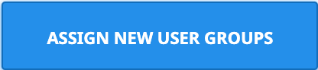
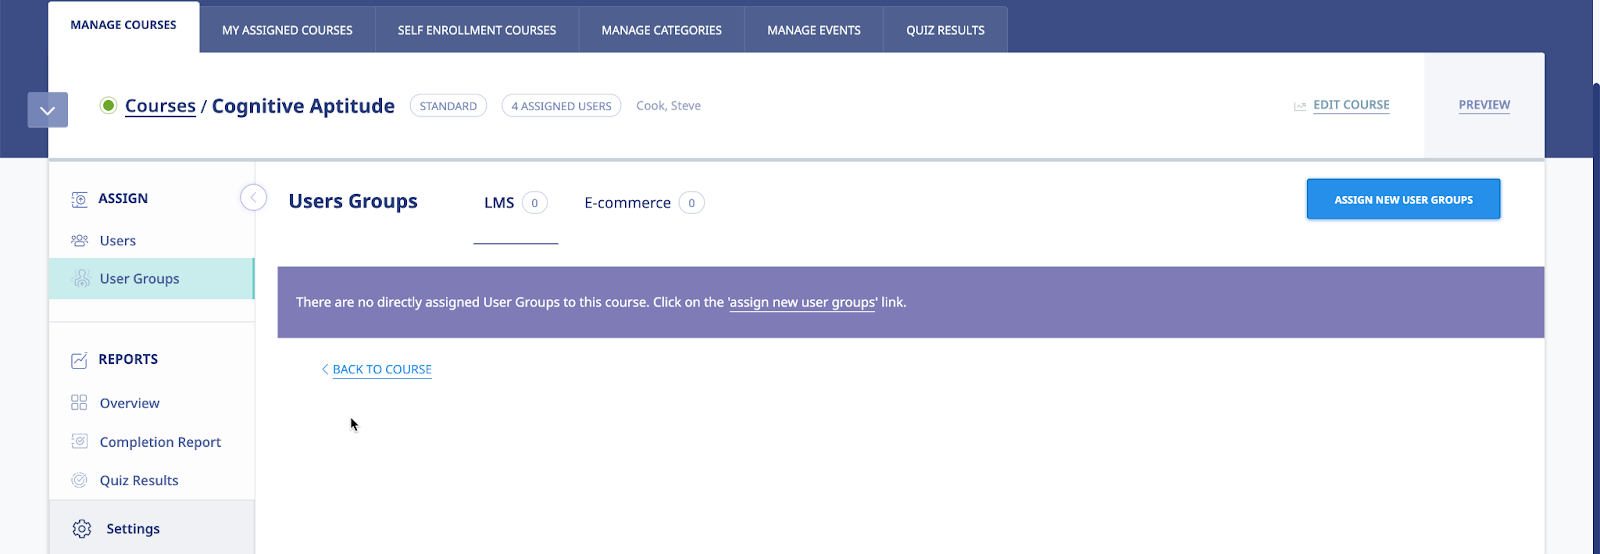
As shown in the following illustration, the Assign User Groups screen is displayed. You can filter what is displayed on the User Groups list by entering a User Group Name in the Name field and clicking .
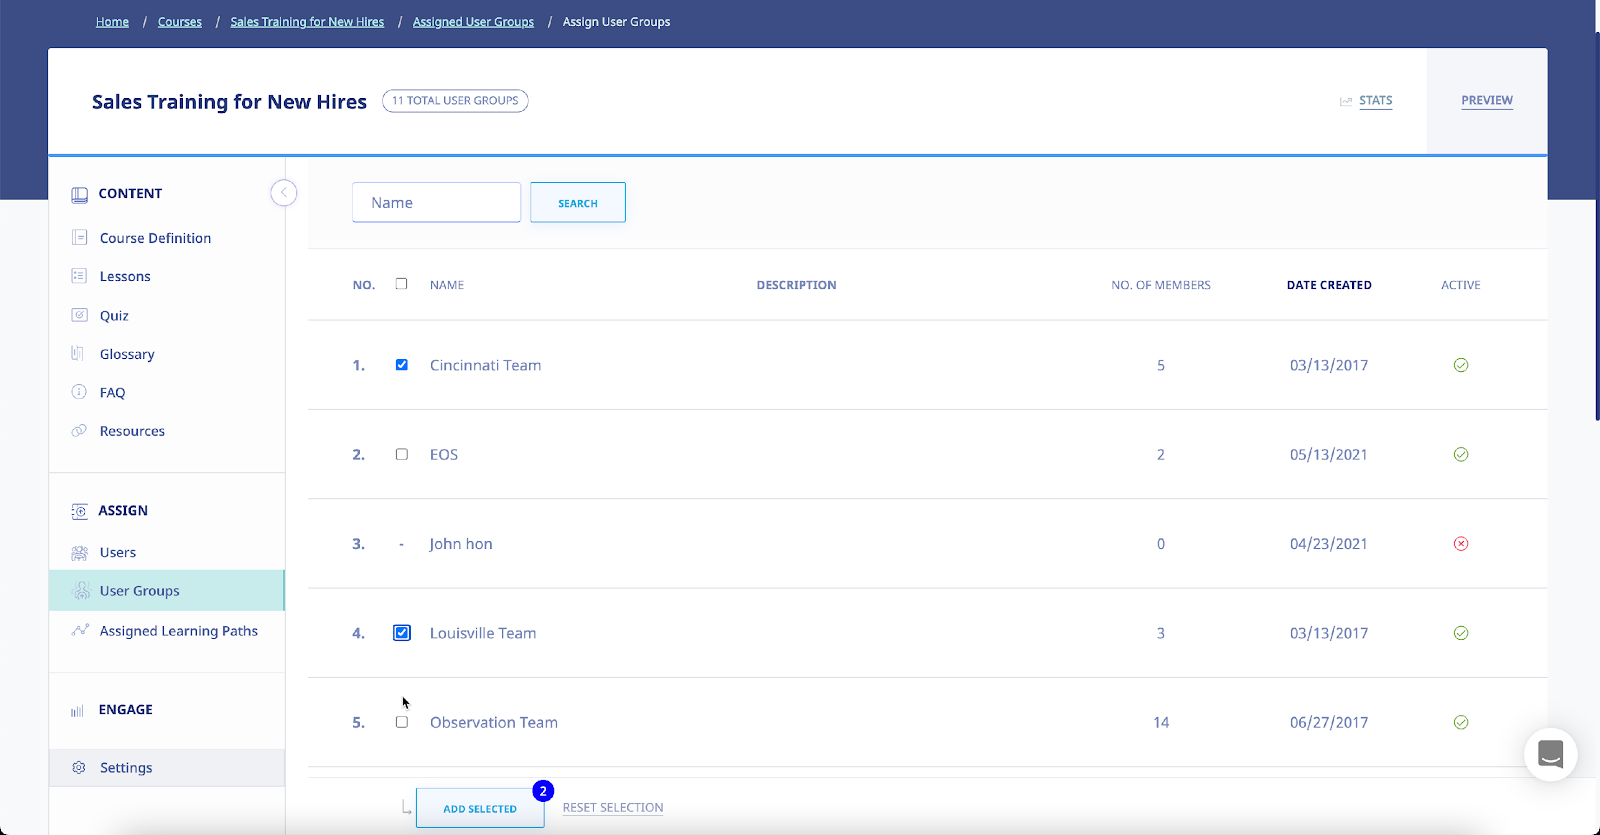
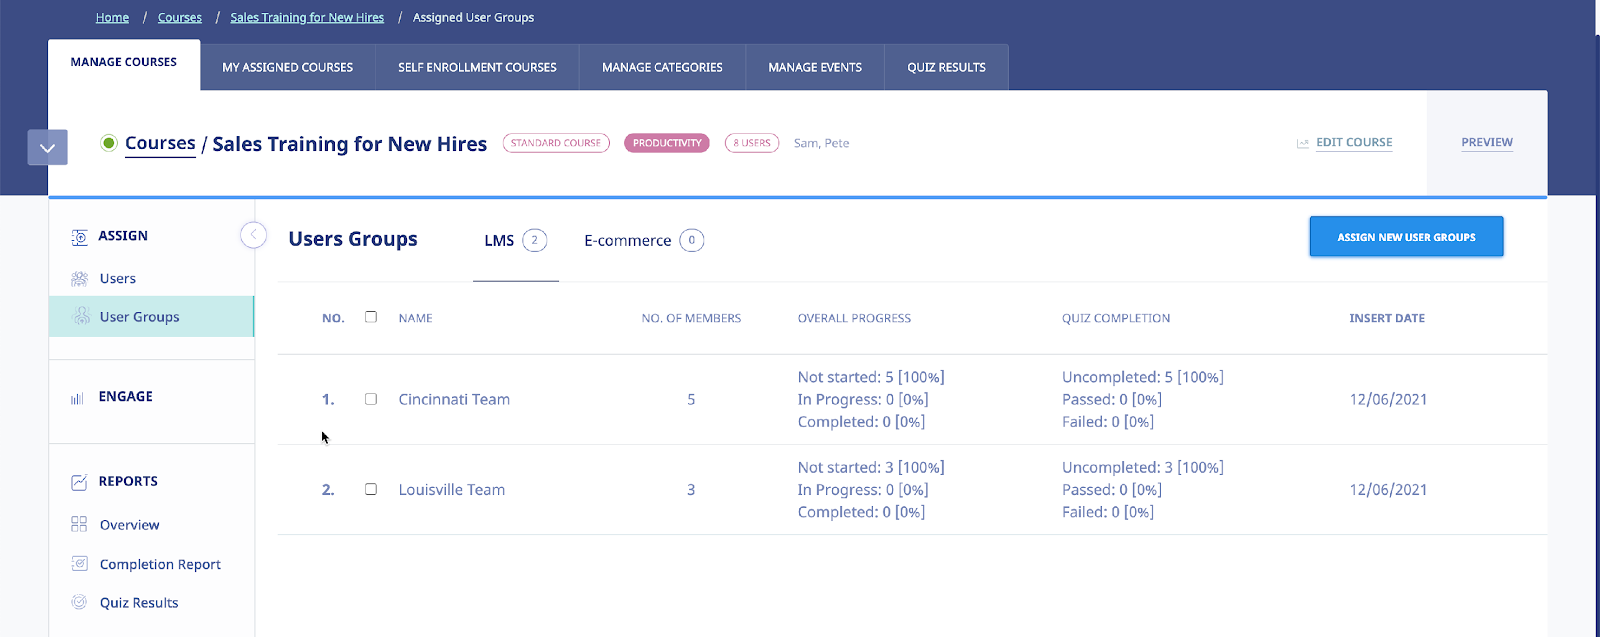
Select the check box for any User Group(s) that you want to assign to the Course and then click . As shown in the following illustration, the system confirms that the User Group(s) have been assigned to the Course, with the Group’s Name, No. of Members, Overall Progress, Quiz Completion and Insert Date details displayed. You can now click the assign new User Groups link to assign additional User Groups or select User Group check boxes and click the delete selected User Groups link to remove those User Groups from the User Groups list assigned to the Course.
Course Report
Overview
Clicking on the name of a course in the courses listing will take you to the course report overview page.
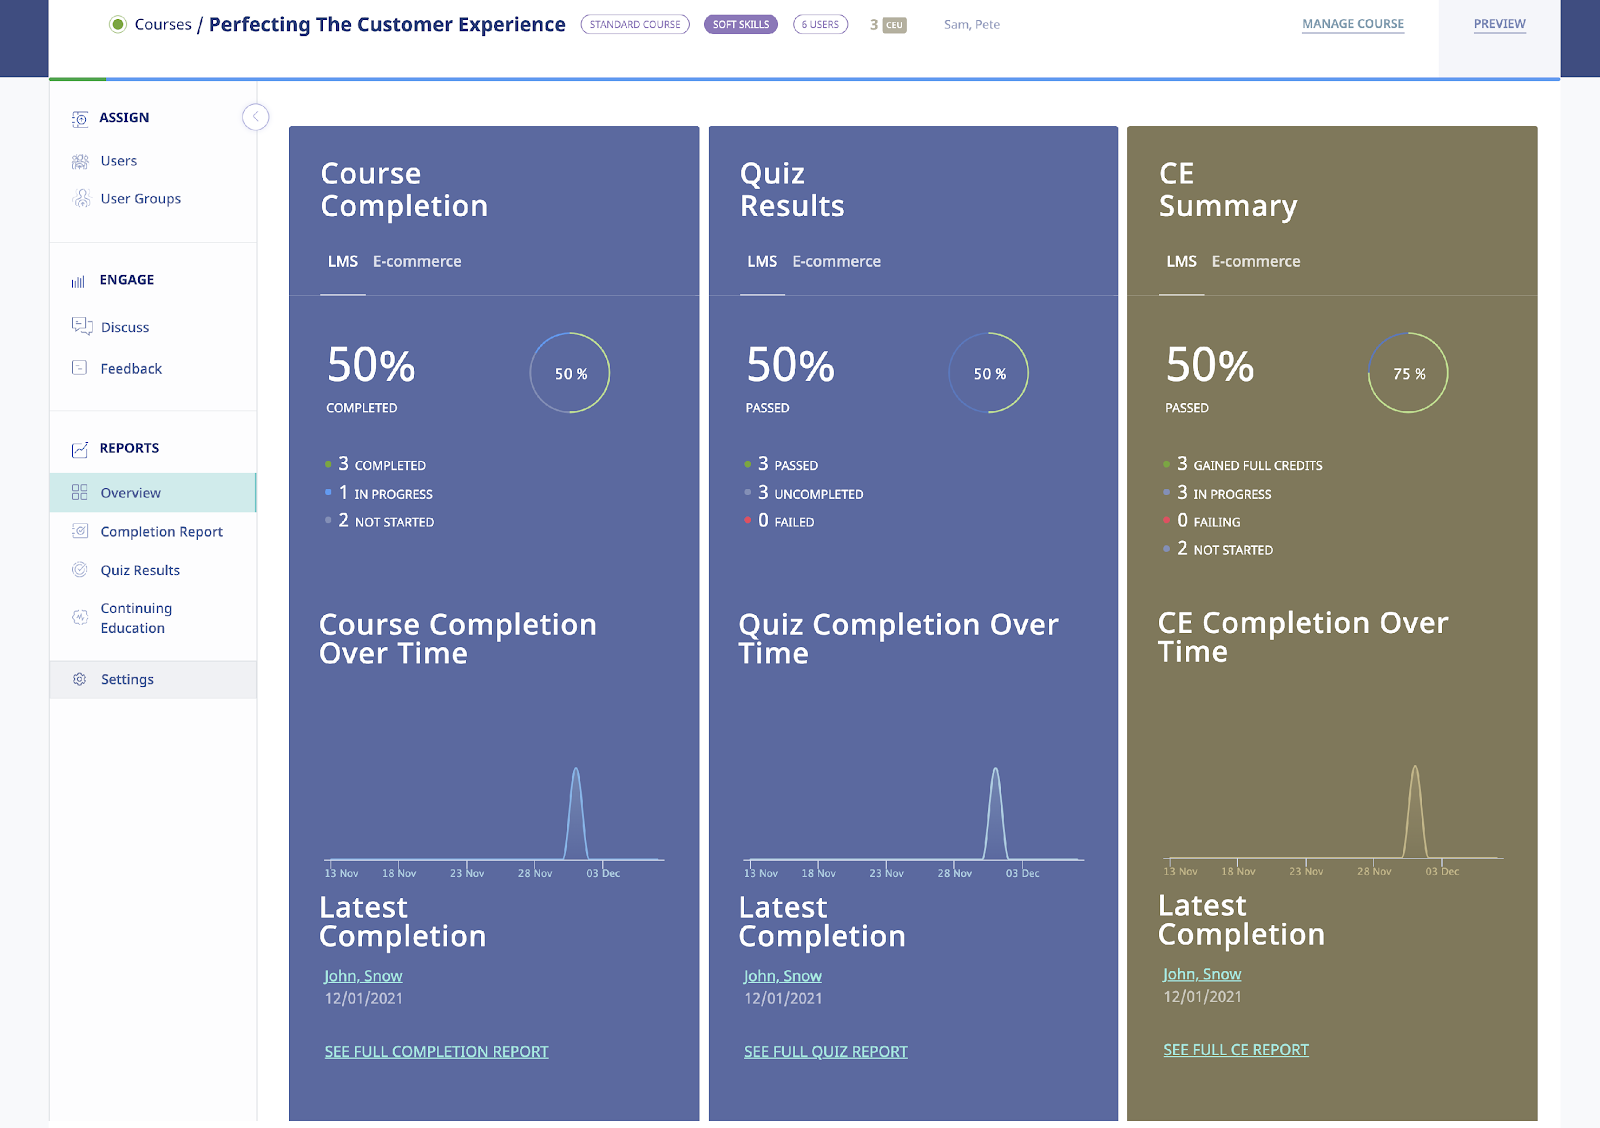
The course report overview will display Course Completion, Quiz Results, CE Summary (if activated), Completion over time as well as Latest Completions.
If you don’t have the CE Module activated your overview screen will look like:
The overview reports are designed to give you a quick view of the activity occurring within the course. You can click on other sections of the Reports area to see additional information.
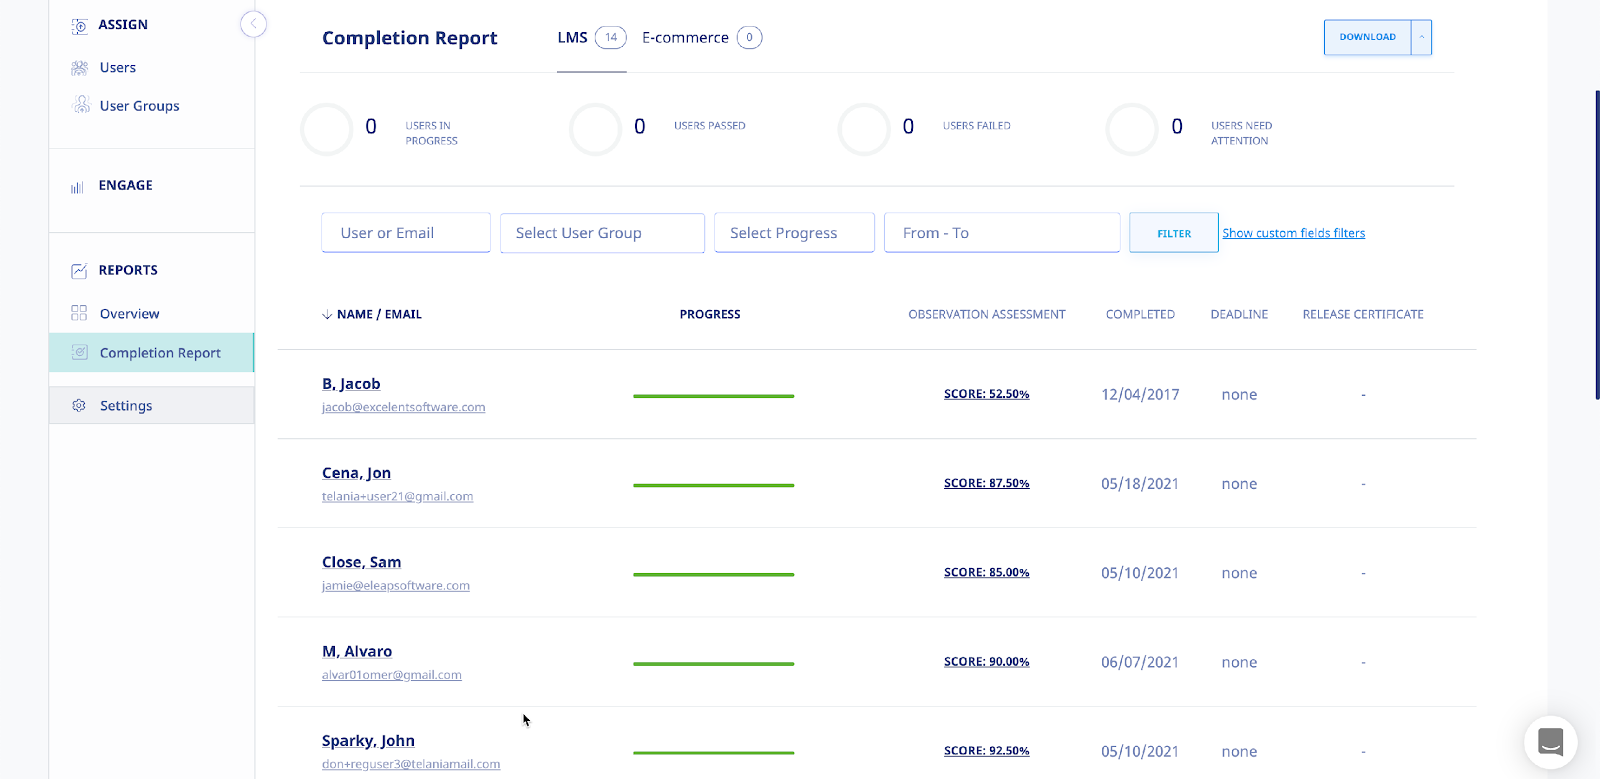
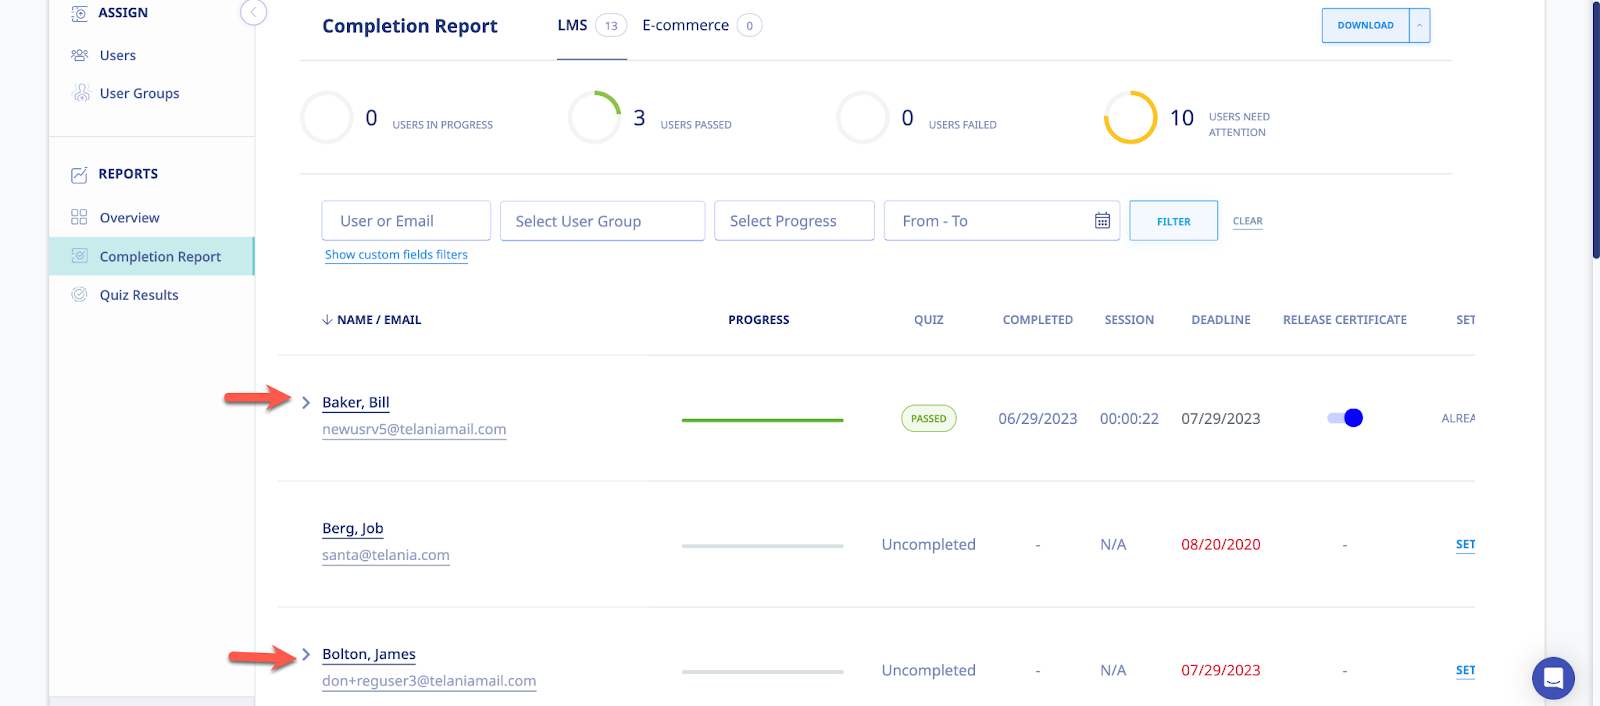
Completion Report
Click the link in the section of the sub menu. This opens the [Completion Report] section of the Stats area.


In the Completion Report you will be able to see:
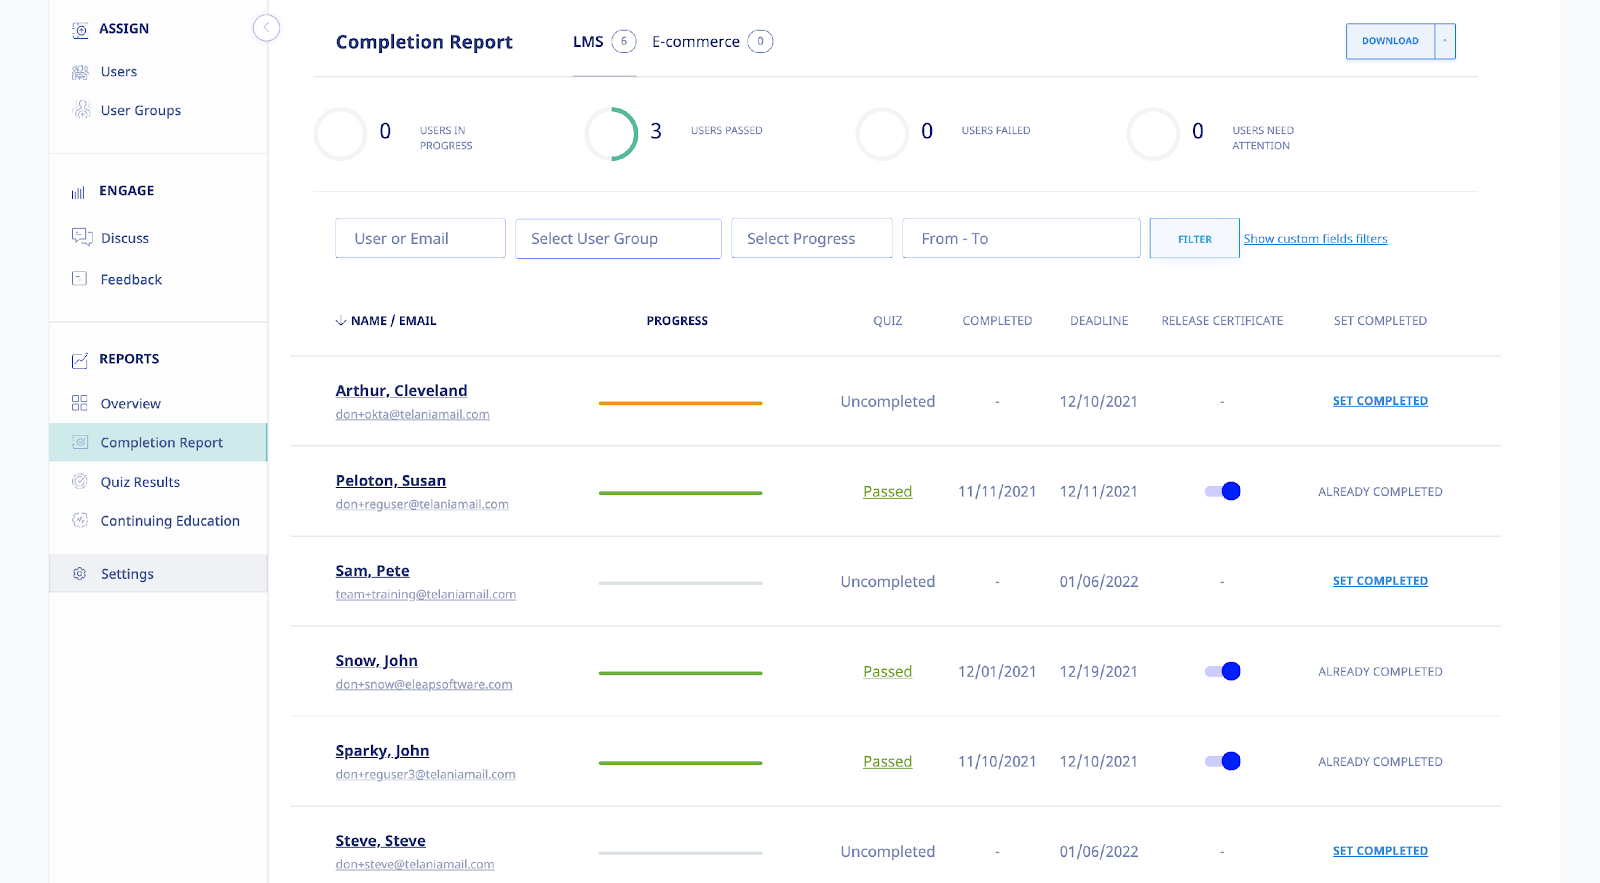
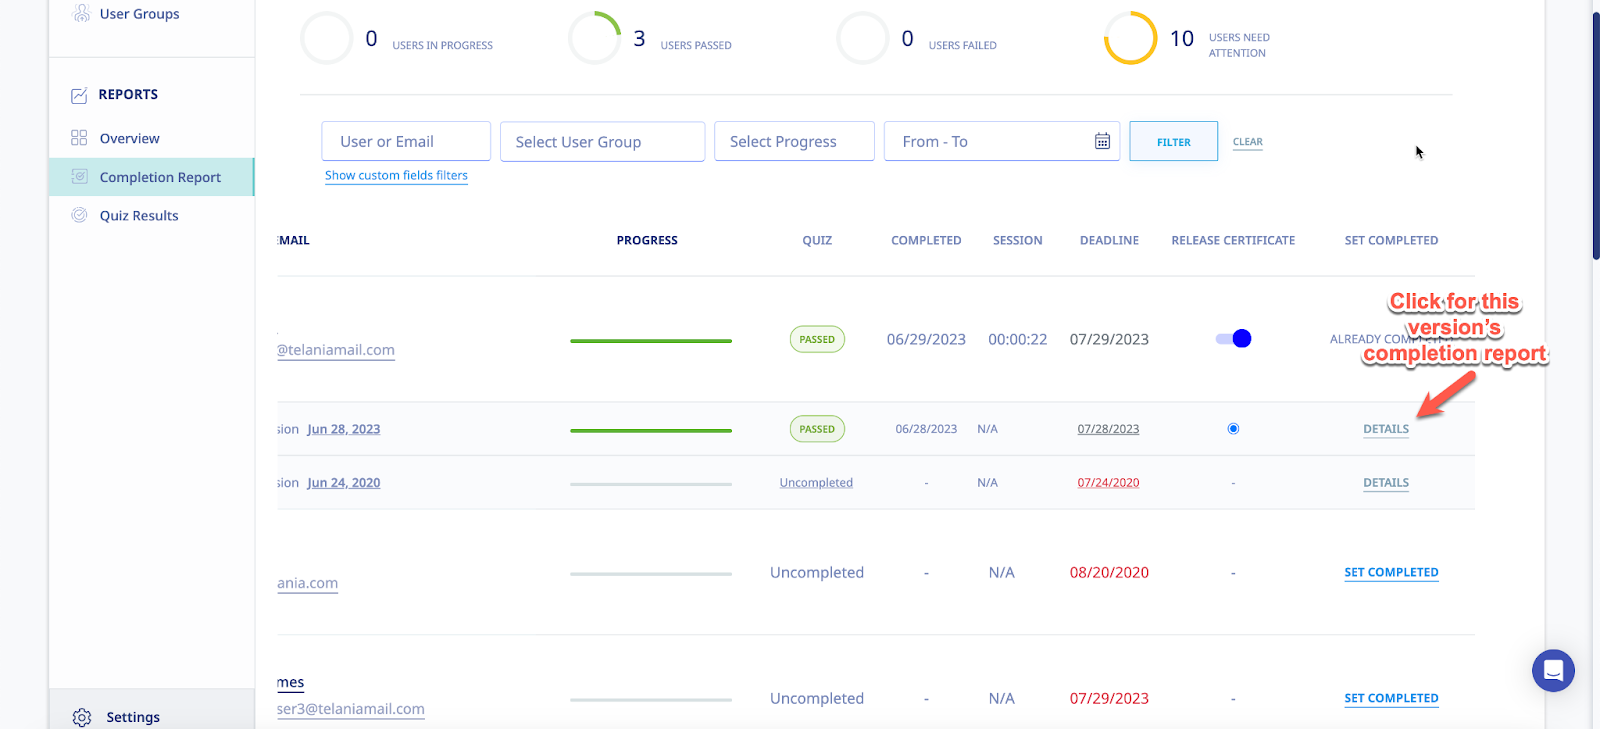
This screen displays all Stats & Completion Reports on a Completion Reports list, with the Name, Email, Progress, Quiz, Quiz Completed, Release Certificate, Deadline, Active/Inactive status and Set Completed status details shown for each report on the list. You can filter the results displayed on this screen by making a selection from the User list and/or the User Group list, entering a date range within the From and To fields (or using the Calendar icon to select those dates) and clicking .
The Completion Report displays several Progress statuses including:
- means the user has not submitted their quiz for auto or manual grading.
- means the user has not submitted an e-Signature to signify completion.
- means the user has met all requirements for course completion.
- means the user has not submitted a required feedback form.
- means the user has not started the course.
- means the user is in progress (note progress percentage).


Previous Completions Data
If the course completion report contains completions from previous attempts, we indicate the presence of additional data using the [>] symbol next to the user’s name.
Once the > symbol is clicked the additional data is shown as illustrated below:
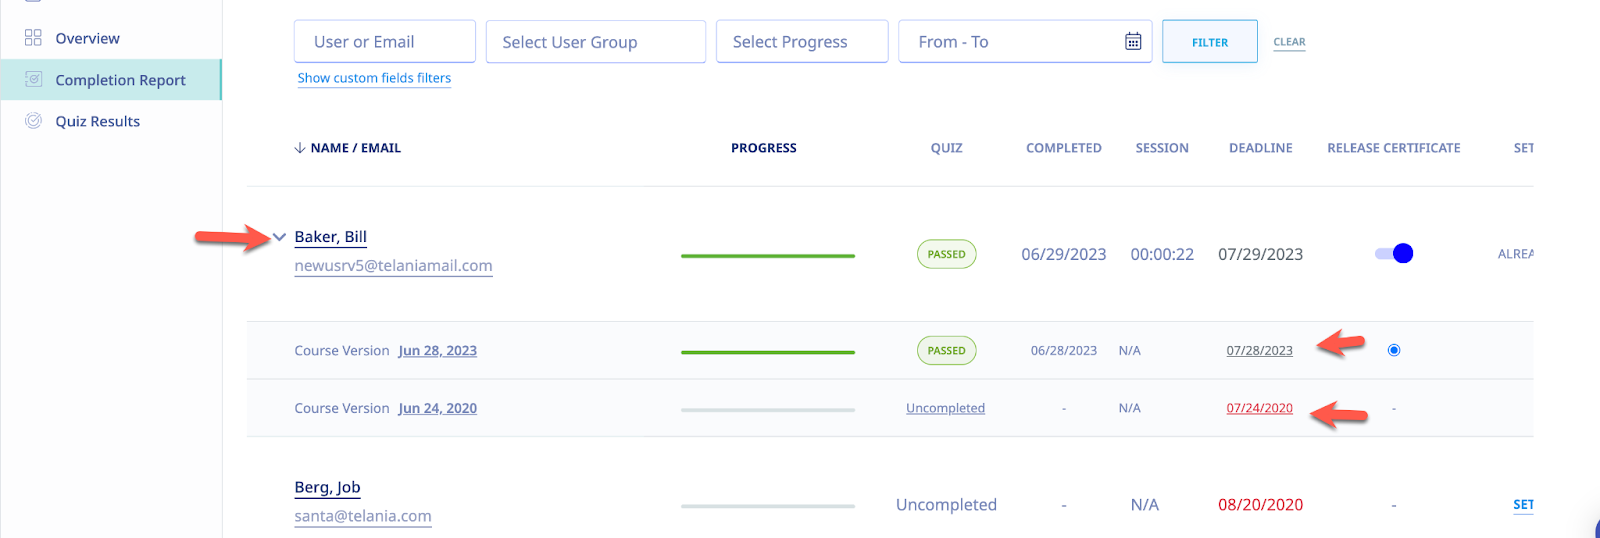
To see the details of each of the completion periods, horizontal scroll to your right and click the [Details] link to see the completion report for that version.
Quiz Results
Click the link in the section of the sub-menu. This opens the [Quiz Results Report] section of the Stats area.

In the Completion Report, you will be able to see:
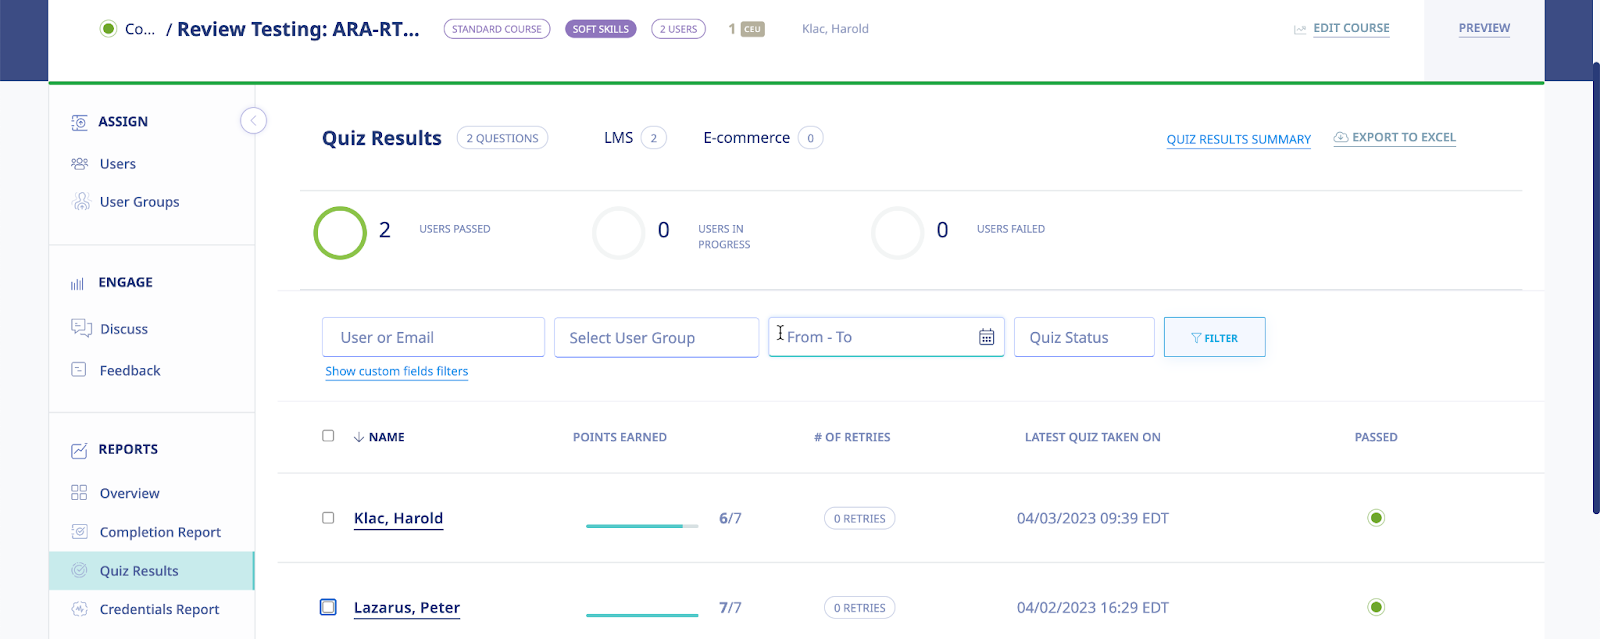
User name, Points Earned, Number of Retries, Latest Quiz Completion Date as well as Pass/Fail status for the quiz. You click on the user’s name to get more details on their quiz results.
You can filter this report by User or email, User Group, From – To date range, and Pass or fail status as well as using custom fields. To download this report into Excel, click the Export to Excel link. You can click the Quiz Results Summary to get details on how your users scored across your entire quiz question set.
To reset the quiz status, simply select the user(s) and click [Delete Selected Results]
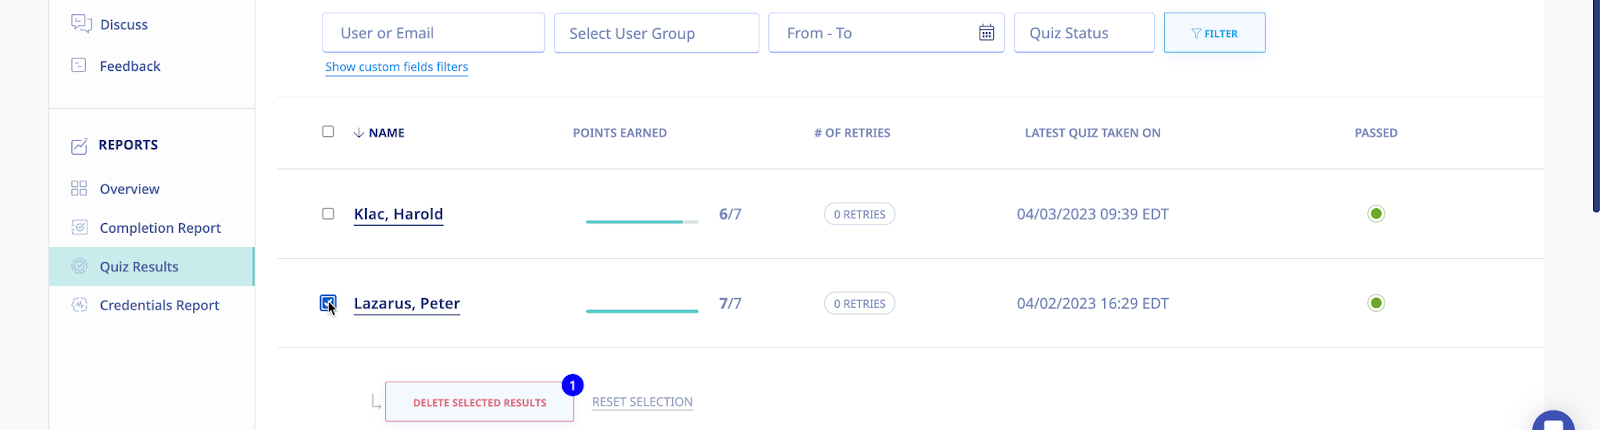
This will reset the quiz status back to [Not started] and your user can attempt the quiz session (without restarting the entire course).
Continuing Education Results
Click the link in the section of the sub menu. This opens the [Credentials Report] section of the Stats area.

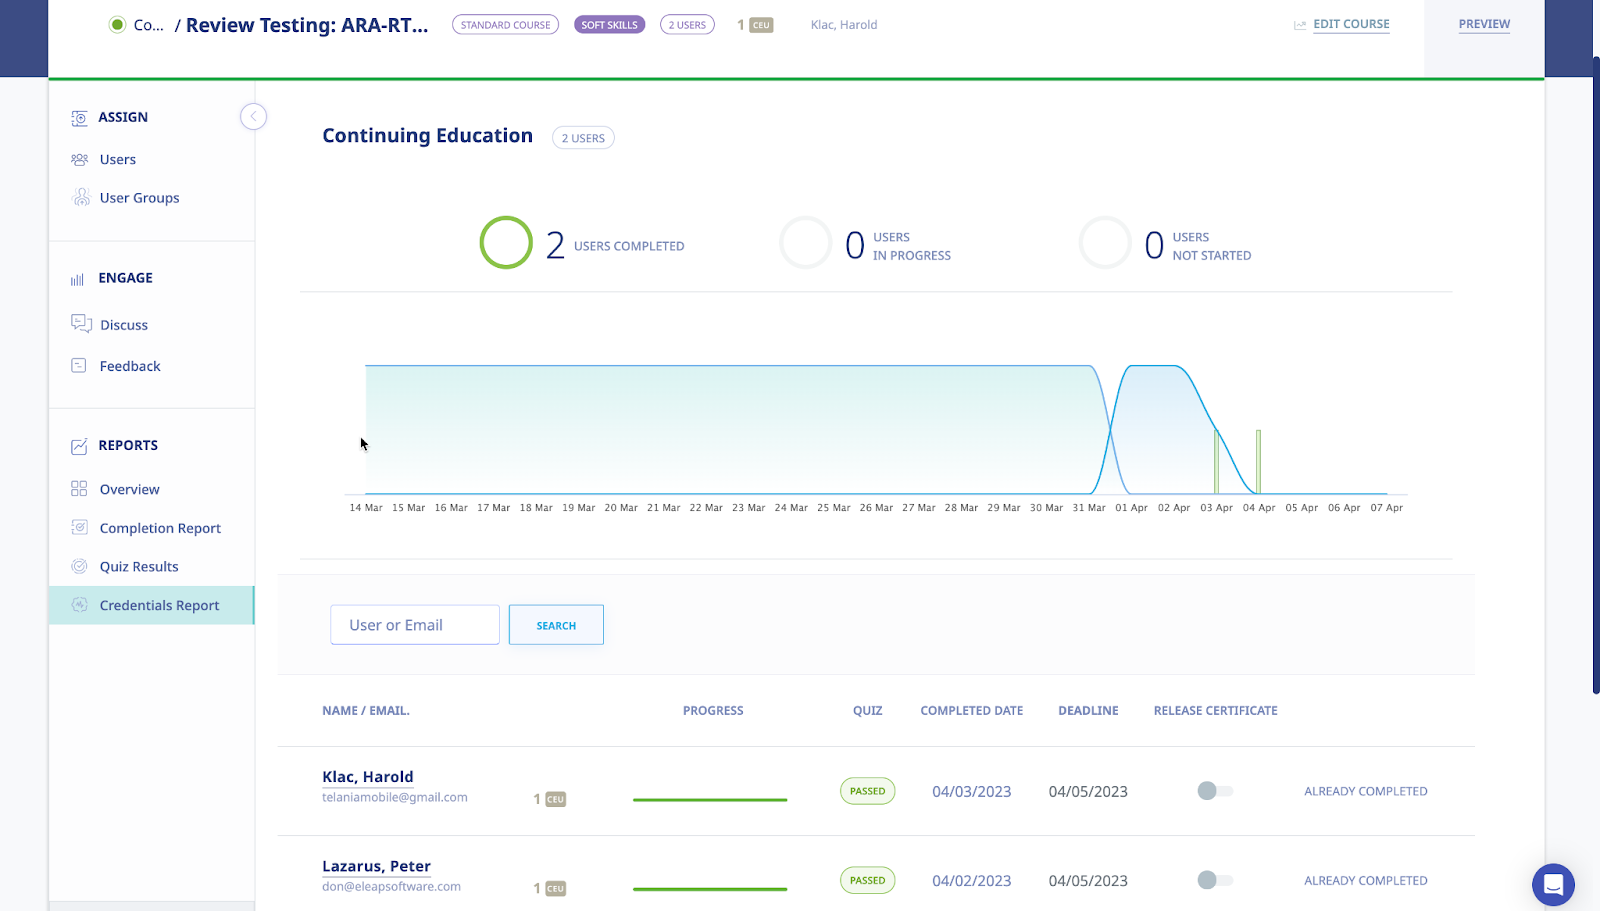
The Continuing Education course completion results section enables you to see how your users are progressing through their CE courses.
E-Signature log
If at least, one E-Signature has been submitted, eLeaP will display the [E-Signature log] link This link is located in the dropdown section. Click [Download] and then select from the dropdown.


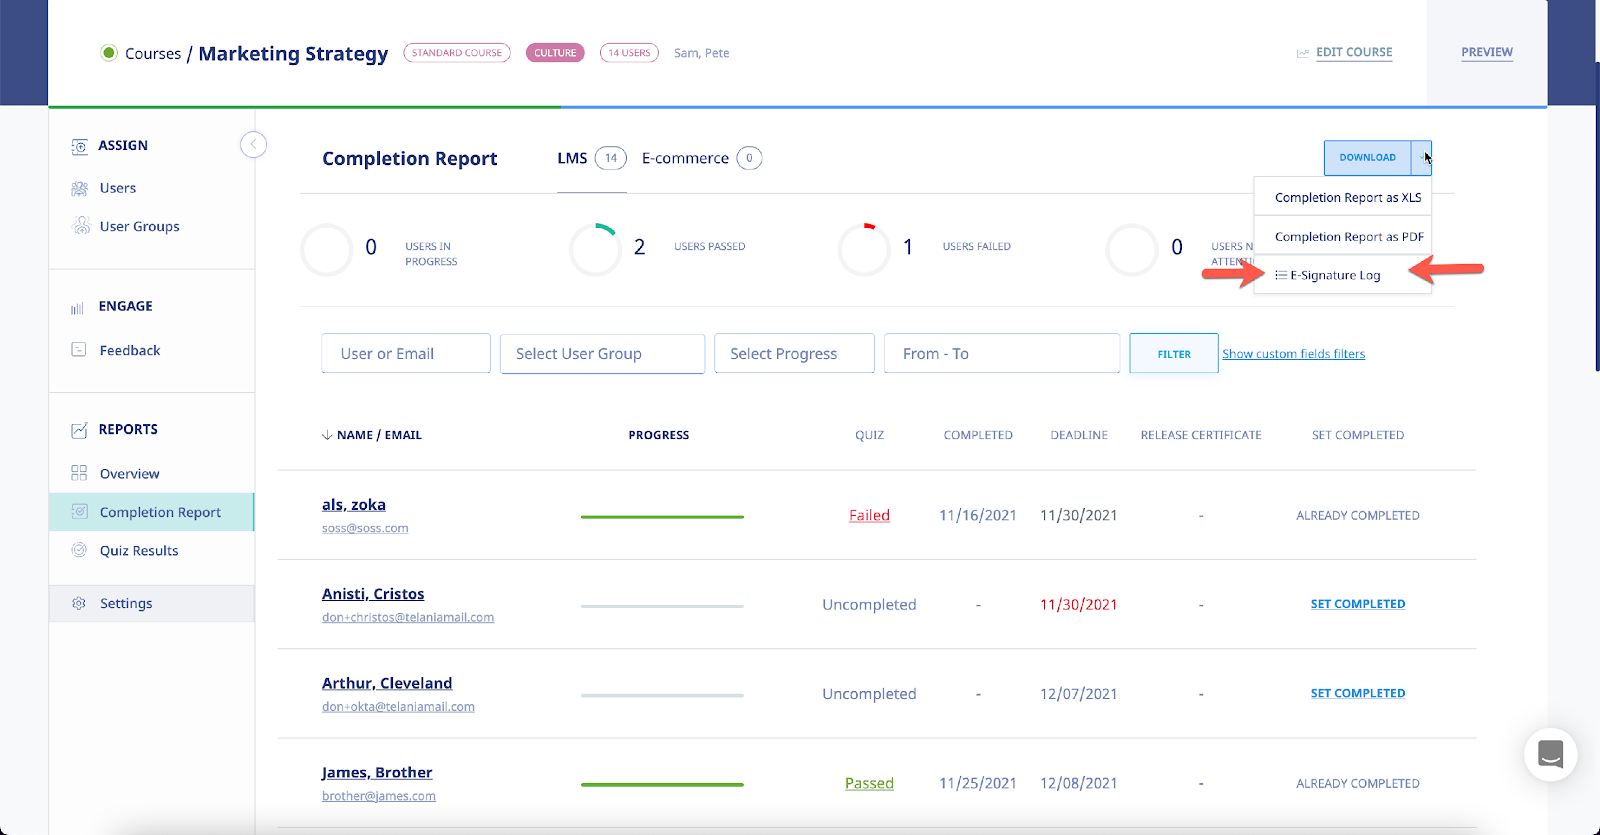
The E-Signature log will display a dedicated list of the submitted E-Signatures including time stamps of submissions as well as IP addresses of the submitted E-Signatures.
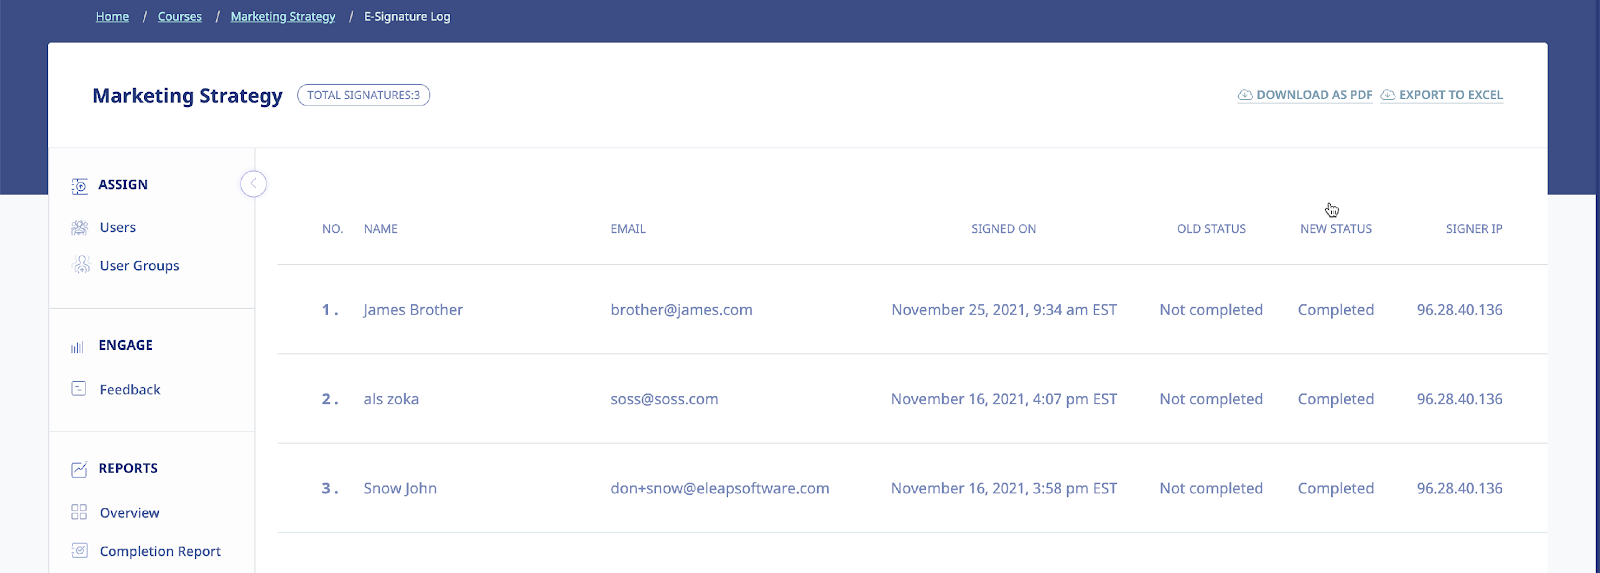
You can download this log into PDF or Excel,
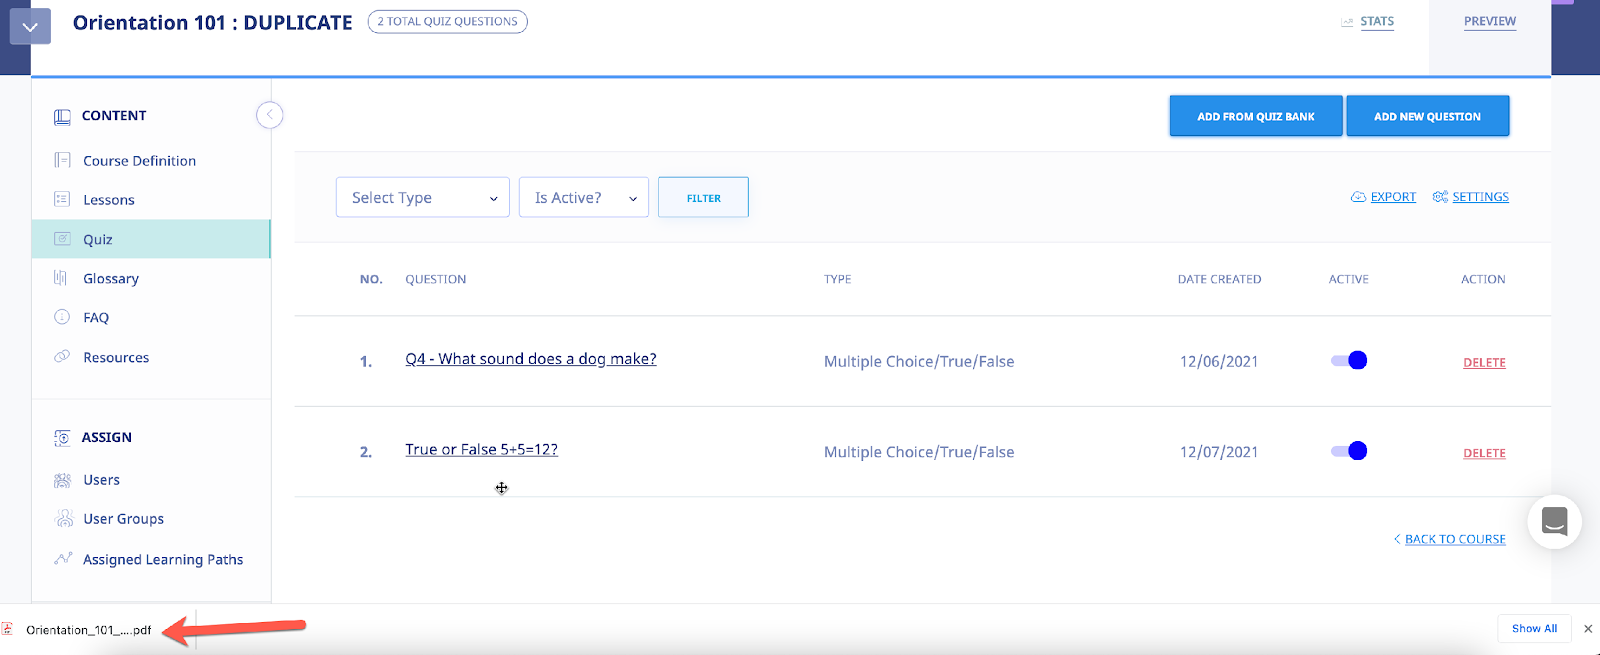
Quiz
Selecting the submenu item from the area of the course management screen displays the Quiz screen for that Course, as shown in the following illustration. eLeaP™ encourages you to create pre- and post-course assessments. Measuring trainee performance enables you to evaluate the full impact of your e-learning training program.


You can filter the results displayed on the Quizzes list by making a selection from the Type list, making a selection from the User Groups list and/or entering dates within the From and To fields (or using the Calendar icon to select those dates), and then clicking .
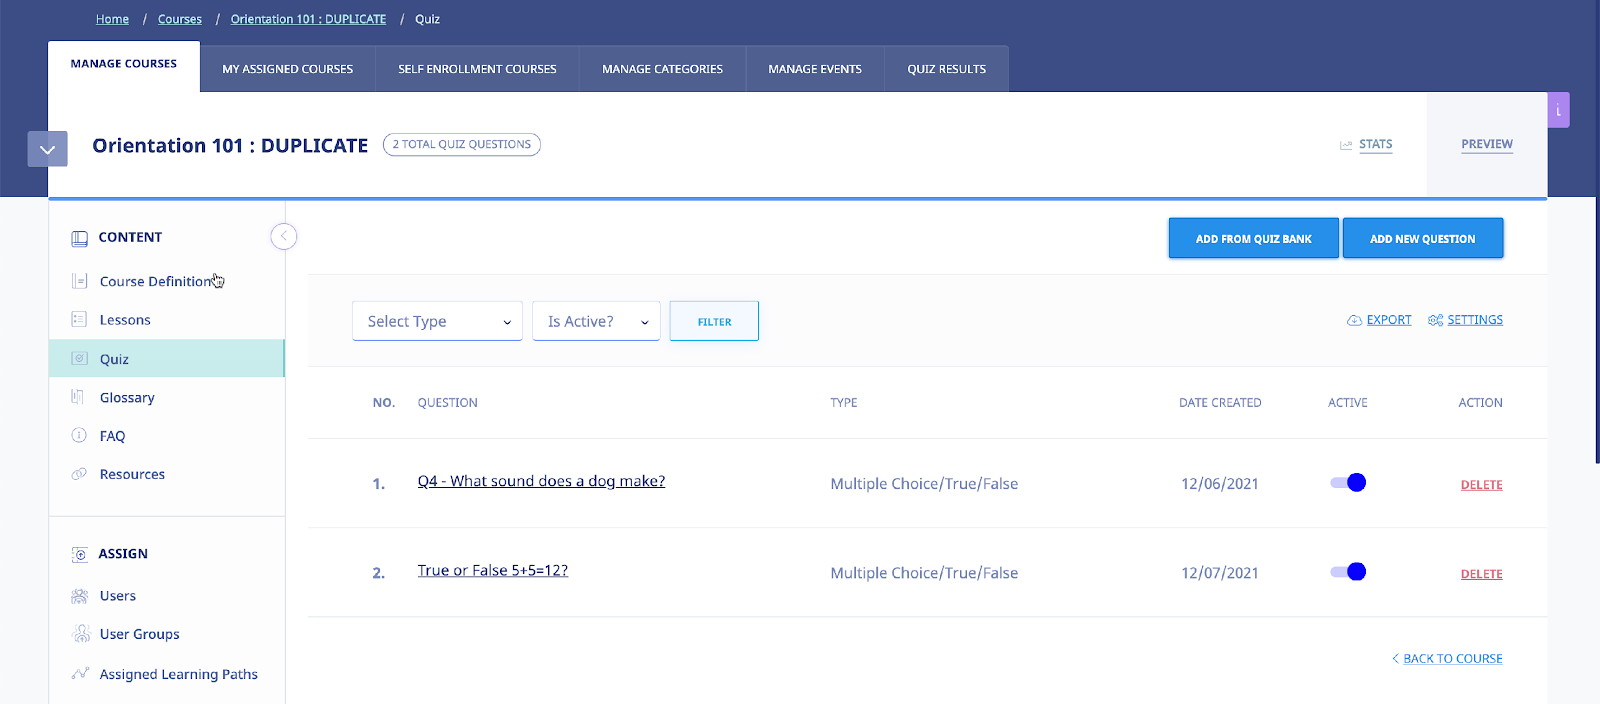
As shown in the following illustration, the following Quiz Types are available: Multiple Choice/True False, Sequence/Sort/Order/Ranking, Essay/Short Answer/Explanation, Multiple Choice with Explanation and Hotspot, Find Errors and Upload Answer.
You can begin to add questions to it by selecting the button, as shown in the following illustration.

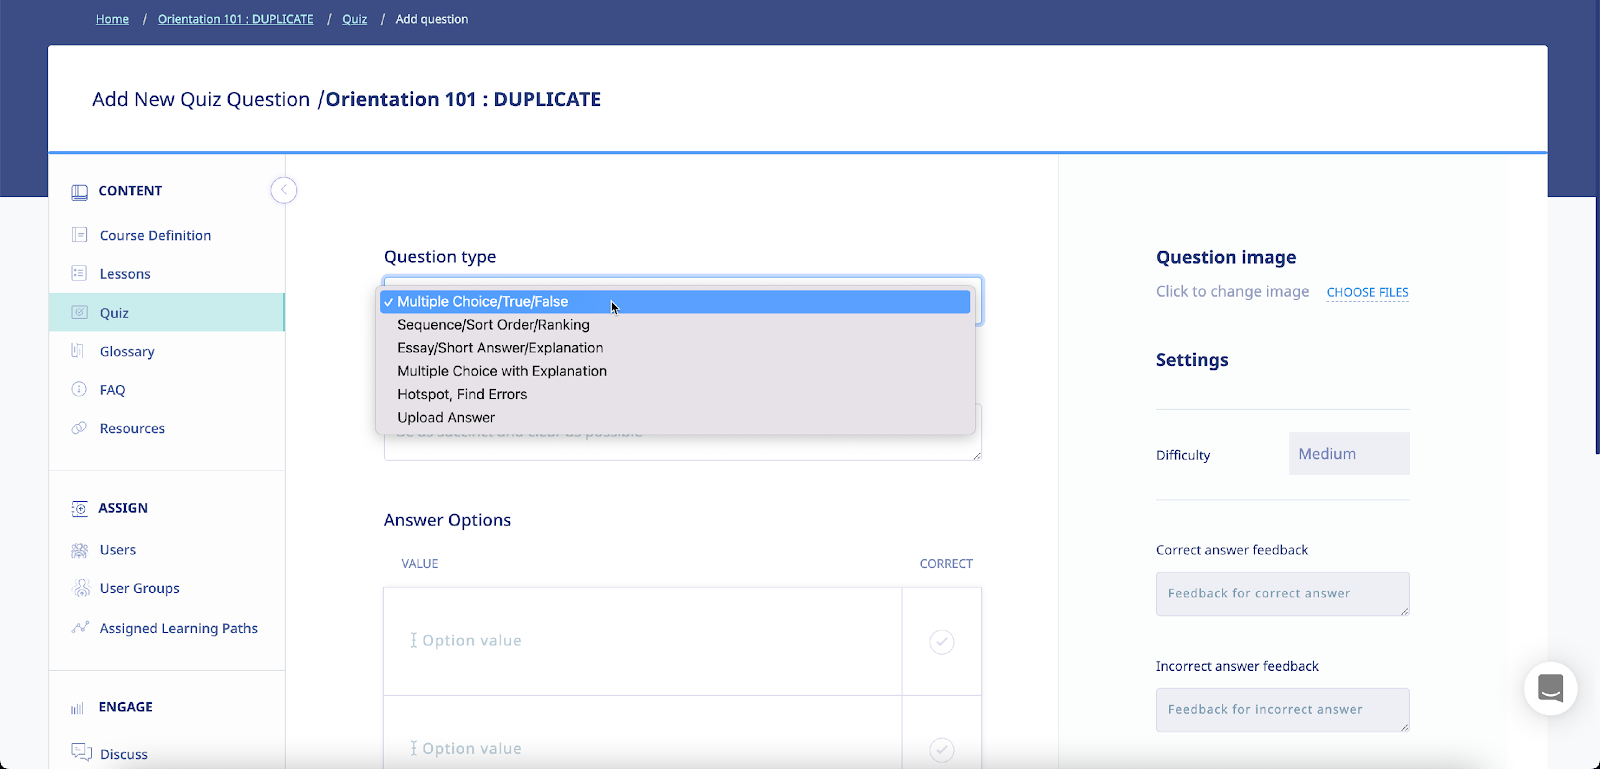
The Add new question screen is displayed, as shown in the following illustration. Use the steps below to successfully add a new question to a Quiz.
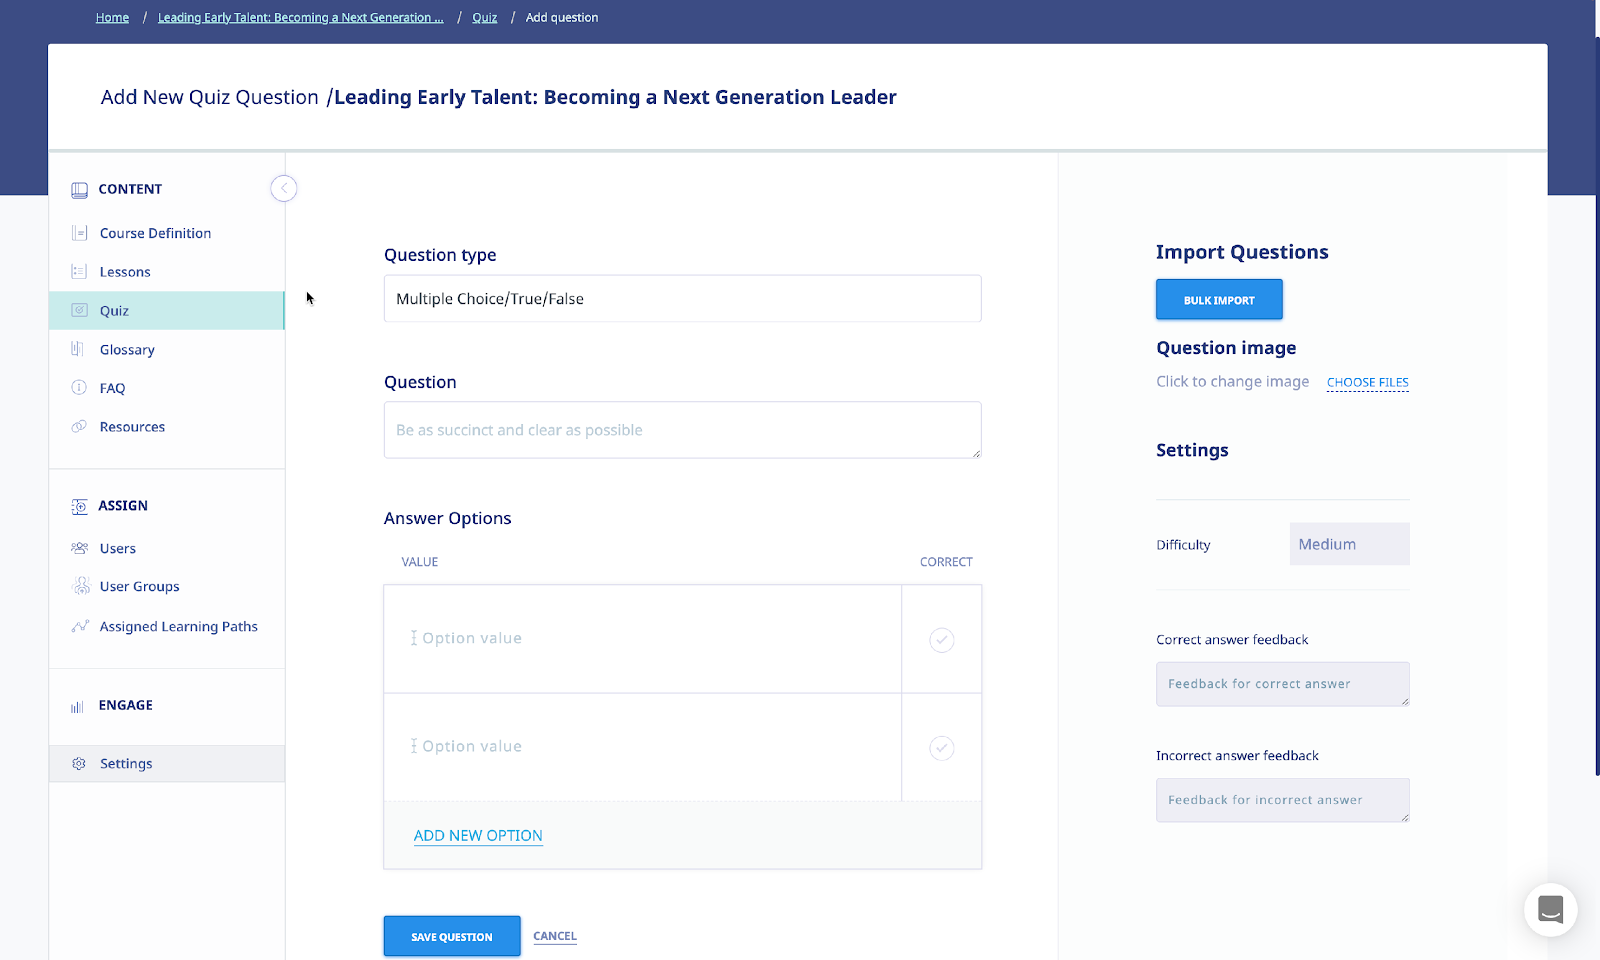
- Select a Question Type from the Question type list.
- Enter the question in the Question box.
- If you want to upload multiple quiz questions, use the option. Please make sure to download and properly fill out the question template:

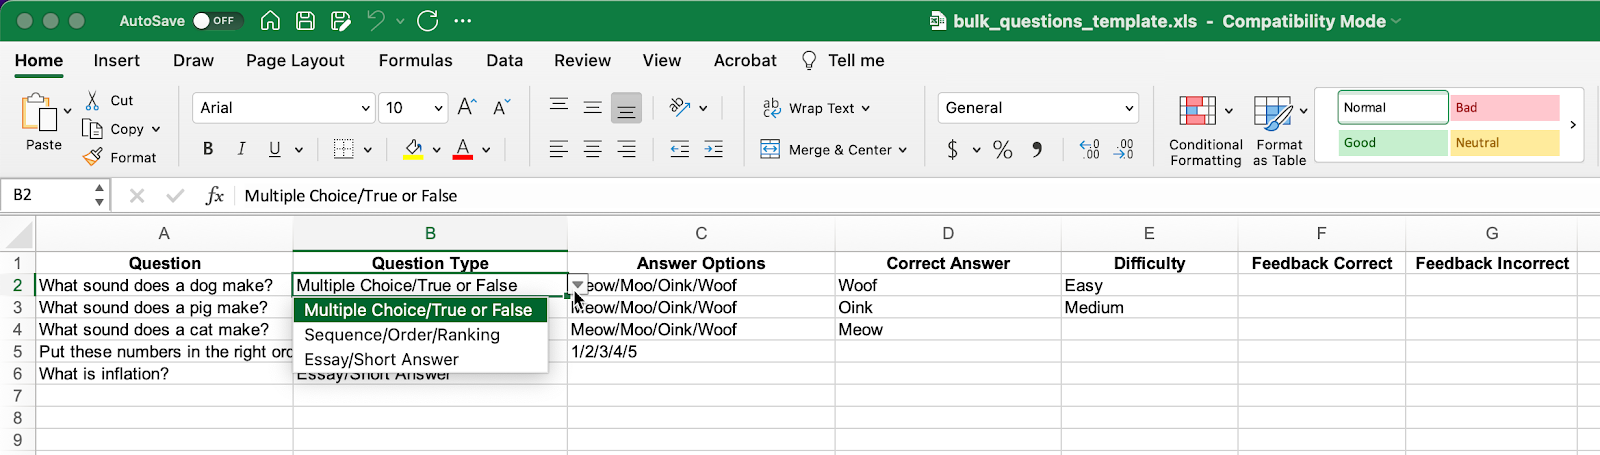
- Enter question
- Select question type using the dropdown options
- If Multiple Choice or Sequence type enter the Answer Options. Note that / is the delimiter
- If Multiple Choice, enter the Correct Answer (this should be the same as entered in the Answer Options cell).
- Upload an image for each option, if desired, by clicking the icon.
- Select the degree of difficulty for the Question from the Difficulty list in the Settings area. Available options are Easy, Medium or Hard.
- Click the option to upload an image associated with the Question. eLeaP provides its users with the opportunity to use images within Questions and Answers. For example, if the Question was “Which of these two images represents the small intestines,” they could upload an image of the large intestines as Option A and an image of the small intestines as Option B. Enter as many options as necessary with the Options boxes. In our example, only two would be necessary; one for if the answer is True, and another for if the answer is False.
- Select the Correct checkbox for the option that represents the correct answer to the question.
- Enter any Feedback desired when an answer is correct within the Correct answer feedback and Incorrect answer boxes in the Settings area.
- Click to create the question.


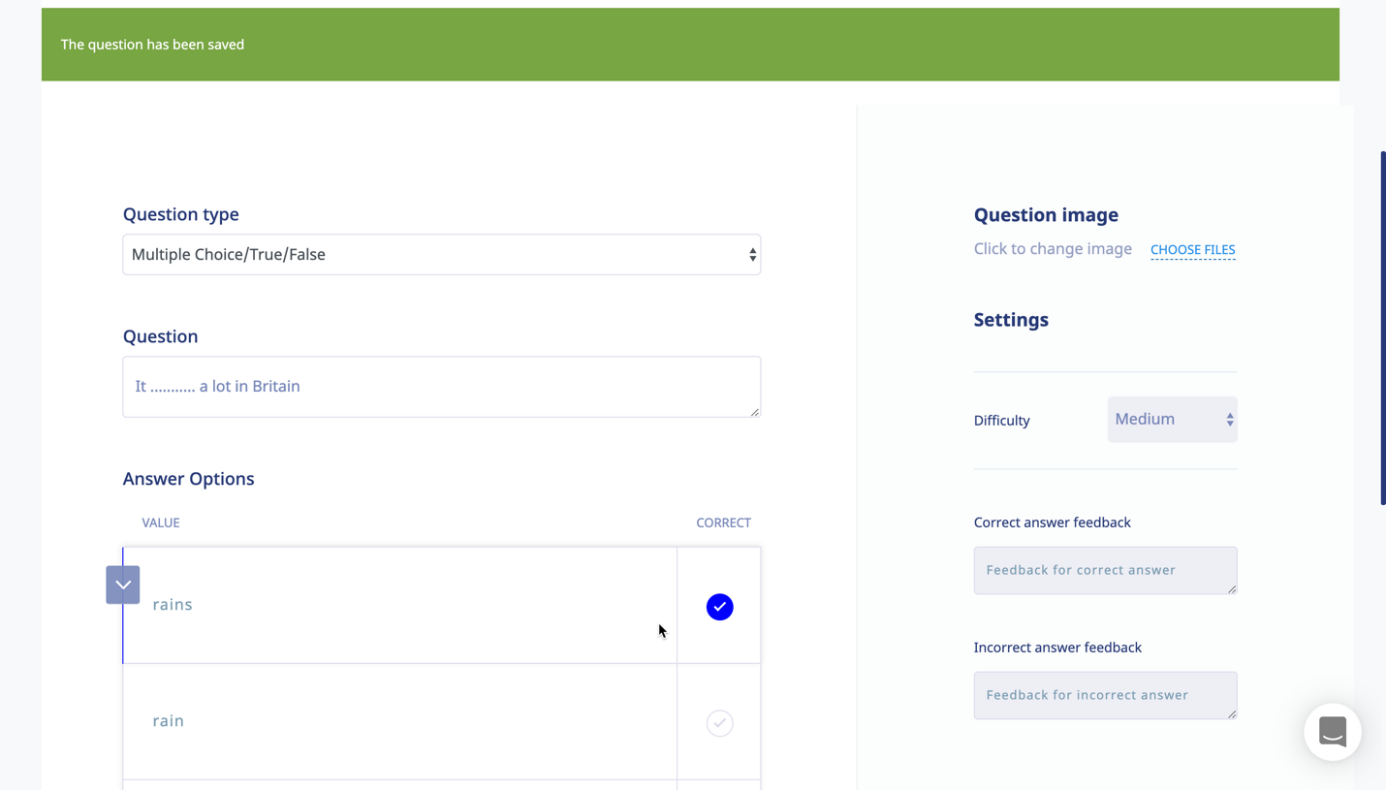
The system confirms that the question has been added, as shown in the following illustration, and you can add additional questions, if desired.
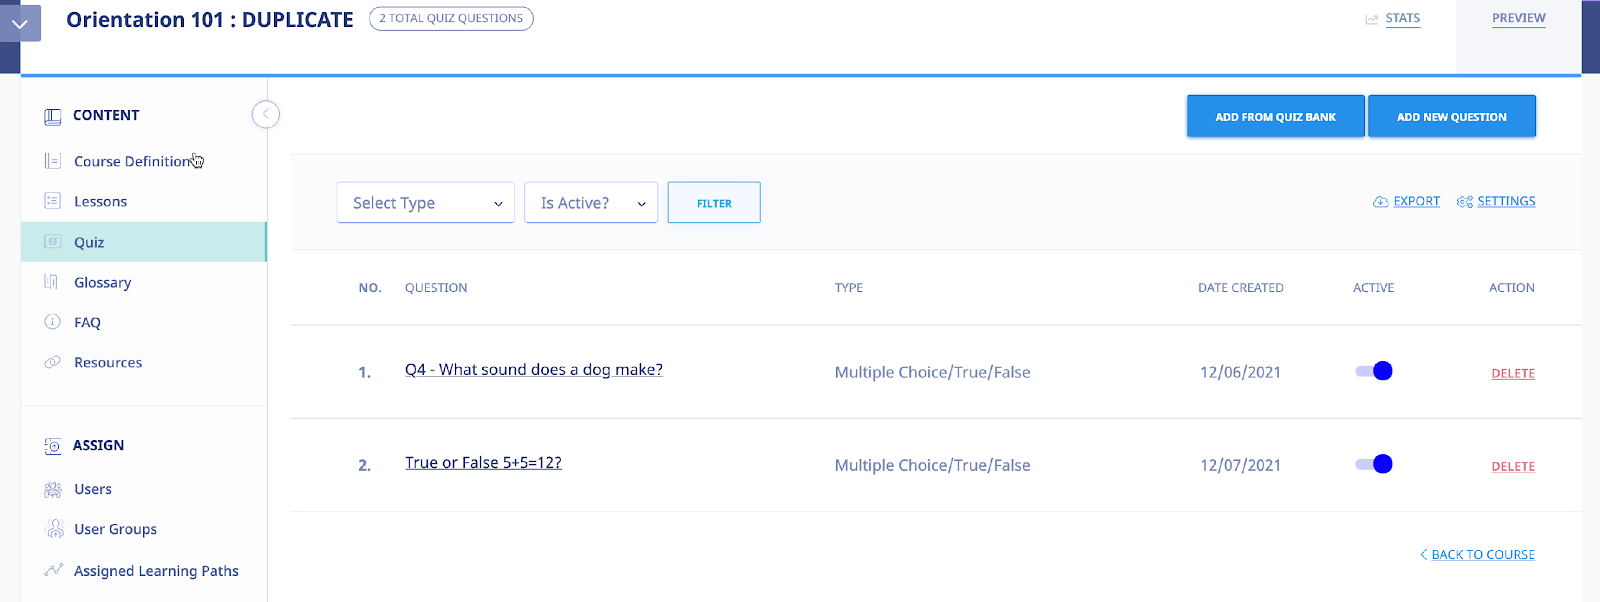
Re-selecting the QUIZ tab shows that the Question has been added to the Quiz, as shown in the following illustration.
You can now click the add new question button to add an additional Question, click the export link to export the Quiz, and/or click the settings link to access the quiz settings area.
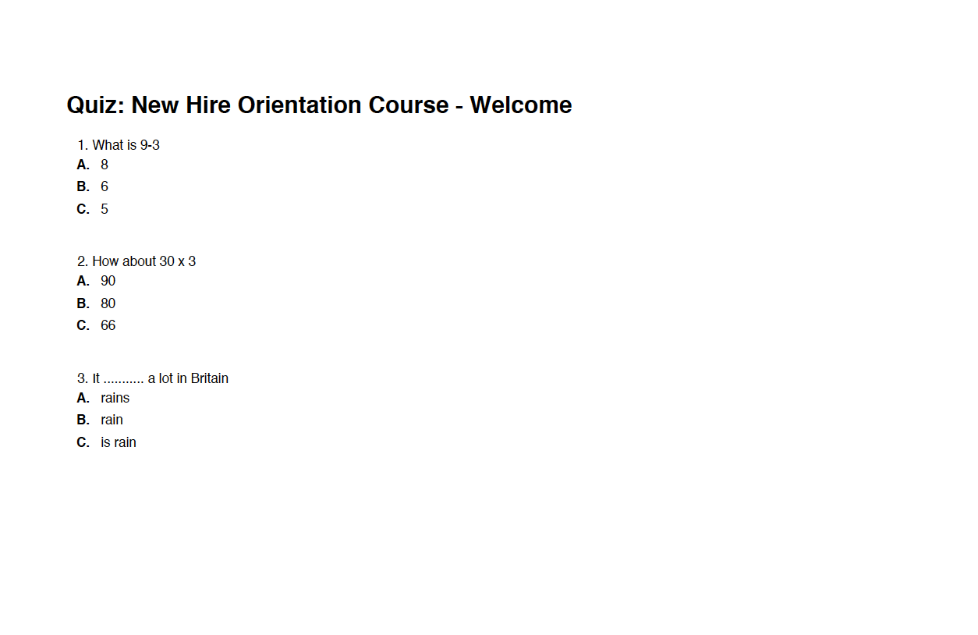
Clicking the export link will export a Quiz in .PDF format. As shown in the illustration below, you are given the option of Opening or Saving the Quiz.
Selecting the Open option will open the Quiz in your .PDF Reader, as shown in the following illustration, where you can save it to a location on your computer using the Reader’s Save option on the File menu.
Quiz Question Facts
eLeaP™ currently has six (6) question types or formats:
- Multiple Choice/True/False,
- Sequence/Sort Order/Ranking,
- Essay/Short Answer/Explanation,
- Multiple Choice with Explanation, and
- Hotspot, Find Errors
- Upload Answer
To create Multiple Choice or True or False quiz questions, select that Question option, enter your question, assign a Difficulty Level, and upload an Image if needed. Next you will proceed to add the possible Answer options. You can add up to six (6) possible Answers. If you need to upload images as part of your answers, click the button next to the relevant question. You are almost done. Next, you need to pre-select the correct answer(s) so that the eLeaP system can automatically grade your Quiz. Click to submit your question! Note that learners will need to select all correct answers to pass this question.
Quiz Feedback: You can include feedback rules based on correct and incorrect answers. Simply input the relevant feedback options in the bottom boxes provided in eLeaP™.
Repeat this process as many times as needed to create other Multiple Choice or True or False questions.
Select “Sequence, Sort Order or Ranking” type questions if you want to create Quiz questions that test the ability of your Users to correctly Rank, Sequence or Sort different answer options. An example of such a question would be “arrange the planets in the correct order starting from the nearest to the sun”. You would then add the correct order sequence as Mercury, Venus, Earth, Mars, Jupiter …”
The eLeaP™ system would automatically unscramble the answer sequence when your quiz is deployed so that your users would have to re-arrange them in the proper sequence.
Remember, click to submit your question!
If you want to create a quiz question that asks for a short answer or an essay, click the Essay/Short Answer/Explanation question option. All you have to do is type in your question and select the relevant Difficulty Level (if applicable) and then click to submit your question!
You can ask a Multiple Choice question but also require your Users or Trainees to explain their answer choice. Select the Multiple Choice with Explanation option for this type of question. You need to enter your question in the Question box, select the Difficulty level that is needed, upload a picture or image if needed, and type in the answer options. You will then pre-select the correct response or answer and also check the Explanation Needed box for the relevant answer you have selected. If one of the possible answers is an image or picture, go ahead and upload the relevant picture from your computer. Click to submit your question!
The next question type in the eLeaP™ Quiz Creator system is the Hotspot or Find the Error Question Type. Do you have a map you need correctly identified or a schematic diagram you need to have correctly analyzed? Select the [Hotspot, Find Errors] Question Type, enter the question, select the Difficulty level, click the upload image link to find and upload the relevant image into the eLeaP™ system. Note: if this is a schematic diagram that you need to analyze, you would need to have pre-created it as such.
If you are satisfied with your question and you have uploaded the relevant image(s), it is time to click to save your new quiz question.
The Upload Answer question type is designed to allow your trainees to send in ‘homework’ to be reviewed and graded. To create the Upload Answer question type, add in the question and click to save your question. Your trainees can then upload their answers during their quiz session.
Import Quiz Questions
Quiz Settings
Selecting the link on the Quiz screen displays the Settings screen for the Quiz, as shown in the following illustration. Use the steps below to successfully navigate the Settings screen.

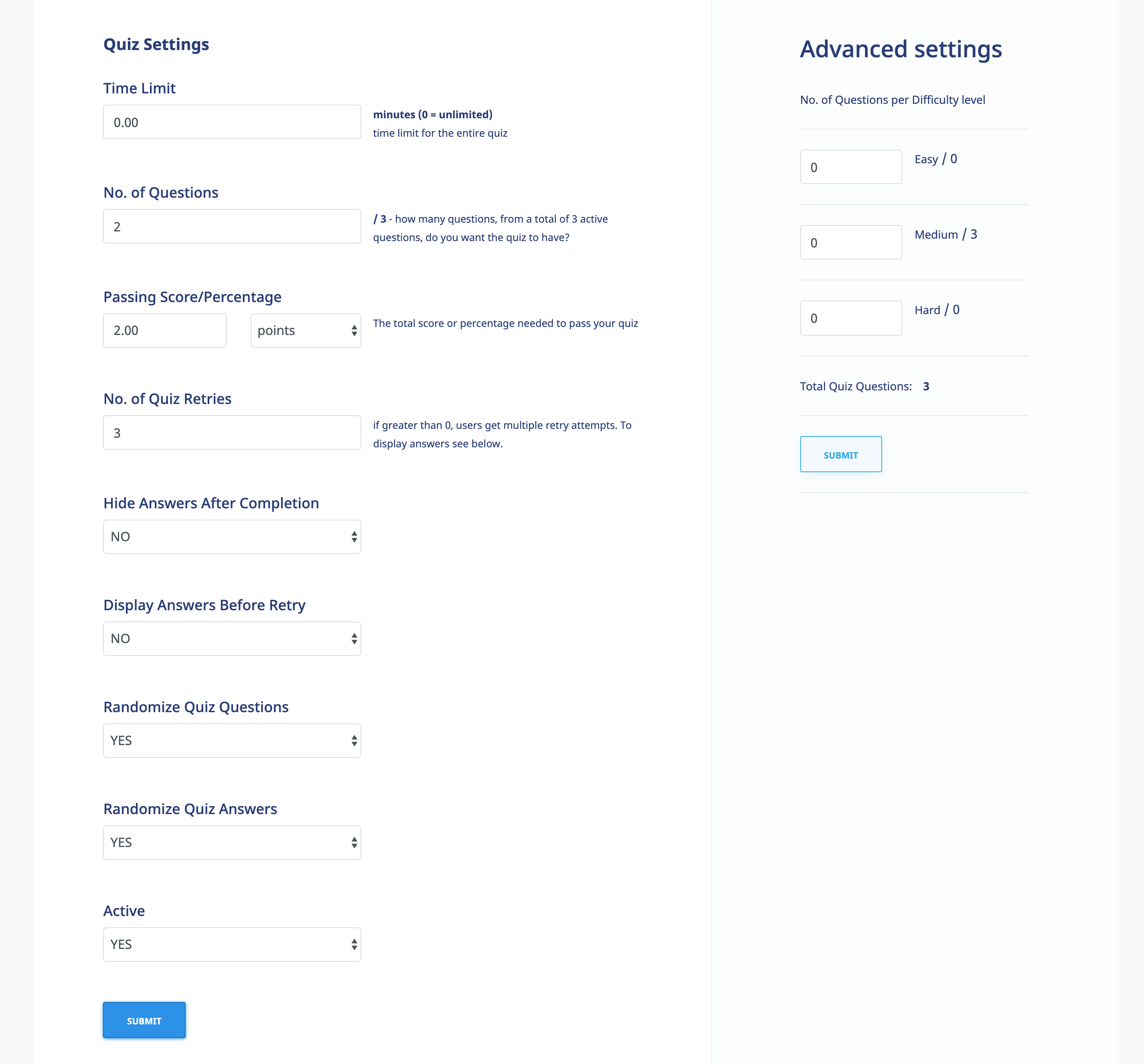
- Enter a Time Limit for the entire Quiz in the Time Limit field, in Minutes.
- Enter the number of Questions that you want to have in the No. of Questions field.
- Enter the Total Score or Percentage necessary to pass the Quiz in the Passing Score/Percentage field, selecting points or percentage as the basis for passing the Quiz.
- Enter the number of retries available for students who don’t pass the Quiz in the No. of Quiz Retries field. If greater than 0, users get multiple retry attempts. To display answers, see below.
- Select the YES option or the NO option to indicate whether or not to display answers before a retry from the Display Answers before retry list.
- Select the YES option or the NO option to indicate whether you want to randomize the quiz questions or not from the Randomize Quiz Questions list.
- Select the YES option or the NO option to indicate whether you want to randomize the quiz answers or not from the Randomize Quiz Answers list.
- Select the YES option or the NO option to indicate whether or not the Quiz is Active or Inactive from the Active list.
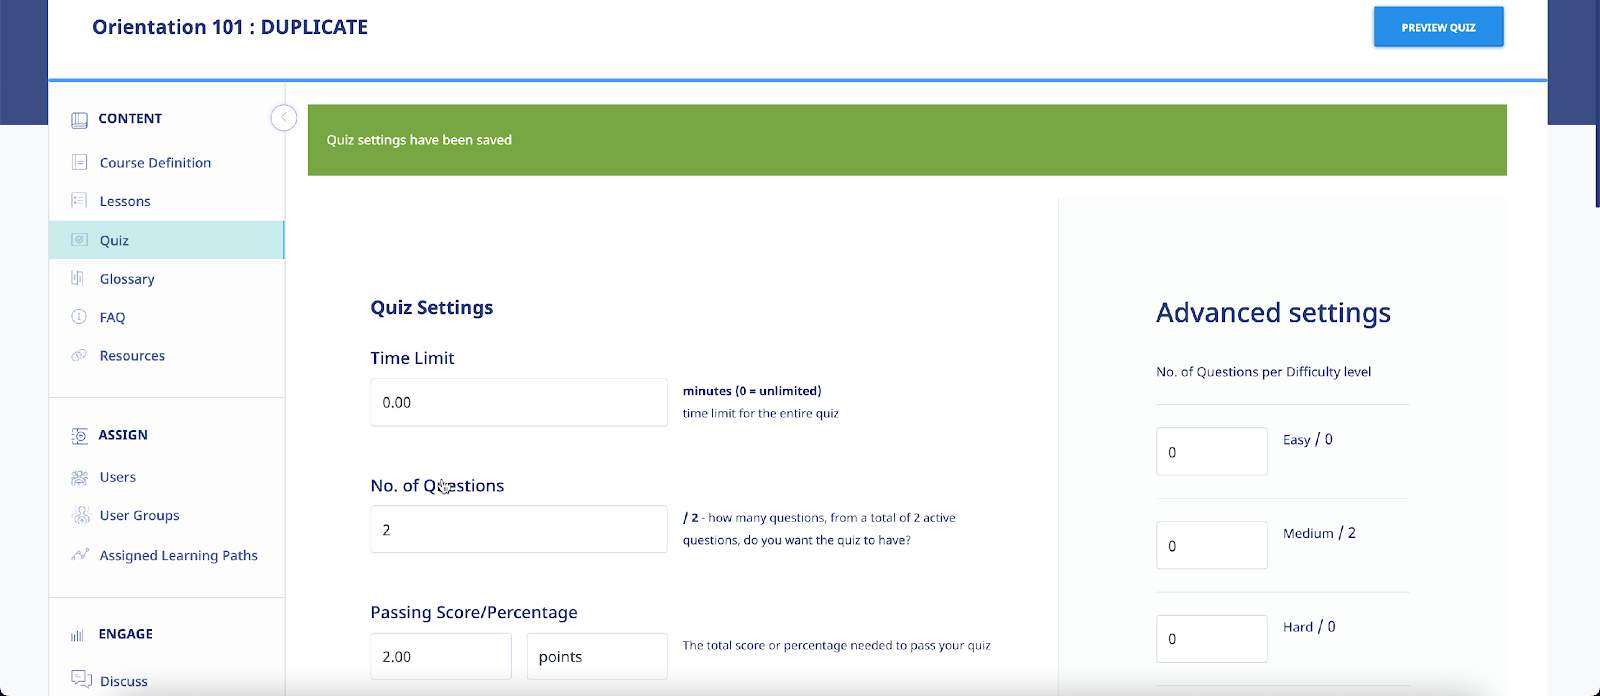
- Click to save the Quiz to the system. The system confirms that the Quiz Settings have been saved, as shown in the following illustration.
- Within the Advanced Settings portion of the screen, enter the number of Questions with a difficulty level of Easy, Medium or Hard, and then click .
Quiz Settings Explained
- Time Limit: Assign a time limit for Quiz completion. Just type in the number of minutes you want to assign for your quiz.
- No. of Questions: Do you want to use a 1/3 of the questions you have available in your Question Bank? Then type in the relevant number of questions (to be deployed) out of the Total Quiz Questions available to you. For example, if you had 30 questions in your Question Bank but only wanted to use 25 of them, then you will type in 25 in the [No. of Questions] box.
- Passing Score: What is the minimum score a user would have to achieve to pass your quiz assessment? From the example above if you need your users to correctly answer 20 questions out of 25 total questions to pass your quiz then type in 20 questions in the [Passing Score] field.
- Passing Percentage: You can alternatively select the percentage passing value, and eLeaP will automatically calculate it based on the number of questions used.
- Number of Quiz Retries: Give your users more than one quiz attempt. Use the Quiz Retries option to set the number of additional retry opportunities.
- Display Answers before Retry: Because of the retry options above, you may choose to block answer feedback during the retry effort. This way, users will only see the correct answers when they accept their final quiz scores.
- Randomize Quiz Questions: Use this option to let eLeaP automatically randomize how it serves up your quiz. This works best if you use fewer questions than your total number of created quiz questions.
- Randomize Quiz Answers: In addition to randomizing the order of the quiz questions, you can also randomize the order in which your Quiz answers are displayed. For example, the correct answer might not be option B, it could be moved to option C.
- Ready to launch your quiz? Choose option [YES] in the [Active] field and then click [Submit] to launch your Quiz.
Quiz Advanced Settings
eLeaP™ makes it easy to automatically set and assign different difficulty levels of quiz questions to your users. Let’s say out of a total of 30 questions in your Question Bank, you want the eLeaP™ system to designate 10 questions as Easy, 10 questions as Medium and 10 questions as Hard or Difficult. Click . The eLeaP™ system would then automatically assign these questions to your users.
EcommerceSelecting the section from the Course Definition dropdown displays the Ecommerce screen, illustrated below.

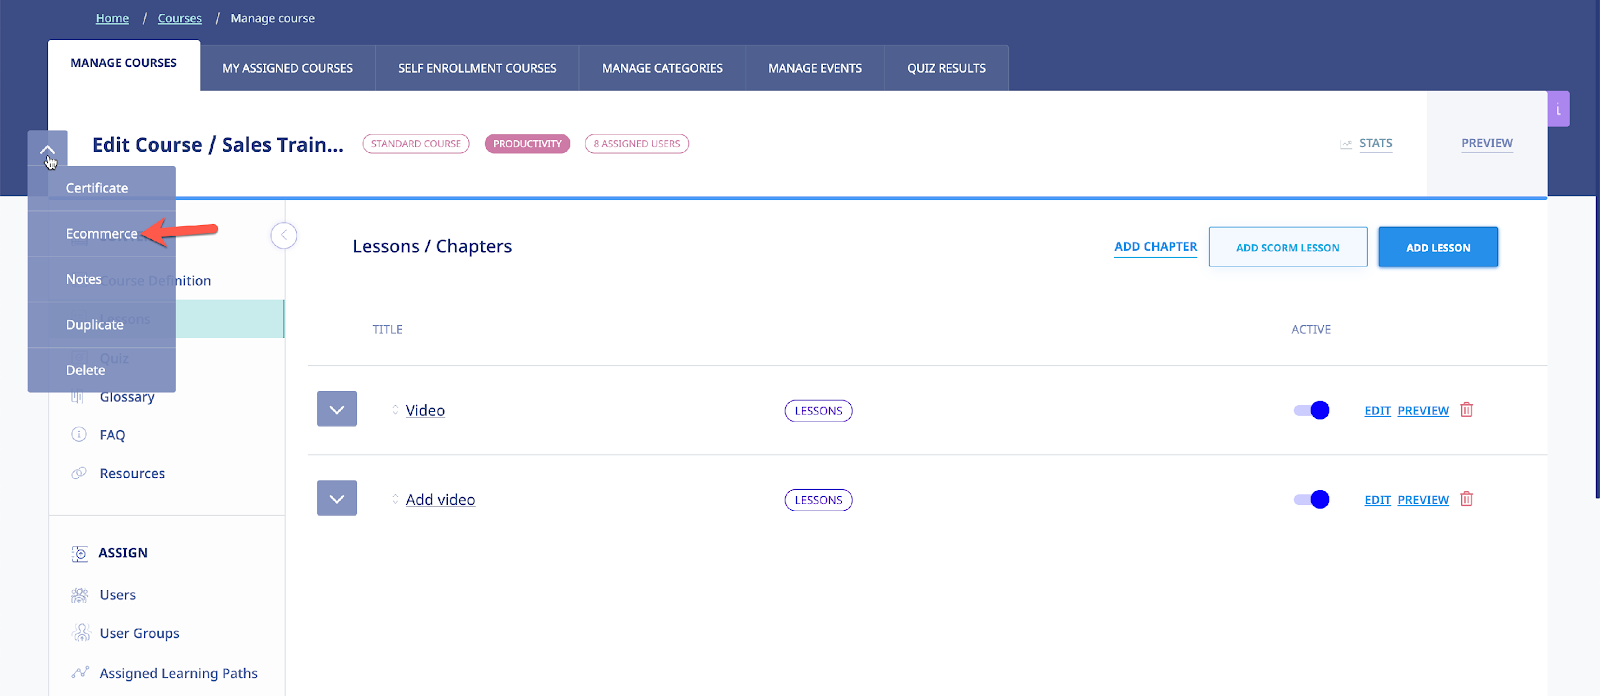
Select the I want to sell this course on my eLeaP e-catalog check box if you want to sell this Course on your eLeaP e-catalog.
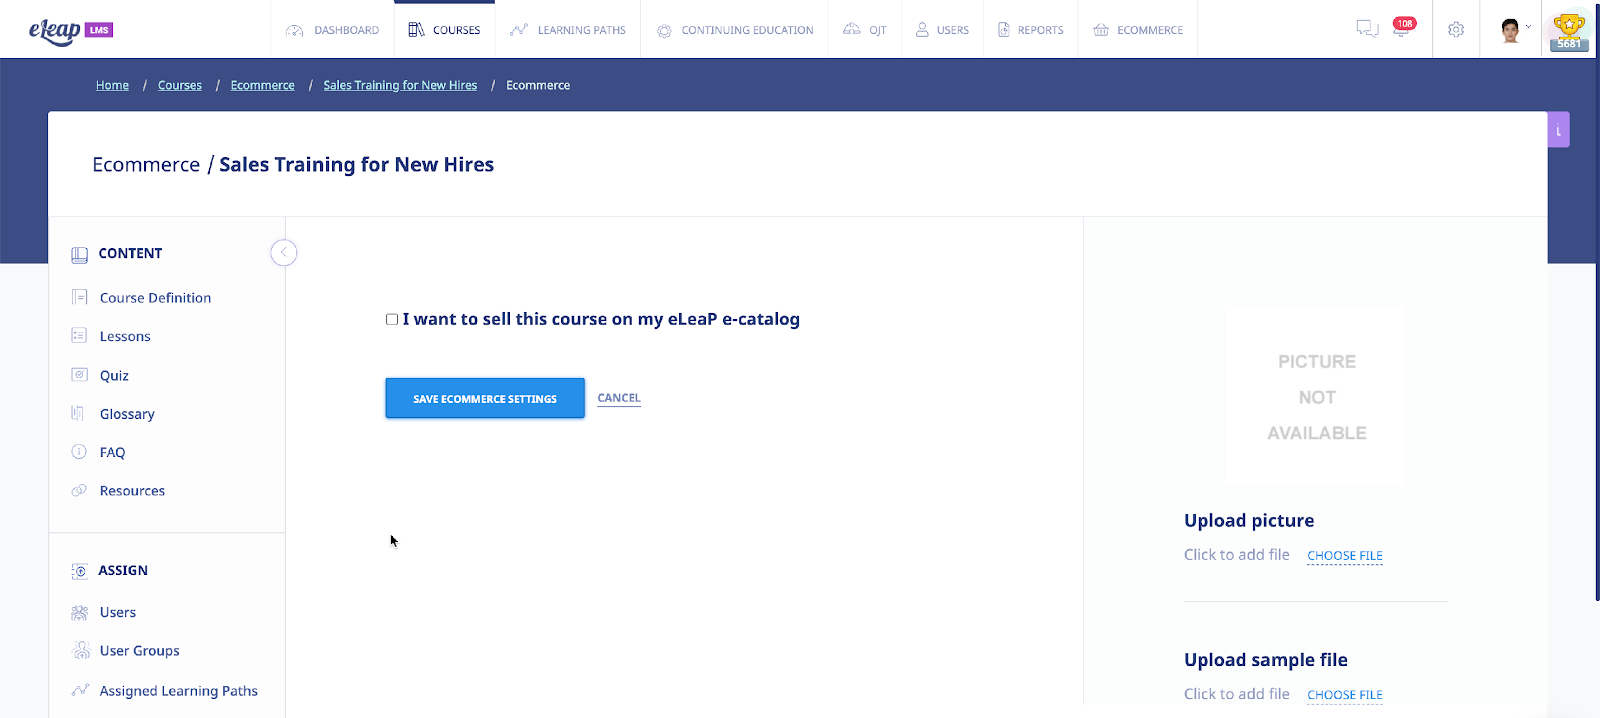
The screen expands, as shown in the following illustration, so that you can configure the necessary settings to accomplish this task. Use the steps below to successfully configure these settings.
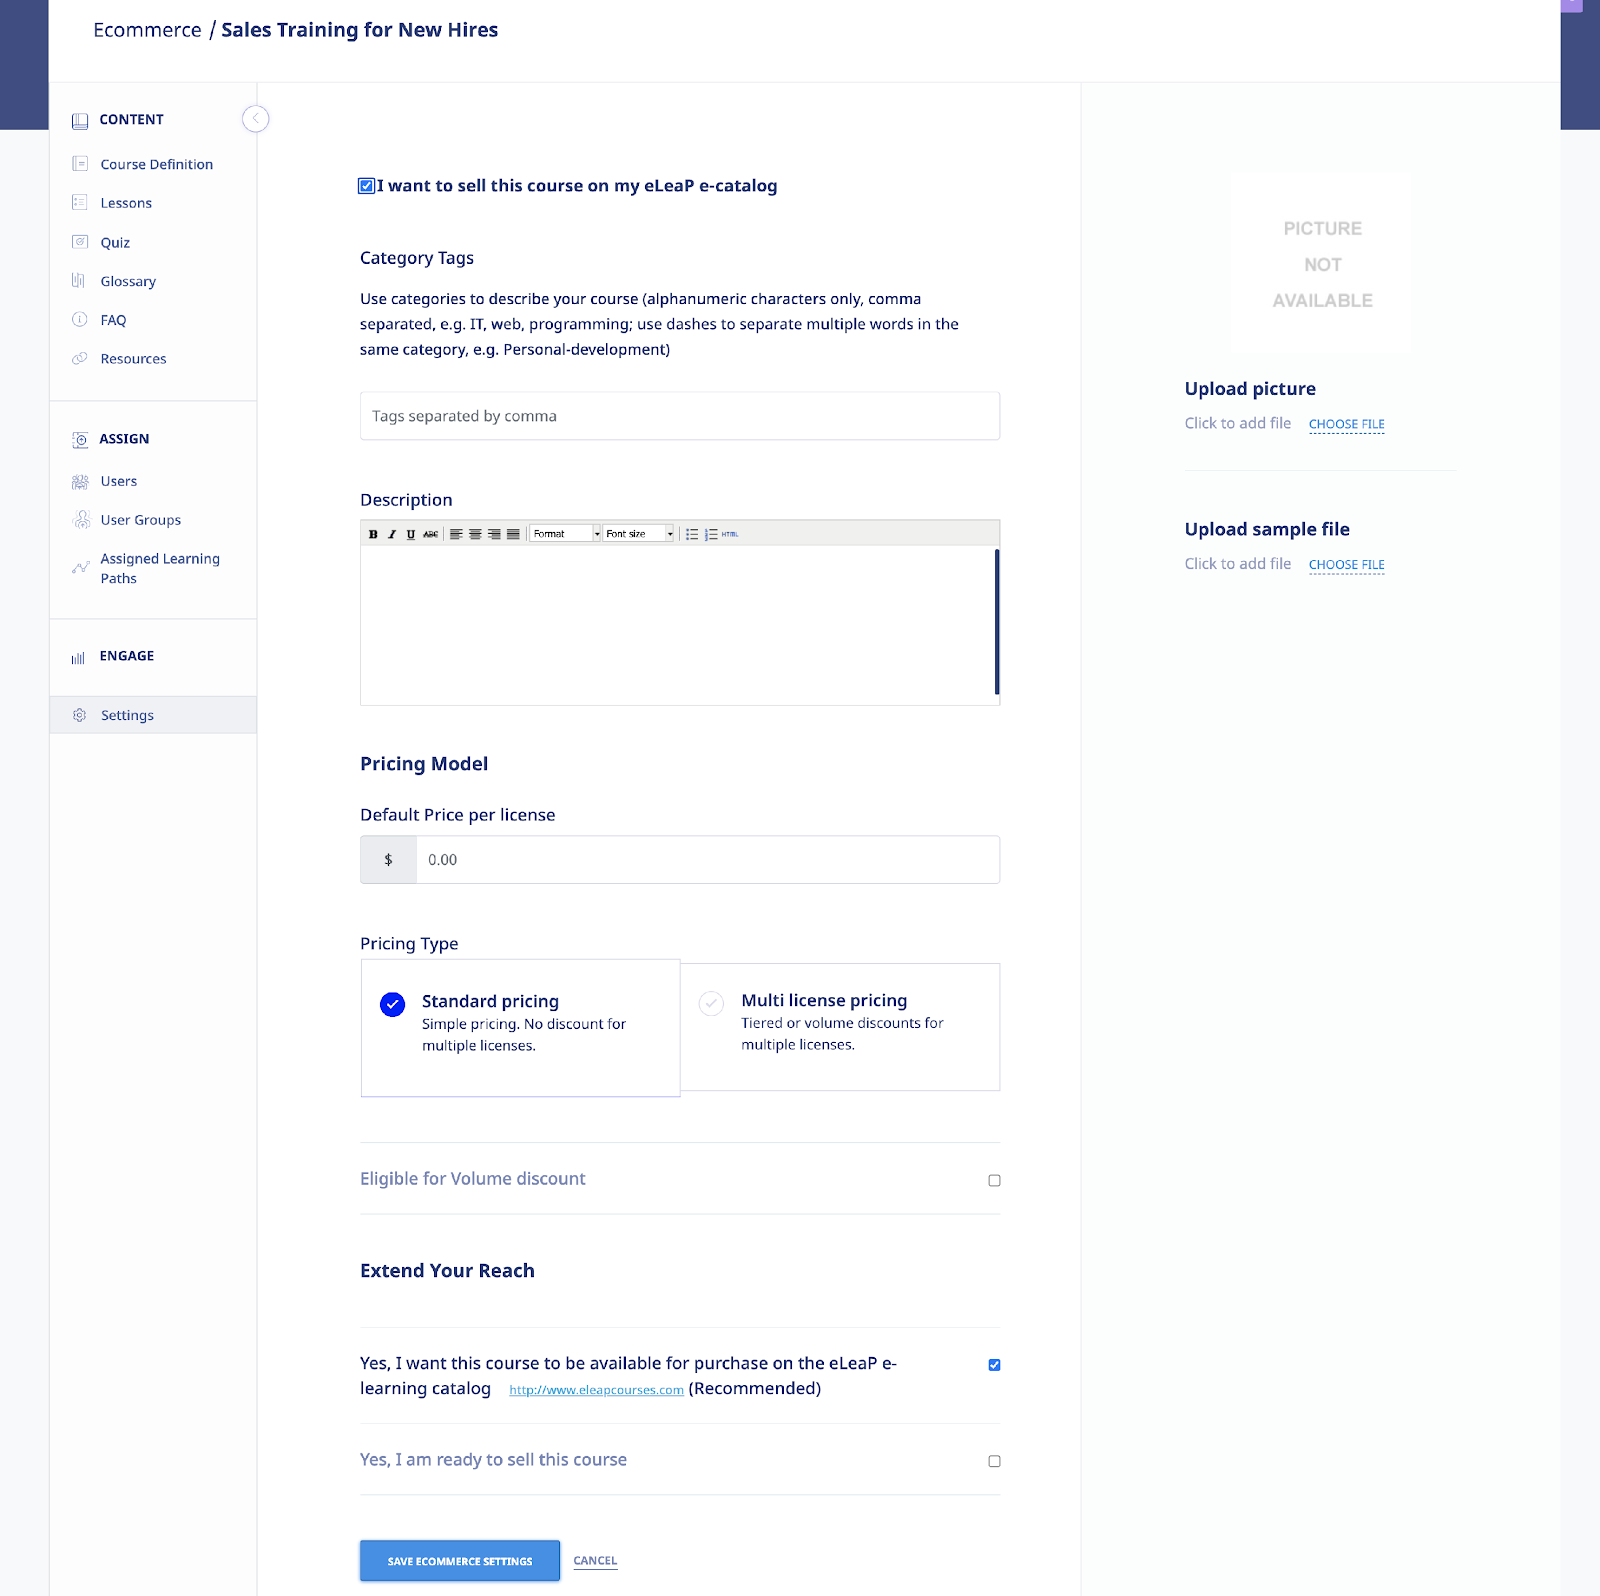
Within the Category tags portion of the screen:
- Use category tags to describe your course (alphanumeric characters only, comma separated, e.g. IT, web, programming; use dashes to separate multiple words in the same tag, e.g. Personal-development).
Within the Description section of the screen:
- Enter in the product description that would motivate buyers to purchase your course. If you want to add video, you can embed video from YouTube or Vimeo or other sources. Let us know and we can help you.
Within the Pricing Model portion of the screen:
- Use Standard Pricing if you have a simple single price per license regardless of how many are purchased. Enter the price for a single user to take a Course; for example, $10.
- Use the [Multi license pricing] if you wish to create more complex pricing.
Note: You can create your own multi-user price based on the number of users below. For example, for a total number of users between 1 and 150, the price per user is $50. You can also change to Volume-based multi-license pricing.
- You can use Volume pricing or turn off Volume pricing and use Tiered pricing for the Multi-license pricing calculation.
- Select either the Sum of previous order and new order total or the only new order total radio button as the Calculate upgrade pricing using method option, as appropriate to this Course.
- Enter the upper range value in the Upper Range field for the number of Users and then click . The pricing will be added to the Pricing Structure. Once pricing has been added, you can click the delete link to remove it.
Note: Since pricing is cumulative, deleting a single price level will void all other price levels.
Within the Upload picture portion of the screen:
- Click the link. While eLeaP does not require a course image for posting eCommerce courses, an image for display and marketing purposes is incredible. Images can be in JPG, GIF or PNG format. After clicking , the screen expands to display your files. Simply select an image file and click to upload your image file.

Within the Sample File portion of the screen:
- Click the link. eLeaP requires a course sample for display and marketing purposes. Samples can be in PDF format. The screen expands to display your files. Simply select a file and click to upload your sample file.
Within the Extend Your Reach section of the screen:
- Toggle the ON button to make your approved course available for purchase on the main eLeaP learning catalog located at http://www.eleapcourses.com (Recommended)
- Toggle the ON button to submit your eCommerce course for activation. Toggle ON for Yes, I am ready to sell this course.
- Click to save your changes to the system.

Certificate Template
To create and deploy completion certificates, click dropdown from the Course Controls dropdown. The Certificate Template screen, illustrated below, is displayed. Use the steps below to create a Certificate Template.

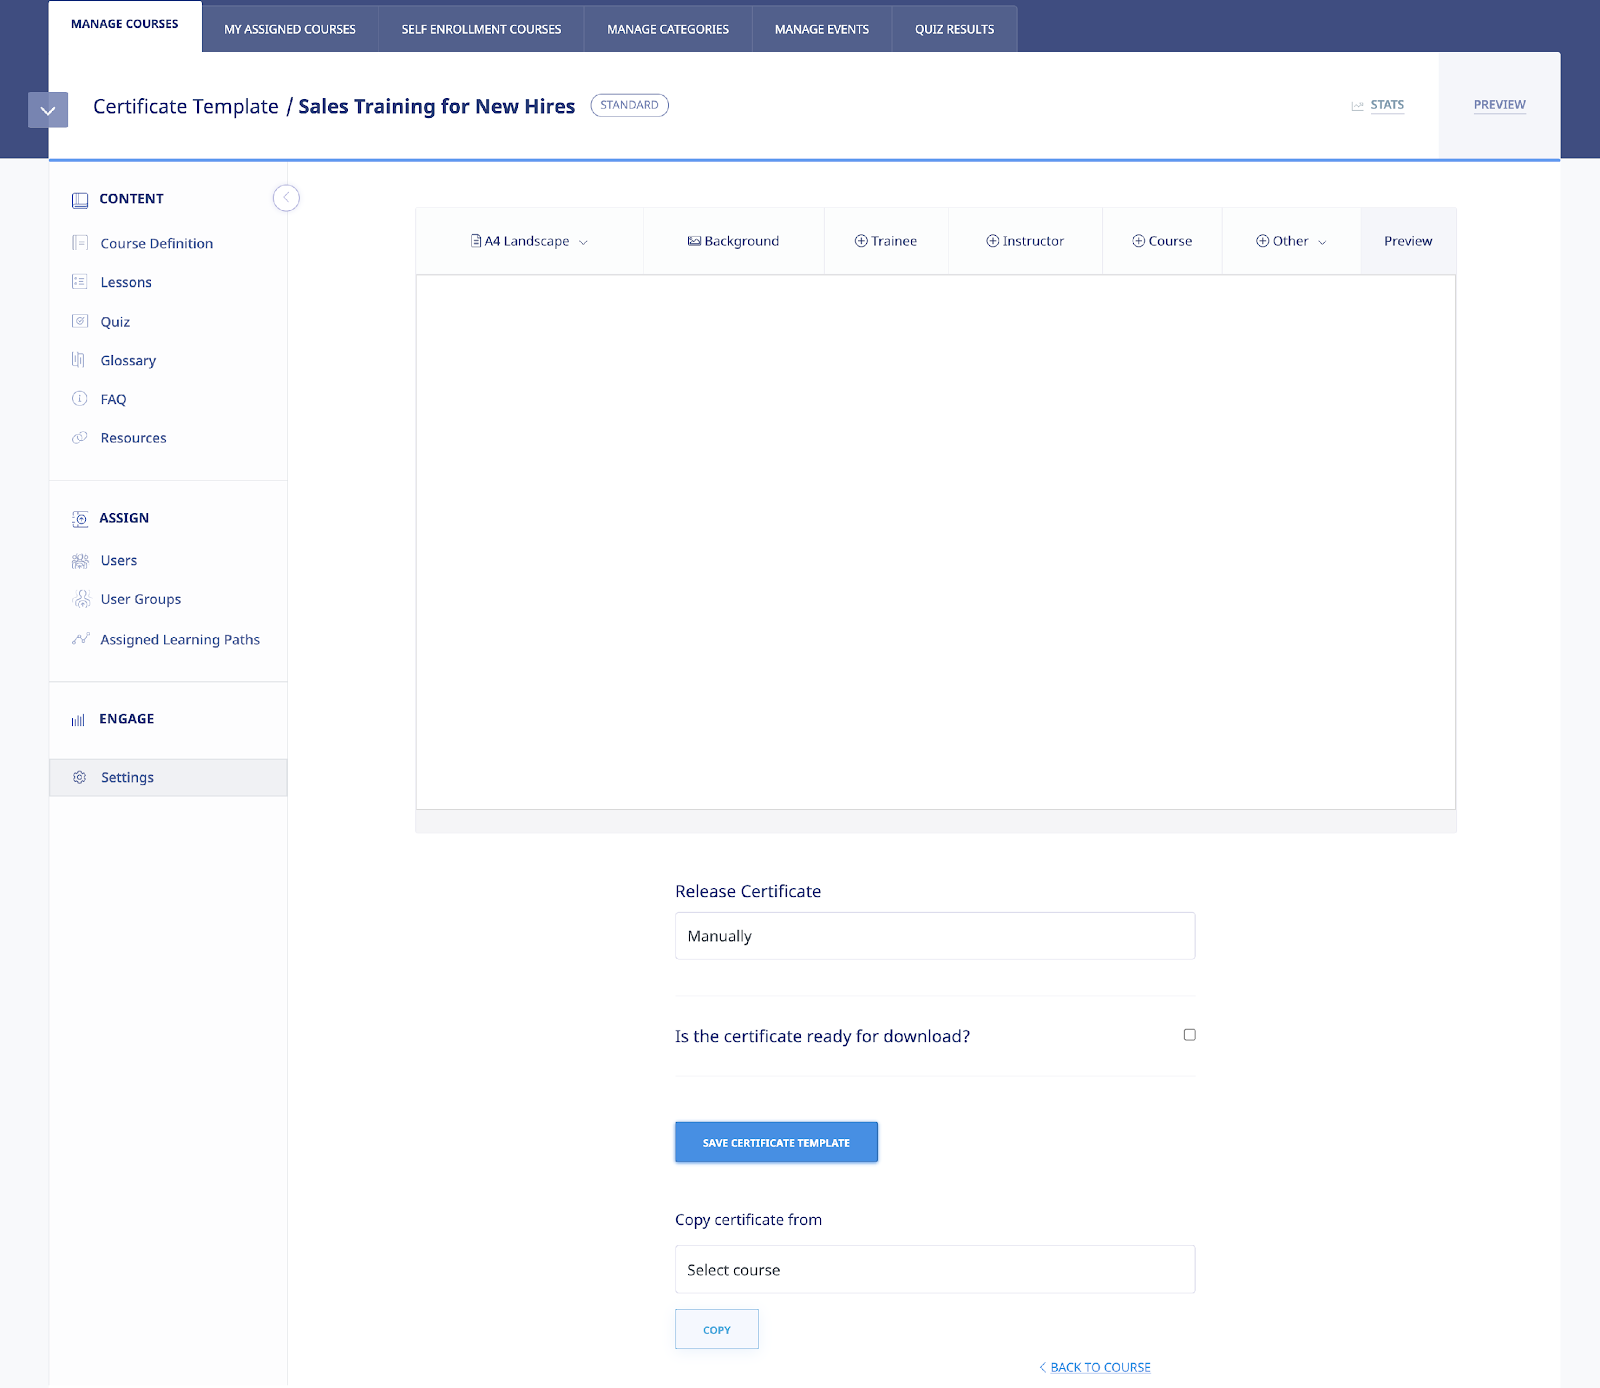
Certificate Orientation:
- First, select your certificate paper orientation. Your certificate can be any of the following sizes and dimensions:
- A4 Landscape (842x595 px)
- A4 Portrait (595x842 px)
- Letter Landscape (792 x 612 px)
- Letter Portrait (612x792 px)
Certificate Background Image:
- Next, select your certificate back image to upload. Please note that the background image should be the same dimensions as the certificate orientation in step one. Click tab to upload your own background design for your certificate of completion. Follow the on-page instructions to add in your certificate background.

- Download free certificate backgrounds at https://help.telania.com/en/articles/6139029-certificate-backgrounds
Customize Certificate Fields:
- Use the following options, as appropriate, for your Completion Certificate:
- Add <Trainee Name> by clicking
- Add <Instructor Name> by clicking
- Add <Course Name> by clicking
- Add other fields including custom fields by clicking


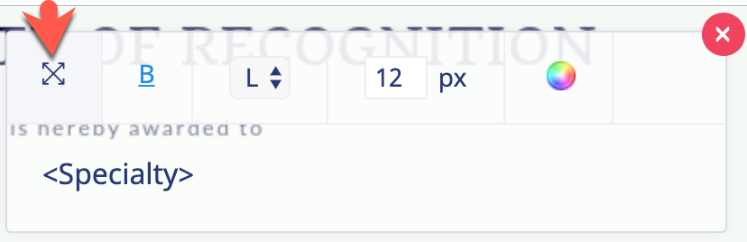

- To position/reposition inserted fields in your certificate, use the drag-and-drop option within the inserted field block. Once the desired position is achieved, feel free to use other formatting like [B], left/right alignment, font size or font color to further customize your certificate. When a field is added to the Template, as shown in the following illustration, you can modify its appearance using the available options. You can set the text alignment as Left (L), Center (C) or Right (R), set the Color for the text by clicking , make the text Bold by clicking , and set the Font Size for the text by modifying the px value.


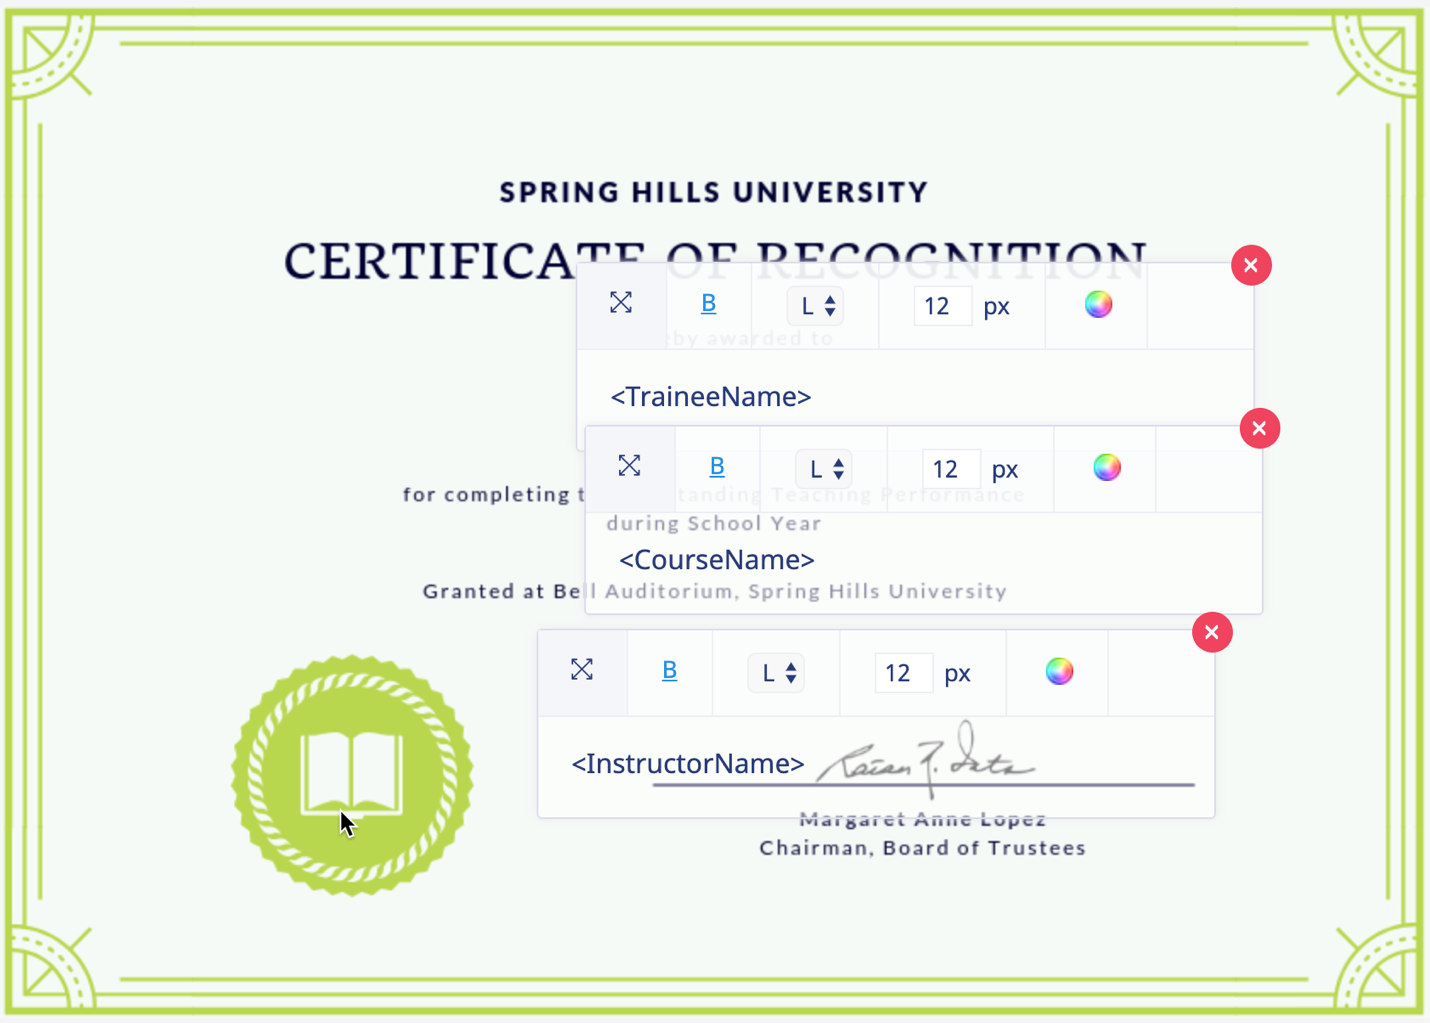
Certificate Release Options:
- Select either the Manually, After course completion, or After course and quiz completion option from the Release Certificate drop down. For example, you can manage this process manually or issue certificates after a course is completed. You can also set eLeaP to automatically release a certificate if a user has successfully completed a quiz assessment.
- Toggle the Certificate Template Ready for Download option to ON or leave it OFF, to indicate whether or not the Certificate Template is ready to be downloaded.
Preview Certificate:
- Once you have added all of the Fields that you are going to use, click to display a Preview of the Certificate.
- Once you are satisfied with the options/selections you have chosen, click . As shown in the following illustration, the system confirms that your changes have been saved.


Note: If your certificate is set to release upon a successful Quiz completion, you need to make sure you have created and set up or activated your quiz.
To quickly create a new Certificate, you can copy one that was created for another course by selecting that Course on the Copy certificate from drop-down, as shown in the following illustration, and clicking .
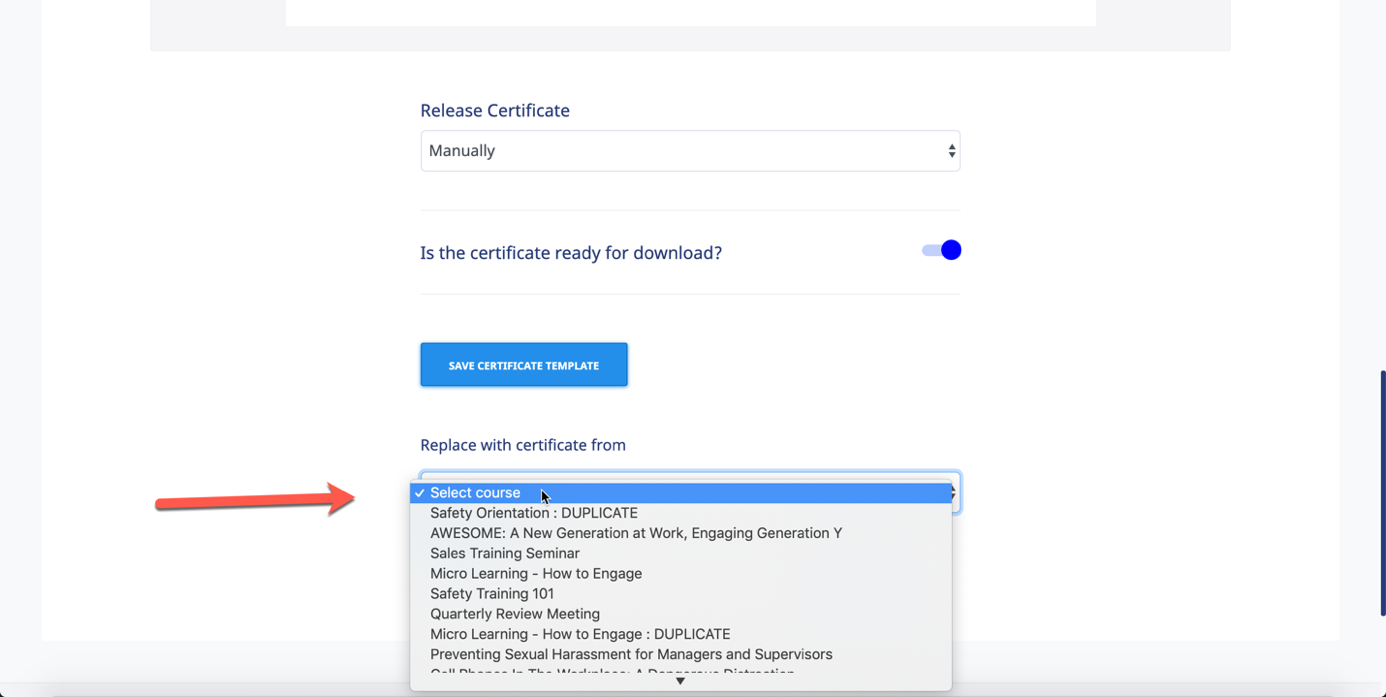
The system displays a warning message before performing the copy function to ensure that is your intention. Click to perform the copy function.


The illustration below shows a completed Certificate Template:
Categories
Categories are an important way to manage your course content. Think of categories as specific sections that will contain specific types of courses. Say you want to have your content organized by Leadership Training, Compliance, Orientation, Safety and so on, then use the category system to organize them. Course categorization is also a great way to create Learning Paths made of specific courses from specific groups of content.
To create a category, you can go to the tab and click the enter the name of the new category you want to add. Select the category color you want and [Save New Category]


Edit Categories
To edit categories, click the link to edit the name of the category. Please note that the name of the category can change and does not impact the category ID.

Delete Categories
To delete categories, click the link. Confirm the deletion by clicking the [Ok] button on the popup message.


Note: You can also create course categories during the course creation process.
Events
Use Events to manage classroom training or Instructor-led training. If you need users to self-enroll for upcoming classes or courses, the Events system will deliver.
Selecting the tab from the MANAGE COURSES menu, displays the Events you have created with Name, Created By, Date Created and Action details shown for each Event on the Events list.

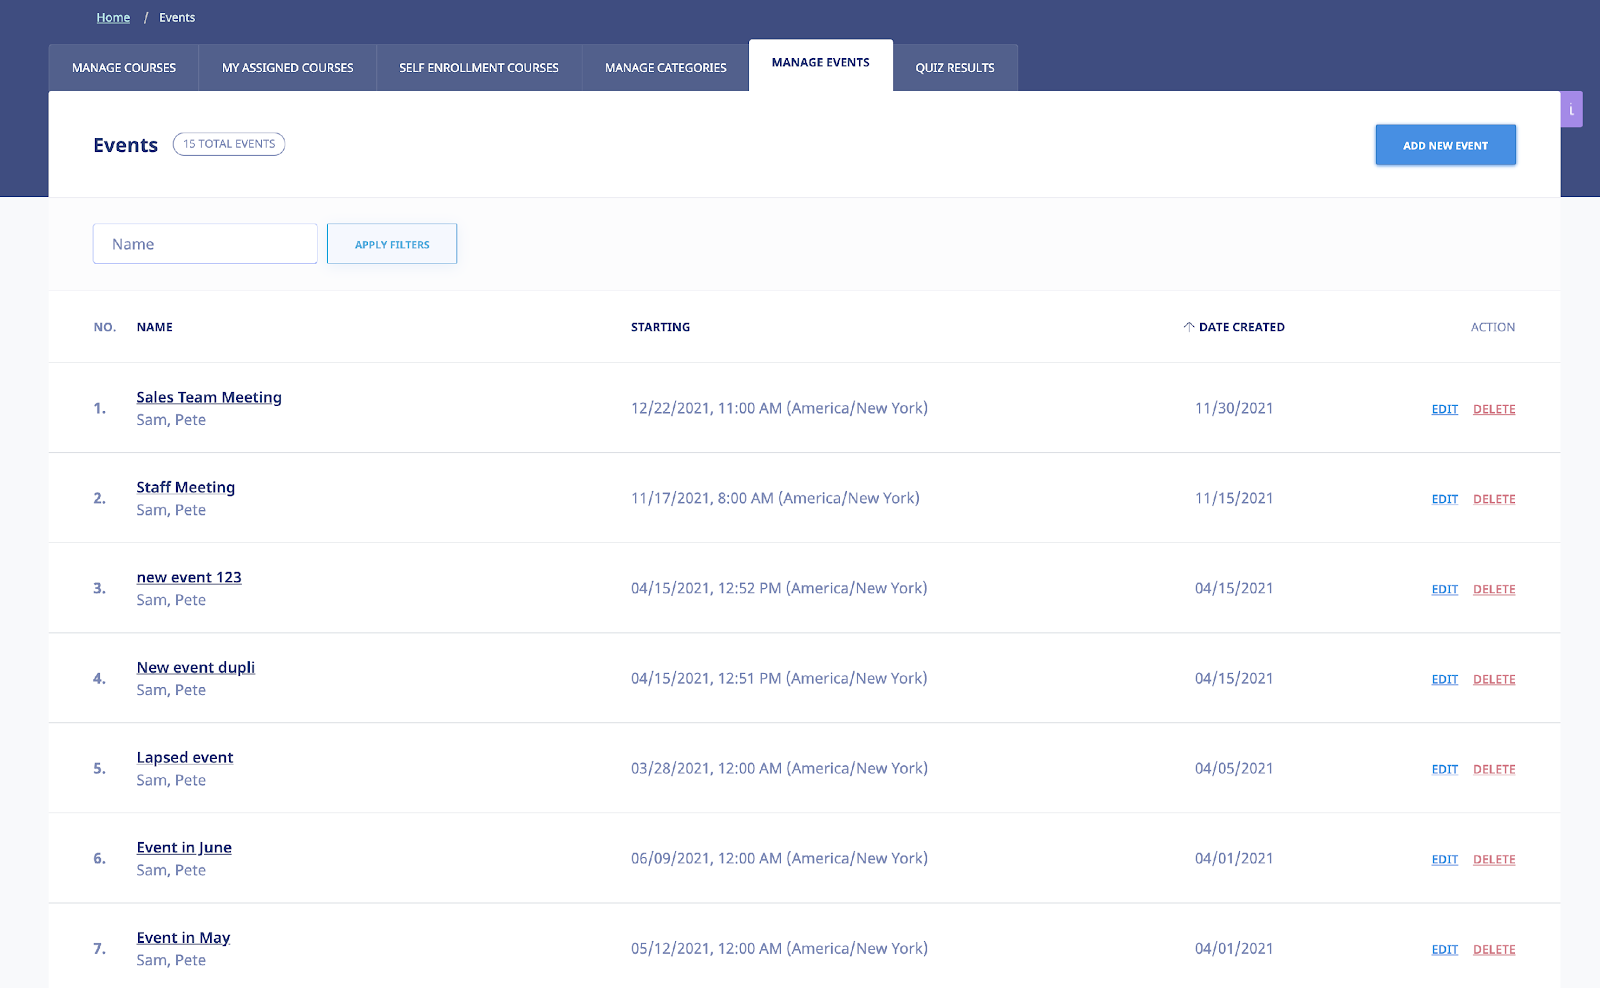
You can filter Events displayed by entering Event name and clicking .
Event Courses
Your Events require you to prepare a simple tracking course to be attached to your Event. A simple course can be created in 2 minutes. Here’s what do to do:
Add Event Course
Go to or click on if you are already in the Courses section, click to start adding in your new course.


IMPORTANT: Event courses should not have deadlines set. Also make sure to set Assignment Notifications to No. This will ensure that users are not getting conflicting email messages. See an illustration below:
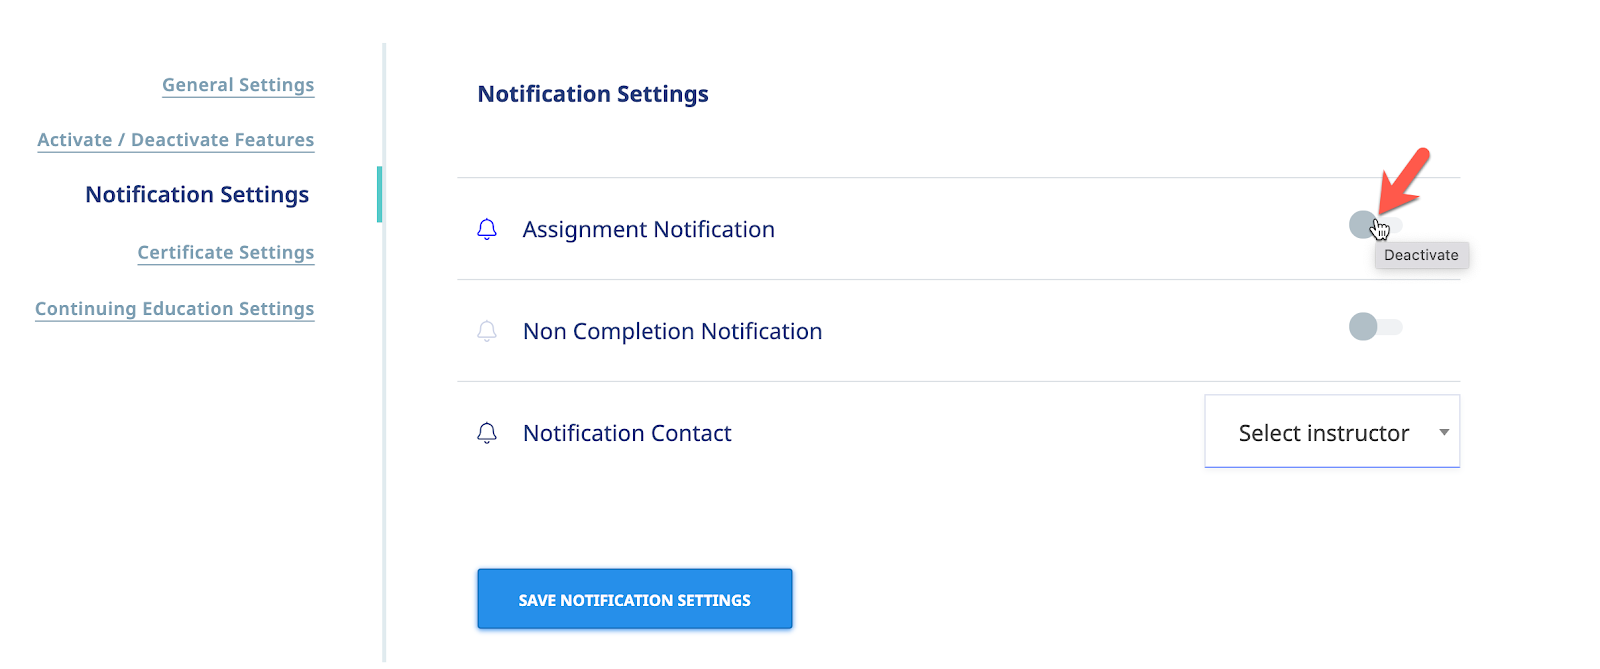
You can also duplicate your existing course to make a new course.
Adding a New Event
Selecting the link from the Manage Events screen displays the Add Events screen as shown in the following illustration. Use the steps below to successfully add a new Event to the system.

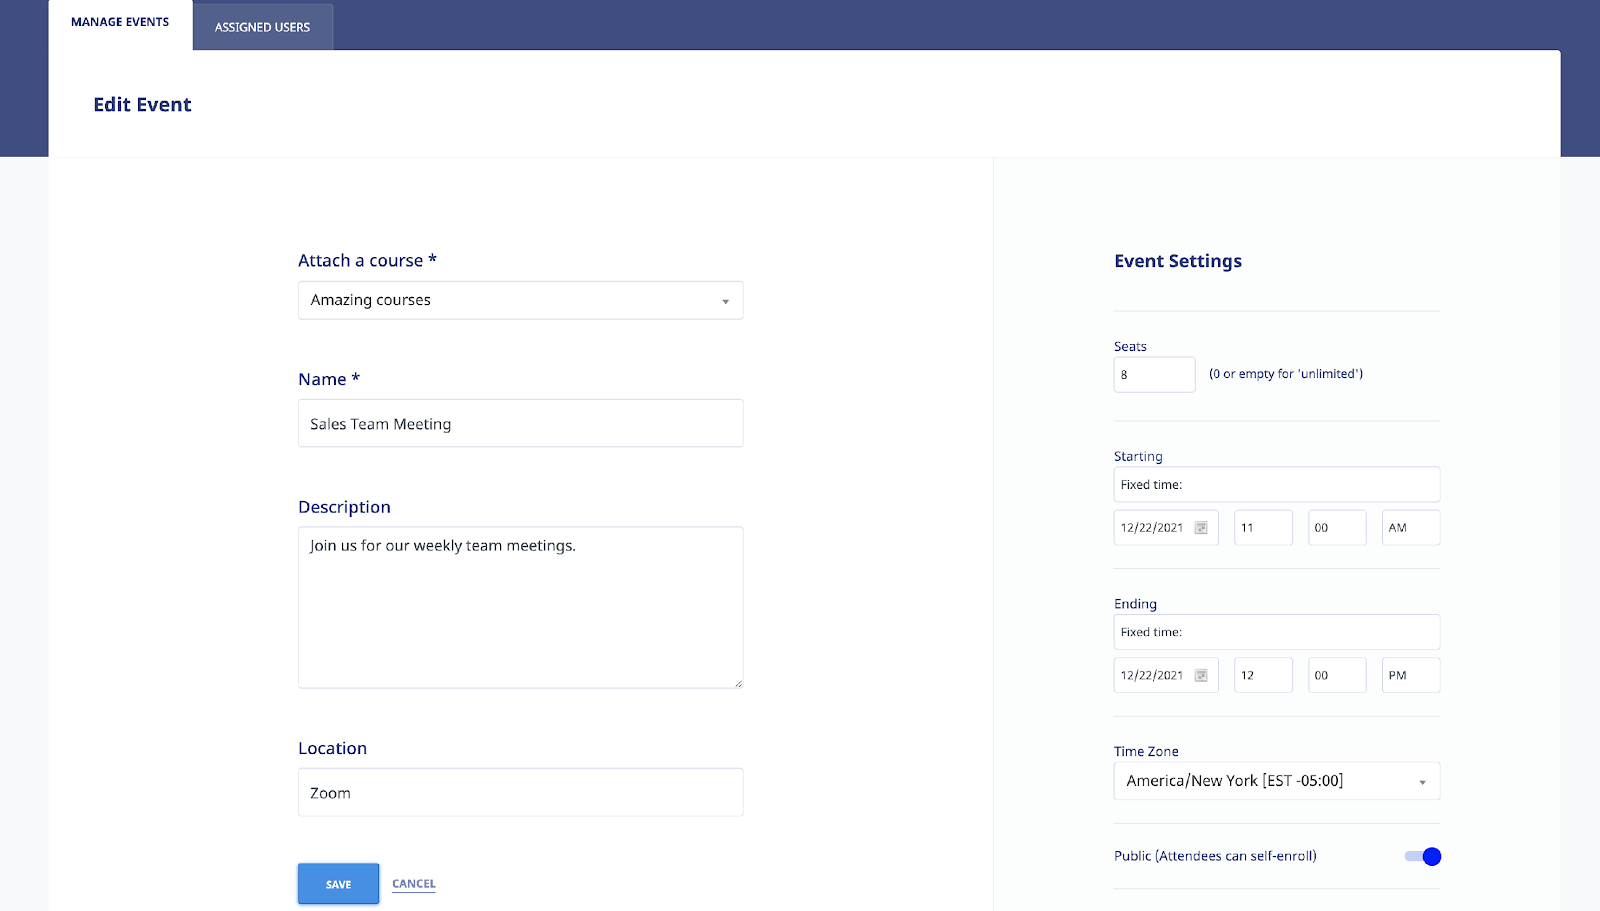
- Use the drop-down selector to select a Course to attach to your new Event. Please note that courses are required for Events in order for eLeaP to properly track and document completions. Plus, you can issue certificates, assign quizzes and distribute documents and handouts using the courses. Check the course settings to make sure Assignment notifications are turned off and deadlines are not set.
- Enter a Name for the new Event in the Name field.
- Enter a Description for your new Event. Descriptions are not mandatory.
- Enter a Location for your new Event
Event Settings
- Enter the number of available Seats for your new Event. You may leave this field blank or 0 (zero) for unlimited seats.
- Select whether your event starts Now or at some future date and time. For a future date and time, select the Fixed time option
- Should you select Fixed time, use the calendar to select the date and then use the hour selector to select the hour the event starts.
- Use the minutes selector to select the minute the event starts. For example, an event that starts at 8:45, you will select 8 for hours and 45 for minutes.
- Use the AM/PM selector to indicate if your event starts in the morning or afternoon.
- Select the Ending time for your Event using the same procedure as in (6) above. You may leave it as Never if you don’t wish to enter an Ending time.
- Use the Time Zone selector to indicate in which time zone your event starting and ending time occurs.
- Select the option to make this event available for self-enrollment in your Events Calendar.

- To make the event available, select Yes. Attendees can self-enroll.
- Click to create the new Event. It will now be displayed on the Manage Events screen.
The Events details screen for the newly created Event is displayed in the following illustration. You can click to make modifications to the Event.
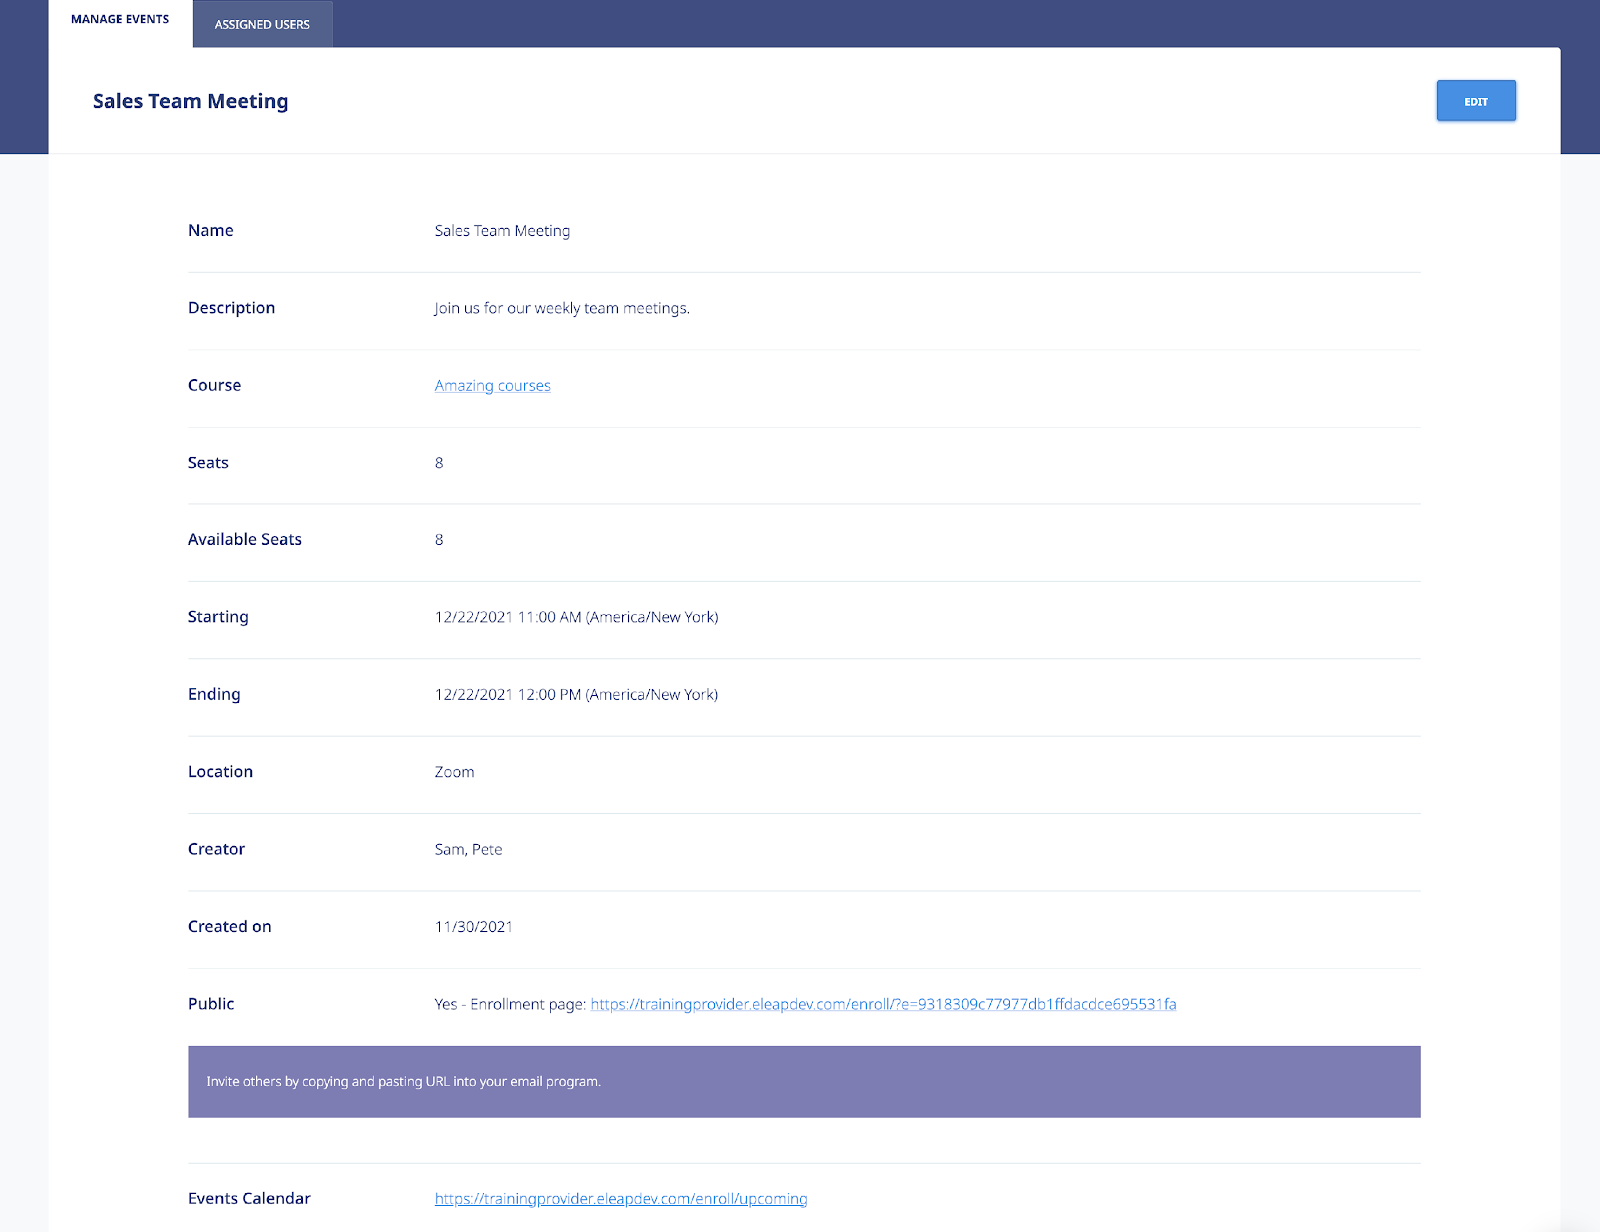
You can also click on the Course link to see the details of the Event-associated course. You can make modifications to your course including adding materials, setting up quizzes, or even adding in certificates and many other features.
Edit Event
To edit an Event, go to the Manage Events screen and click on next to the Event you want to edit. You can then proceed to change any existing information or setting of the Event you are editing.

When done, click the to make your changes permanent or to leave the edit screen and go back to the Events listing page.


Delete Event
To delete an Event, click the link in next to the Event in your Event listing.
You will need to confirm your delete attempt by clicking [OK] on the confirmation window.
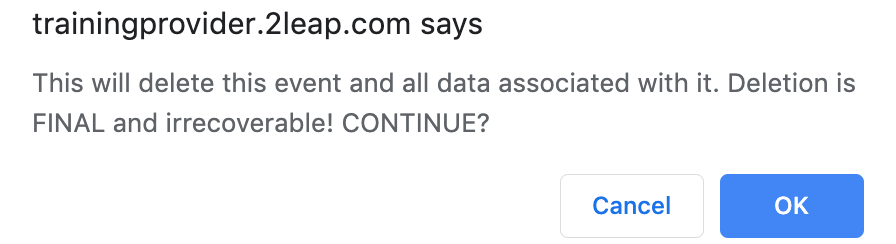
Note: Delete is final and irrecoverable. Your Event data will be lost and we cannot retrieve it. Please use only if you are sure you want to delete your Event.
Self-Enrollment
eLeaP has made it easy to invite attendees to your event(s). Simply click on the Public link displayed to see the specific Event registration page. You can copy and paste this link into your favorite email program to invite attendees to register for your event.
Another option is to share your Events Calendar link on your website, intranet or via email. Simply copy the link provided and add it to any location your attendees can go to register for your event(s). Your Events Calendar link will be something like https://youreleapaccount.2leap.com/enroll/upcoming
Event Registration page
When your attendees go to an Event registration, they will see the option to either log in to register (for users who already have an account in your company), or to enter their name and email as well as password to create an account to register.
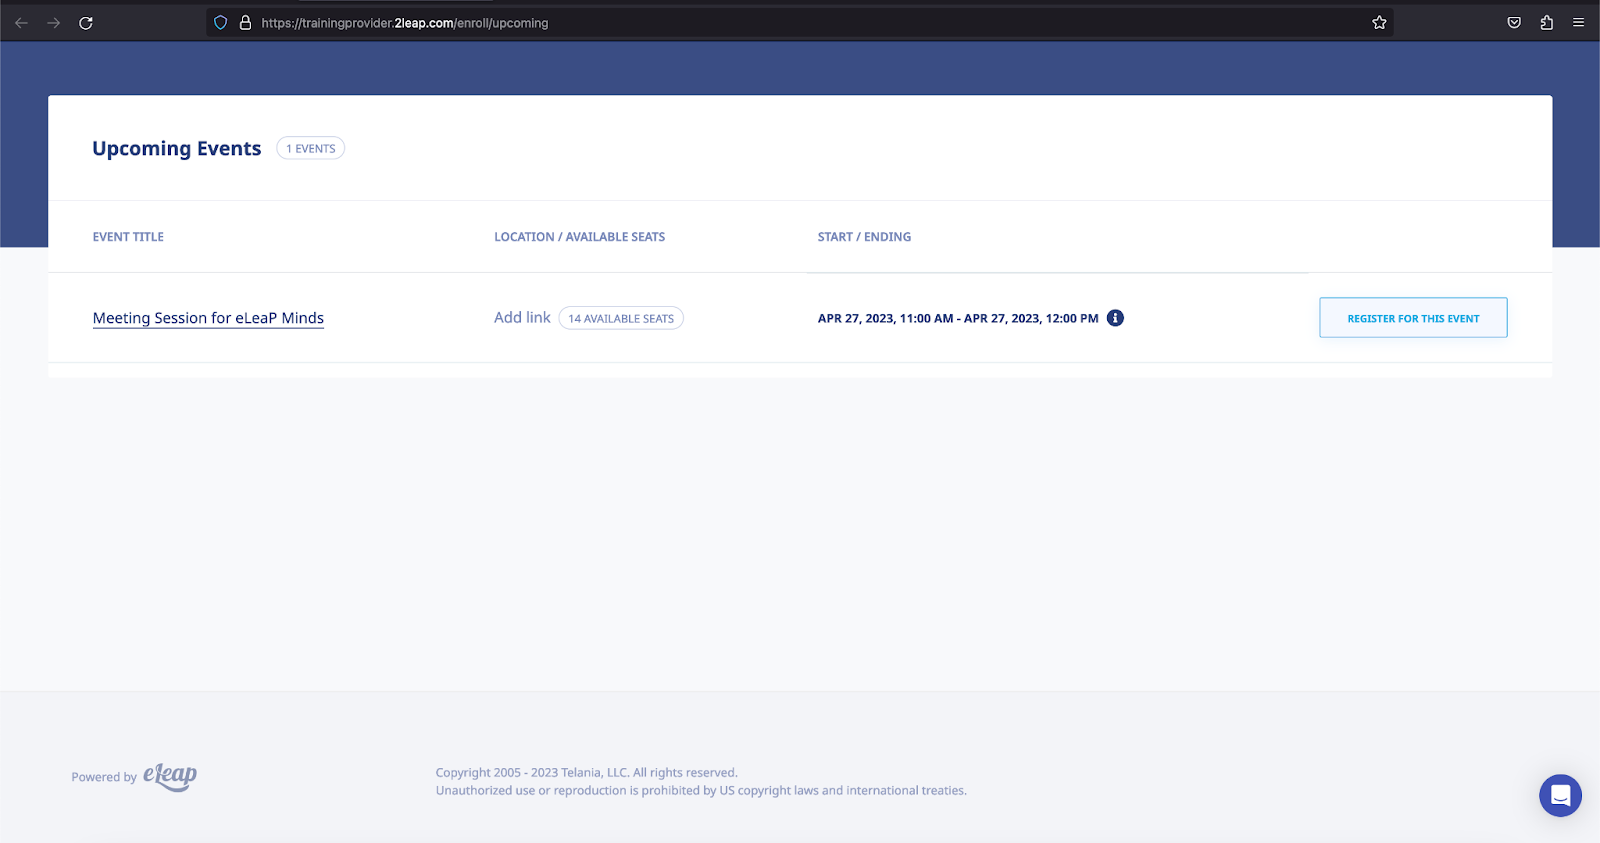
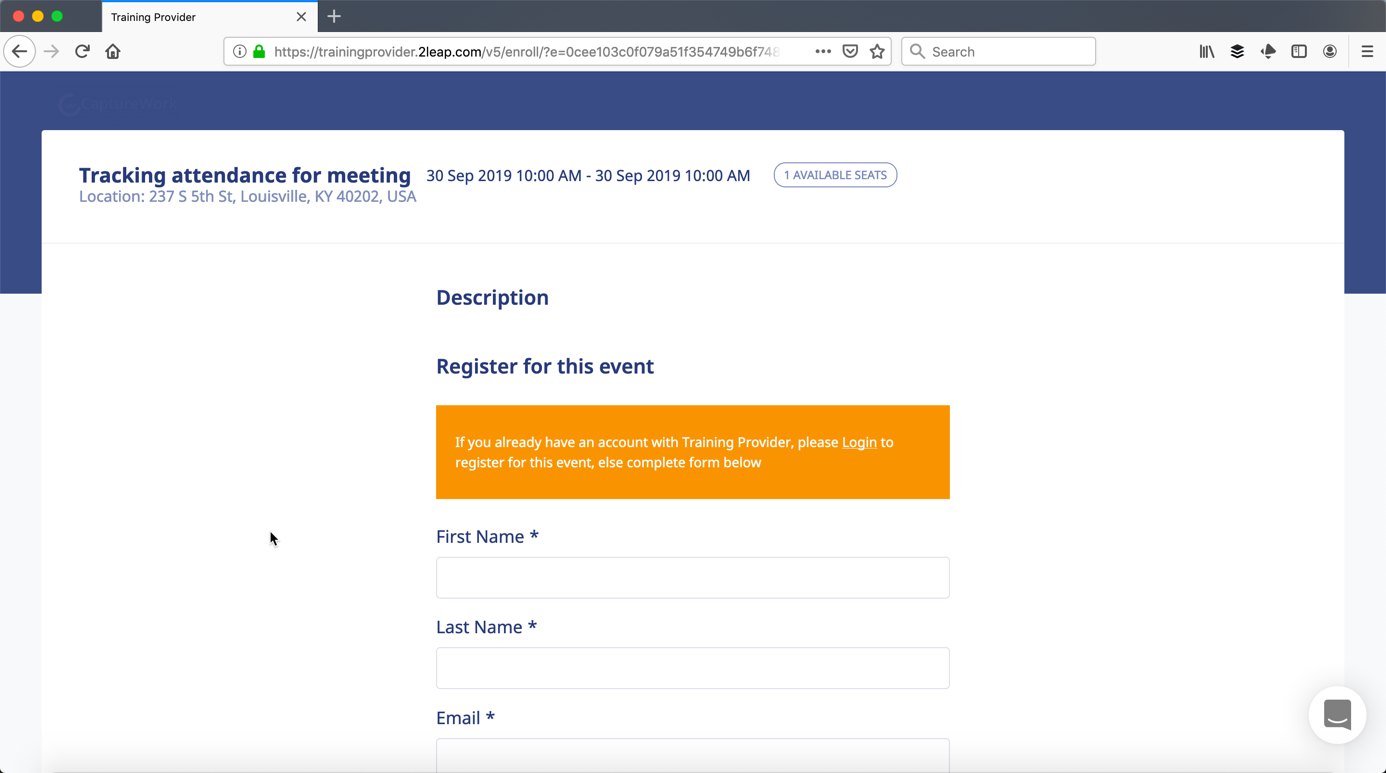
If your event is full, the following message will appear:

Subsequent registrations will be held in Pending status. See more about Event statuses below.

You should see your existing attendees or assigned users in your Event.
Event Assignment
While you can enable the public self-enrollment option for your attendees, you can also directly assign your existing users to your events. A direct assignment is quick and ensures that only the right attendees show up for your Event.
To assign users to your Event, click the tab from the Event details screen.

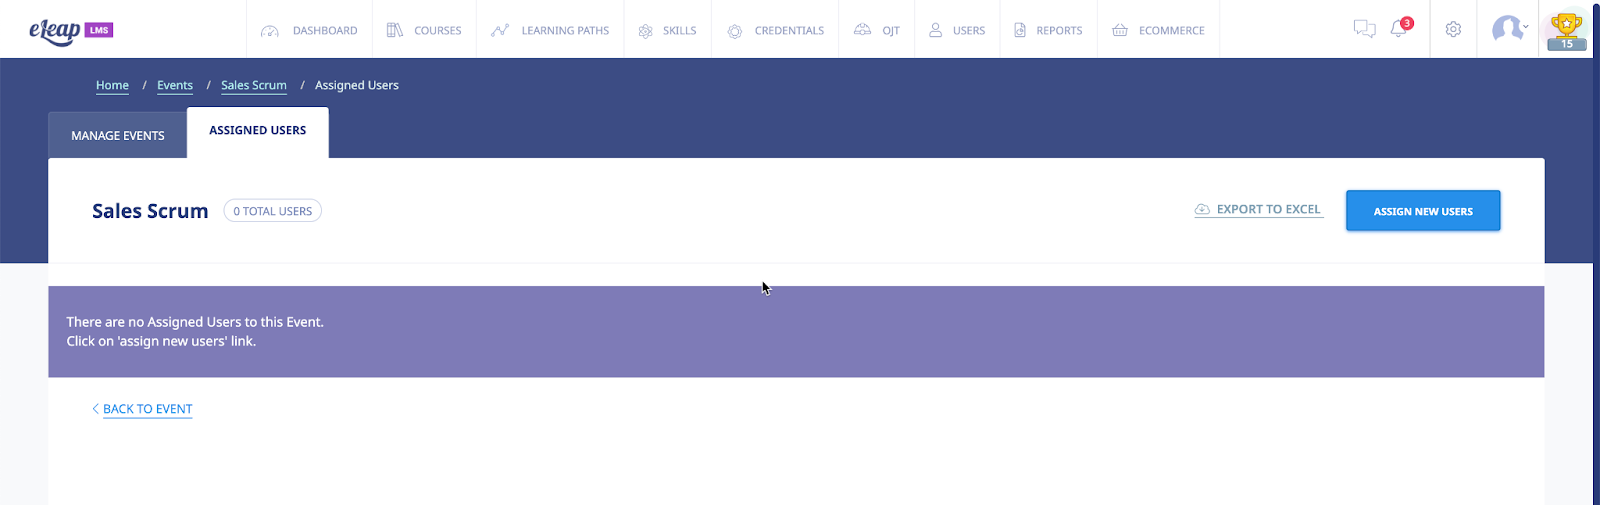
To assign users to your new Event, click the button. You can then filter your list by user Name, Access Level or User Group membership.
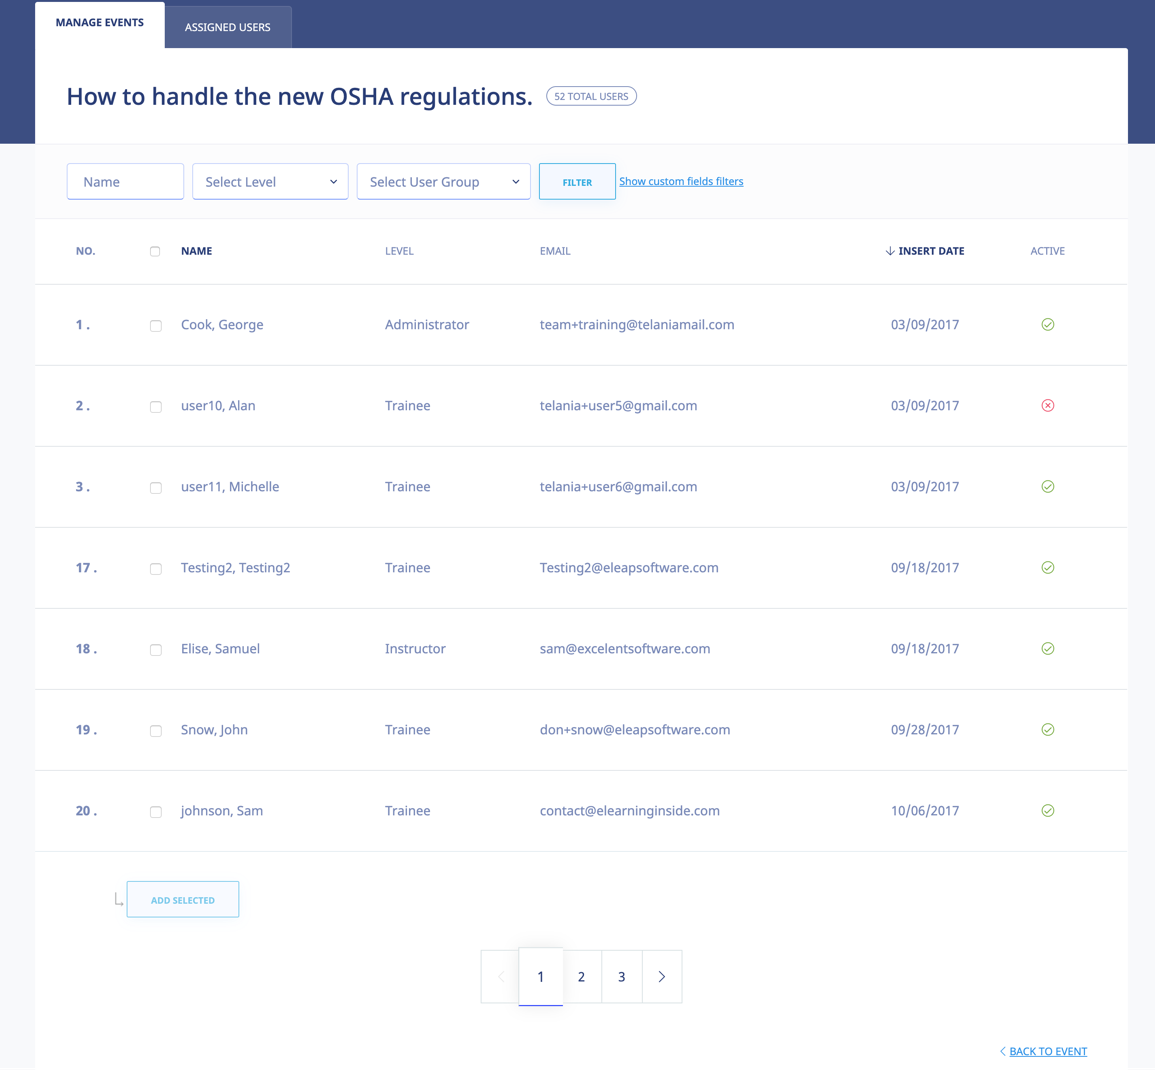
Check the boxes next to the names you wish to add to your Event and click to add attendees to your Event.
Once added, your attendees will receive an Event confirmation message like:
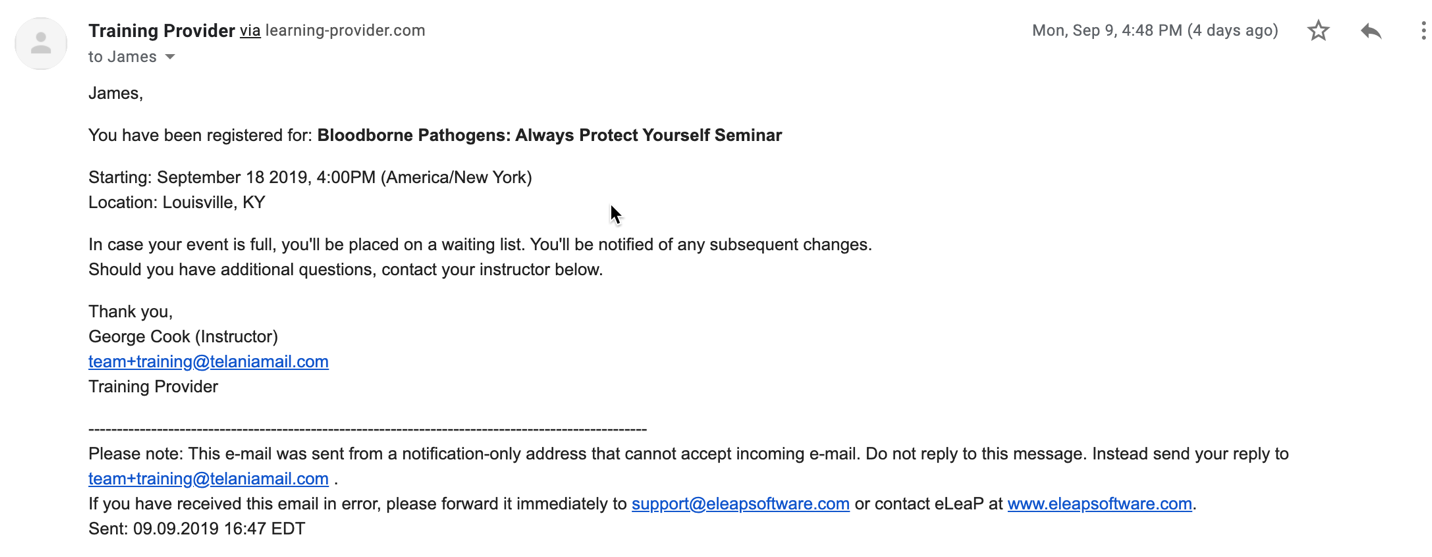
Note: Most modern email programs will enable users to click on the Event Date to add the Event reminder to their own calendar.
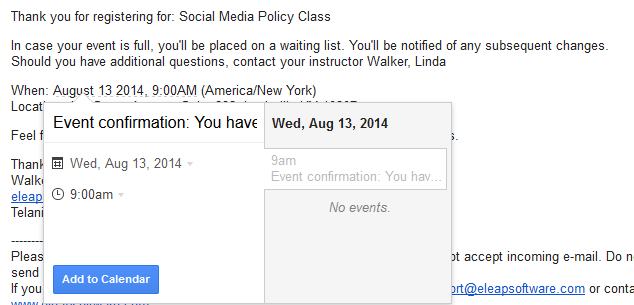
Event Status
The Events System has two main statuses: Registration Status and Event Completion Status.
Event Registration Status
Event Registration status indicates the current status of a user’s registration for the specific event. Event registration can be:
- (Approved):

- An Event user is automatically approved if their registration occurs before the Event Start time and if the registration did not occur after the maximum number of seats allowed has been reached. For example, if you create an event with 5 seats, the first 5 users you add to the event or self-register for the event will automatically be approved.
- The 6th registrant and subsequent ones will be held in a wait list with the word ‘waiting’ added to their names -
- You can move a user from the Waiting list to Approved by clicking on the [Pending] status to reveal a drop-down with options to select Approved, Withdrawn or Pending -

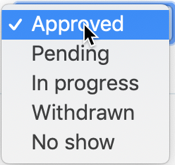
Note: Please be careful with changing Event Statuses as this triggers an email notification to the specific user.
- (Pending):

- A Pending Event status indicates that there have been more registrations than the allowed number of seats. All Pending registrations will have been warned about the event being full.
- An attendee in the Pending status will receive an email notification indicating their Event status.
- Any changes to the Pending event status will trigger an email alert to the specific users. For example, if you change a Pending user to ‘Approved’ or even ‘In Progress,’ eLeaP will send an email alerting the user as to their new status.
- You must first change a user’s Pending status to ‘Approved’ or ‘Withdrawn’ before you or the system can automatically assign a course to them for completion purposes.
- (Withdrawn):

- A Withdrawn status is when you need to leave a user in the list of registered users but yet indicate the user as no longer part of the active attendees.
- You can add the Withdrawn user back into the list of assigned users.
Event Completion Status
Event Completion status refers to what happened to the registration and subsequent event attendance and completion. Now that a user has registered for your event, are they:
- (In progress):

- eLeaP automatically assigns the associated Event course to your assigned users on the day of the Event. This is how the system can help you track and document your Event attendance and completion.
- You can force the [In Progress] status change by clicking on the Status field and using the drop down selector to choose the relevant new status; in this case In Progress.
- (No show):

- A No Show designation means the registered attendee failed to show up at the Event. Use this to conduct your Roll Call.
- You can change a No Show status to In Progress or even Completed should you decide it is needed.
- (Completed):

- Setting a Completed designation or status is the final goal of your Event manager. Once attendees complete the class and course, you may choose to finalize their status by selecting the [Completed] design from the status option.
- If a course is created with a certificate of completion, a course completion certificate can trigger a certificate release. Depending on the individual certificate settings in your associated course, you might have to manually release certificates by clicking the red icon in the Certificate column.

- Please note that eLeaP will send a certificate release notification to the completed user.
Sample Event Status
The illustration below shows a sample Event with the various statuses we discussed above.
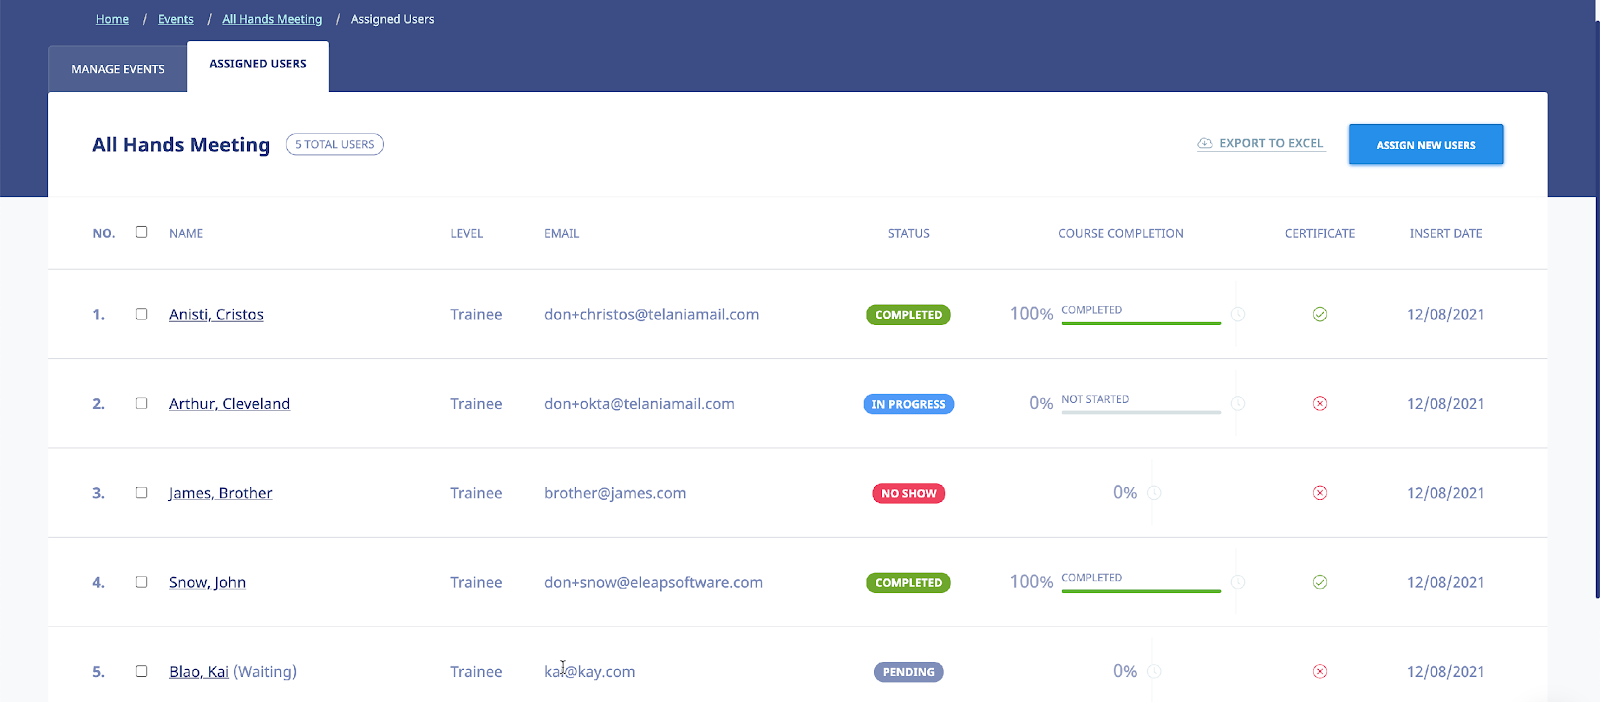
Event Reports
Your Event status displayed (see above) can also be downloaded or exported out of eLeaP. To download your Event report, click from your Event Assigned Users screen.

Your Excel download will look something like:
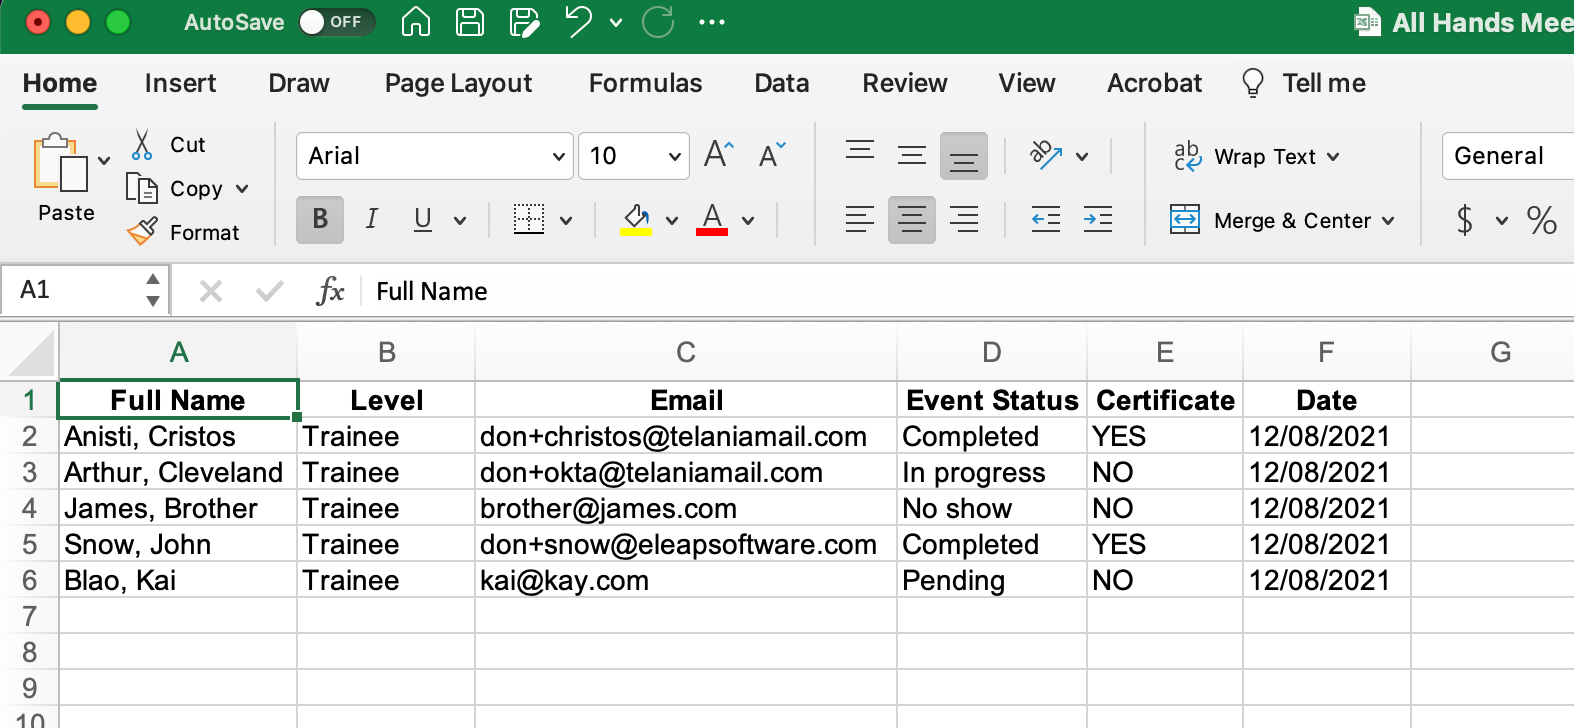
Learning Paths
Selecting on the main menu bar displays the Learning Paths screen, with the MANAGE LEARNING PATHS tab selected, as shown in the following illustration. A Learning Path is a collection of courses that the student must complete in order to achieve the defined Learning Path’s certification. Each Learning Path that you create is displayed on the Learning Paths list, with the Name, Created By, Date Created, and the Active/Inactive status details shown for that specific Learning Path.

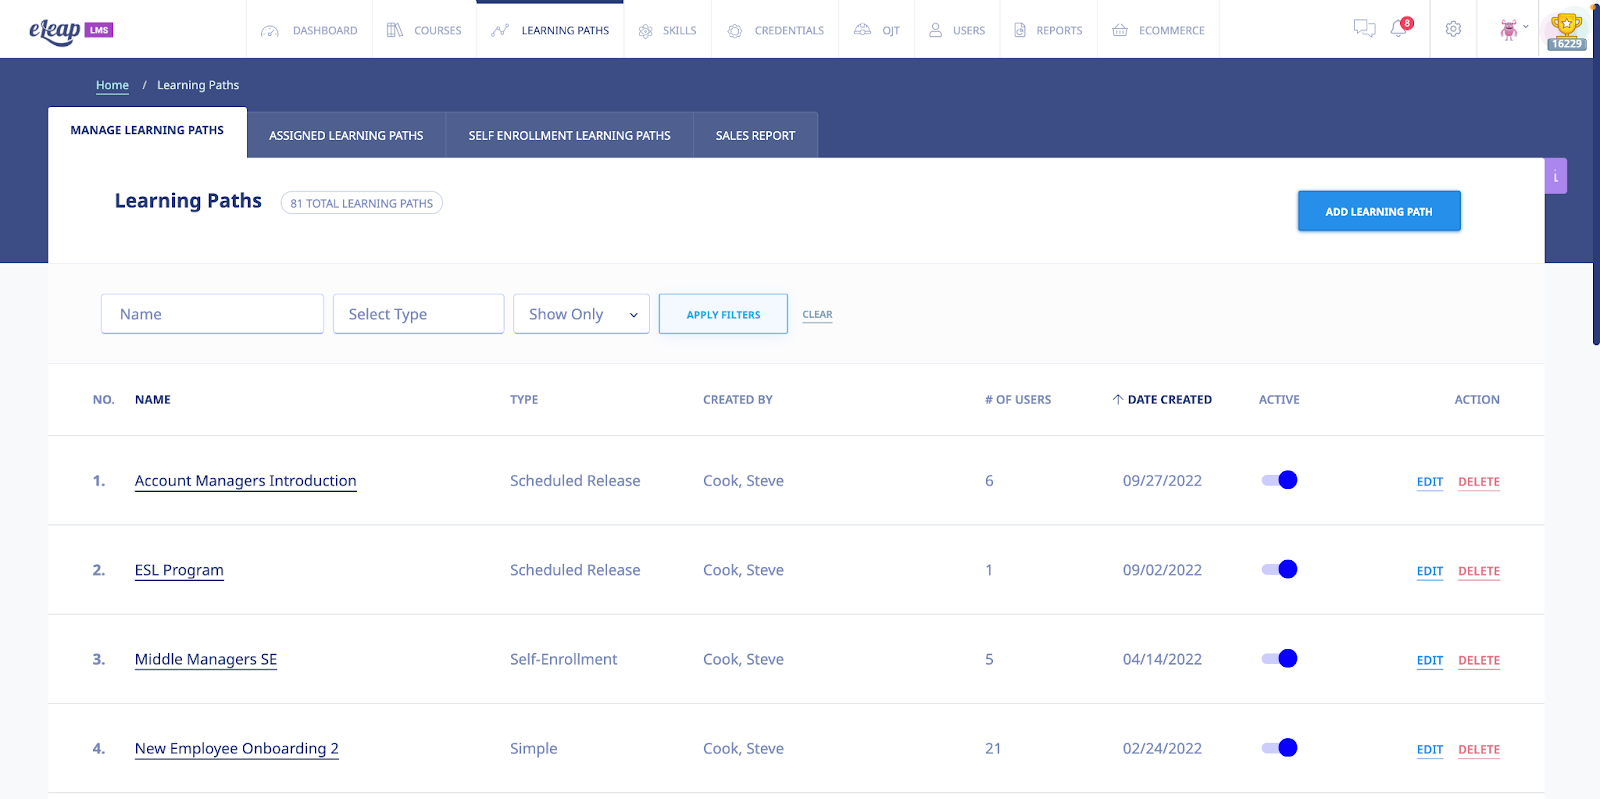
Adding a New Learning Path
Clicking the button within the Learning Path screen’s Manage Learning Paths tab displays the Add Learning Path screen, as shown in the following illustration. Use the steps below to add a Learning Path to the system.

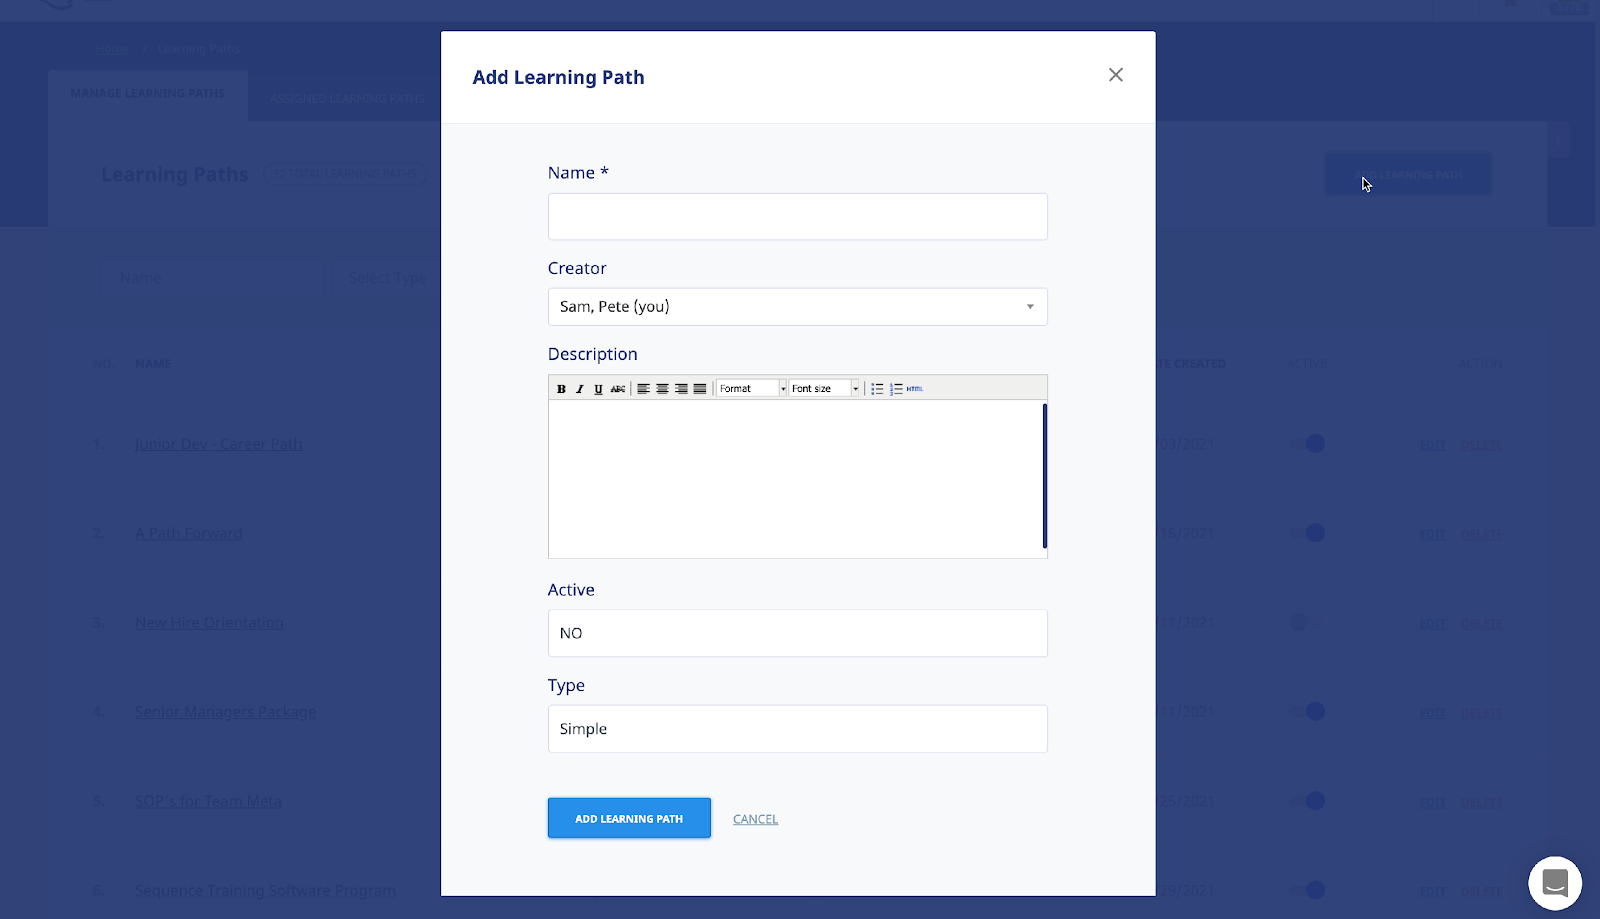
- Enter a Name for the new Learning Path in the Name field.
- Enter a Description for the new Learning Path within the Description box.
- Select YES from the Active list to make the new Learning Path Active or select NO to make it Inactive.
- Select the type of Learning Path you want to create. We have 4 types of Learning Paths:
- Simple: A simple Learning Path allows courses to be added to a simple container for courses. A simple Learning Path does not require prerequisites or specific navigation paths.
- Pre-Set Navigation: Pre-Set Navigation is designed to set navigation rules in a Learning Path. Use Pre-set Navigation to enforce prerequisites. You can also use quiz passing as a condition for progression in the Learning Path.
- Self-Enrollment: Use the Self-Enrollment option to create internal Course Catalogs which your assigned Users can then select from. The Self-Enrollment system does not penalize users for not viewing Courses and they can select which Courses they are interested in.
- Self-Enrollment restriction:
- All Users: Any user in your account can self-enroll in this learning path.
- Specific User Groups: Only users in selected user groups can self-enroll in this learning path.
- Scheduled Release: A Scheduled Release Learning Path is designed to set the release date of the courses in the Learning Path. This is a great way to schedule long term training courses.
Click to create the new Learning Path. It will be displayed on the Learning Paths list, in alphabetical order.
Adding Courses to a Learning Path
Selecting a Learning Path’s Name on the Learning Paths list displays the Learning Path Details screen, illustrated below. Selecting the or the link on this screen allows you to build a list of Courses that the student must successfully complete before they can be certified as having satisfied all the requirements necessary for that Learning Path.


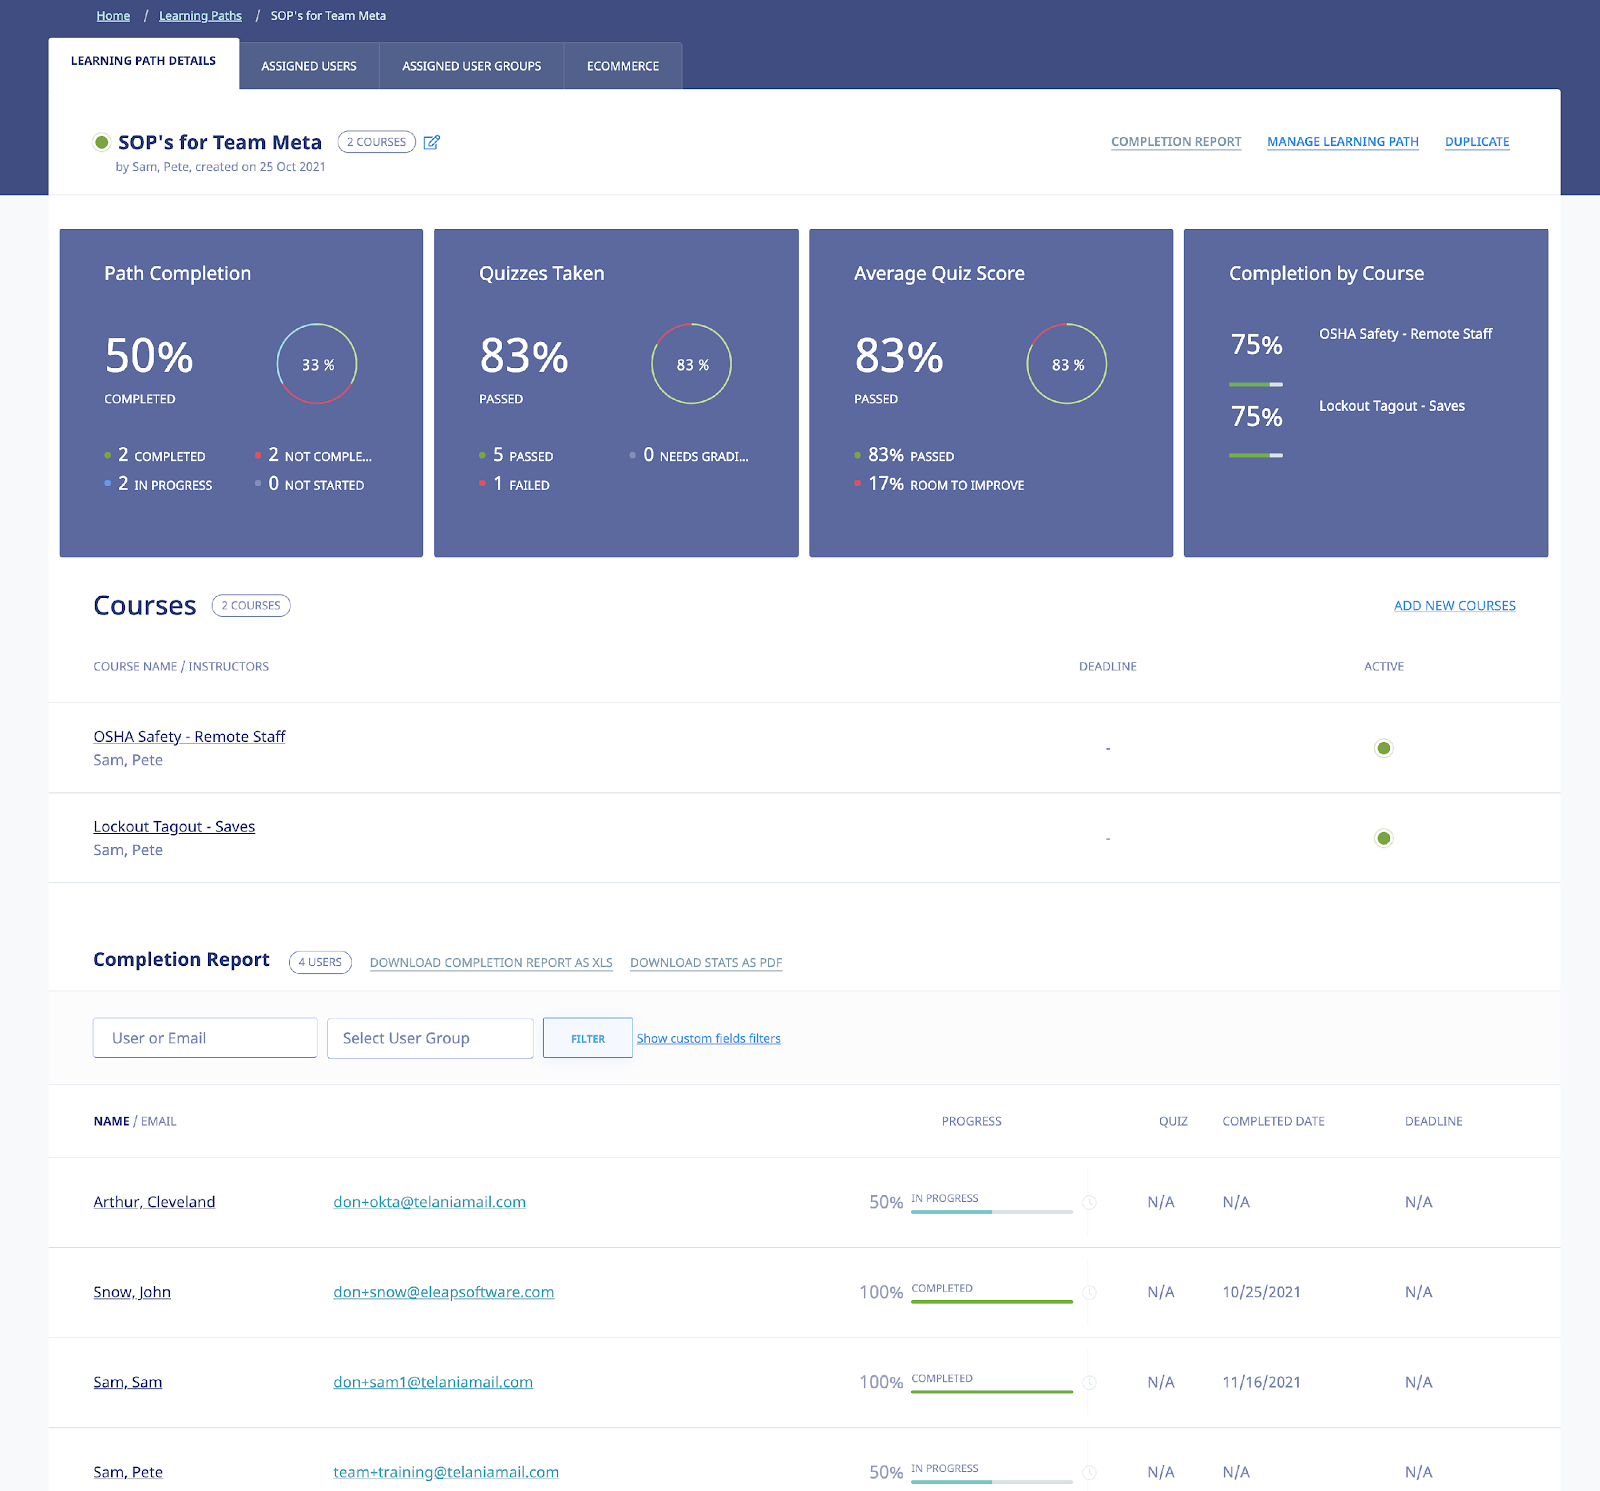
When you click the add new courses link, the Add New Courses screen is displayed, as shown in the following illustration. You can filter the Courses list by entering a Name in the Name field and by selecting a Course Category from the Course Category list, or both, and then clicking . Use the steps below to successfully add new Courses to a Learning Path.
On this screen, select the check box for each Course that you want to add to the Learning Path, and then click .
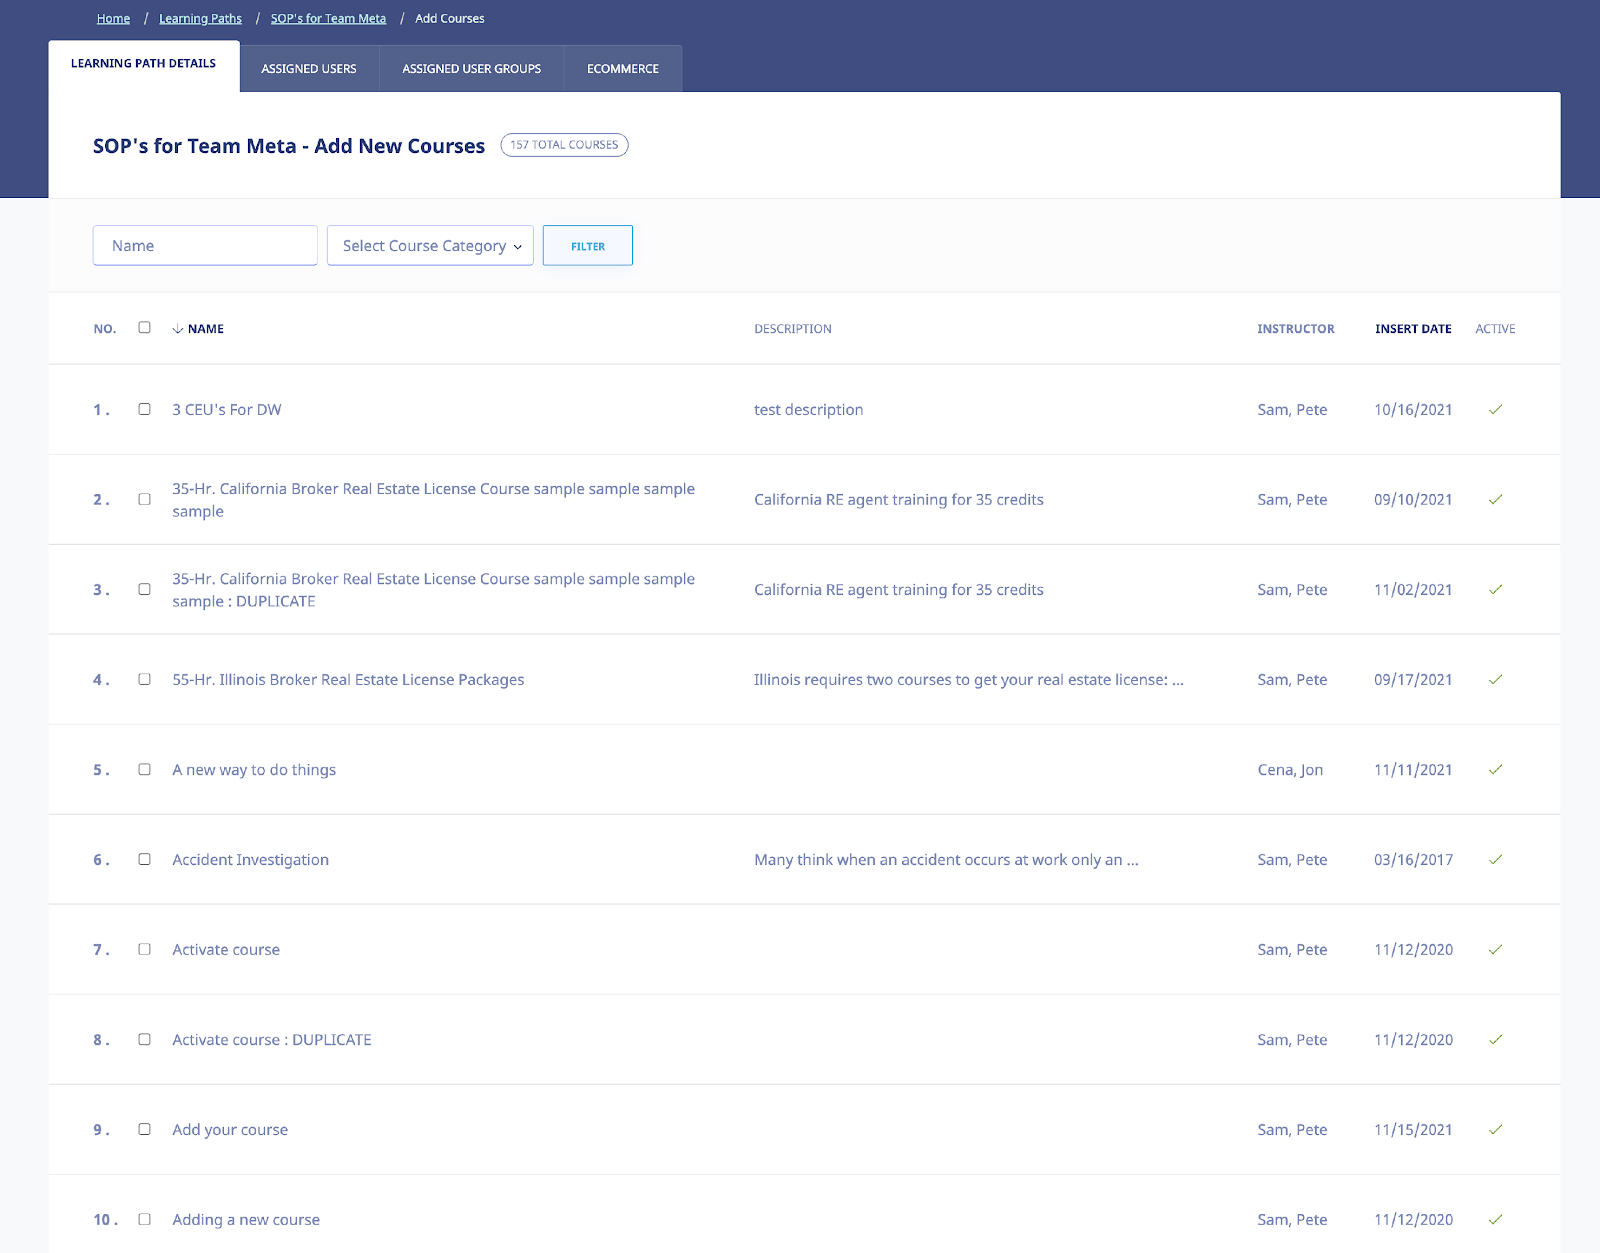
As shown in the following illustration, the Courses that you selected are added to the Learning Path Details screen.
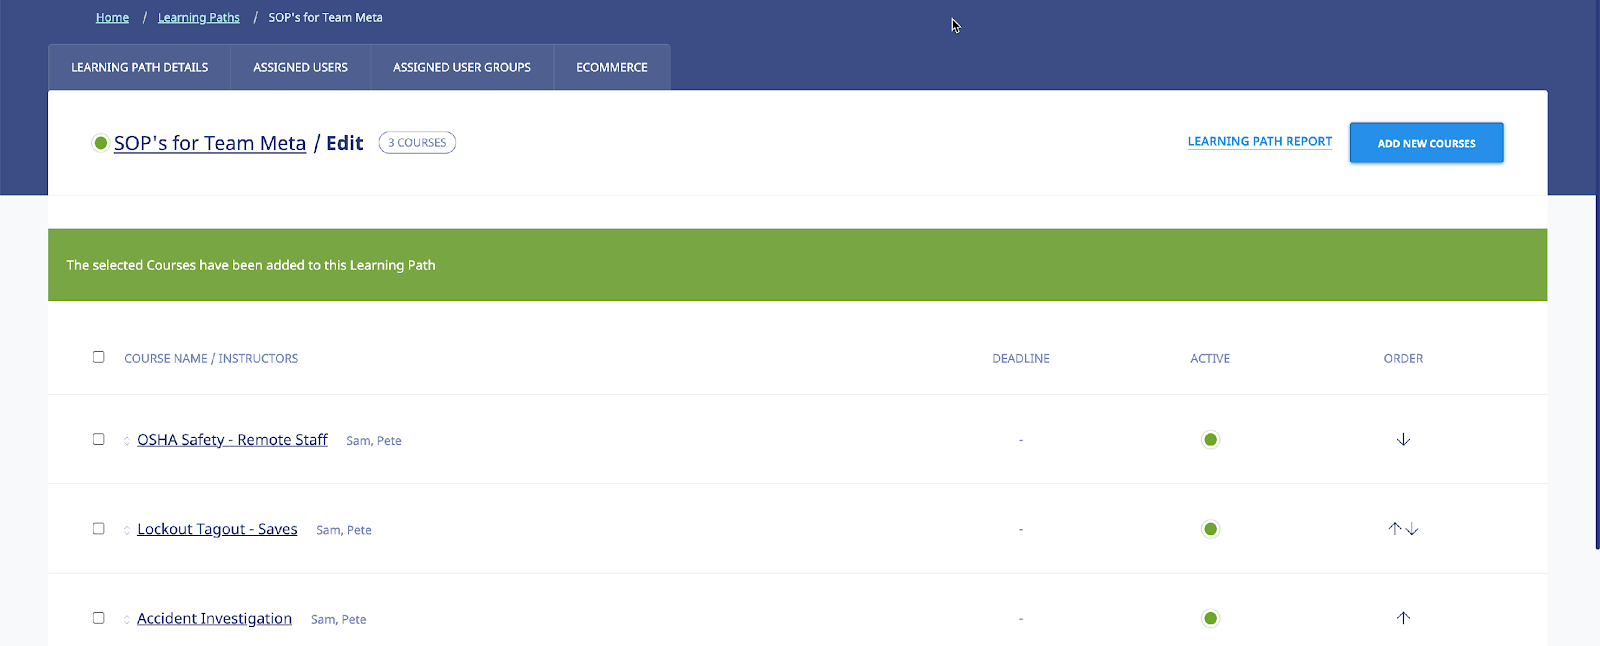
Don’t forget to set toggle the Learning Path to ON if you want to activate your New Learning Path.

Note: You can edit your Learning Path, add and delete courses and also assign mandatory Quiz or assessments for the individual courses in that Learning Path.
Assigned Users
Selecting the tab on the Learning Path Details screen displays the Assigned Users screen, illustrated below. This screen displays all of the Users associated with this Learning Path. You can click the assign new users link to add additional Users to a Learning Path, and you can select the check box for any existing Users on the Assigned Users list and then click the unassign users from Learning Path link to remove them from the list.


Assigned User Groups
Selecting the tab on the Learning Path Details screen displays the Assigned User Groups screen, illustrated below. This screen displays all of the Users associated with this Learning Path. You can click the assign new User Groups link to add additional User Groups to a Learning Path, and you can select the check box for any existing User Group on the Assigned User Groups list and then click the unassign User Groups from Learning Path link to remove them from the list.

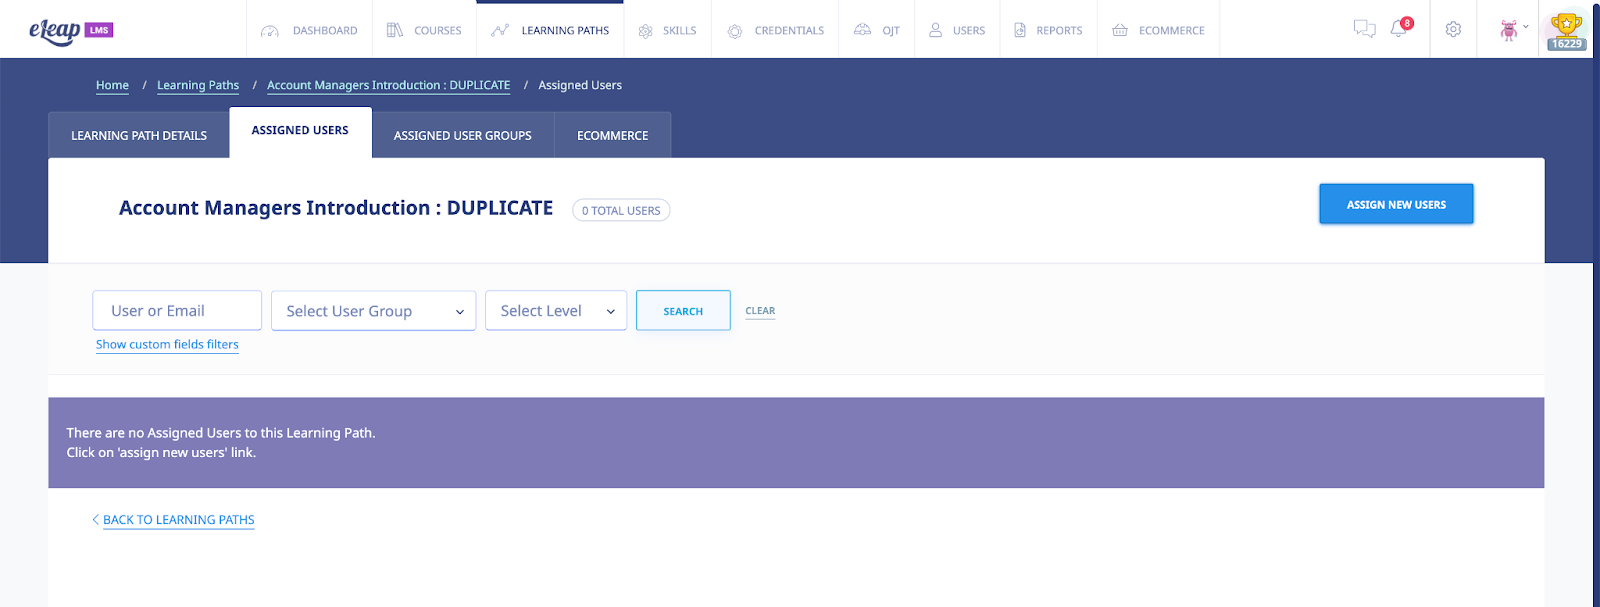
Completion Report
The new Learning Path system displays a report summary once you click on the Learning Path name. The Path Completion, Quizzes Taken, Average Quiz Score, and Completion By Course charts provide a quick insight into the status of your Learning Path. Further, selecting the tab on the Learning Path Details screen displays the Completion Report details for your assigned users, as shown in the following illustration. A Summary Report bar is presented, with a numerical representation of the progress that has been made on this Learning Path. You can filter by user name or user group. You can also filter by Custom Fields. To filter simply select or enter input and click .

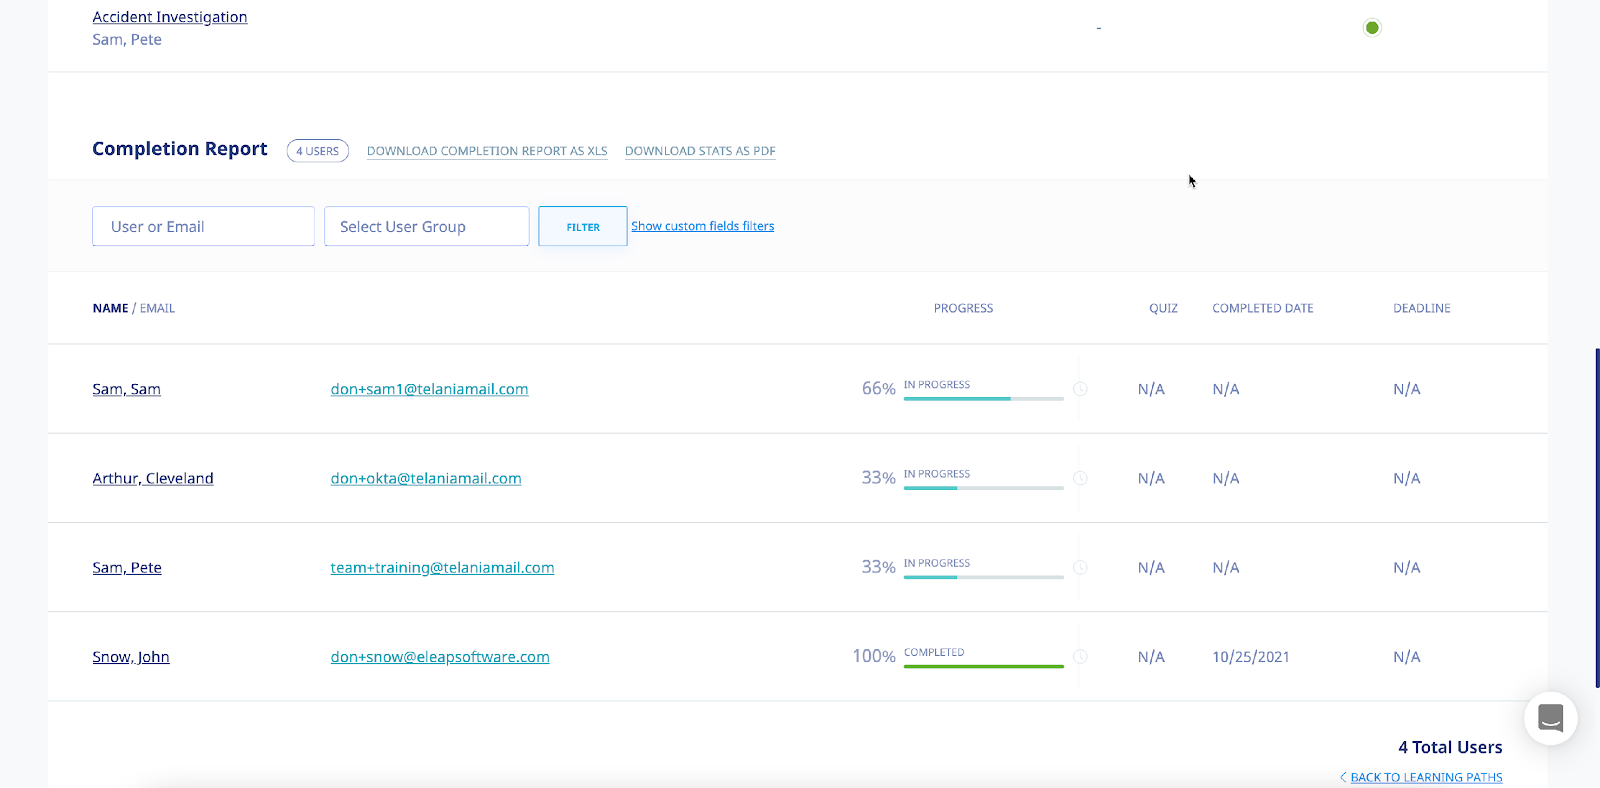
Additionally, you can click the or links to export the Completion Report or Stats Report to a local drive on your computer.


As shown in the following illustration, when the report opens in Excel, you can see the First Name, Last Name, Email, Progress (%), Progress status and User Groups details for each user who has been assigned to the Learning Path.
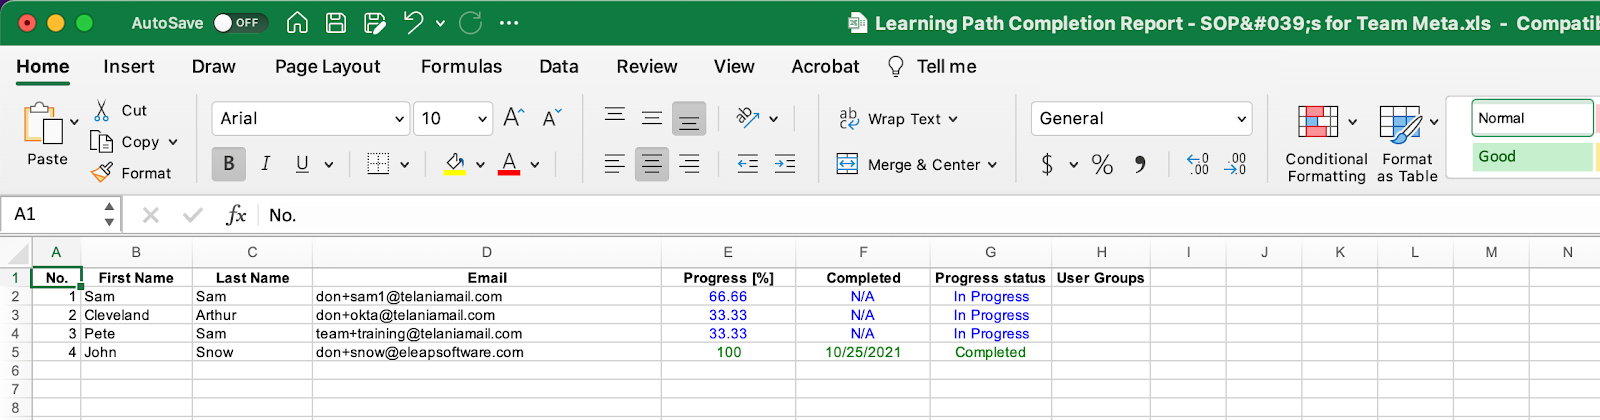
Editing a Learning Path
Clicking the edit link for a line on the Learning Paths list on the Learning Paths screen displays the Edit Learning Path screen, illustrated below. Use this screen to make any modifications necessary to the Learning Path’s details and then click to save your changes to the system.
You can also click the button to add an additional Learning Path to the system or select the edit or delete link for any of the existing Learning Paths on the Learning Paths list to either edit or delete that specific Learning Path.
Duplicating a Learning Path
To quickly create a learning path you can duplicate an existing path. Note that while the courses in the path are duplicated in the new path the assigned users are not.
To duplicate a learning path, click the [Duplicate] link in the top right corner of the learning path.
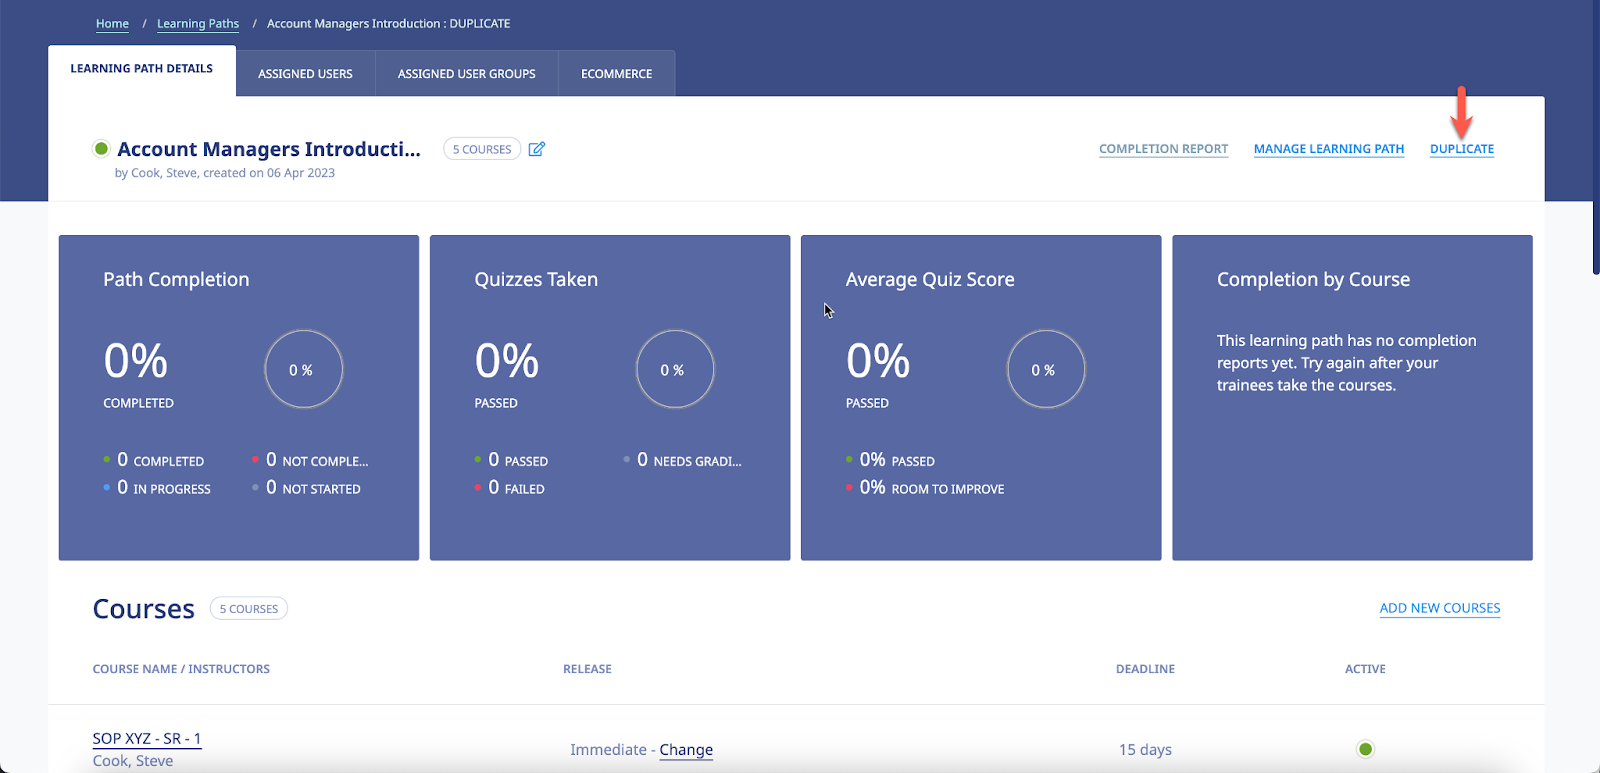
Deleting a Learning Path
Selecting the delete link for a line on the Learning Paths list within the Learning Paths screen allows you to remove that Learning Path from the system. The system displays a warning message, as shown in the following illustration, before performing the deletion to ensure that is your intention. Click to proceed with the deletion or click to cancel the deletion process.

Assigned Learning Paths
Selecting the tab on the Learning Paths screen displays the Assigned Learning Paths screen, illustrated below. This screen displays the Learning Paths that you have been assigned to, with the Name, Status, No. Courses and Instructor details for the Learning Path Displayed. You can filter the Learning Paths listed here, if necessary, by enter a Learning Path Name in the Name field, and then clicking .


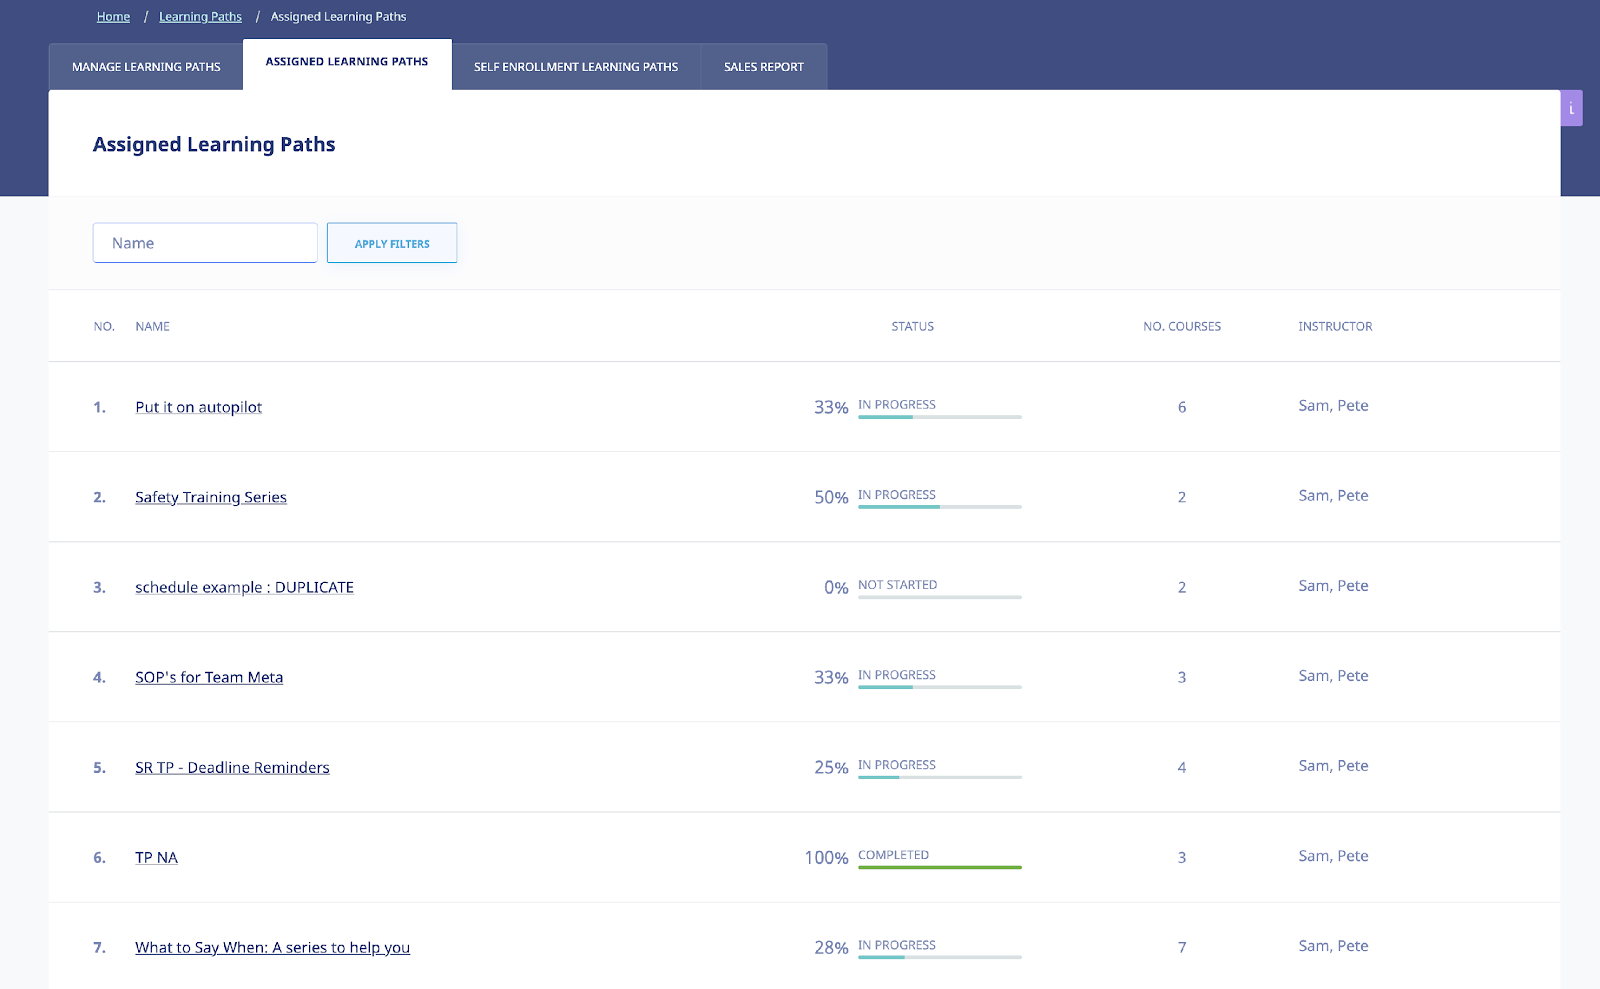
Your Assigned Learning Paths will be displayed within the Assigned Learning Paths portion of the Home screen, as shown in the following illustration.
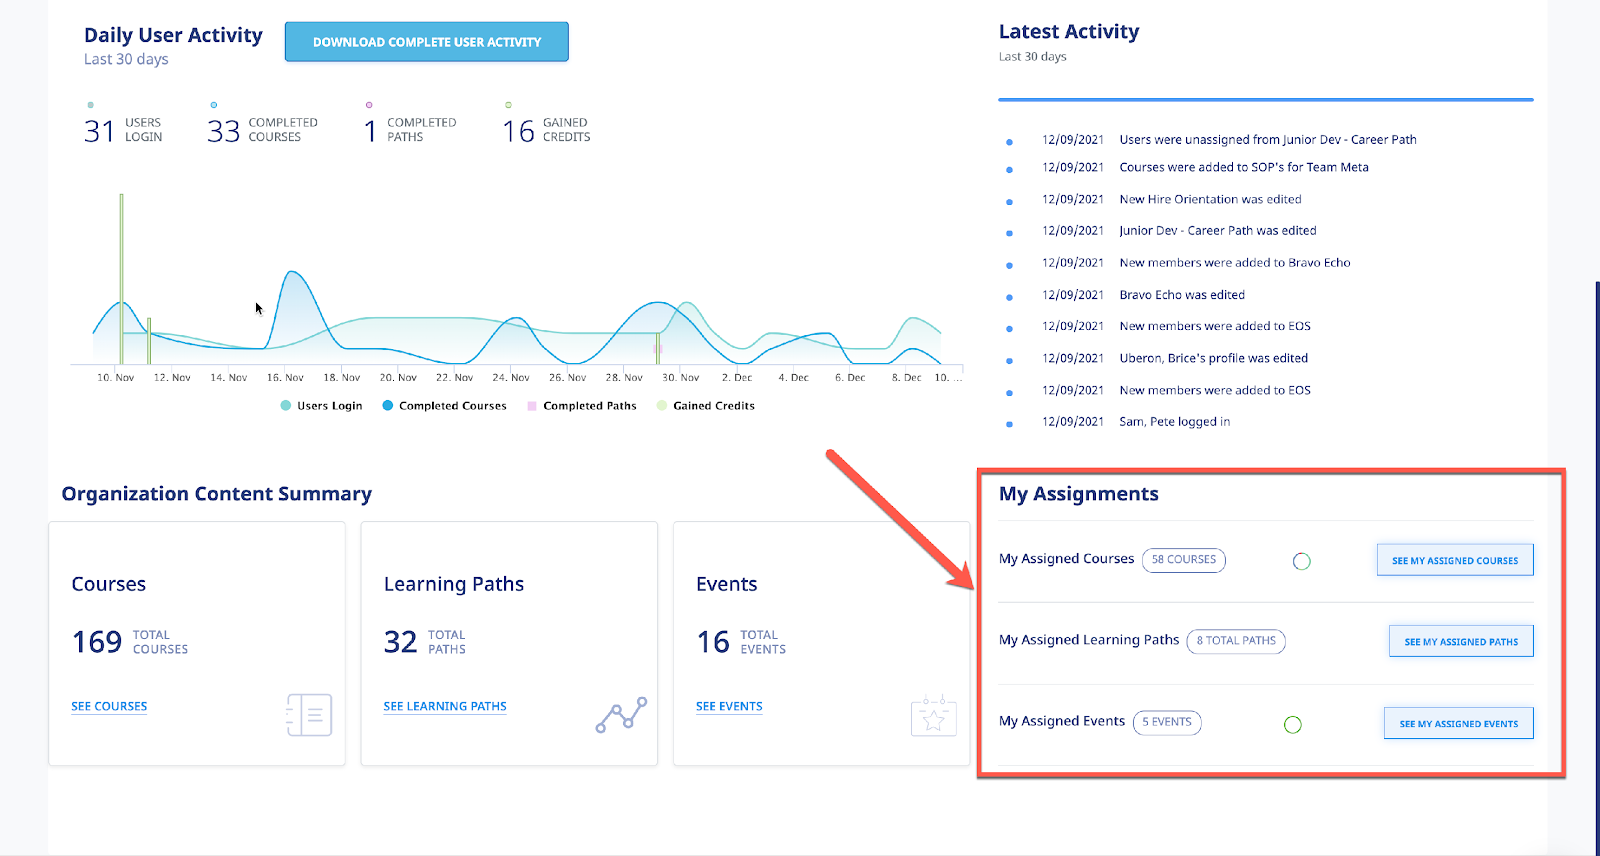
Additionally, you will receive a Notification Email like the example below when you are assigned to a Learning Path.
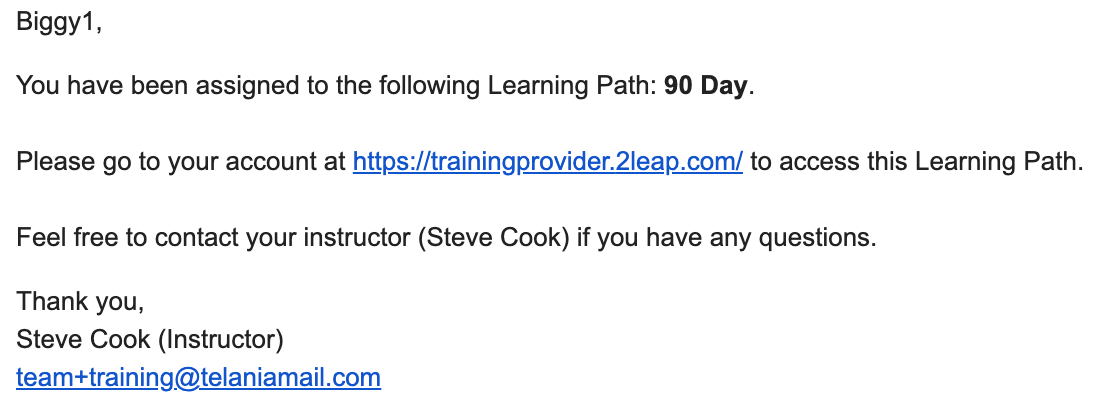
Learning Path Log
Clicking on the Learning Path log icon, displays a page showing the changes and activities of the specific learning path:
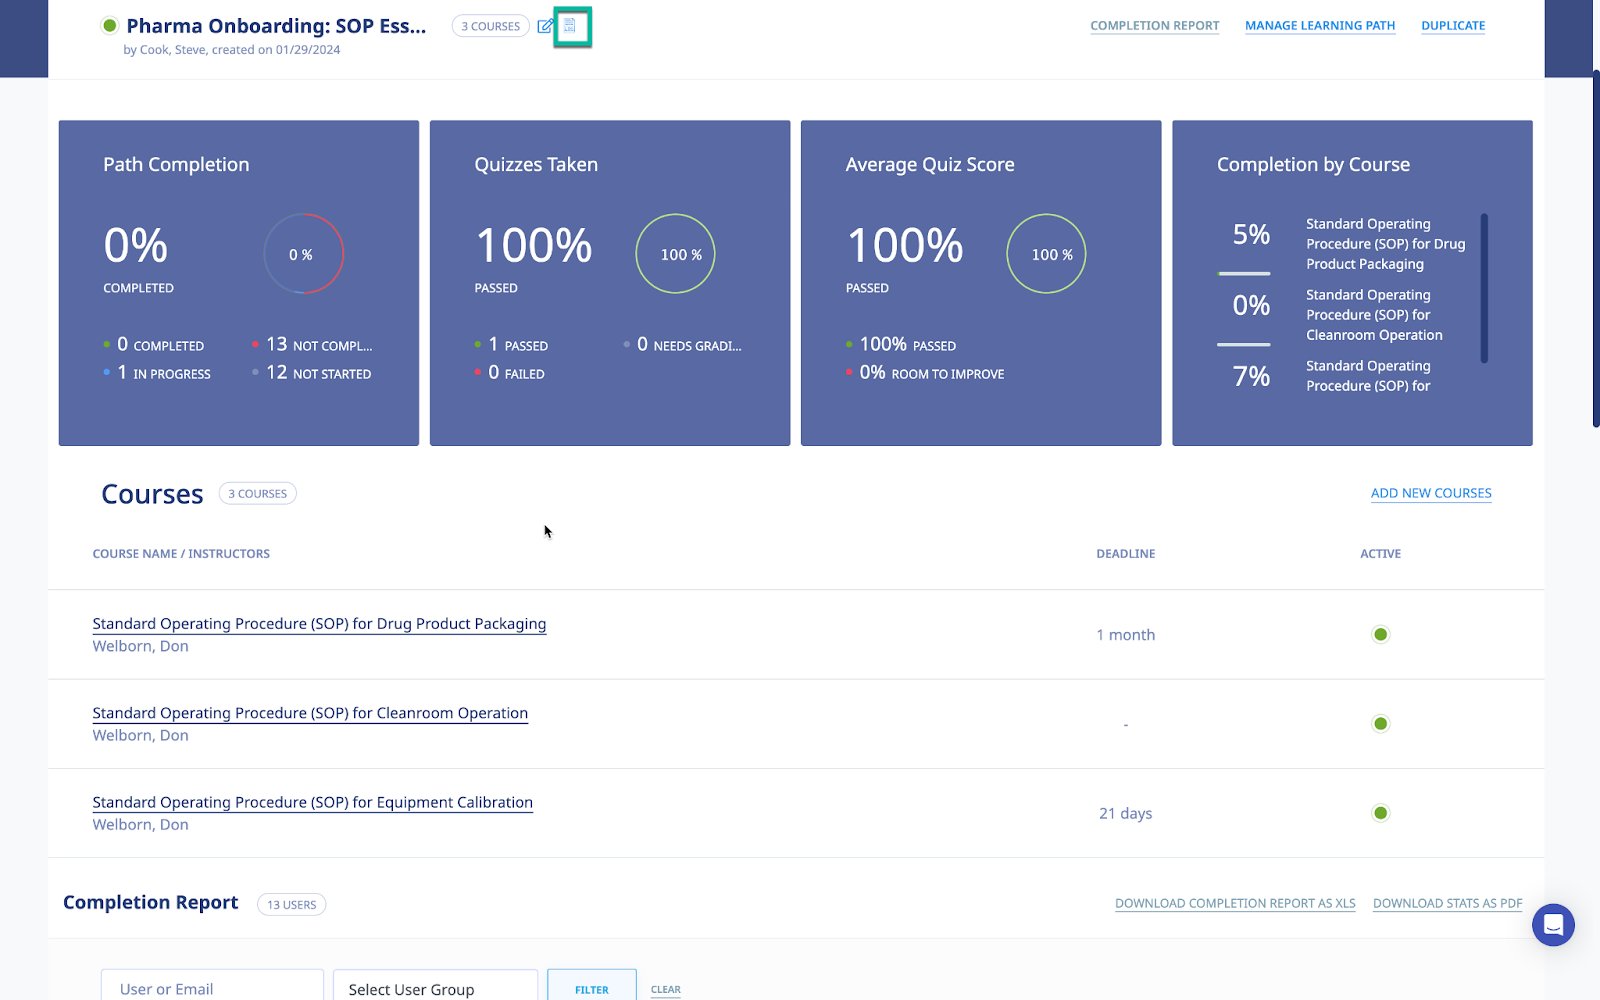
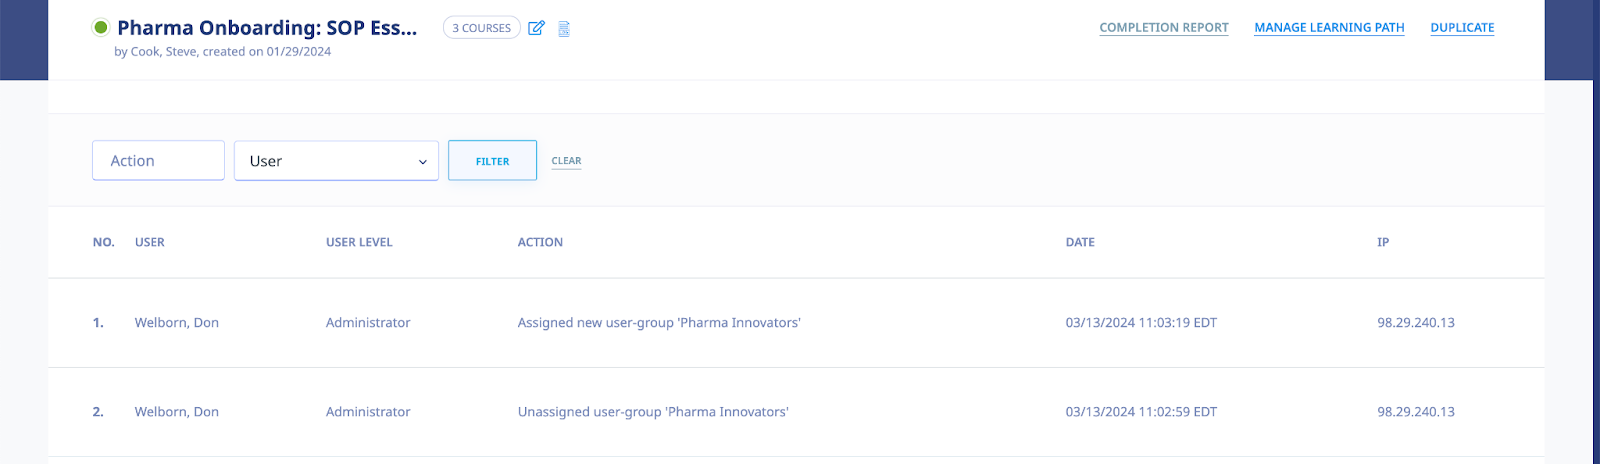
Credentials
Selecting the tab in the main menu section displays your Credentials Overview page. Note that this module might not be available on all accounts. Please contact eLeaP for more information.

Before activating any courses for CE purposes, make sure the CE Types section of your organization profile page is completed. To go to the CE Types page click the icon and click the [CE] sub tab as illustrated below:

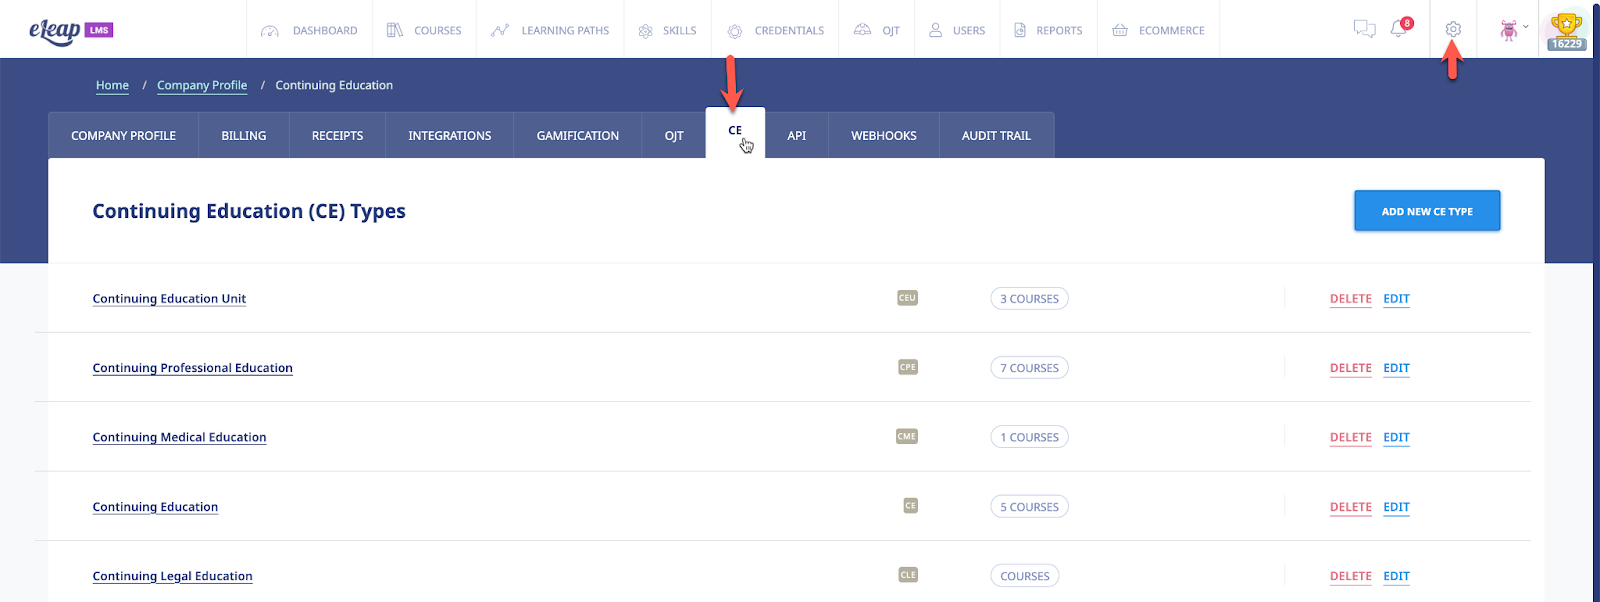
CE Overview
Clicking CE Reports from Dashboard or selecting the tab from the main menu brings you to the CE Overview page.
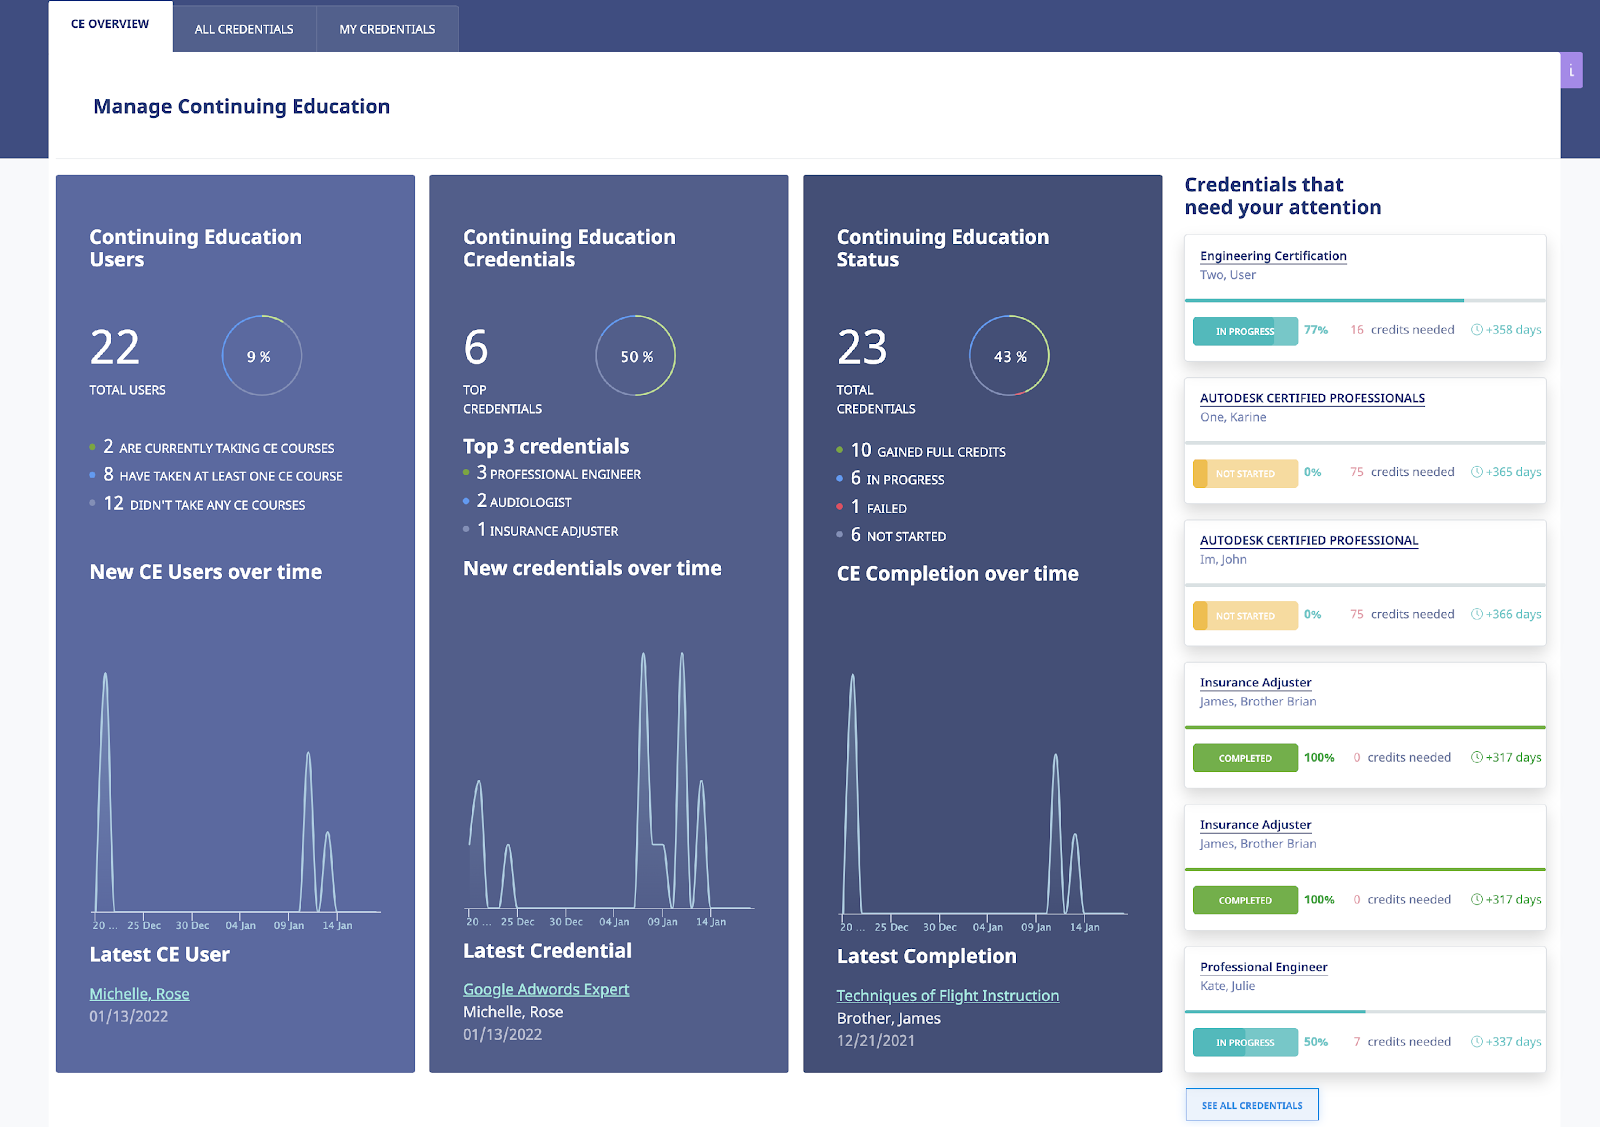
This page gives you a quick overview into the users taking CE courses or have credentials associated with their profiles. You can also see the types of Credentials your users are tracking including new credentials over time. Lastly this section indicates the CE completions over time.
Any Credentials which still have CE credits outstanding or are not yet completed will be tagged for your attention. You can click the button to see the overall list.

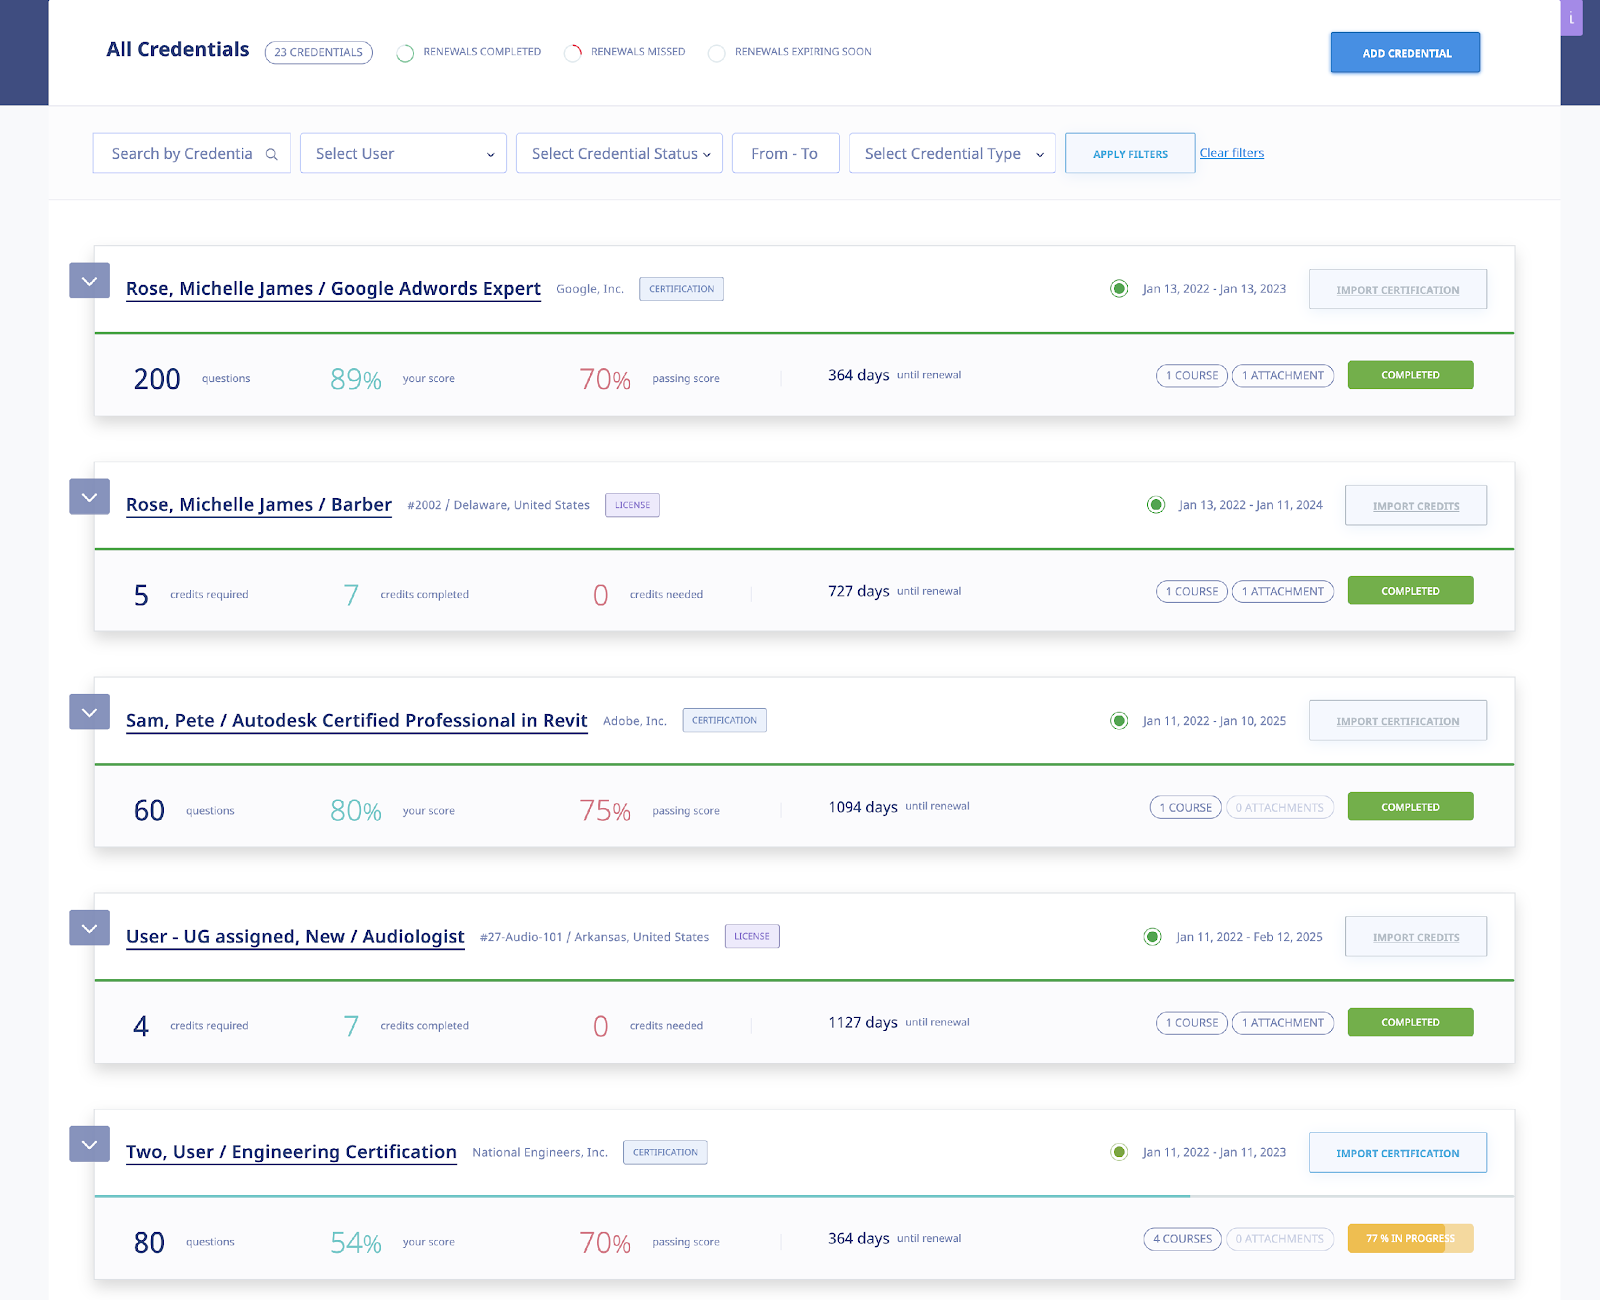
Individual Credential Management (All Credentials)
Click on name and Credential to get individual credential details and manage specific credentials.
Types of Credentials
License:
A license credential is usually a state-specific professional credential that is required to maintain employment or practice. A license is typically verified by a government (state or federal) entity or agency to allow a professional to perform particular occupations or specialties.
Certification:
A certification proves that a professional has completed certain third-party assessments or tests to be qualified to meet certain criteria or skills to perform a job or role.
In eLeaP, you can track your credentials as well as the credentials of your users via the All Credentials section of the Continuing Education module.
Add a Credential
To add a credential for your users, click the button and select the type of credential you want to add.
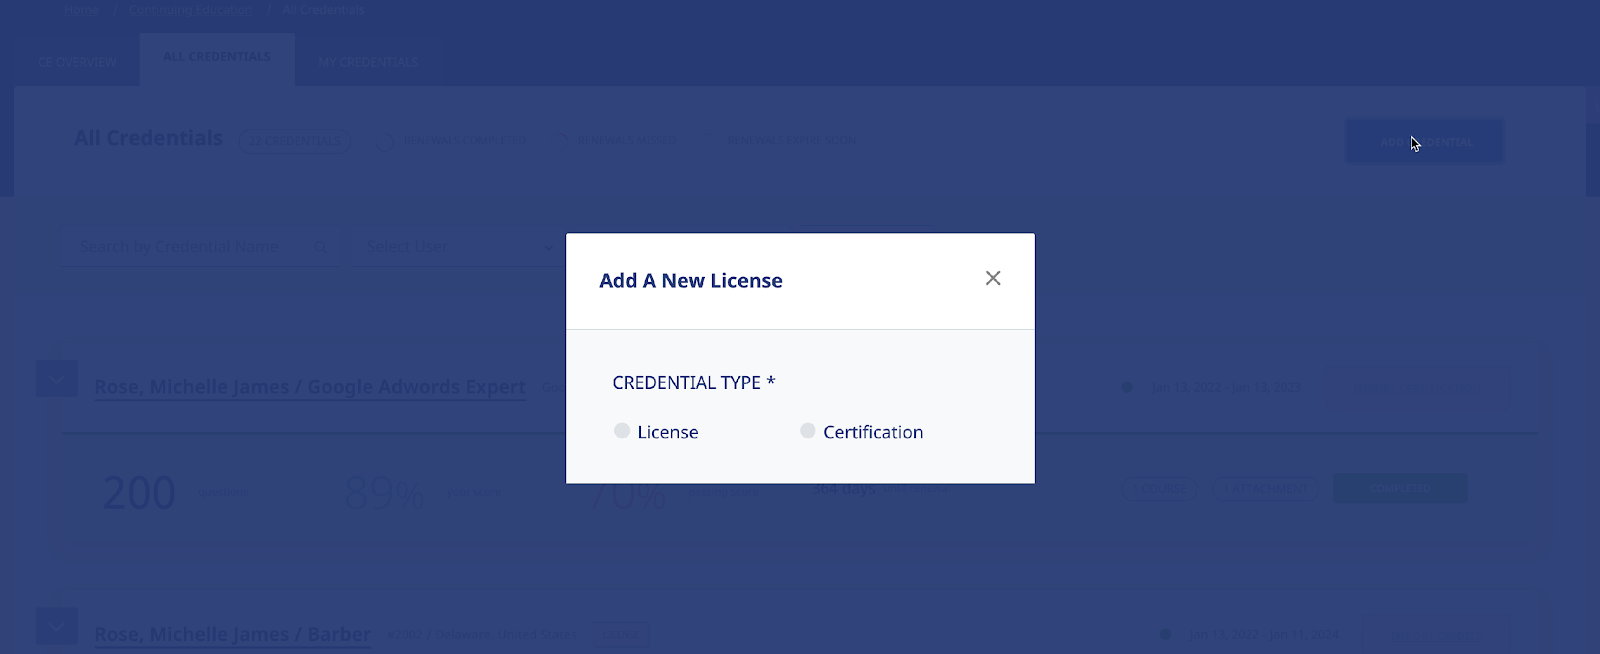
Select the [License] option if you want to add a License type credential or select the [Certification] option if you want to add a Certification.
Add New License
To add a new license, click the button. Once clicked, select the [License] option and fill out the short form to add the user license.
Some fields in the form marked with * are required.
Sample form:
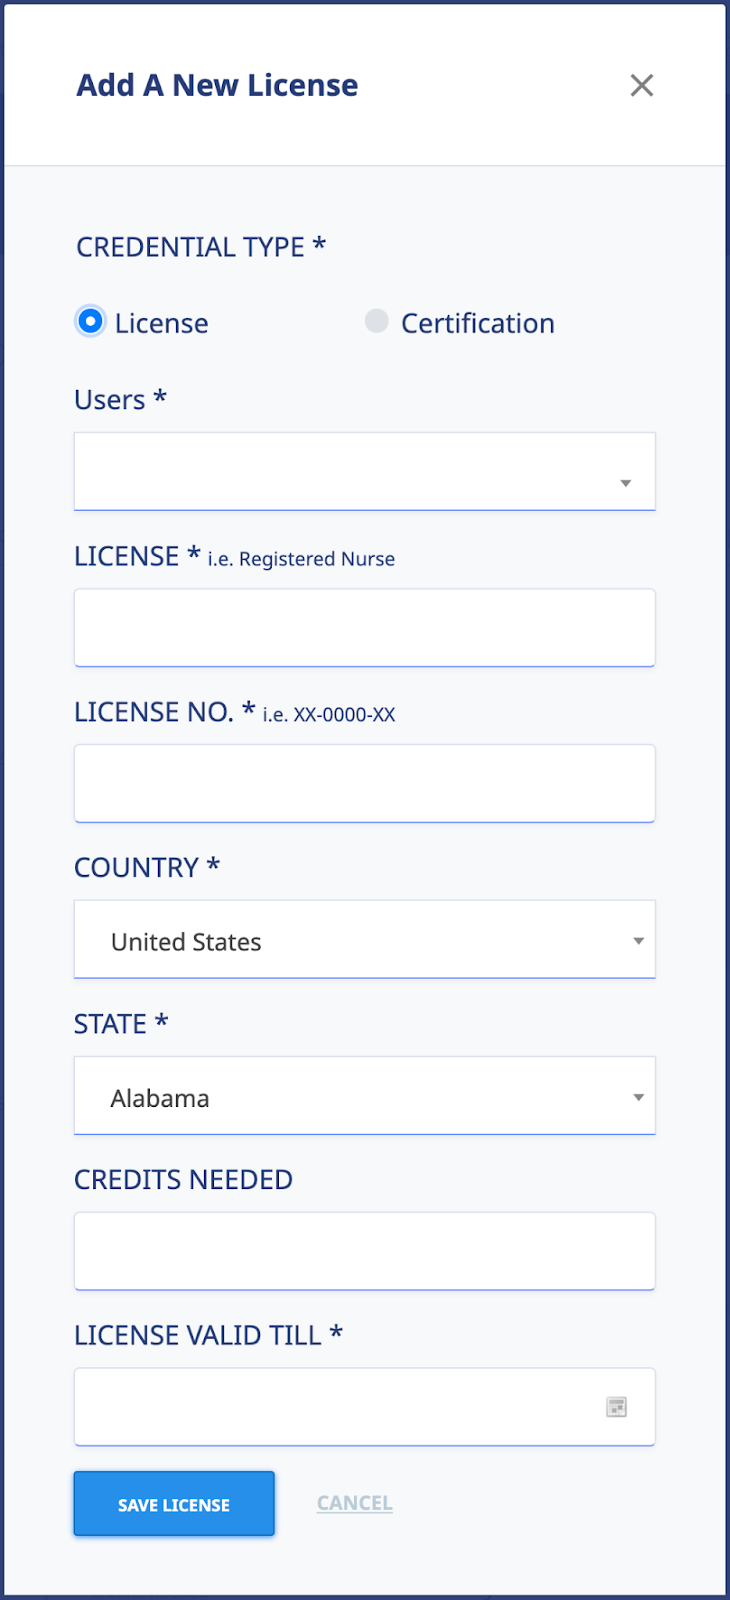
Users*: Select the user you want to add a license for. You can use the [Select User Group] option to filter down your user list.
LICENSE *: The name of your professional license for i.e., Auctioneer
LICENSE NO.*: Your license number i.e., XX-0000-XX. If you don’t have a license number put NA
COUNTRY *: Your country i.e., United States
STATE *: Your State or Province i.e., California
CREDITS NEEDED: The number of CE credits needed to fulfill license requirements
LICENSE VALID TILL *: When does the license expire? Use the calendar tool to select the license expiration date.
Import Credits
Once you create your user’s license, the next steps are to import credits, or have the user register for self-enrollment credit courses. You can also assign credit courses to the user.
To import Certification information, click the button and fill out the short form with the relevant information such as:
- Continuing Education Provider: This is the title of the certification course or assessment completed
- Course Title: This is the score you (if your own certification) or the user achieved in the assessment.
- Number of Credits: This is not required for certifications. If the user earned any CE credits, you can add this here.
- Credit Type: This is not required for certifications. If the user earned any CE credits, you can select the type of credit earned.
- Date of Completion: This is the date the CE course or program was completed by the user.
- Certification Validation URL: Though not required, many only CE providers will provide the user with their earned certification URL. If this is available, post it here.
- Attachment: If available, use the [Attachment] tool to upload any earned documents or attachments such as test scores or certificates of completion.
Add New Certification
To add a new Certification, click the button. Once clicked, select the [Certification] option and fill out the short form to add the user certification.
Some fields in the form marked with * are required.
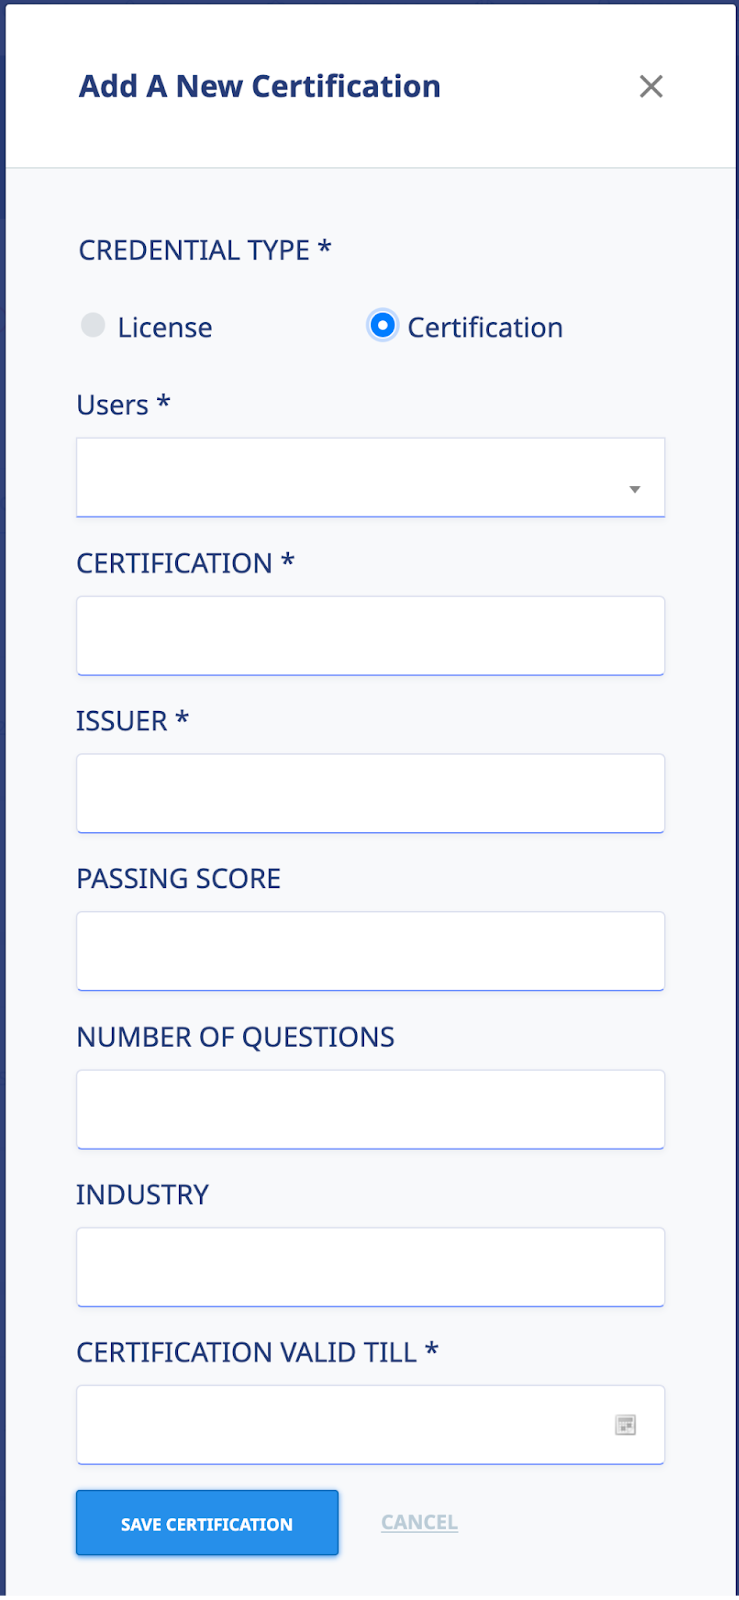
Sample form:
Users*: Select the user you want to add a license for. You can use the [Select User Group] option to filter down your user list.
CERTIFICATION *: The name of your professional certification for i.e., Adobe Certified Professional
ISSUER*: Third-party organization which assessed and issued the certification i.e., Google, Inc, Adobe
PASSING SCORE : The passing score criteria for the third-party assessment.
NUMBER OF QUESTIONS: If available, add the total number of questions in the third-party assessment.
INDUSTRY: If available, the applicable industry for the certification.
CERTIFICATION VALID TILL *: When does the certification expire? Use the calendar tool to select the license expiration date.
Import Certification
Once you create your user’s certification, the next steps are to import the certification information or have the user import their own certification credit. To import Certification information, click the button and fill out the short form with the relevant information such as:
- Certification Title: This is the title of the certification course or assessment completed
- Your Score: This is the score you (if your own certification) or the user achieved in the assessment.
- Number of Credits: This is not required for certifications. If the user earned any CE credits, you can add this here.
- Credit Type: This is not required for certifications. If the user earned any CE credits, you can select the type of credit earned.
- Date of Completion: This is the date the third-party assessment was completed by the user.
- Certification Validation URL: Though not required, many only certification providers will provide the user with their earned certification URL. If this is available, post it here.
- Attachment: If available, use the [Attachment] tool to upload any earned documents or attachments, such as test scores or certificates of completion.
Manage Existing Credentials – All Credentials
Quick Charts
Use the quick charts on this page to easily access different credential statuses. Click on the [Renewals Completed] to see all completed credentials. The [Renewals Missed] is able to let you see which CE credentials were not completed before their valid date expired. Click the [Renewals Expire Soon] to drill down to a heads-up list of credentials that are coming up for renewal in the next 60 days.

Filtering Options
Use the various filtering options to select and manage different types or credentials. You can search for credentials by User name or Credential name or you can select the type of credential. You can also filter by Credential Status.

Managing Individual User Credentials
To manage existing user credentials, including importing credits, click on the name of the credential you want to manage.
Managing License Credentials
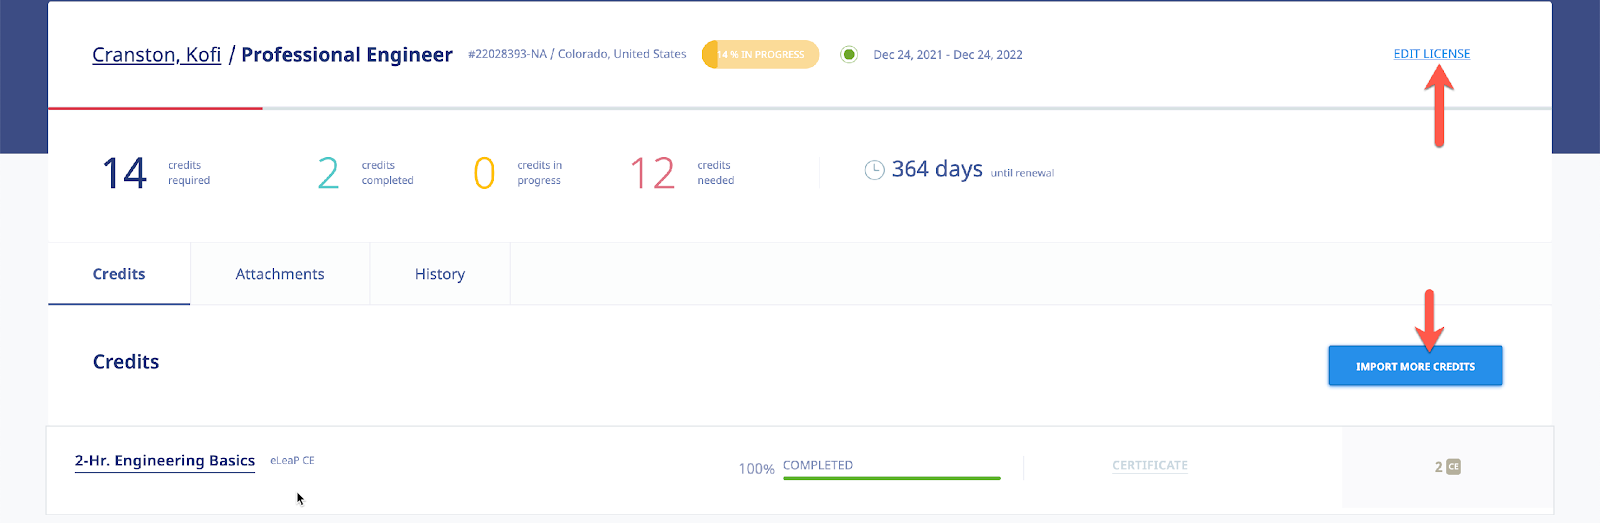
To manage your user License credentials, click on the name of the User/License. You can edit the existing license to change the license data, or you can use the button to add credits to this user’s license.

Should you want to add additional documents to the user license, click the [Attachments] tab to upload documents and files. Click the icon to delete the attachment file. To download the attachment, click the [Download] link.

The [History] tab allows you to see a history or log of uploads and deletions of attachments.
Note: A grayed-out button means the license has enough credits for completion of the license, and no additional credits are needed.
Managing Certification Credentials
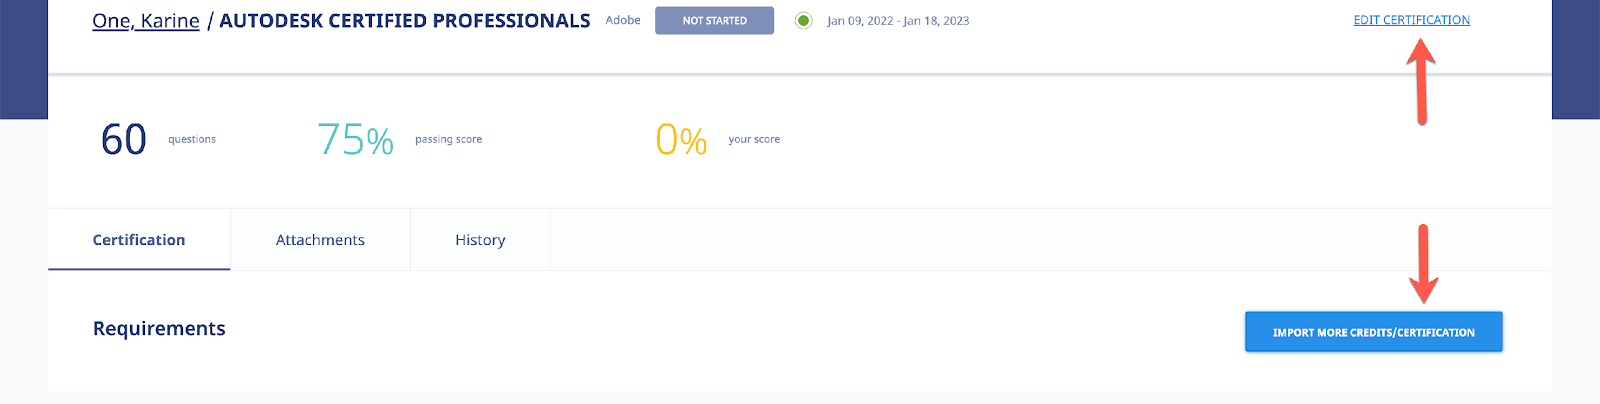
To manage your user Certification credentials, click on the name of the User/Certification. You can edit the existing certification to change the certification data, or you can use the button to add certification validation information to this user’s certification credential.

Should you want to add additional documents to the user certification, click the [Attachments] tab to upload documents and files. Click the icon to delete the attachment file. To download the attachment, click the [Download] link.
The [History] tab allows you to see a history or log of uploads and deletions of attachments.
Note: A grayed-out button means the certification has achieved the minimum passing score for completion of the certification, and no additional credits are needed.

Internal CE Course
If the license credit is earned from an internal course (either assigned or self-enrolled), you will be able to get more details by clicking the course name. This will get you to the course stats page.
Activating CE for Courses
To activate CE credits for your courses, go to the of the course and click the .


Next, switch on the [Continuing Education] toggle and select the credit type as well as the number of credit units users will earn upon successful course completion.
“Although individual professions may have different standards, the most widely accepted standard, developed by the International Association for Continuing Education & Training, is that ten contact hours equals one Continuing Education Unit.[8] Not all professionals use the CEU convention. For example, the American Psychological Association accredits sponsors of continuing education such as PsychContinuingEd.com and uses simply a CE approach. In contrast to the CEU, the CE credit is typically one CE credit for each hour of contact.” - https://en.wikipedia.org/wiki/Continuing_education
If you want us to send renewal email reminders, switch that option on. Don’t forget to save your CE settings to finalize this step.
Courses that have credits are displayed both in the course information as well as in the course listing page.

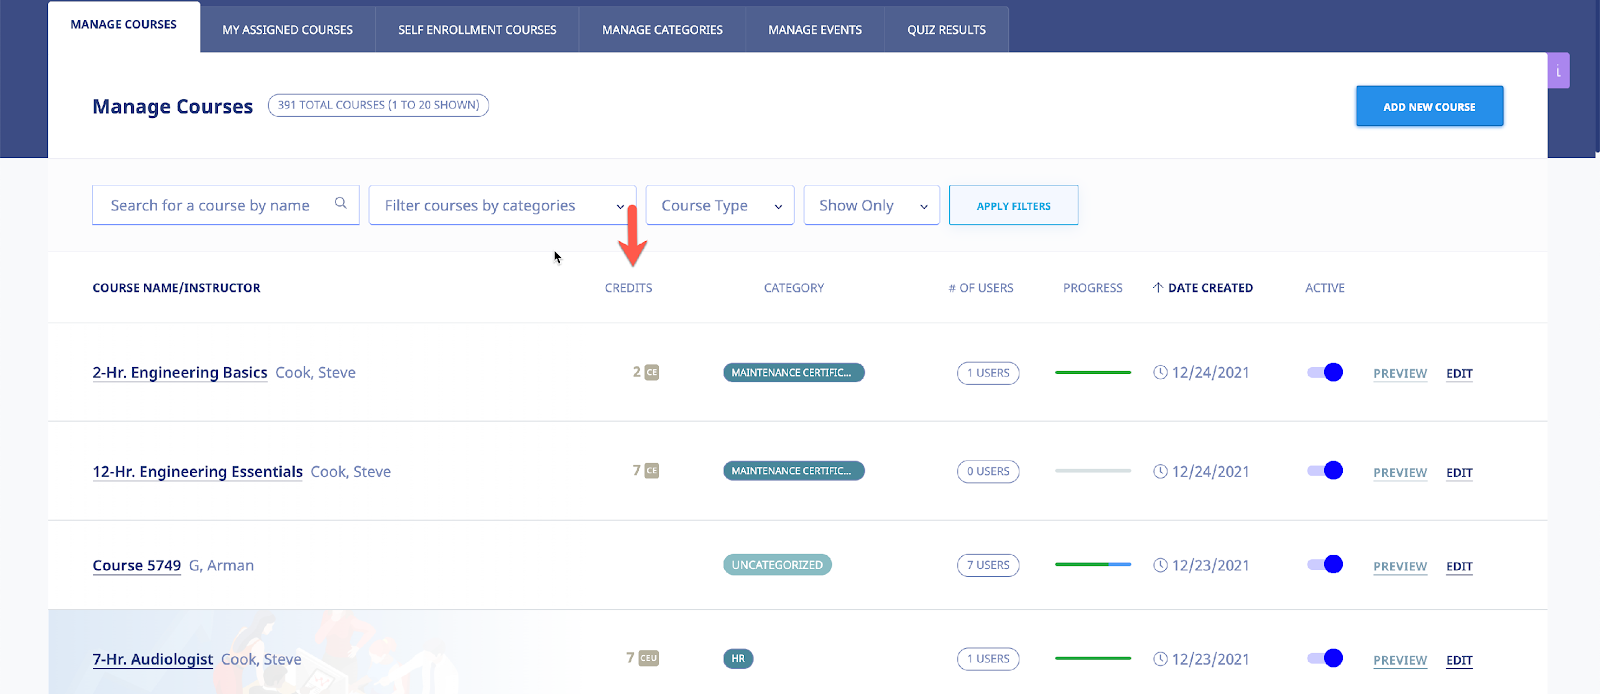
Self-Enrollment CE Courses
You can set up Self Enrollment courses for users to sign up for. This is an easy way to ensure your users can search for CE courses for their licenses. This also removes added responsibility on admins to assign every single last CE course to ensure their users have the credits needed to fulfill their license requirements.
To set up Self Enrollment CE Courses, first create your course as illustrated above. Then use the course to activate the Self Enrollment option for the course.
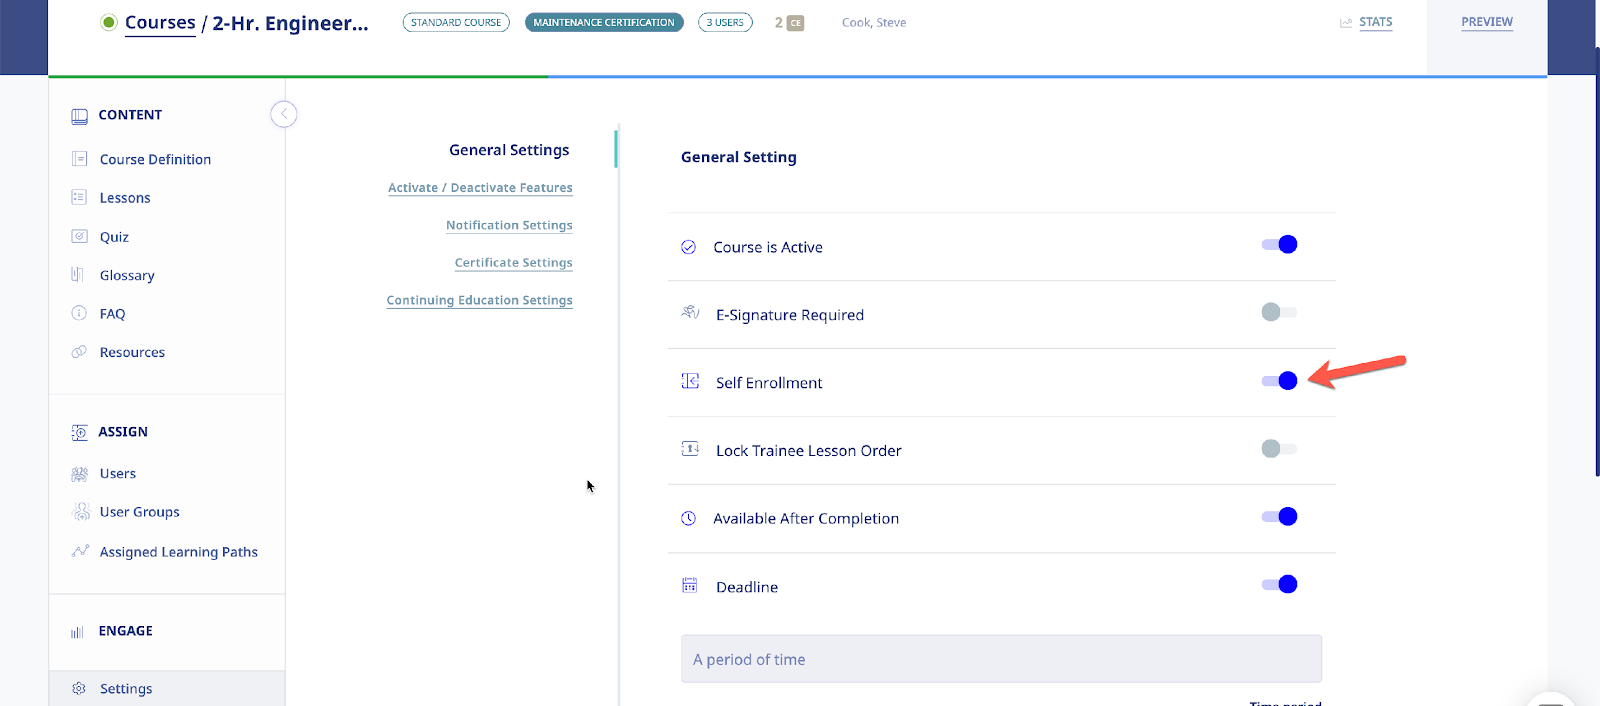
If you want to restrict access to your Self Enrollment course, use the restriction options available in the Settings section:
- Self-Enrollment restriction:
- All Users: Any user in your account can self-enroll in this course.
- Specific User Groups: Only users in selected user groups can self-enroll in this course.
My Credentials
As a user in eLeaP, you can maintain your own professional credentials for your career. From your [Continuing Education] menu, click the sub tab to manage your own credentials.

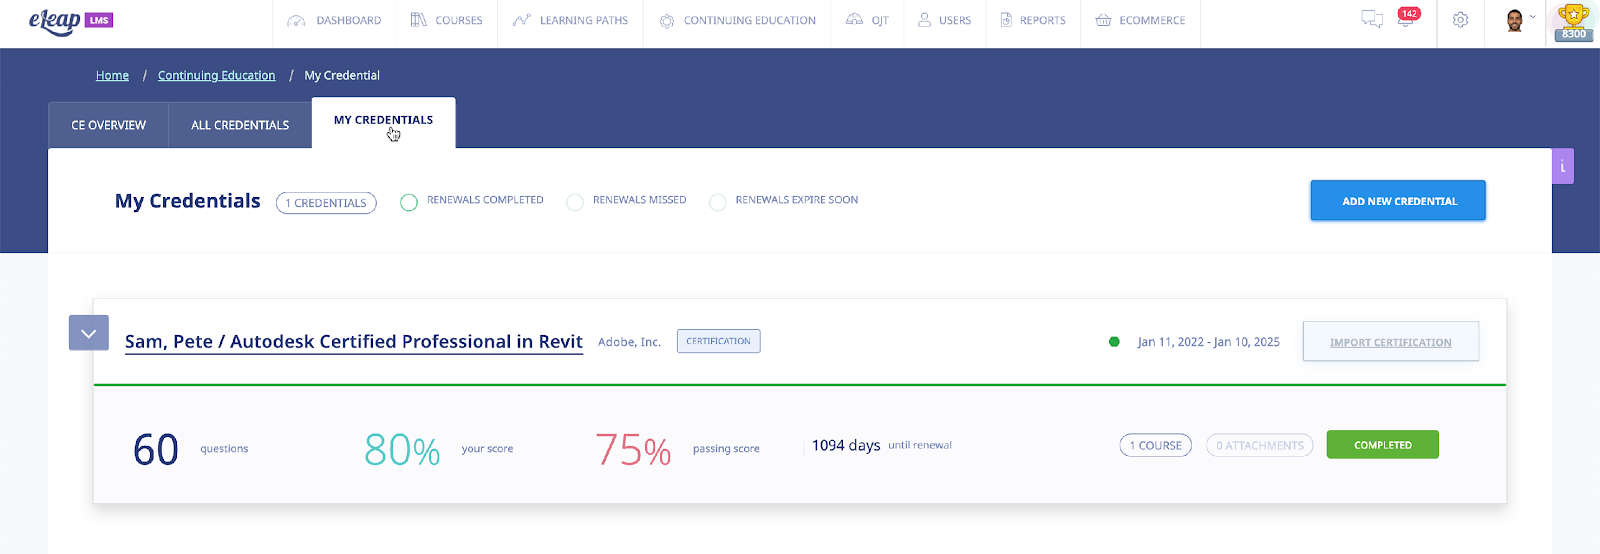
Add New Credential
To add a new credential, see the [Add New Credential] section.
Starting CE Course
You can be assigned to a CE course, or you can self-enroll in one. Regardless of how you are assigned, here’s how to start a new CE course.
Self Enrollment CE course:
If you offer CE courses in eLeaP, you or your users can self-enroll in CE courses if you have created such courses.

To find CE courses, click the link as shown below or go to the section.

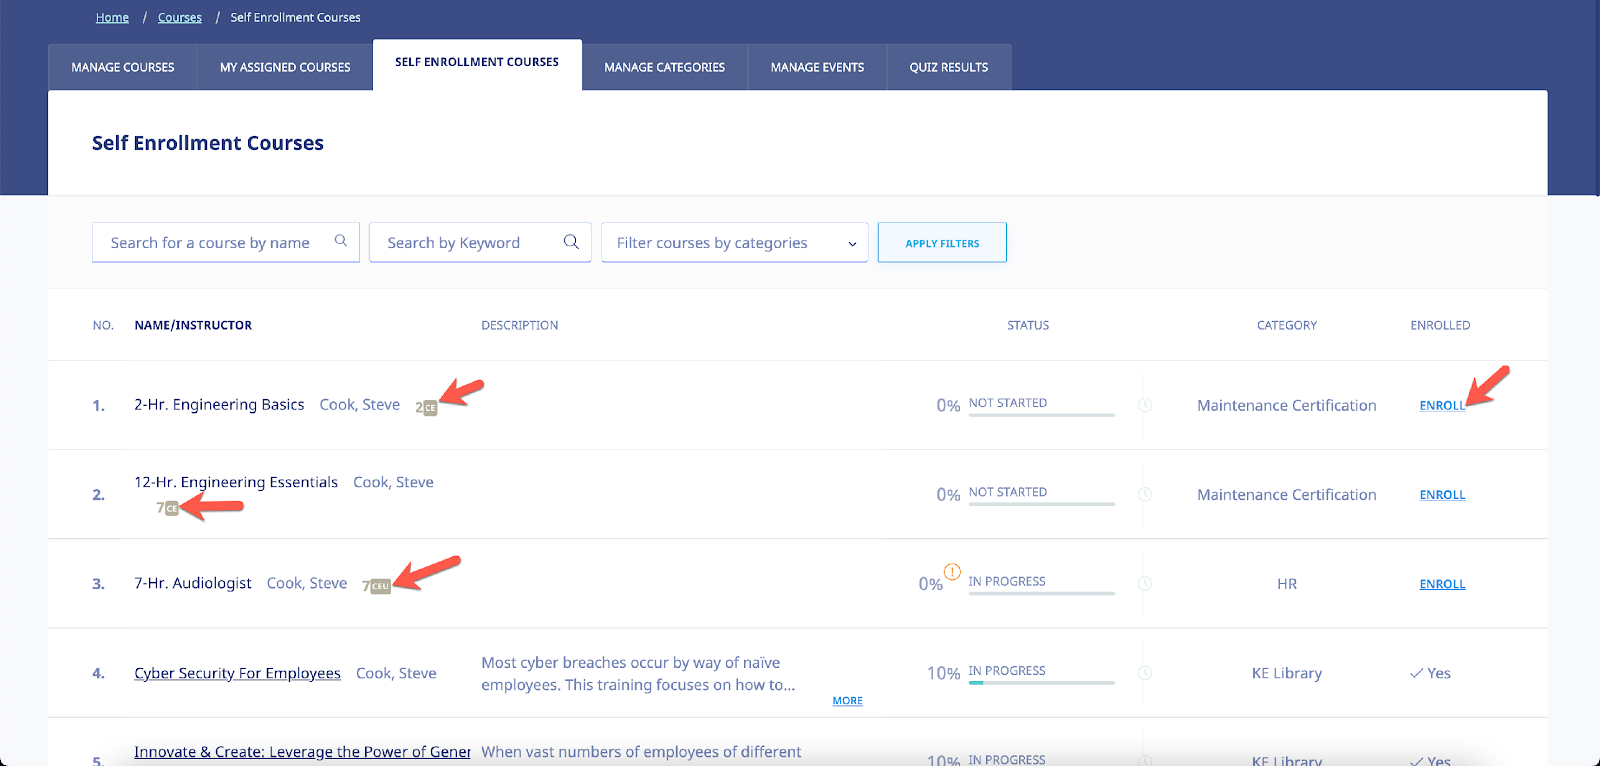
Once you self-enroll in a CE course or have a CE course assigned to you, you must follow a strict sequence to earn CE credits for completing the course.
Step 1:
Associate the CE course with one of your existing licenses (or create a new license)
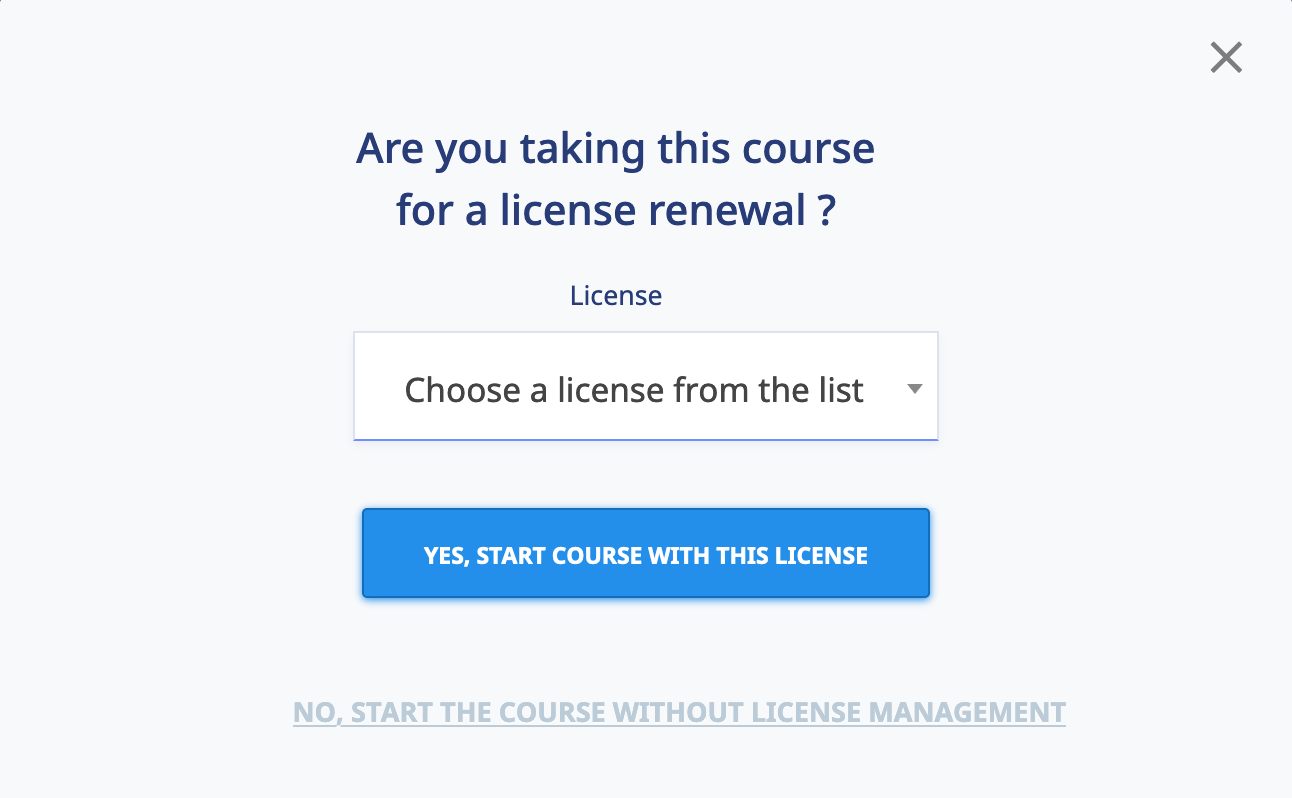
Step 2:
Once you make your associated license selection, click the [Yes, start course with this license]
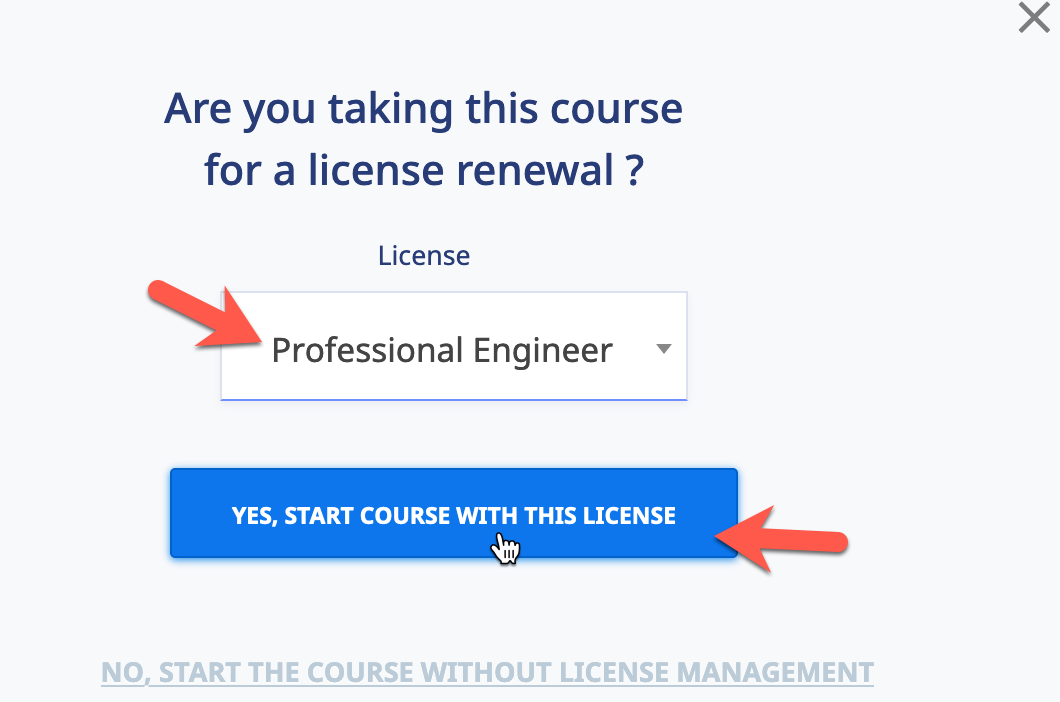
Note:
If you don’t want to take the course for CE credit, select the [No, Start the course without License Management]
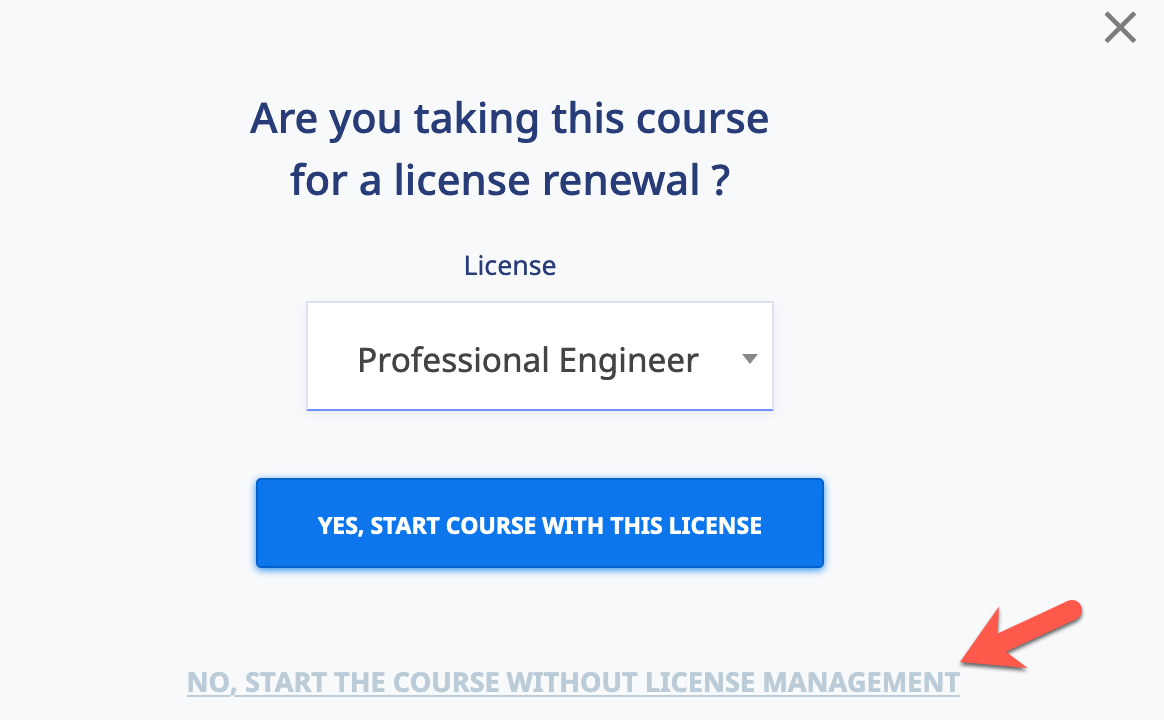
Once you Start and complete your course, you will earn the course CE’s allocated.
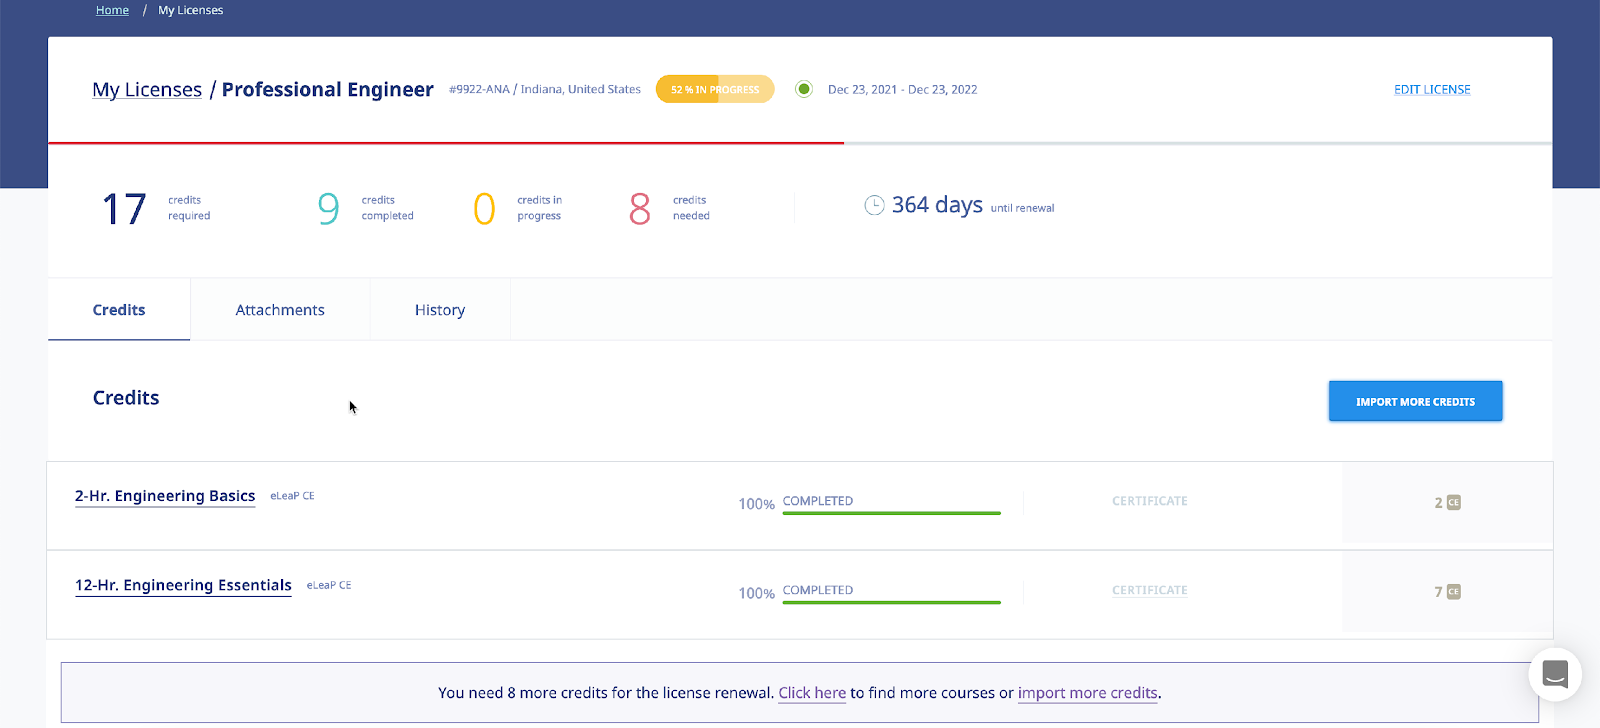
OJT – On-the-Job-Training
Selecting the tab in the main menu section displays your OJT section of the eLeaP system. Note that this module is not automatically available in your main menu section. If you don’t see the OJT tab, you will need to activate it from your account page. Also feel free to contact eLeaP for more information.

To go the OJT Activation page, click the icon and click the [OJT] sub tab as illustrated below:
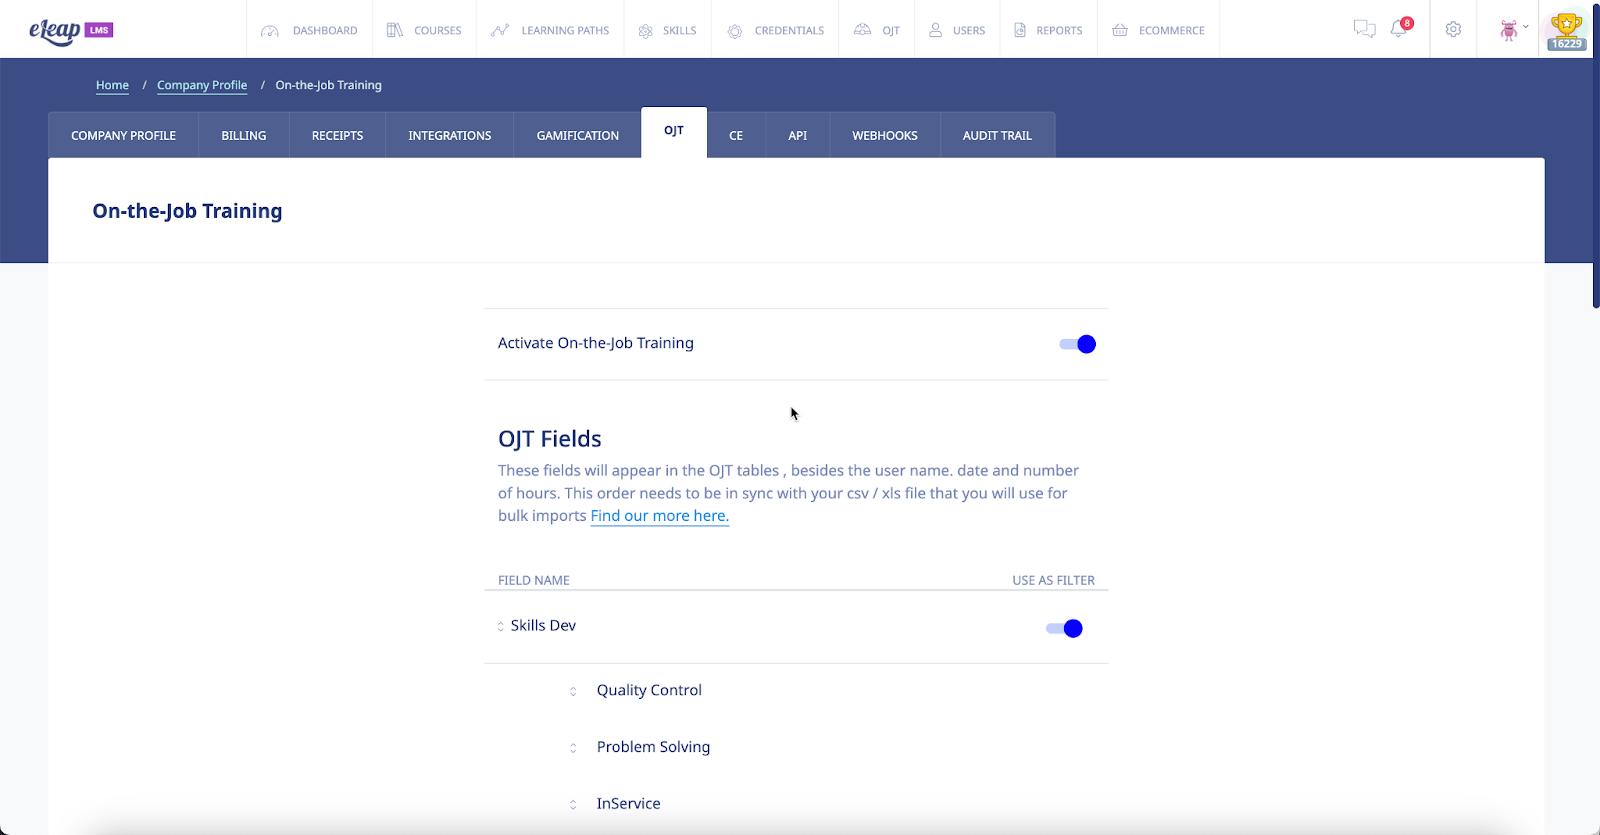
OJT Fields
You can edit the existing default fields like Skill and Task. However, the Date and Hours fields are not editable and are required for the OJT to work properly.
Add New OJT Field:
Go to the last line in the OJT form and enter the name of your new field
. Click the [Add New Field] button to add your new field.

If you want to add a drop-down field selector, no worries, first enter the top-level field and then edit the field to add the drop-down options.
Edit OJT Field:
Hover over the OJT field edit icon to bring up the dropdown menu.
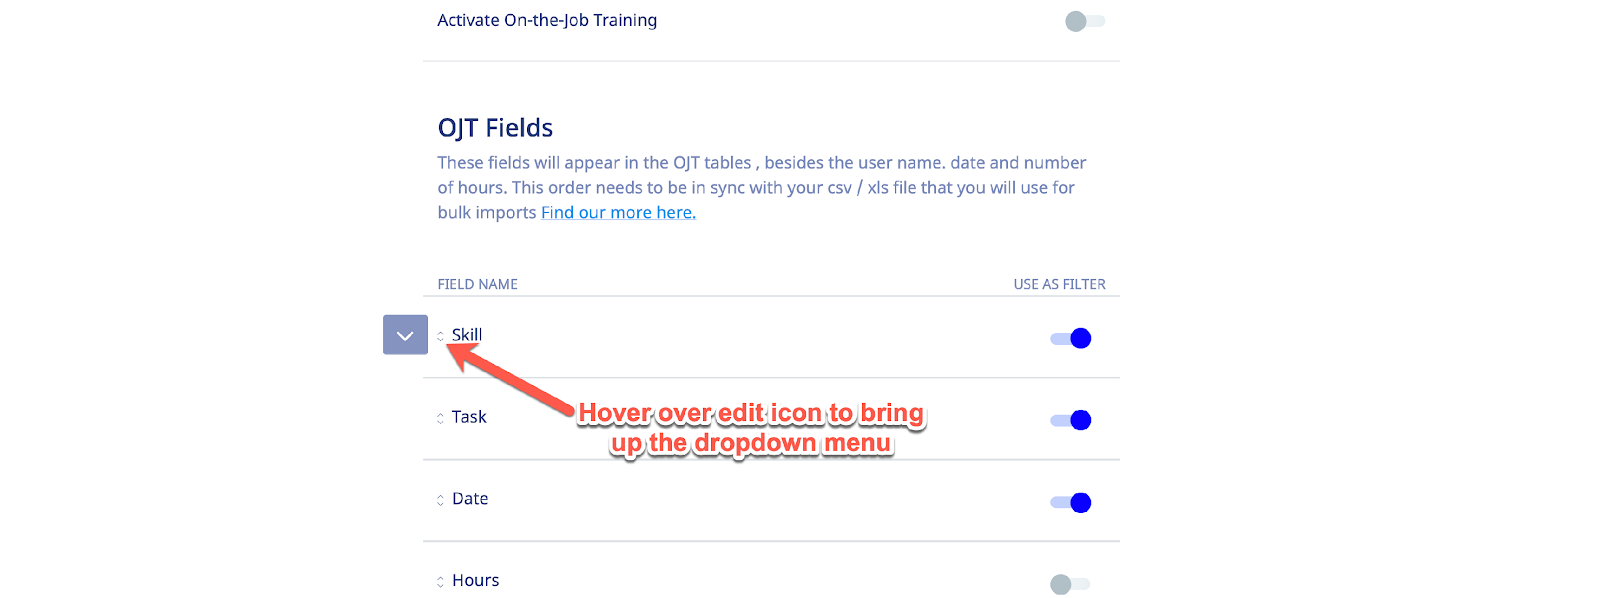
Once the dropdown menu appears select the option to edit the selected field. OJT fields can be text input fields or dropdown selection option fields. Select the right type of field for your needs.

Field Name: Enter the value for the field i.e., Competency
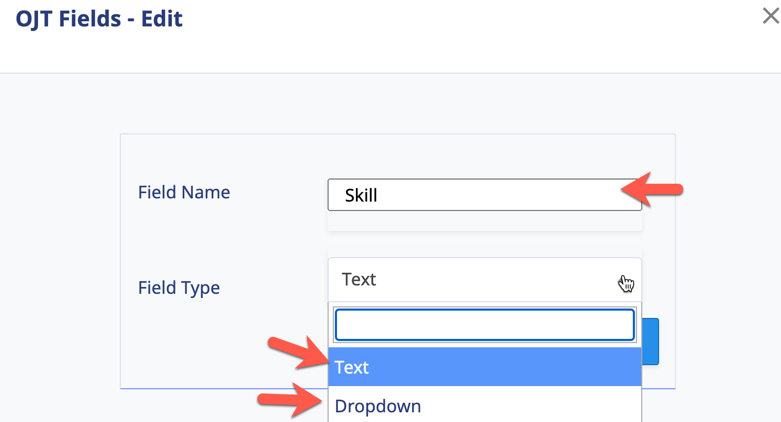
Field Type: Select the field type option that best meets your needs. Text fields enable the user to input their own text response while Dropdown fields enable the user to select from a pre-defined list of answer options i.e., ‘Is this a core level procedure?’ and the answer options are ‘Yes’ or ‘No’.
Adding Drop Down Field Options:
After saving a field as a dropdown type, click field option icon to see the add dropdown option
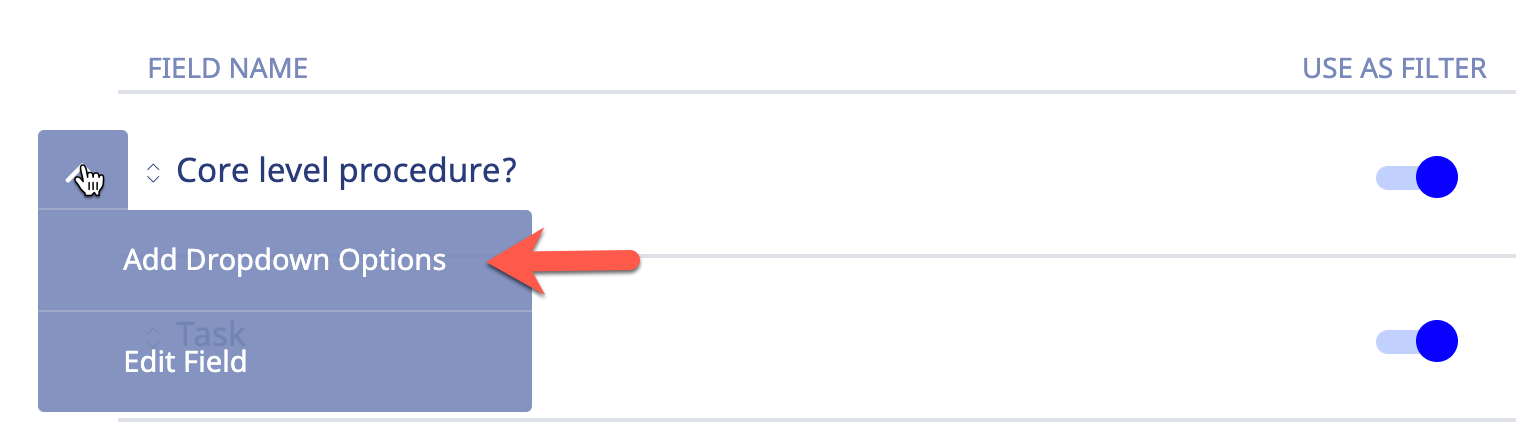
Repeat this process to add additional dropdown options.
Use as Filter
When the ‘Use as Filter’ switch is turned on, eLeaP displays the OJT in your OJT section as one of the fields you can filter records by.
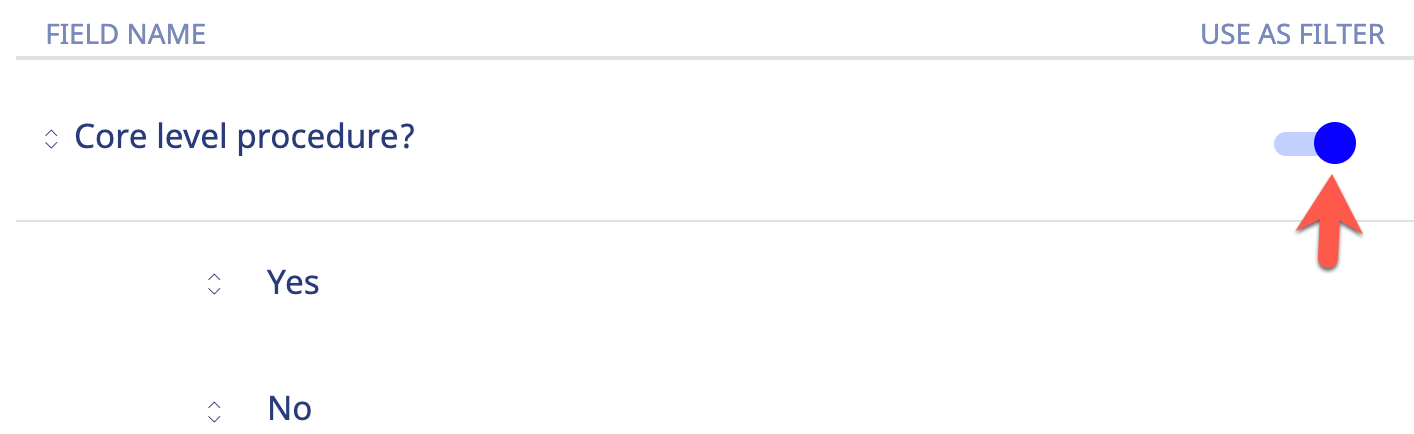
Due to space restrictions, we recommend checking how the filter page looks, as too many fields might look too busy.
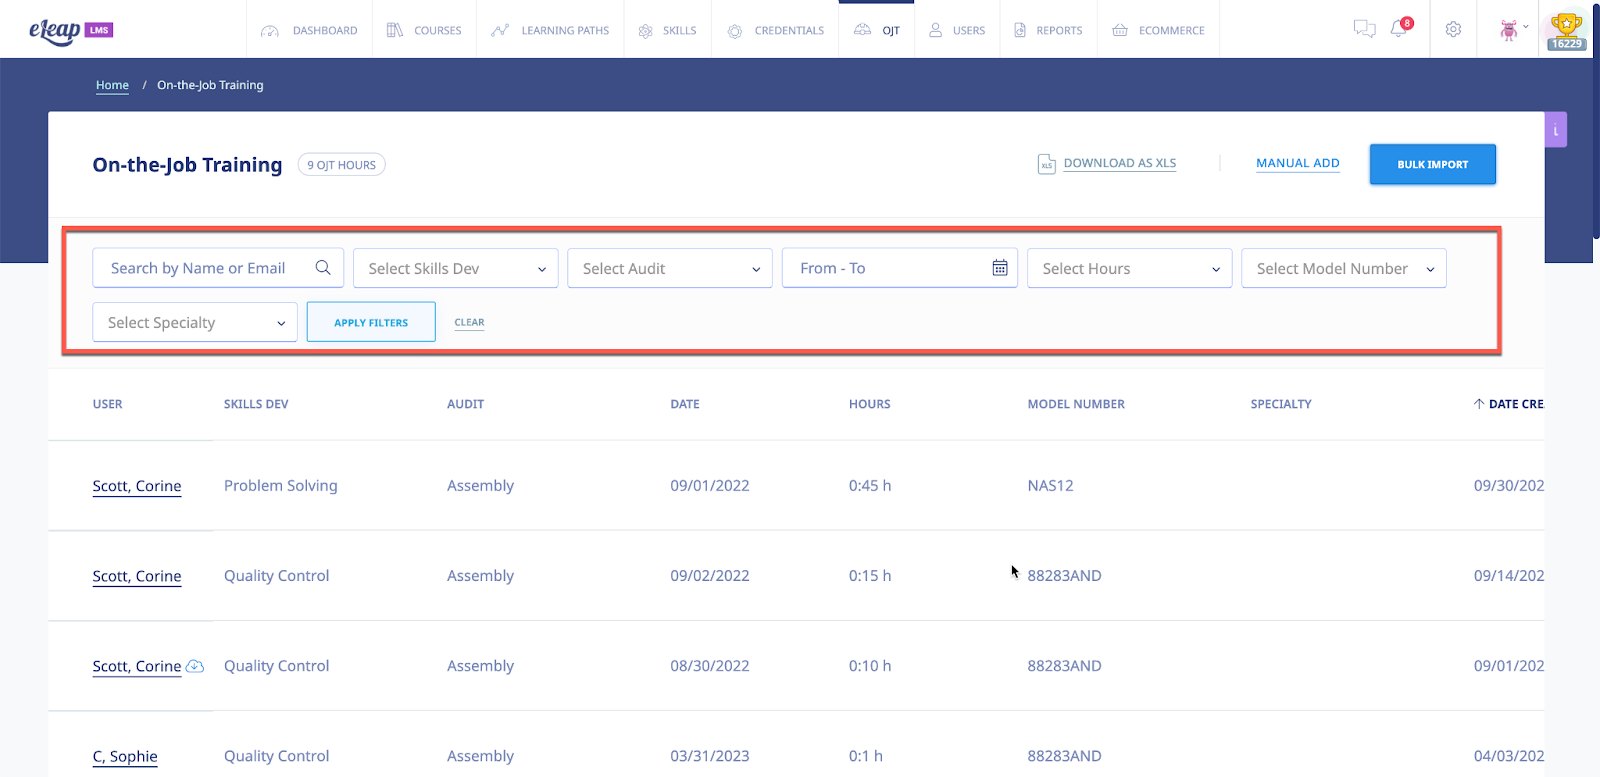
Versus
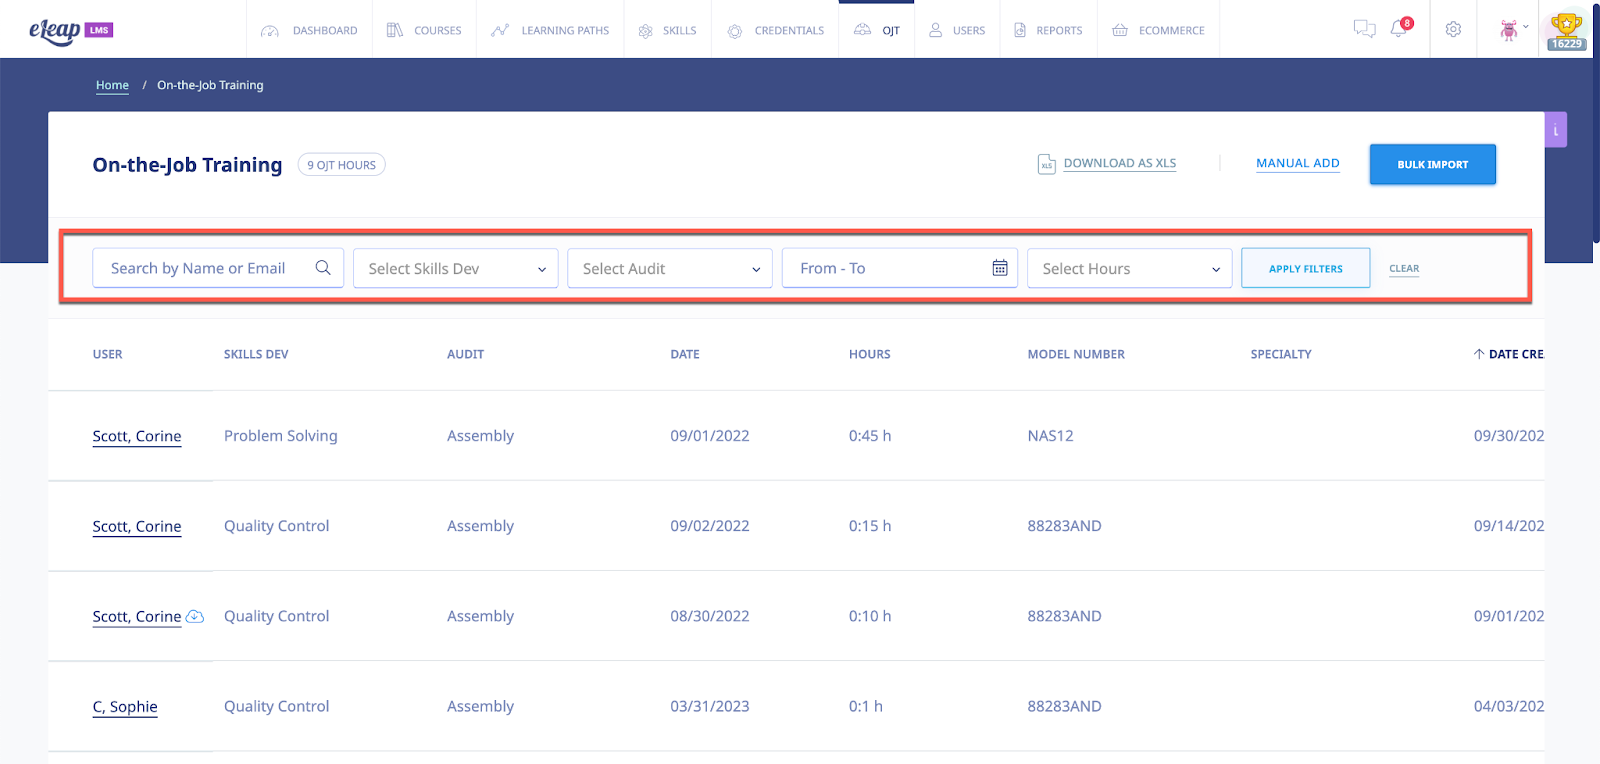
OJT Section
Click the tab to go to the main OJT page. From this page, you manage your OJT records. The OJT page enables Admins and Instructors to add OJT records one at a time or in bulk, edit existing records, download all OJT records, filter OJT records using specific fields, or view individual user OJT records.
Manual Add
Use the option to add OJT records for specific users. Here are the steps to add a manual OJT record:

- Select the specific user you want to add the records for.
- Select the answer options for the various OJT fields, including text and dropdown input options.
- Select the date the OJT record took place.
- Input the time the OJT record took to complete. You can use minutes or hours for the Hours field.
- Add any additional OJT input values and click to save the new OJT record.
- Note that if you want to add a file or upload a document, use the option.


If you need to edit an existing OJT record, simply scroll horizontally to the right, and click the option to bring up the OJT record form. You can also delete an existing OJT record by clicking the icon. As with any deletion in the system, the deletion is permanent.


Bulk Import
If you have many OJT records you would rather upload at once, the Bulk Import tool is the way to do this. Click the button to start the process. Before uploading or importing your file, though, you want to do a bit of prep work:

- First make sure your OJT fields are set up the way you want. Check your OJT settings page to make sure everything looks ok.
- Then, download the bulk import template file by clicking the link. The bulk_ojt.xls file is designed with your OJT fields already available
- Add data to the bulk_ojt.xls and make sure to maintain the email address as it is the verification field the system relies on to properly perform the import. A completed file might look something like
- Once everything looks good to go, click [CHOOSE FILE] to select your import file for the upload process. You are ready to click the [Start Import] to import your bulk file.
- After a successful import, you will receive a confirmation message on screen.
- You can verify that your import was successful by clicking on any of the newly imported records. The individual user’s OJT record would look like this


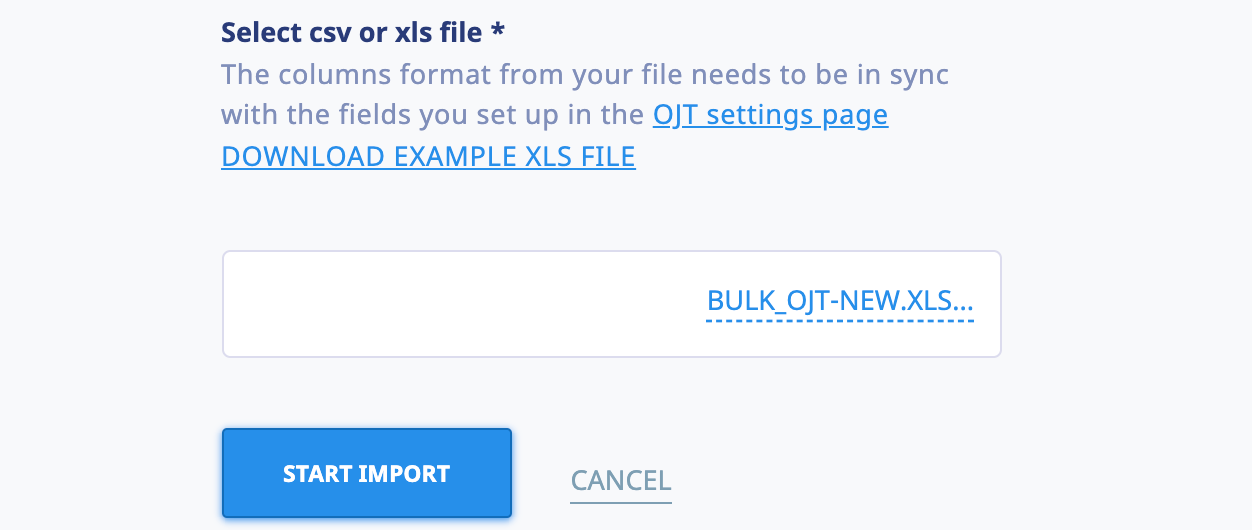

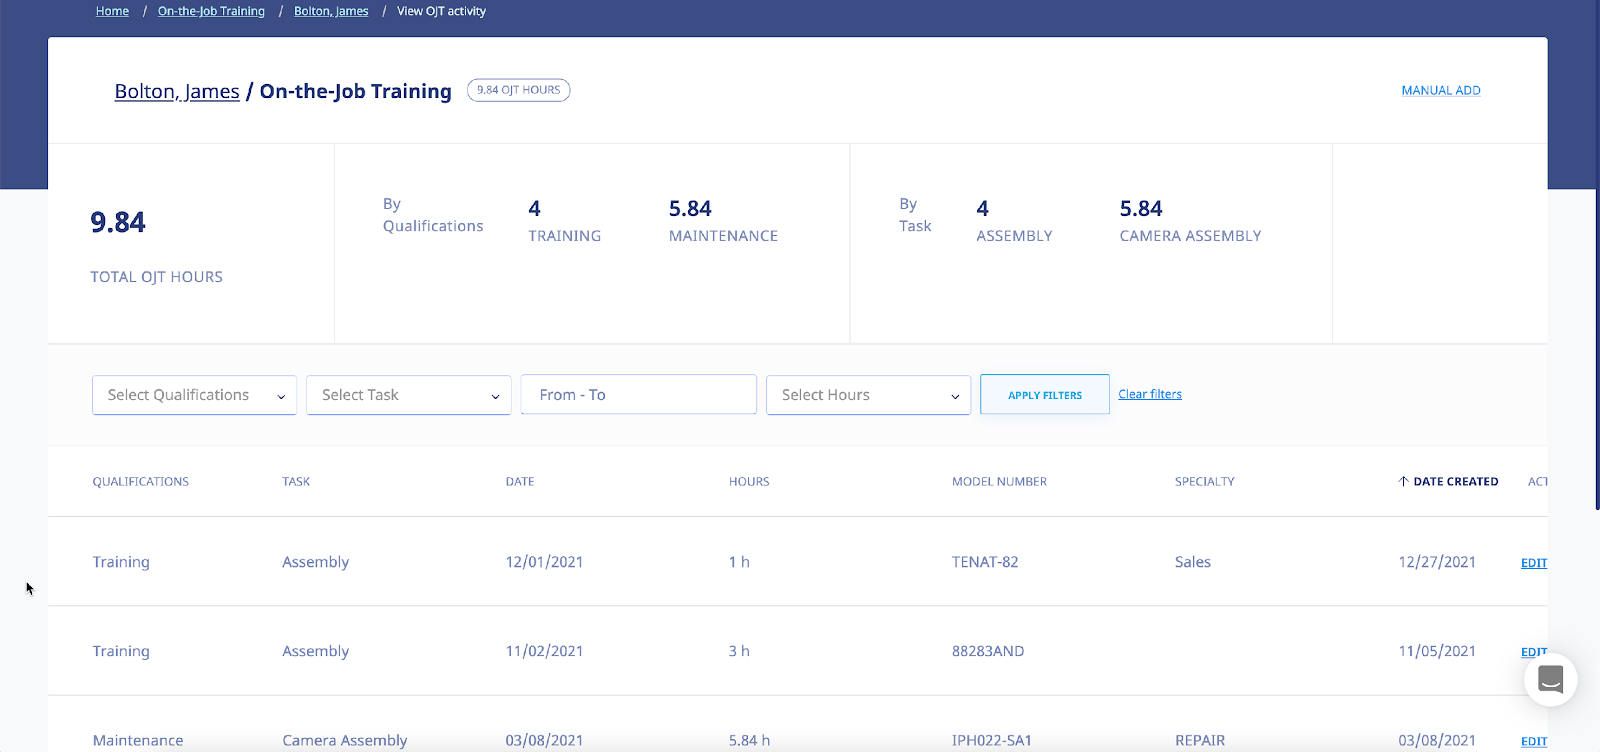
Users
Selecting the tab on the main menu bar displays the Users screen, illustrated below. Each user created is displayed on the Users list, with their Name, Level, Email, Description and Date Created details shown. You are also able to set a User’s Status as Active or Inactive. Users can be added to the system manually or imported from your computer, and you can export User Activity details from the system to a local drive on your computer.

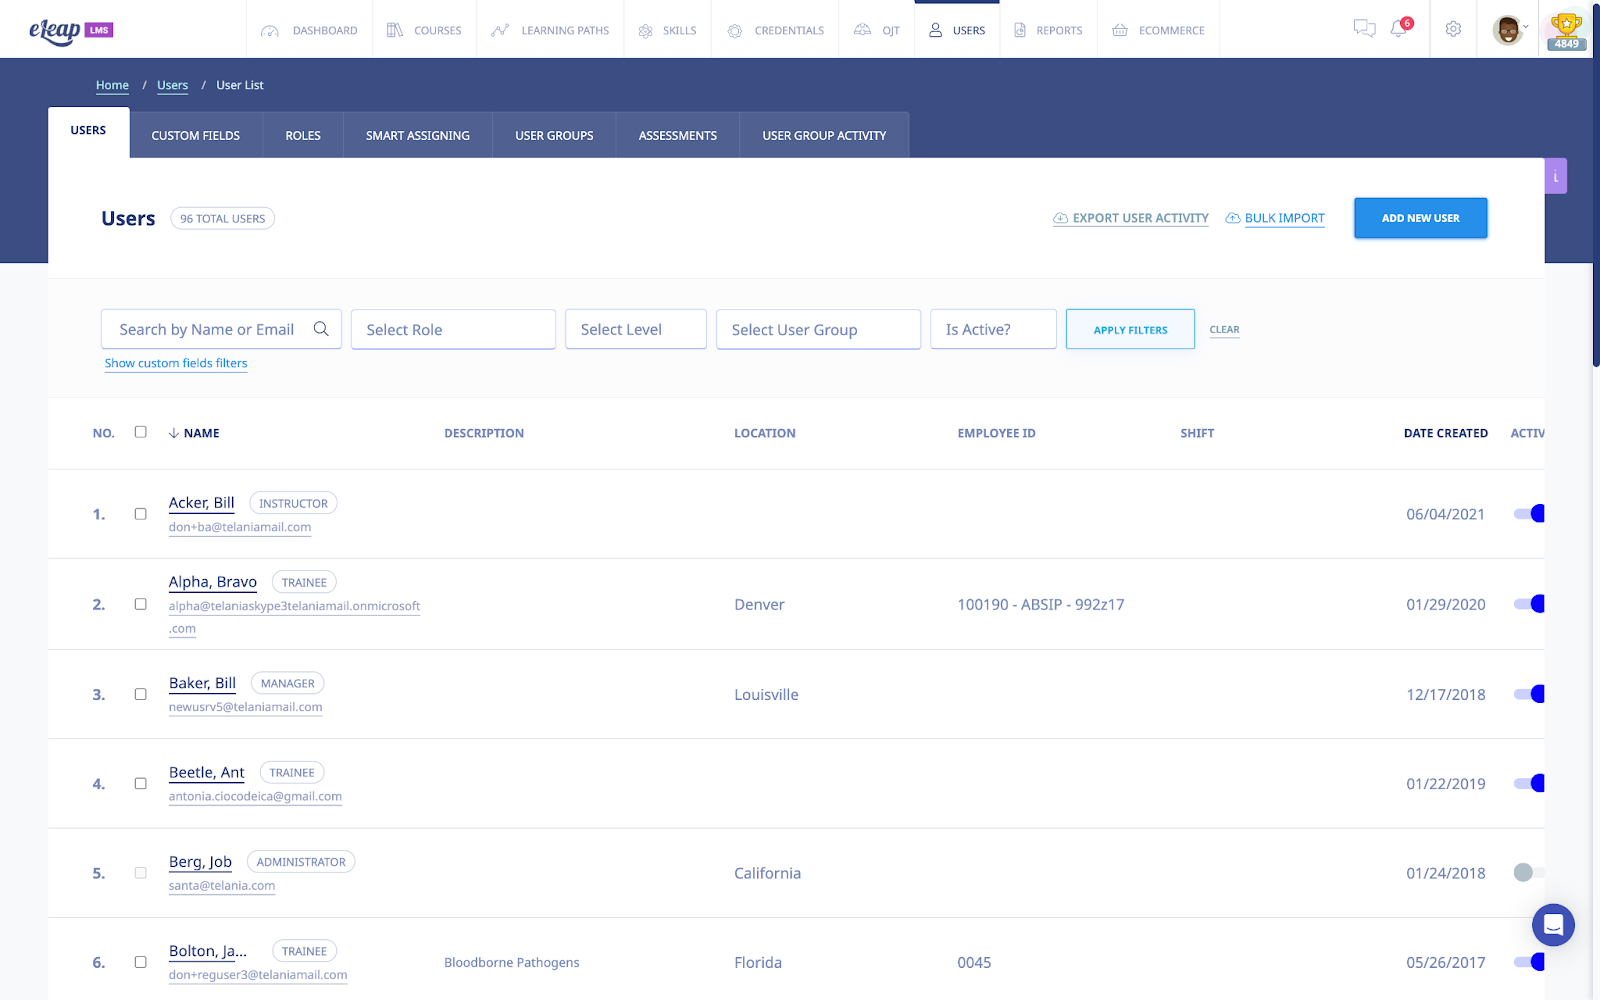
You can filter which Users are displayed on the Users list by selecting a Level from the Levels list, a Role from the Roles list, a User Group from the User Group list, and/or selecting Active or Inactive from the Is Active? list, and then clicking .
Adding a New User
Clicking the button on the Users screen allows you to add additional Users to the system. As shown in the following illustration, the Add User dialog is displayed. Use the steps below to successfully add a new User.
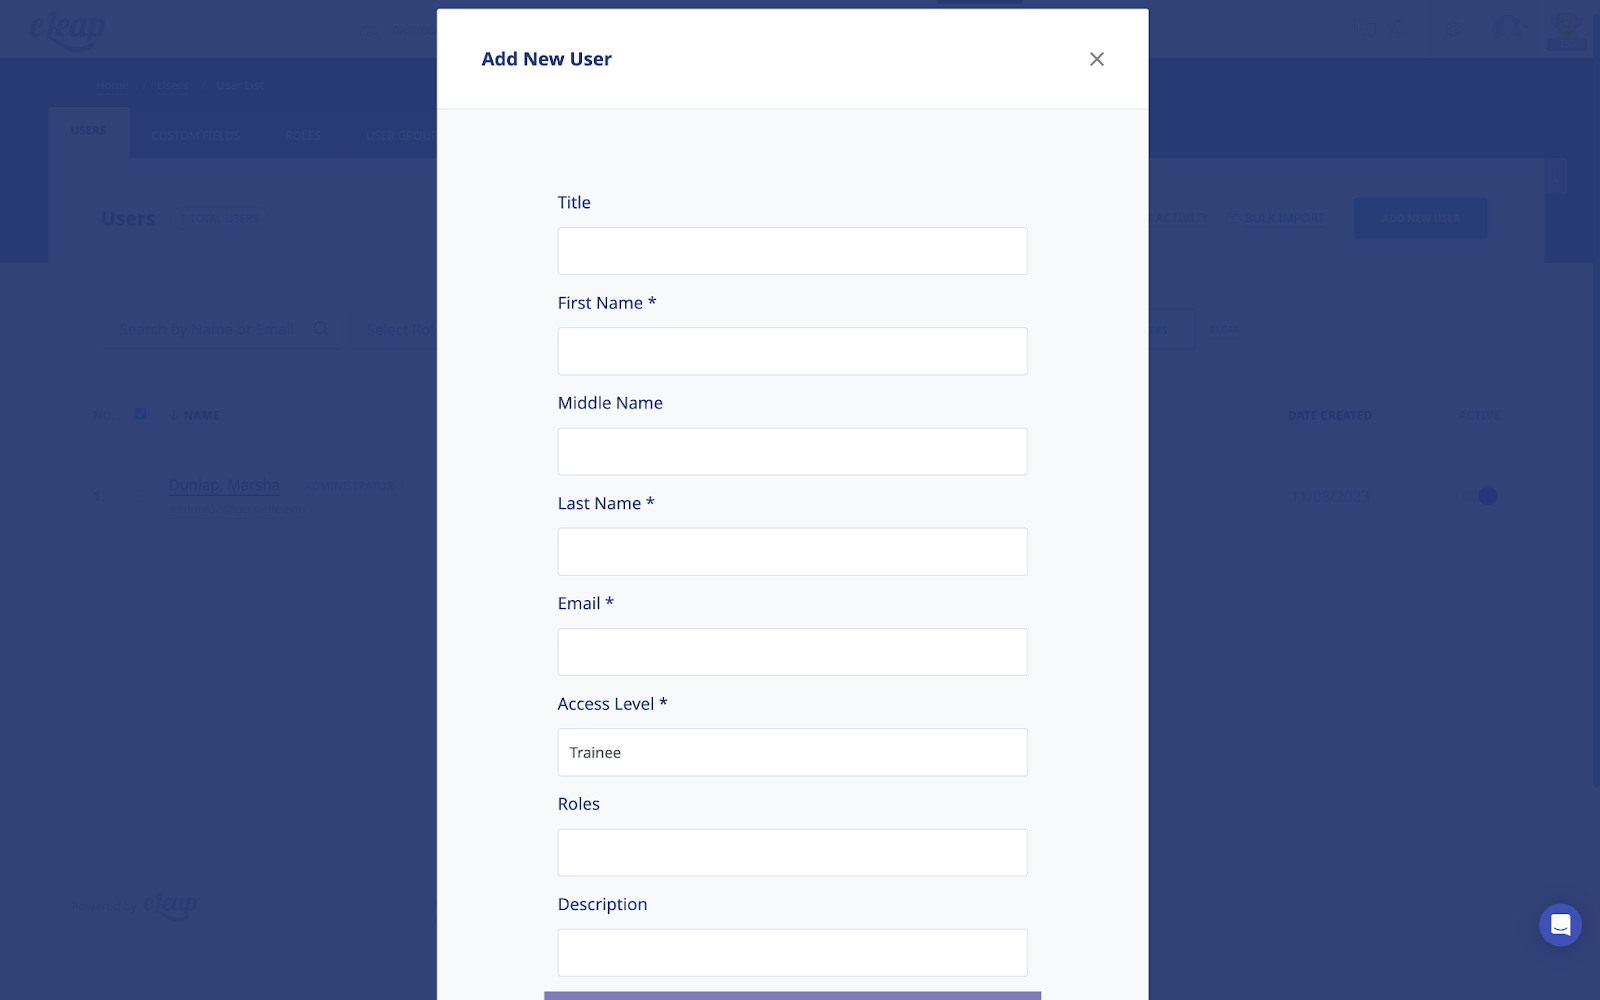
- Select a title for the new User by making a selection from the Title list. Available options are Mr., Mrs., Ms.
- Enter the new User’s first name in the First Name field.
- Enter the new User’s middle name, if applicable, in the Middle Name field.
- Enter the new User’s last name in the Last Name field.
- Enter the new User’s email address in the Email field.
- Select the new User’s access level by making a selection from the Access Level list. Available options are Trainee, Supervisor, Manager, and Instructor.
- Select the new User’s applicable Role(s) level by making a selection from the Roles Level list. Roles must be pre-created in order to be available here.
- Enter a description for the new User, if desired, within the Description field.
- If you have set up Custom Fields for your account (see Custom Fields section), enter values for these fields for the new User.
- Click to add the new User to the system.
The new User will be added to the Users list on the Users screen. Additionally, a welcome email is generated from office@eleapsoftware.com to your new user. This welcome email will contain information for the new user to log into your training website. Please be sure to white list email coming from ELEAPSOFTWARE.COM as vital information can be blocked or dumped in your bulk or SPAM folder.
Note: You can create as many instructors, managers, supervisors, and/or trainee accounts as you like. Just be sure to assign the relevant Access Level to users when you create their accounts. Remember, you can also edit user accounts later and change their Access Level settings.
Trainee Users
Trainee users are set up to be assigned to courses or learning paths. Trainees can also self-enroll in designated courses and learning paths. Depending on course requirements, trainees might be required to complete quizzes, feedback forms, or participate in discussions.
If activated, trainees can also access continuing education tracking as well as on-the-job training options within the LMS.
Instructor Users
The INSTRUCTOR level is a secondary level whose functionality is very similar to that of an Administrator.
INSTRUCTORS are, however, unable to access the COMPANY PROFILE menu or user group and course information that they themselves have not created or been granted access to by an Administrator.
INSTRUCTORS do have the ability to create additional users, including additional INSTRUCTORS. They can also manage their own quizzes and courses in every detail.
For course collaboration, multiple INSTRUCTORS can be added to a single course.
Supervisor Users
The Supervisor account level enables organizations to provide management oversight for User Groups and teams. When a Supervisor is created and associated with a User Group, they are able to access completion reports for members of that User Group.
To access the User Groups they manage, Supervisors will need to click on [USER GROUPS] from the main top navigation area. The Supervisor can then click on any listed User Groups to view completion and tracking reports for members of that User Group.
Supervisors can download completion reports into Excel documents. They will also receive notifications via email when course deadlines for managed Users and User Groups are expiring or have expired.
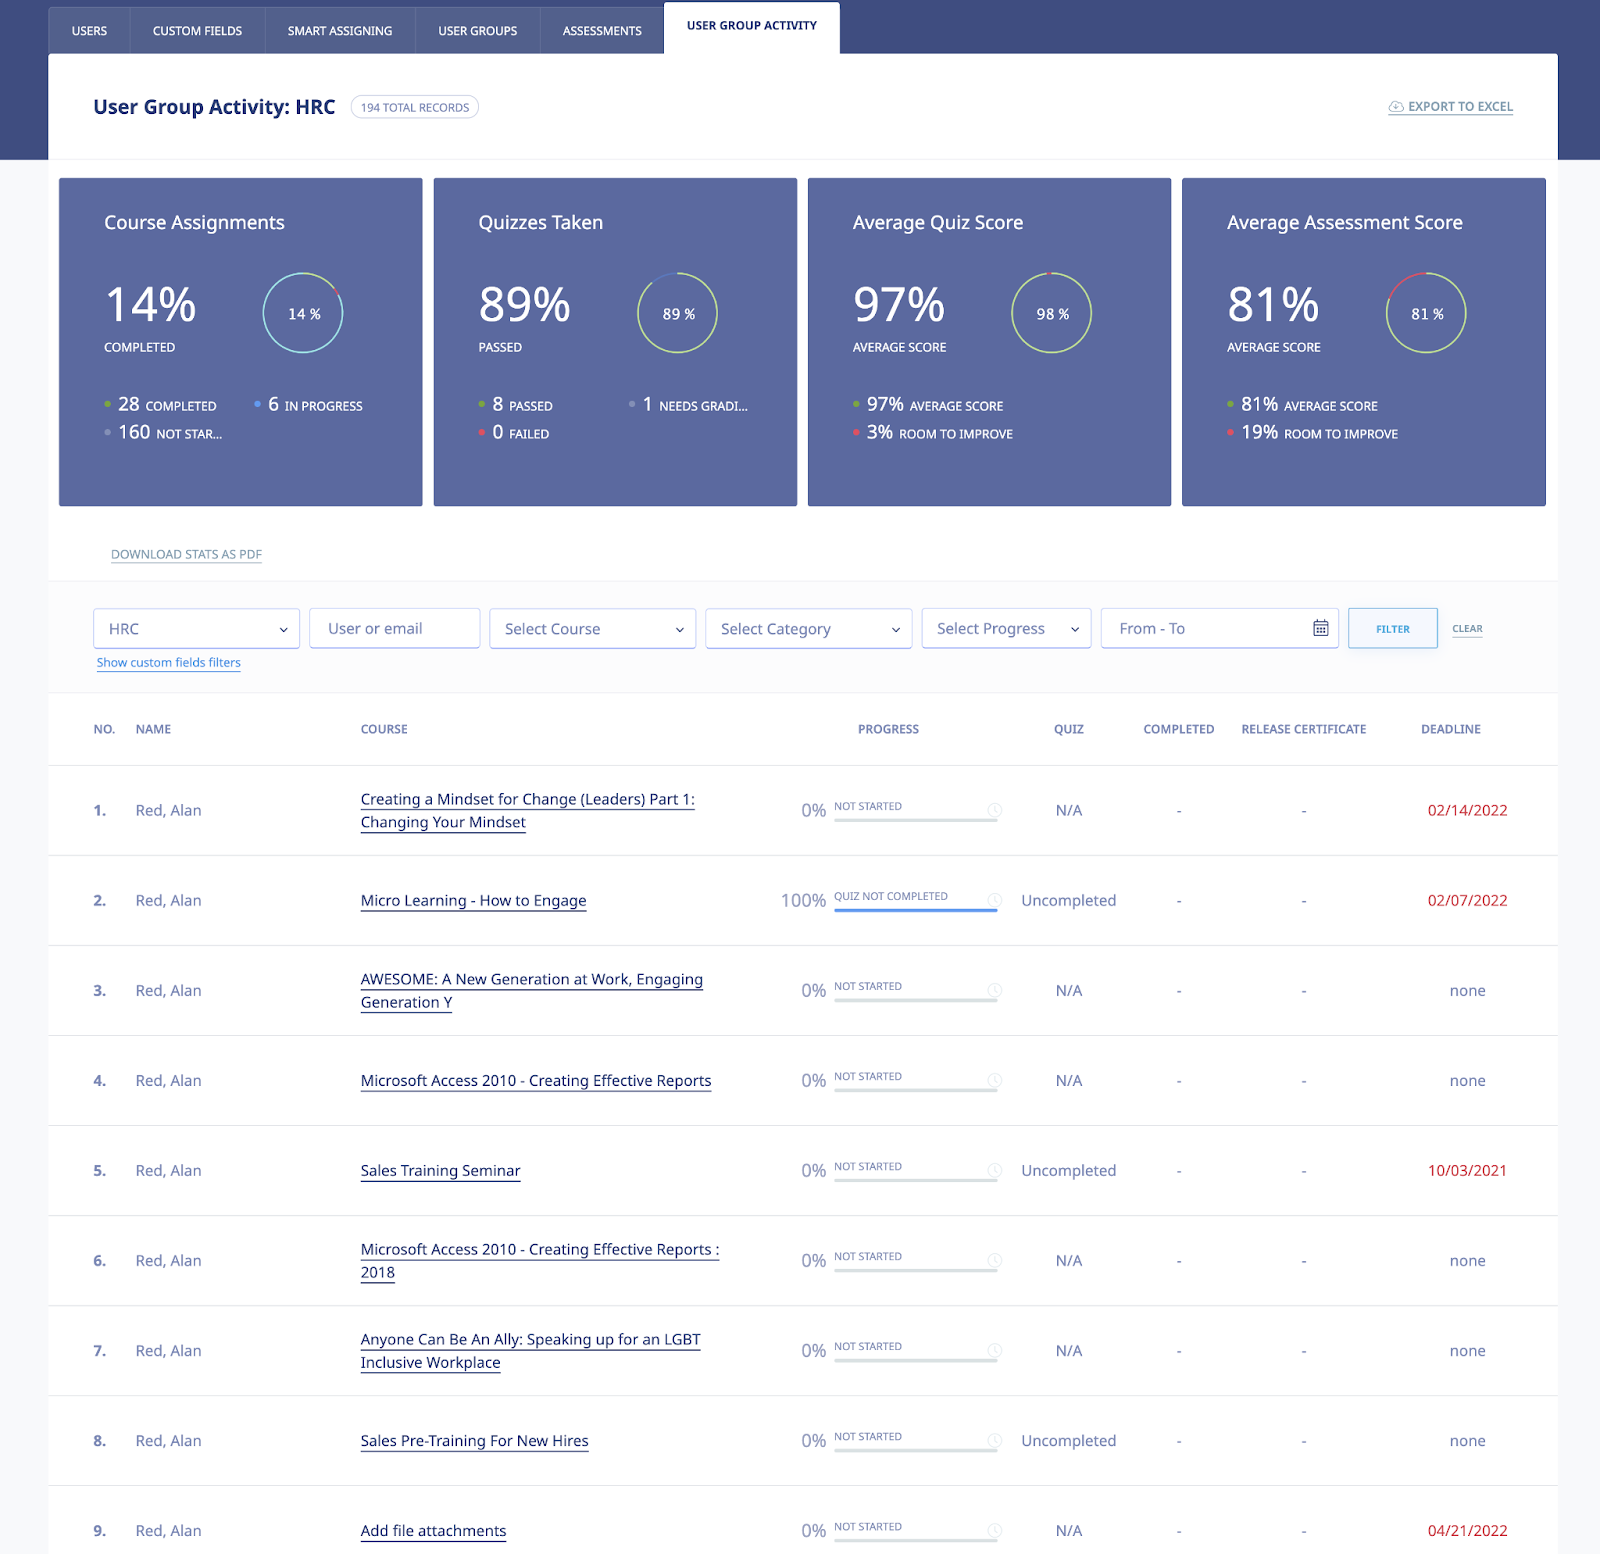
Manager Users
The Manager account level enables organizations to provide management oversight for User Groups and teams. When a Manager is created and associated with a User Group, they are able to assign courses and learning paths to members of their managed user groups. Managers are also able to access completion reports for members of that User Group.
To access the User Groups they manage, Managers will need to click on [USER GROUPS] from the main top navigation area. The Manager can then click on any listed User Groups to view completion and tracking reports for members of that User Group.
Managers can download completion reports into Excel documents. They will also receive notifications via email when course deadlines for managed Users and User Groups are expiring or have expired.
Assigning Managers/Supervisors to User Groups
First go to the [Users] tab and click the [User Group] sub tab. From there, select the user group you want to manage. You can create a new user group if needed.
You will see the new tab [User Group Settings]
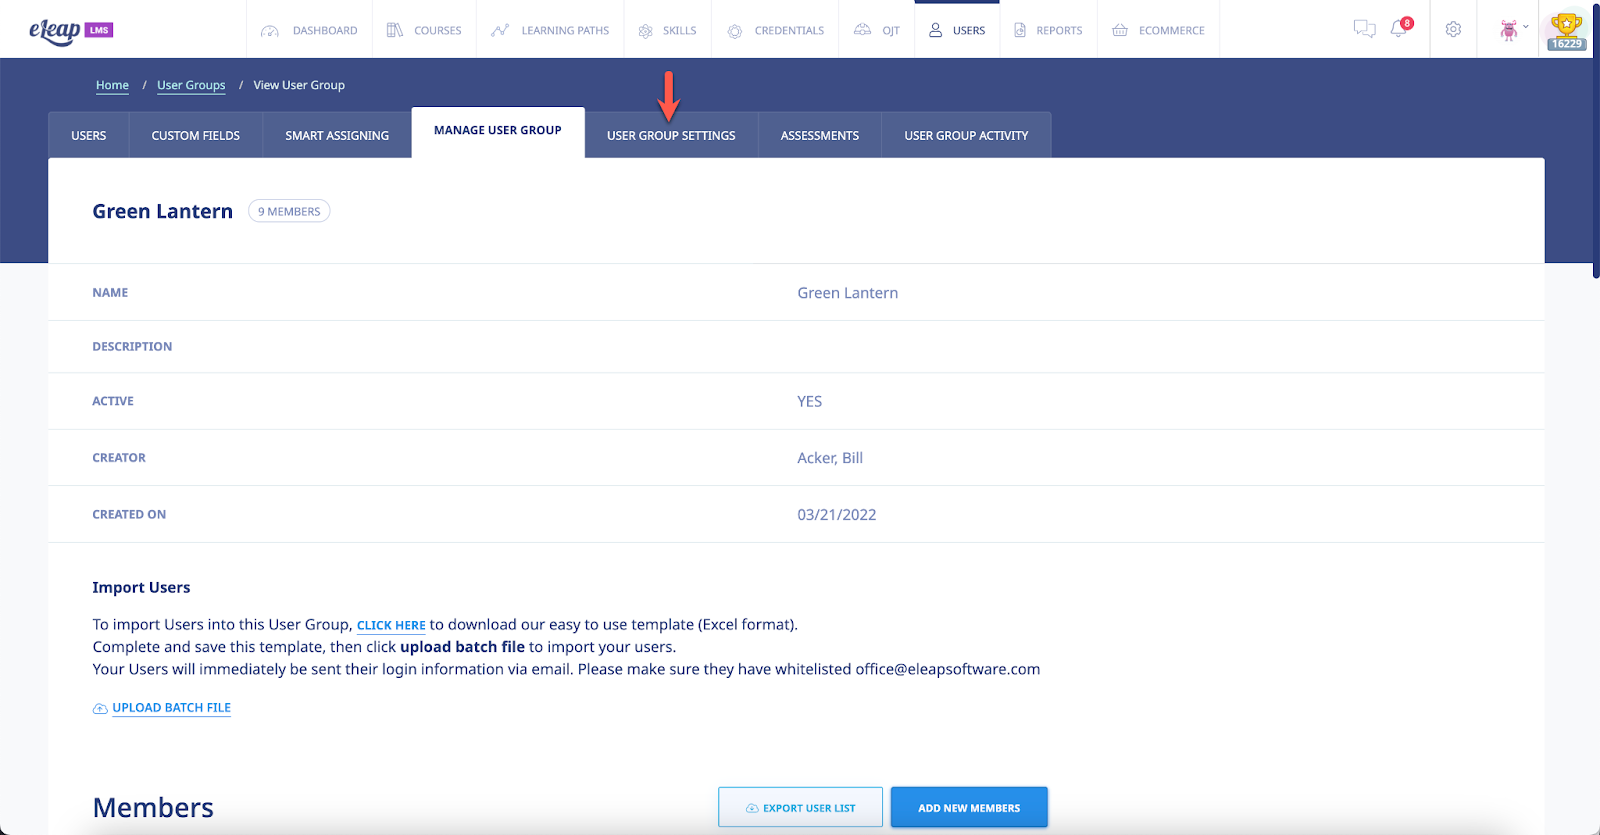
Click on that see the option to [Add New Role]
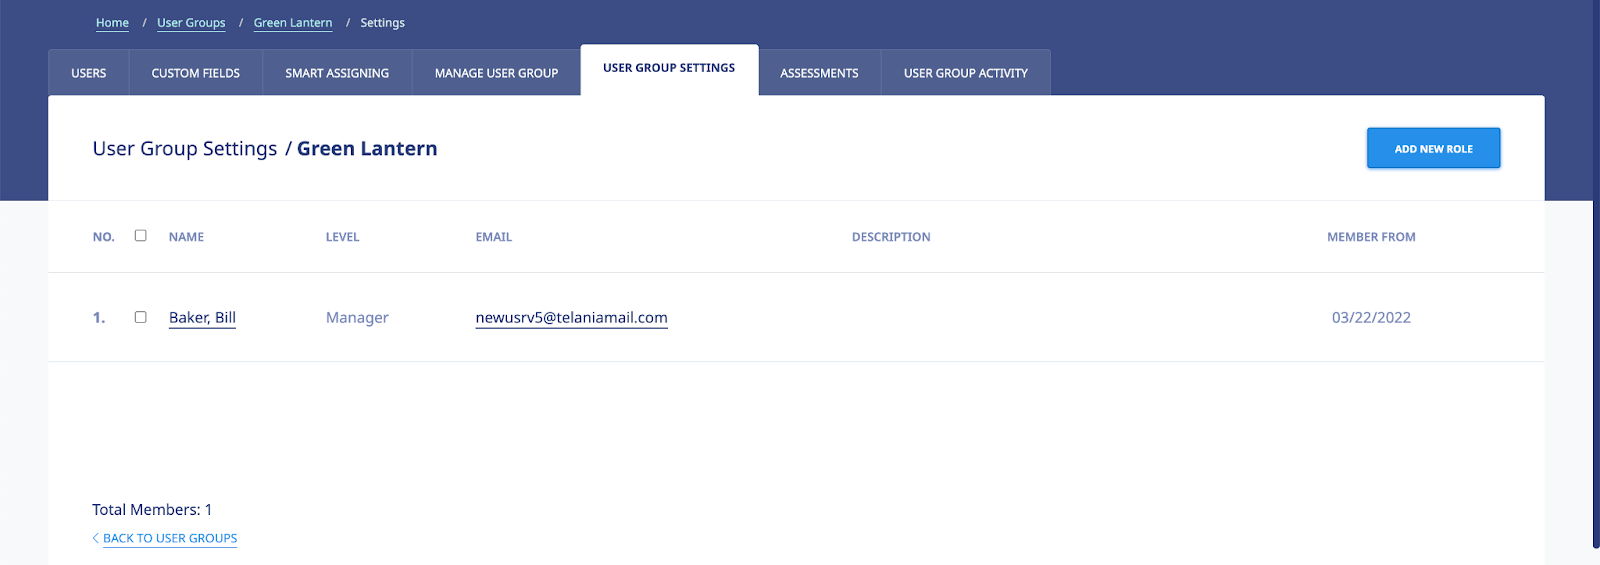
User Activity
Clicking on the name of a user takes you to the user’s activity page. This section includes sub sections like Courses Created (if applicable), Courses (assigned), Quizzes, SCORM (quizzes), Certificates, E-Signatures, Learning Paths, Skills, Credentials, Assessments, Notes, OJT, Events and User Groups
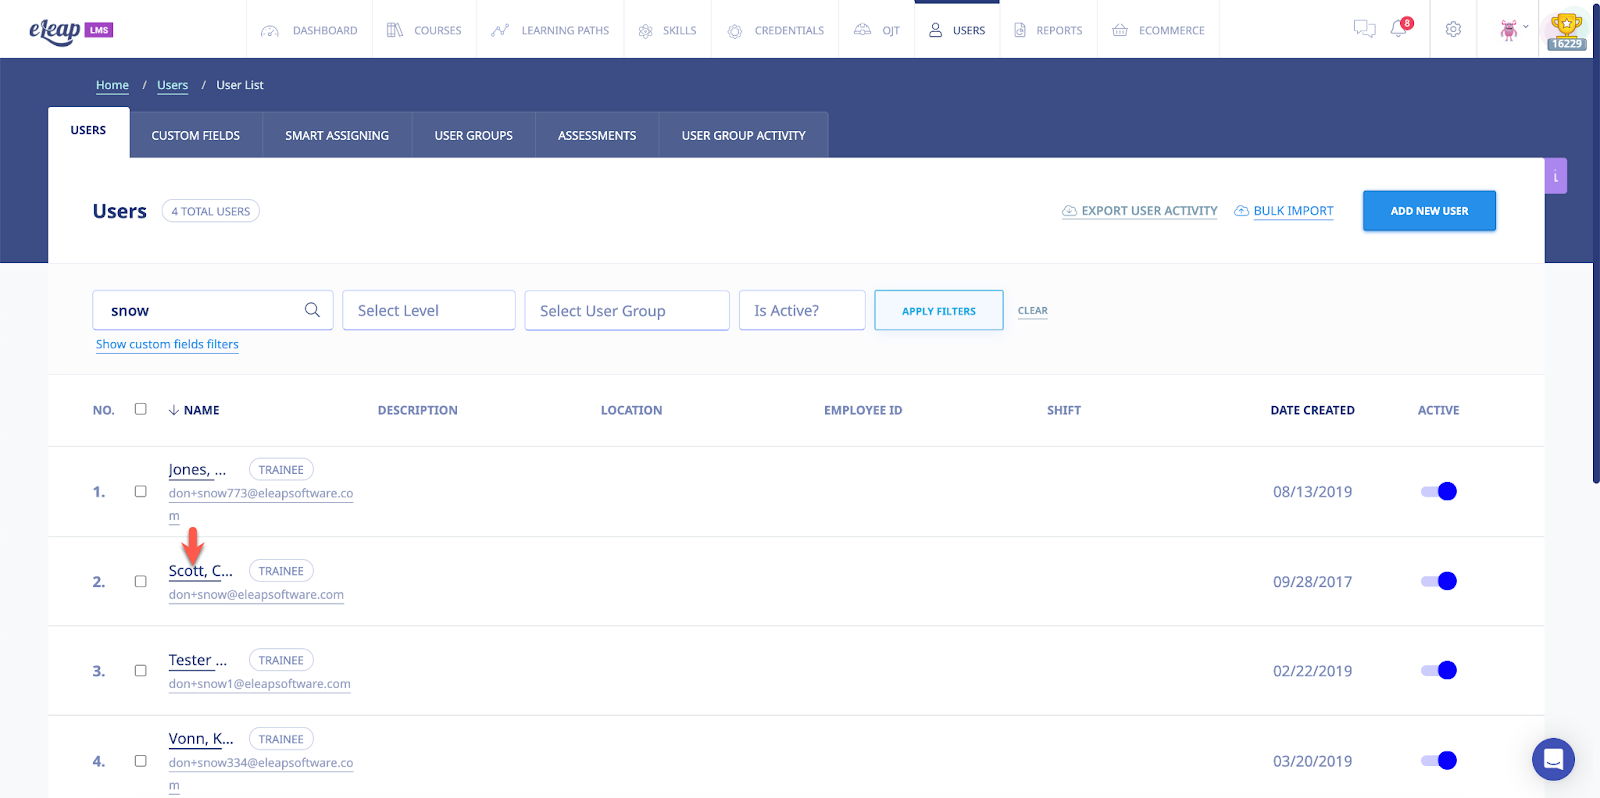
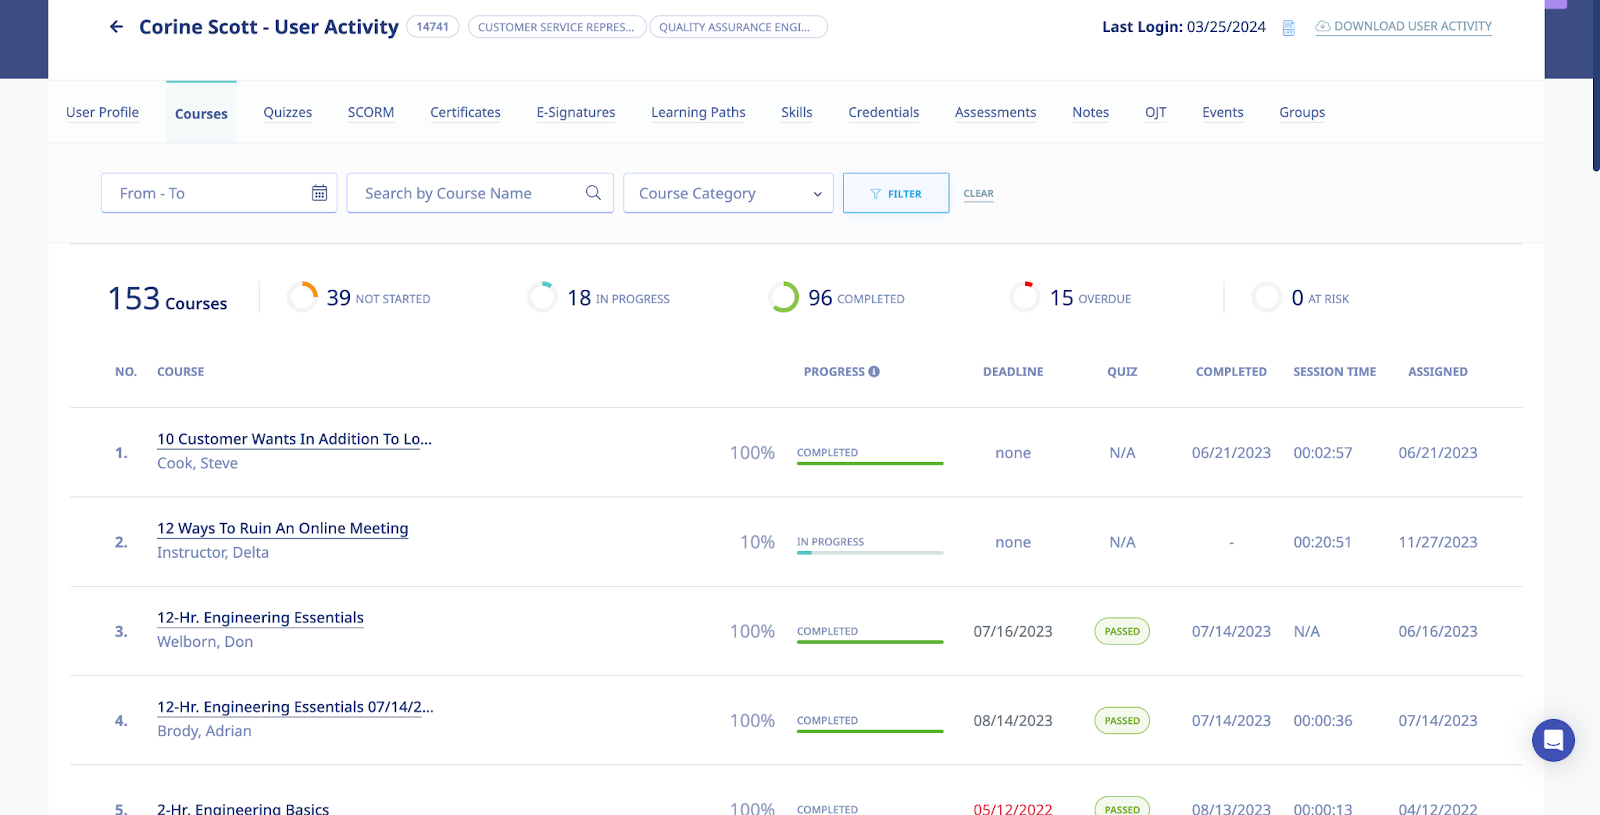
User Activity Sub Sections
Click the individual sub sections to get additional information on the user’s activity.

Download User Activity
Clicking the Download User Activity link allows you to download this information to your computer as an Excel file.
User Profile
Selecting the tab displays the View profile screen for the currently selected User, as shown in the following illustration. In addition to the options described within the Editing Your Profile Fields section of the document, you can add Notes, and upload a File to attach to those Notes for the User, set a new Password for the User, and resend Email Confirmation for the User. You can also delete the picture associated with the Profile, replace that picture with another, or edit the User Profile fields.

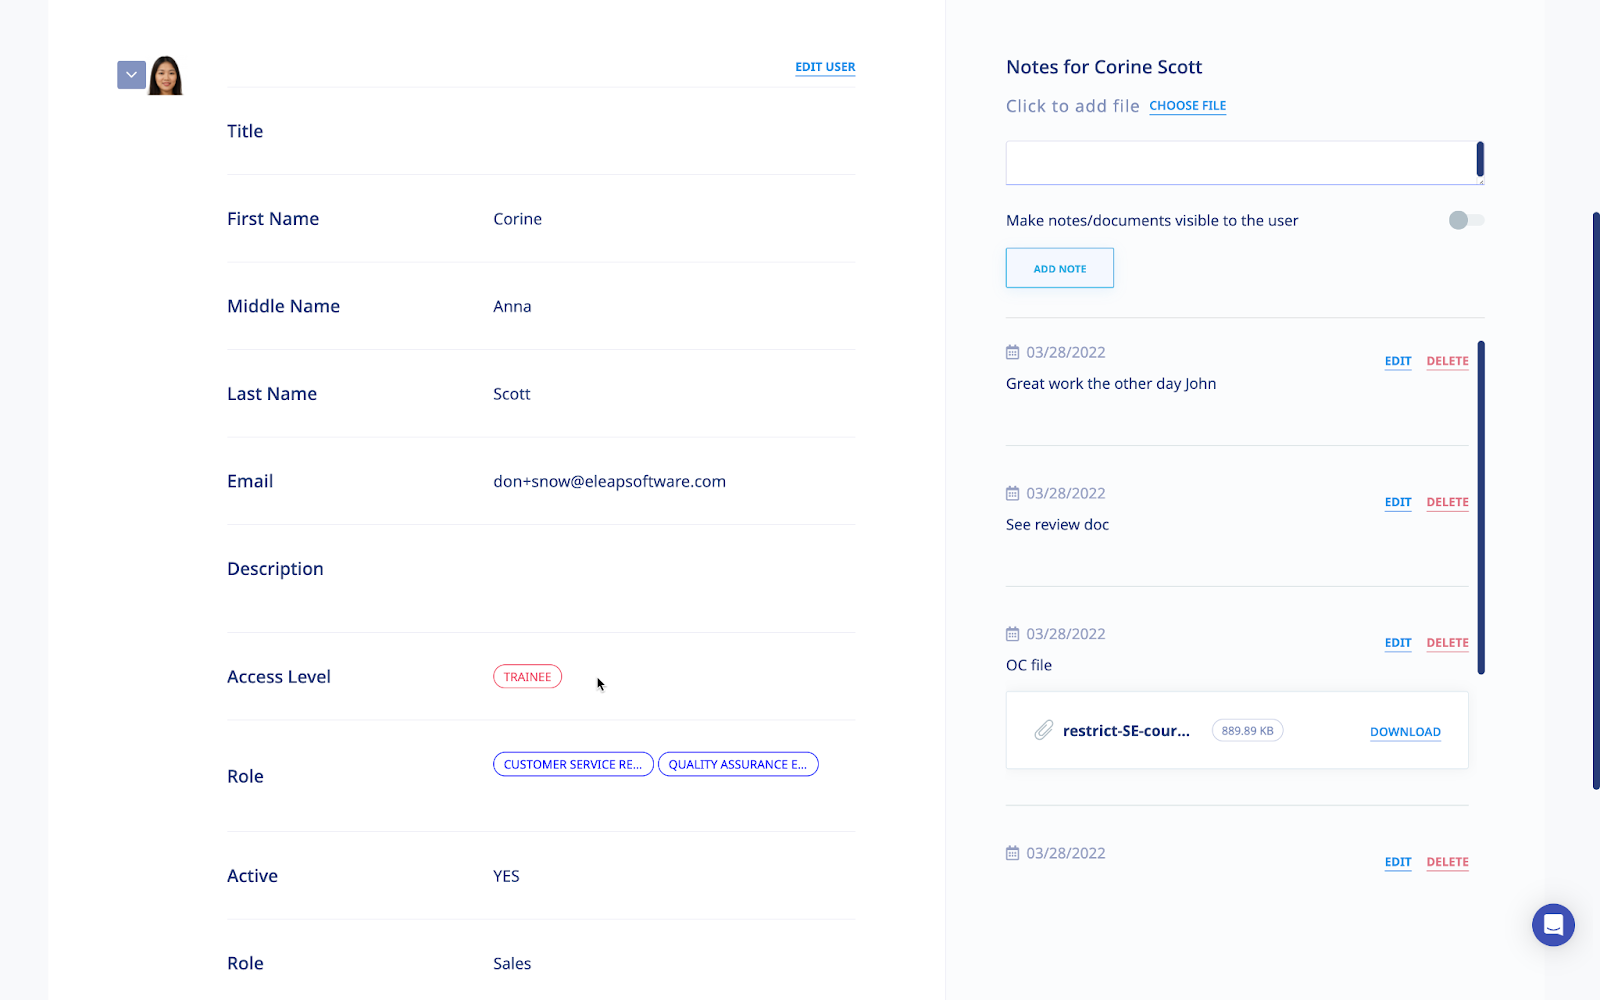
User Log
Clicking on the User Log icon displays the User Log page which captures detailed user activity logs.

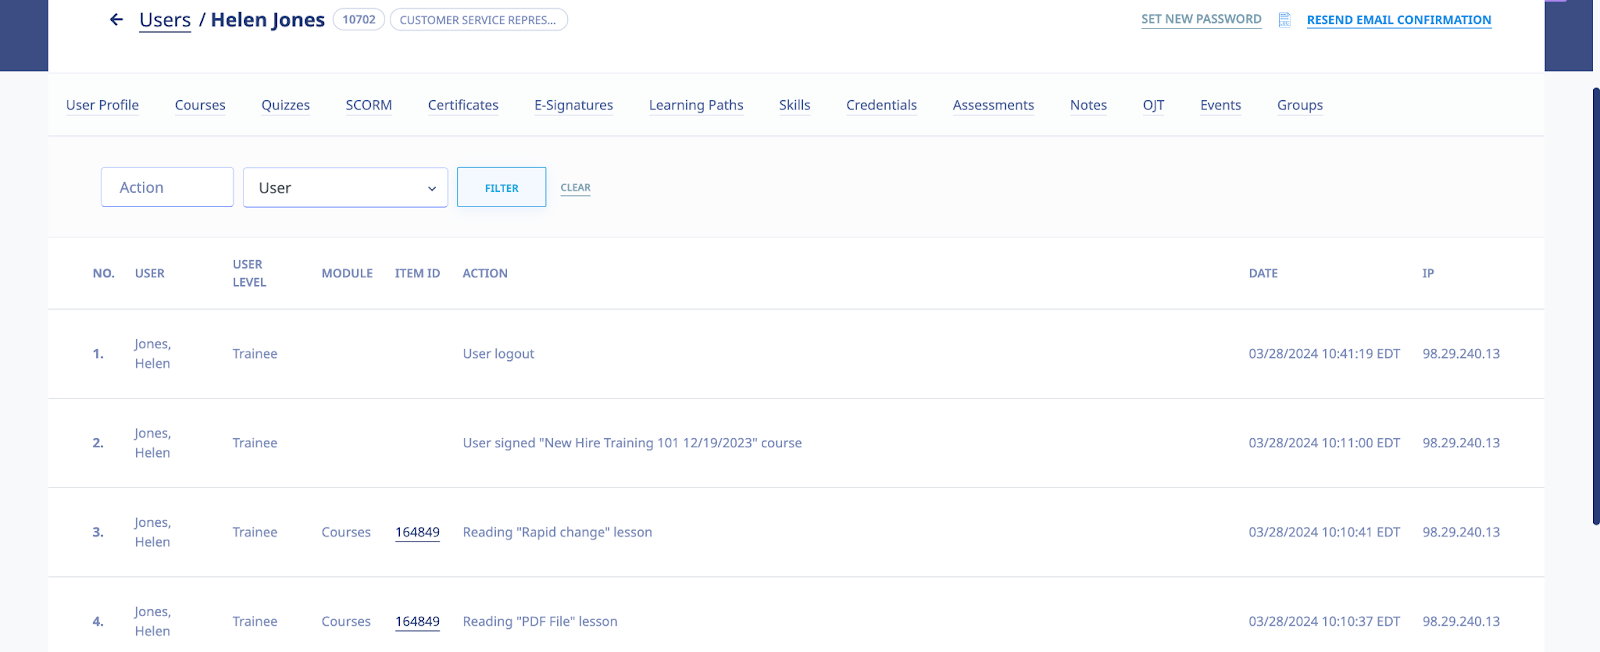
Deleting Users
Selecting the check box for a User on the Users list, and then clicking allows you to remove that User from the system, as shown in the following illustration.
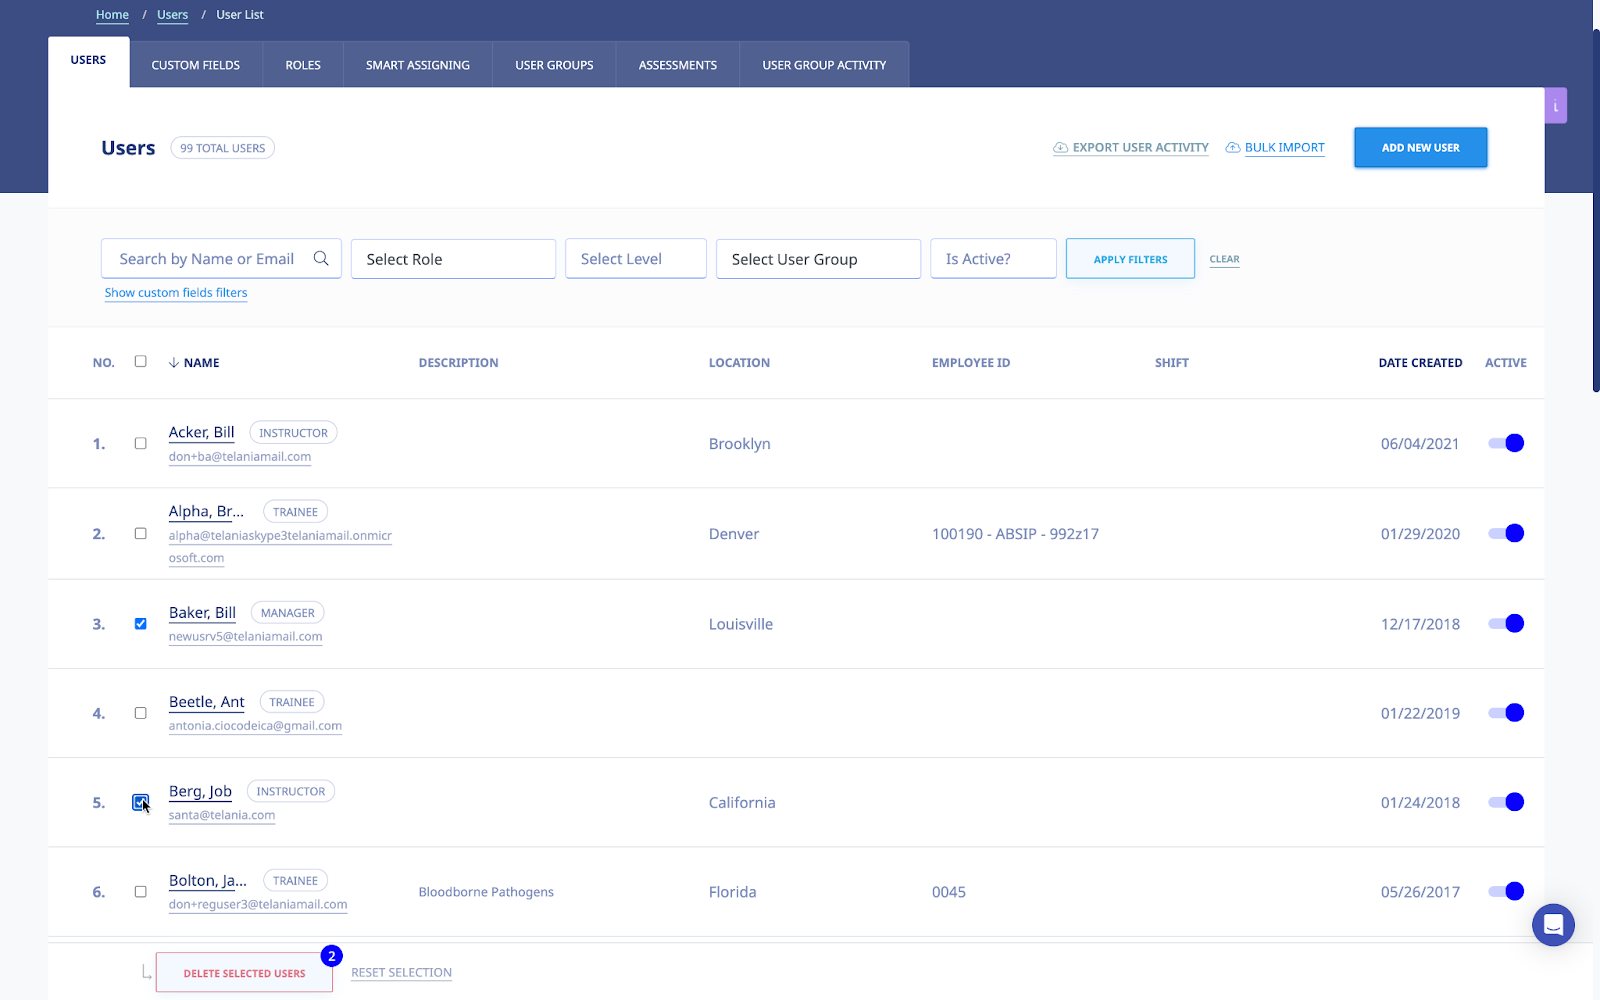
Before performing the deletion, a warning message is displayed to ensure that is your intention, as shown in the illustration below. Click to proceed with the deletion, or click to cancel the deletion process
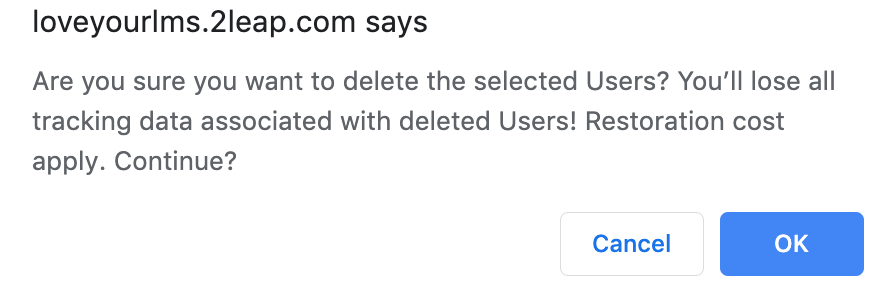
Importing Users
Do you have to create user accounts for multiple users? With eLeaP™, you don’t have to go through the hassle of creating each account one at a time. Use the Import Users feature to accomplish this task. Selecting the IMPORT USERS tab on the Users screen displays the Import Users screen, as shown in the following illustration.
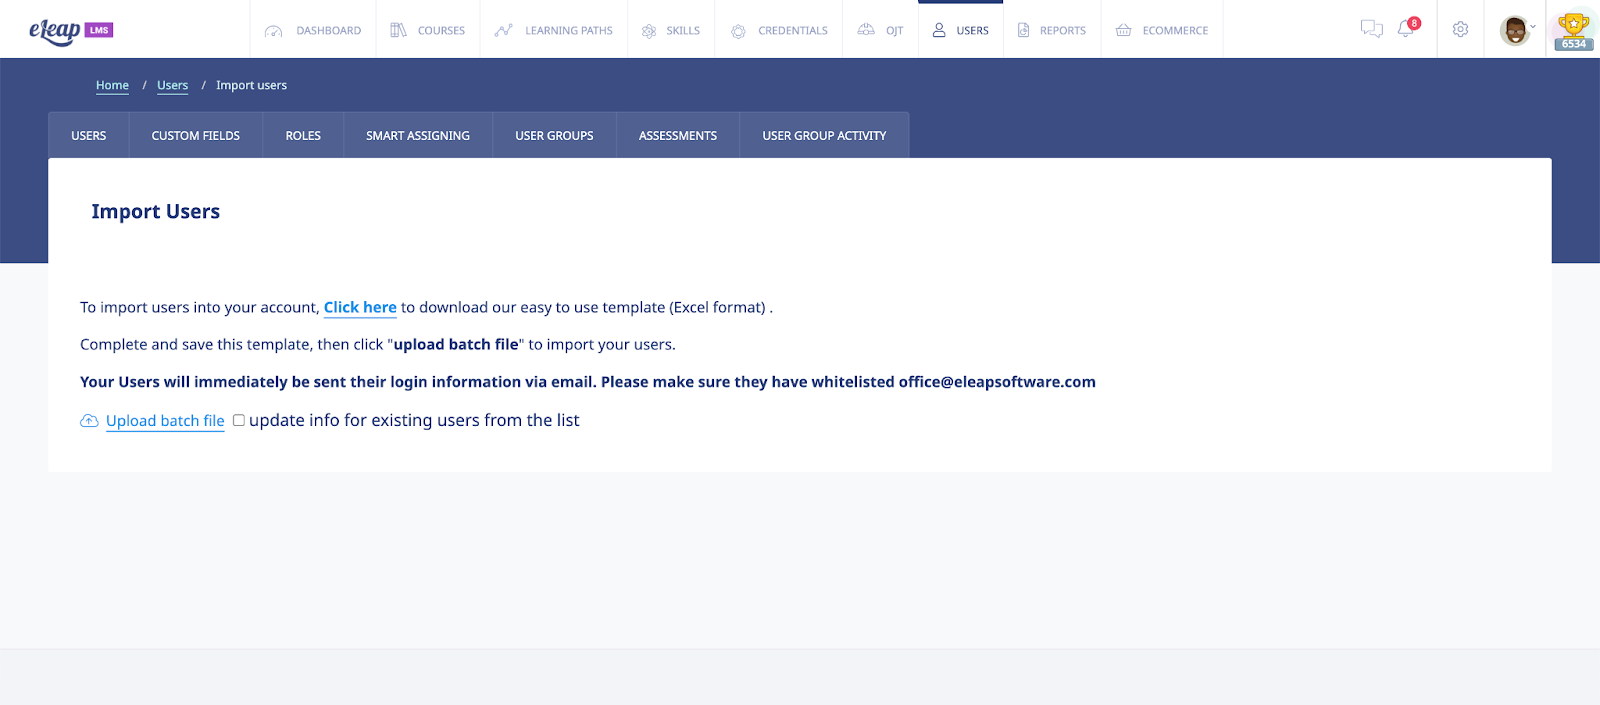
To import users into your account, select the click here link to begin the Import Process. As shown in the following illustration, you are presented with a dialog that allows you to either Open, Save or Save As the bulk_users.xls file.
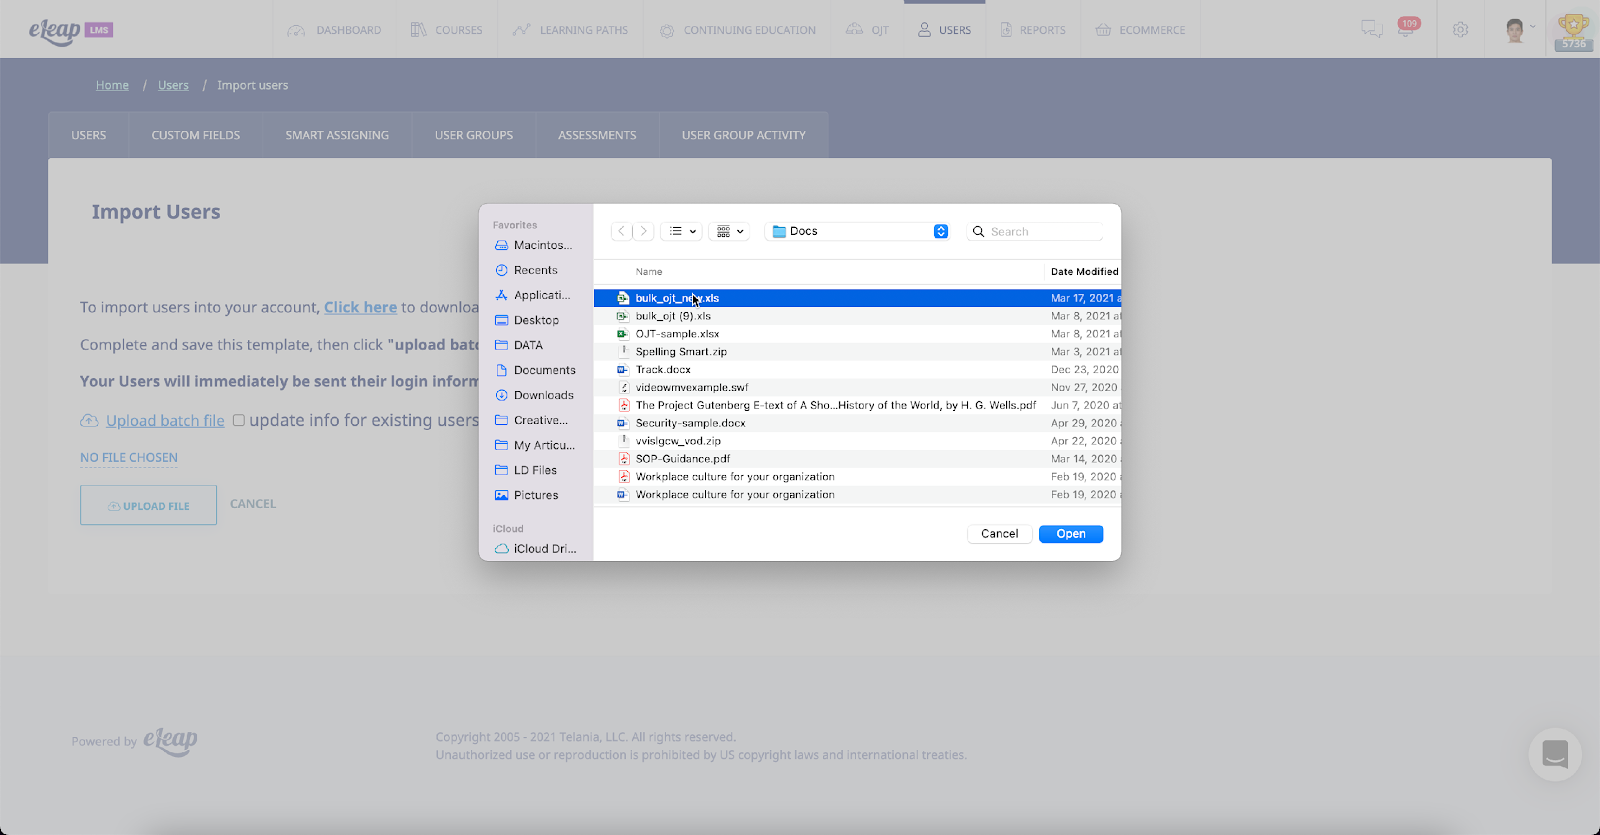
Selecting the Save option will download the file to your computer, where you can open it in Excel to add the Users that you would like to import. As shown in the following illustration, the bulk users file provides you with First Name, Last Name, Middle Name, Email and Is instructor columns of potential User information. Enter each User’s information in their respective fields, changing the Is instructor column data from 0 to 1 if the User will be an Instructor. If you have enabled Custom Fields for your account, you can also import the data for these fields. Simply add the names of your fields as additional headers in the import file, and the respective values for your Users. When finished, save the file for uploading to the system. Since the file opened in Read-Only mode, click OK when Excel displays the Save a Copy dialog, and then name the file within the Save as dialog and click Save.

Now you can return to the IMPORT USERS tab and select the upload batch file link, as shown in the following illustration.

The Processed Users screen, illustrated below, is displayed, confirming that your imported Users have been added. If importing these users has pushed you past the maximum number of Users based on your price plan, as shown in the message on this example screen, please contact billing@eleapsoftware.com.
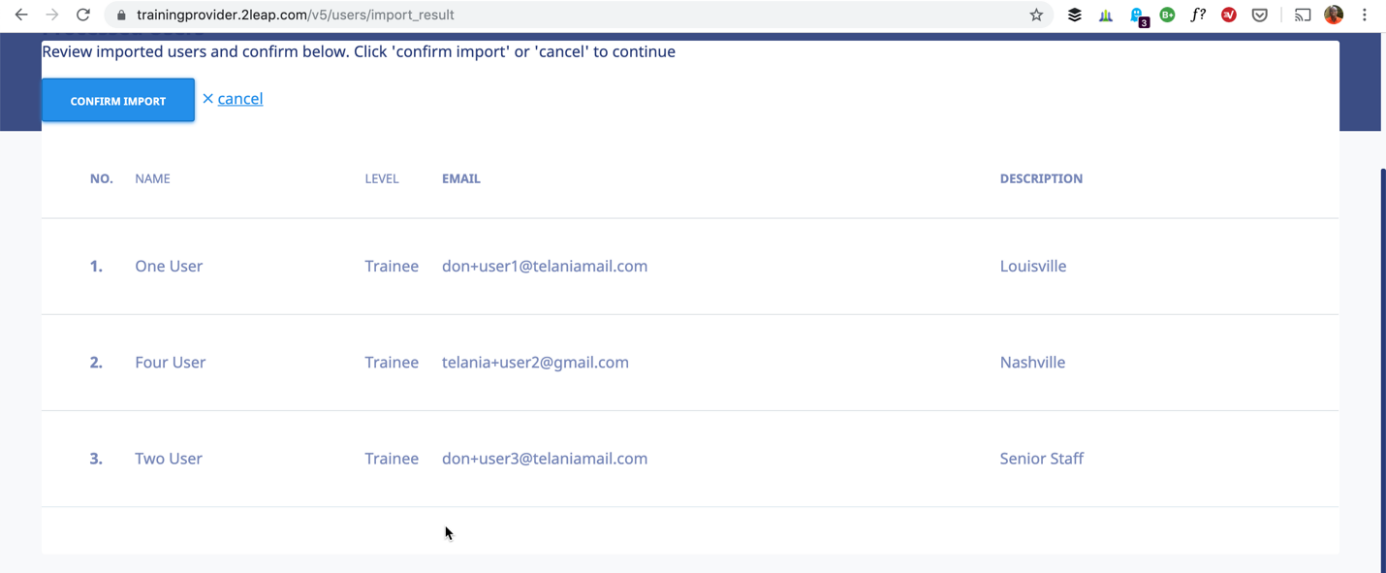
Updating Users through Import
When importing users, if the “update info for existing users from the list” box is checked, then you can update information for many existing users at once.
Note: if a field is left blank in the import file, it will make that field blank in the system. If you do not wish to overwrite existing data for a user, make sure that data is included in your import file!
Custom Fields
Selecting the Custom Fields tab on the Users screen will allow you to manage custom profile fields in your account. Use the button to create a new Custom Field. Simply enter the name of the new field into the text box, then click to save your work.

After adding a Custom Field, you will be able to populate that field through the Add New User, Edit User Profile, and/or Import Users functions.
Filtering
You can use your Custom Fields to filter lists of Users. On the main Users screen, for example, you can click on the “Show custom fields filters” link below the Name field in the filtering area to access these filters. Select which field you want to filter by, the condition you want to use in your filter, and then enter a value for the filter. Press the Filter button to apply. You may use multiple filters at one time. You will find these filters on most reports and assignment pages.

Roles
The Roles system is part of the Skills add-on module. Contact us to request activation if you don’t have it.
Click the [Add New Role] to add new roles. Roles are attributed to users. Click on the role name to see the users who belong to that role.
Add User to Role
To add a user to the current role, click the [Add User] button while on the role details page.
To edit or delete a role, click the relevant button. Be aware that deleting a role that has been used in the Skills module removes any associated actions.
Add Role to User
You can edit a user’s profile to add roles.
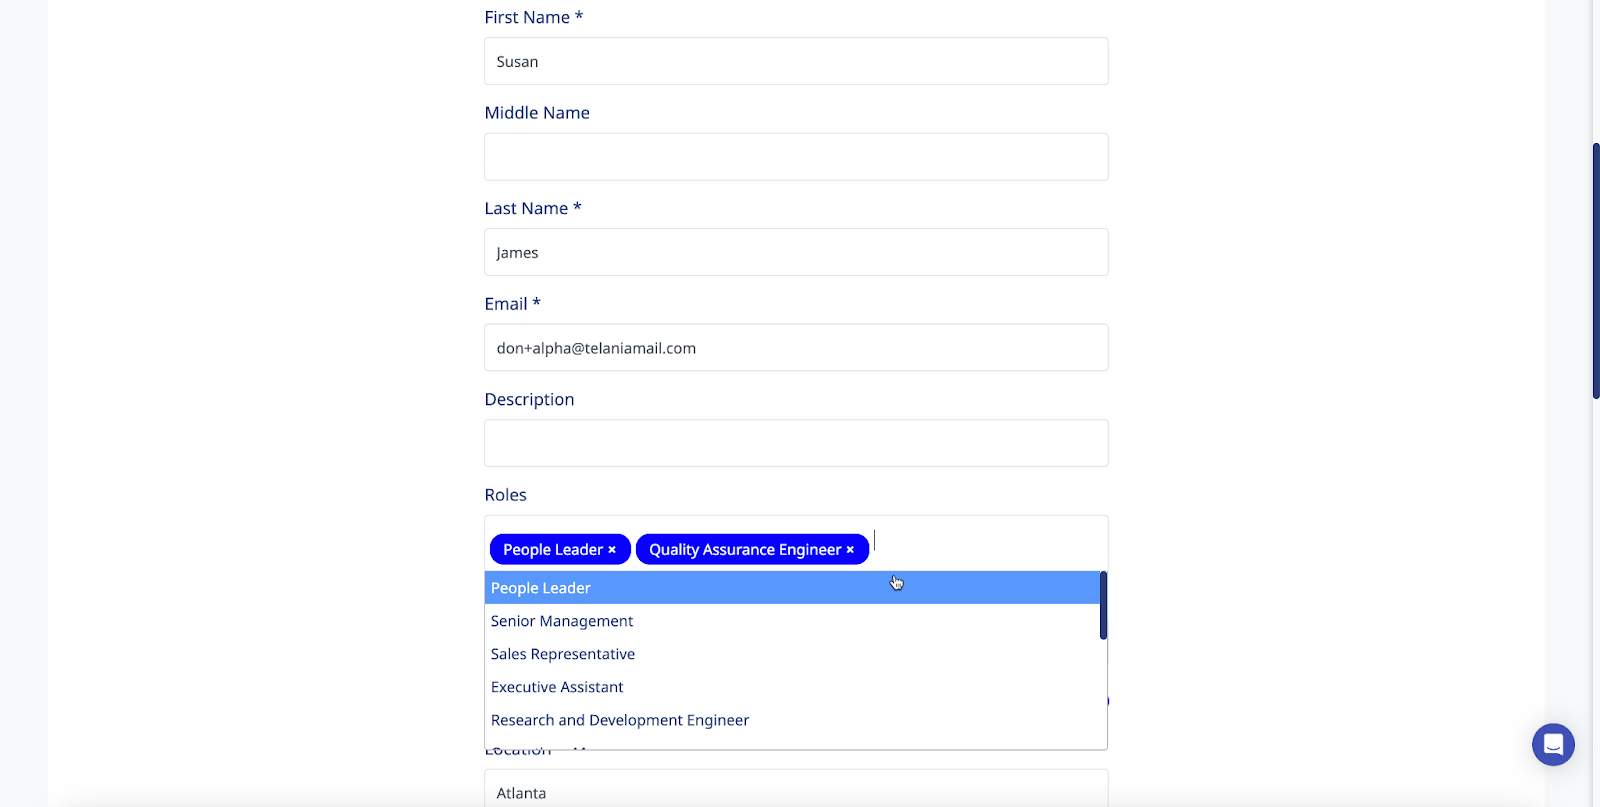
Simply select the role(s) you want to add to the user’s profile and save.
Smart Assigning
The Smart Assigning feature is a powerful tool that allows you to micro-target your Course, Learning Path, and User Group assignments based on the contents of your Custom Fields.
After you create your first Custom Field, the Smart Assigning tab will appear on the Users screen. Clicking on the tab will open up the Smart Assigning menu. The page is divided into two areas: at the top are menus and fields that will let you design a new Smart Assigning Rule. Below that are listed any already-existing Rules.
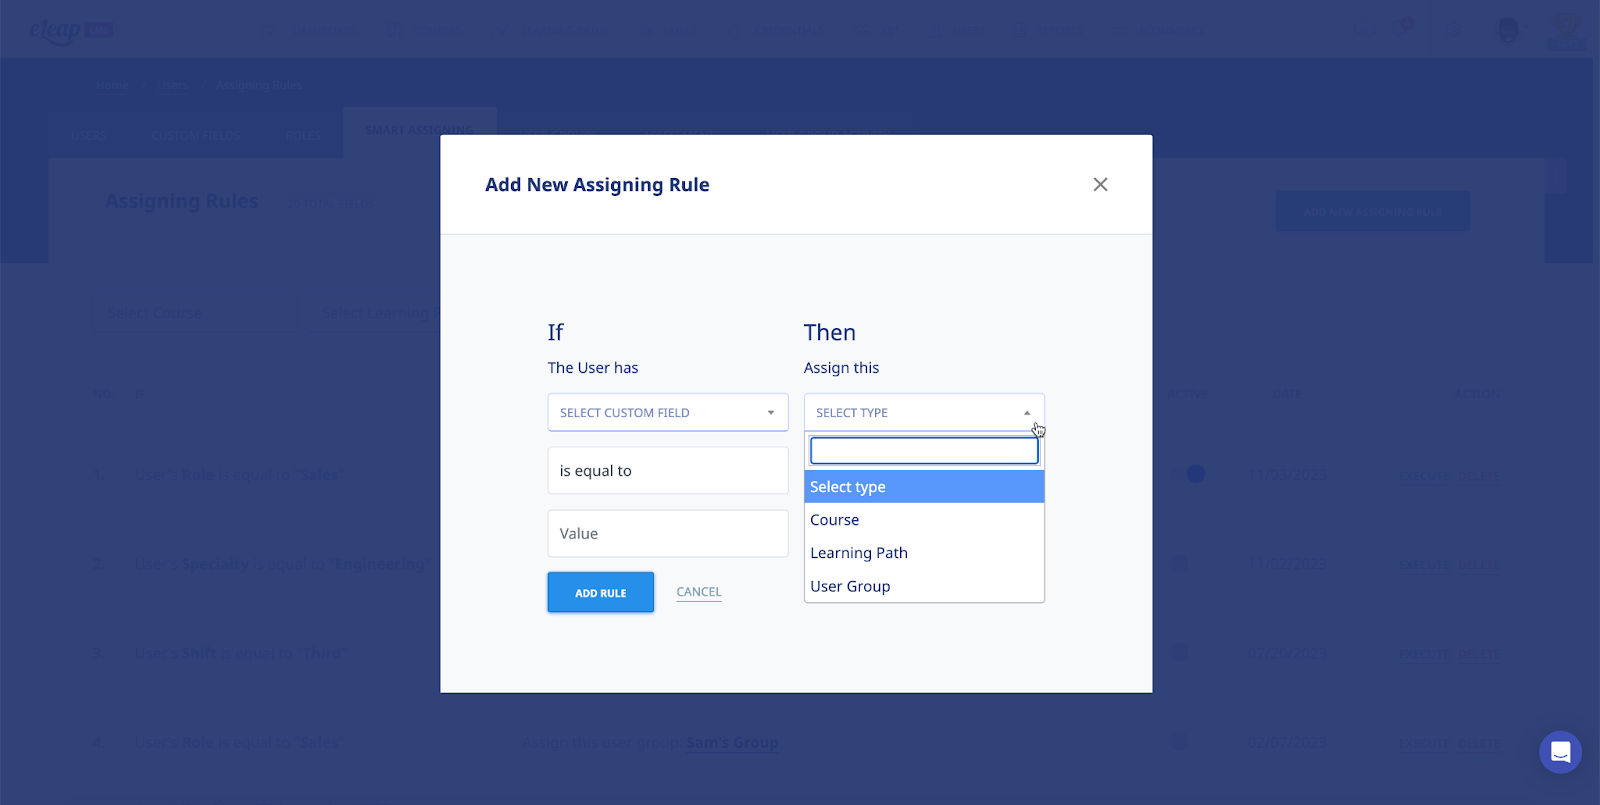
Creating a Smart Assigning Rule
Every Smart Assigning Rule has two components: an “IF” part and a “THEN” part. The “IF” part of the Rule tells eLeaP the conditions that the Rule applies to. The “THEN” part of the Rule tells eLeaP what to do when the IF conditions are met.
Step One: Create Your IF
- Use the “Select Custom Field” drop-down menu to select a Custom Field whose contents you want to use as a condition for your Rule.
- Select the strength and direction of the condition. By default this field displays “is equal to”, but you can also choose “is not equal to”, “contains” and “does not contain” when creating your Rule.
- Enter the value you want the system to look for.
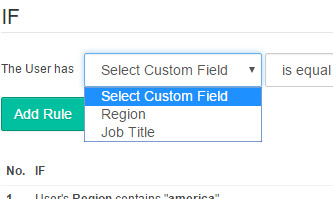
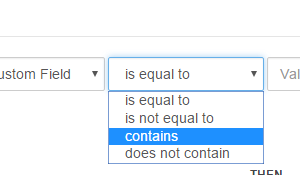
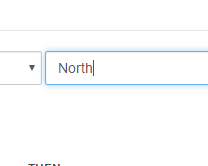
Example: I choose my “Region” Custom Field, “contains”, and then enter “North” for my value. So the IF part of my rule says, “User’s Region contains ‘North’.” This Rule would catch Users with both “North Carolina” and “North Dakota” in their Region field.

Step Two: Create Your THEN
- Use the “Select type” drop-down menu to choose between “Course”, “Learning Path”, and “User Group” for what type of assignment action you want the Rule to do for you.
- After you select a type, a new drop-down menu will appear with the list of existing Courses, Learning Paths, or User Groups in your system (depending on what type you chose).
- Select an item from the new drop-down menu.
- Click the “Add Rule” button to finish the process.
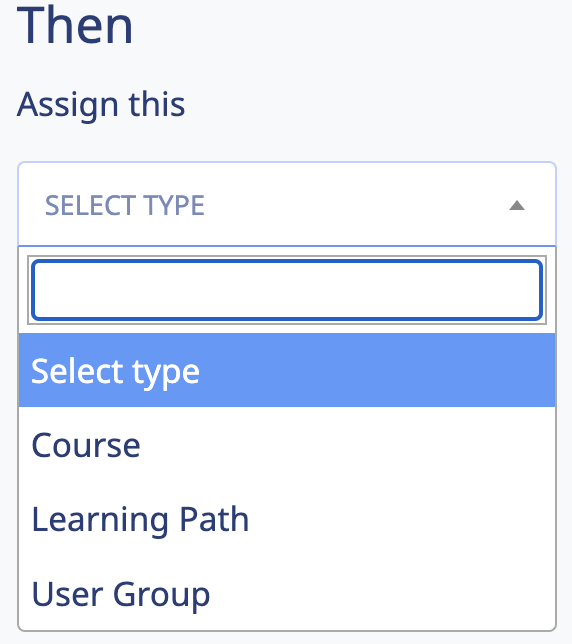
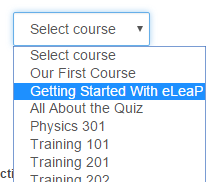

Example: I choose “Course” from the first drop-down menu. Then from my list of available active Courses that appear, I choose “Getting Started With eLeaP.” So the THEN part of my rule says, “Assign this course: Getting Started With eLeaP.”

Step Three: Using Your Rule
There are two ways a Rule can run. It can run in the background, checking every new User and edited User to see if they qualify for its conditions. Or, it can be run on a one-time, “check everyone” basis. Or you can use these two ways in tandem.
- To have your rule run in the background on new and changed Users, make it Active by toggling the active clicking the “Activate” icon next to your rule (it looks like a little red circle with a white “x” through it).
- To have your rule check all existing Users on a one-time basis, use the link for that Rule.


If there are large numbers of Users in your account (1000 or more), clicking the “execute” link takes a few minutes. The page will refresh and display a notification when the process is complete.
Advanced: Multiple IFs/THENs
If you’ve already created one or more Rules, you probably noticed that when you choose a Custom Field or Assignment Type, another set of drop-downs appear automatically. This is so that you can create more complex Rules.
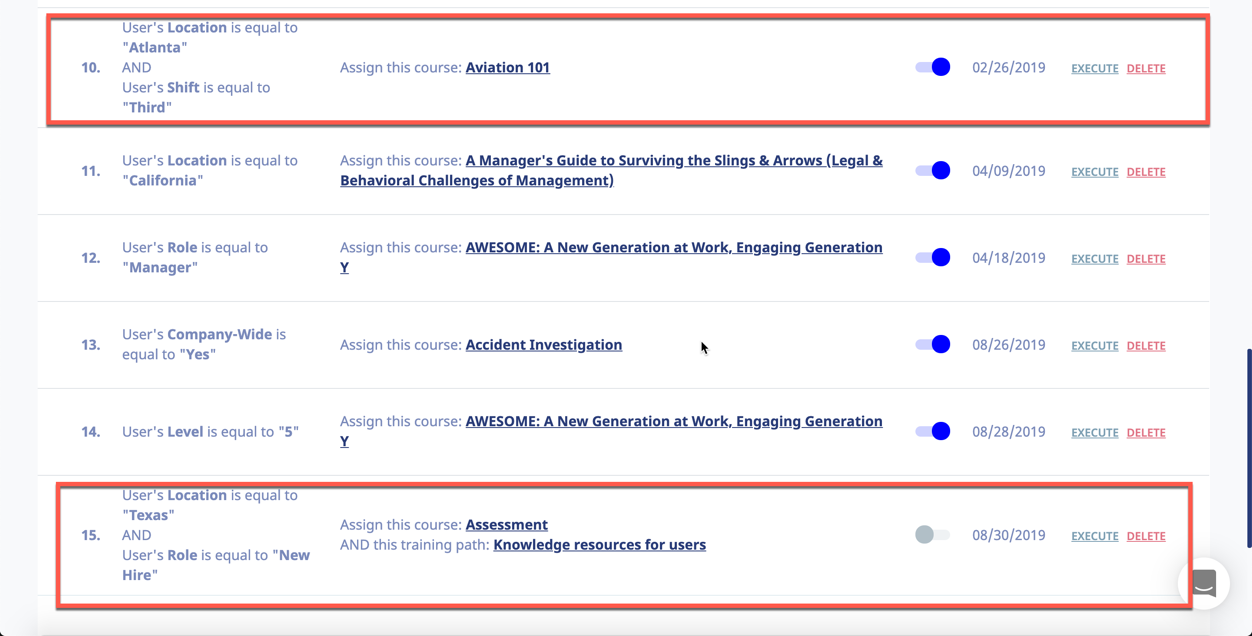
On the IF side of your Rule, you have the option to determine whether your additional conditions use “AND” or “OR” when they are evaluated by the system. Let’s look at some examples to see how this works:
Using AND
For our first example, let’s set up a Rule that has two conditions on the IF side, with the second one added as an “AND” condition – this just means I make sure that the first drop-down menu on the second condition shows “AND” (which is the default). I’ll use “Region contains North” for my first condition, and “Job Title is equal to Tester” for my second condition. This means the IF part of my Rule reads like this:
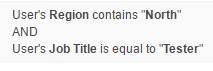
User’s Region contains North AND User’s Job Title is equal to Tester.
So this Rule will only apply to Users who meet both of the specified conditions.
Using OR
To demonstrate “OR”, I’ll use the same conditions. What I’ll do differently is select “OR” from the drop-down menu at the front of the second condition. Once again, I’ll use “Region contains North” for my first condition and “Job Title is equal to Tester” for my second condition. So now the IF part of my Rule reads like this:
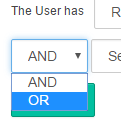
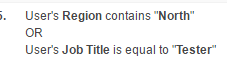
User’s Region contains North OR User’s Job Title is equal to Tester.
This Rule will catch Users who meet either of the specified conditions.
That’s really all there is to it. Try mixing and matching ORs and ANDs for some really micro-targeted Rules.
Filtering Assigning Rules
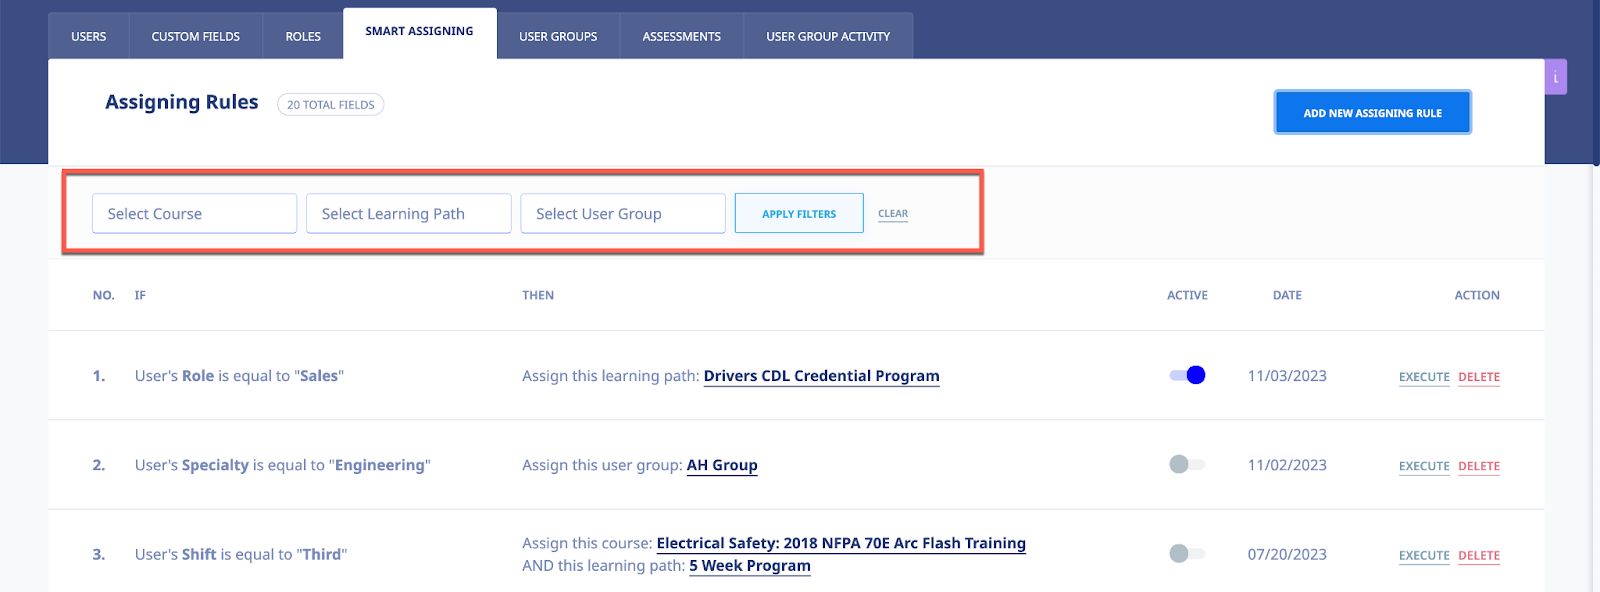
Use the filtering options to locate specific assigning rules. For example, if you want to know which rules apply to a specific course, select that course and apply the filters. You can also use Learning Paths or User Groups to locate specific assigning rules.
Exporting User Activity
Selecting the link on the Users screen allows you to export all User Activity for Users displayed on the Users list to your computer. When the request is submitted, eLeaP will process it and send an email to the requester’s email as shown below. Once the report is ready, you can download and save it. To update the report click the [Regenerate] link.

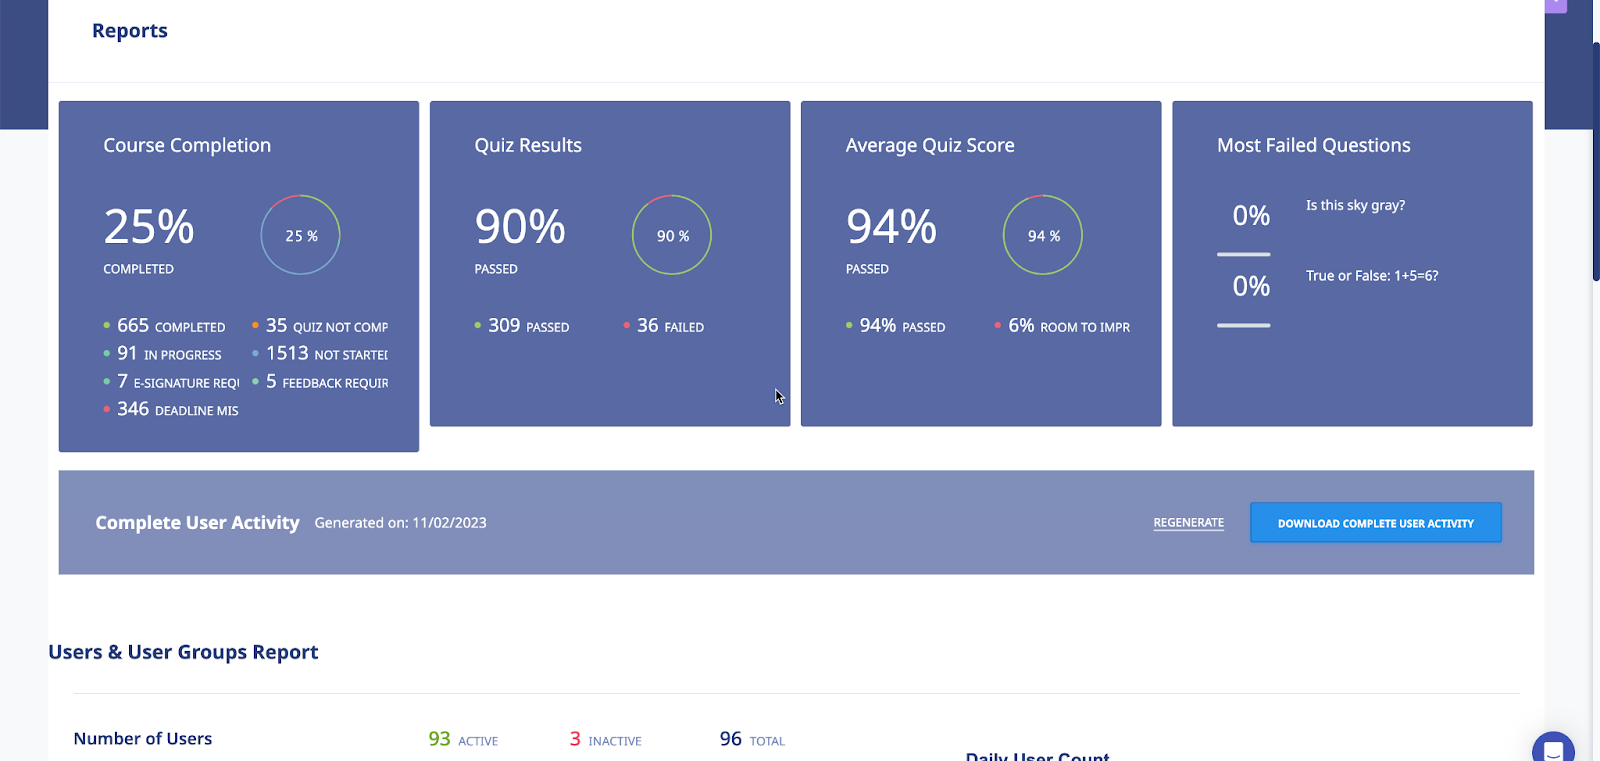
Email confirmation of processed file:

Once you have downloaded the file, it is displayed within Excel, as shown in the following illustration. The Course, Full Name, Email, Description, Assigned Date, Deadline, Progress, Completion Date, Quiz Completed, Quiz Score, Quiz Pass Score, Quiz Max Score, Quiz Status, Quiz Completion Date, User Groups(s) and Active/Inactive details for each User/Course combination on the User Activity list is displayed.
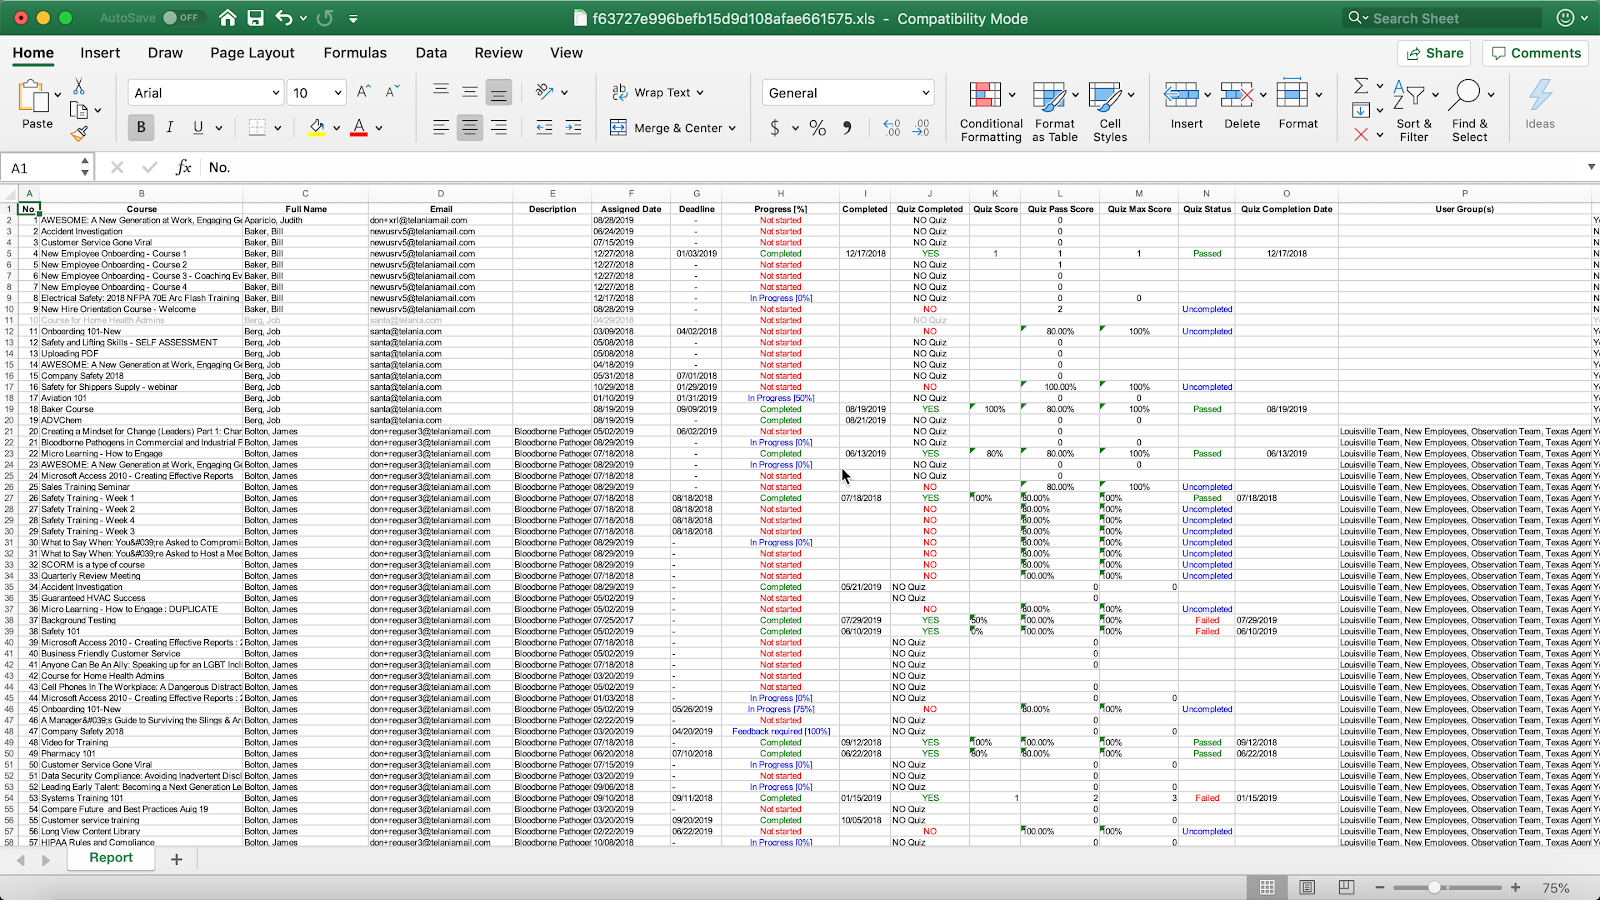
User Groups
Use our simple User Groups feature to organize your users into manageable groups. Selecting sub-tab from the tab on the main menu bar displays the User Groups screen, illustrated below. User Groups that you create are displayed on a User Groups list, with a group’s Name, Description, Created by, Members, Date and Active details shown. The User Groups list can be filtered by entering a User Group Name from the User Group Name list and then clicking . You can add additional User Groups by clicking the add new User Groups link at the right-hand side of the screen. Clicking on a User Group Name allows you to add members to the User Group. Additionally, you can edit an existing User Group by clicking the edit link within the Action column. You can also delete an existing User Group by clicking the delete link within the Action column.

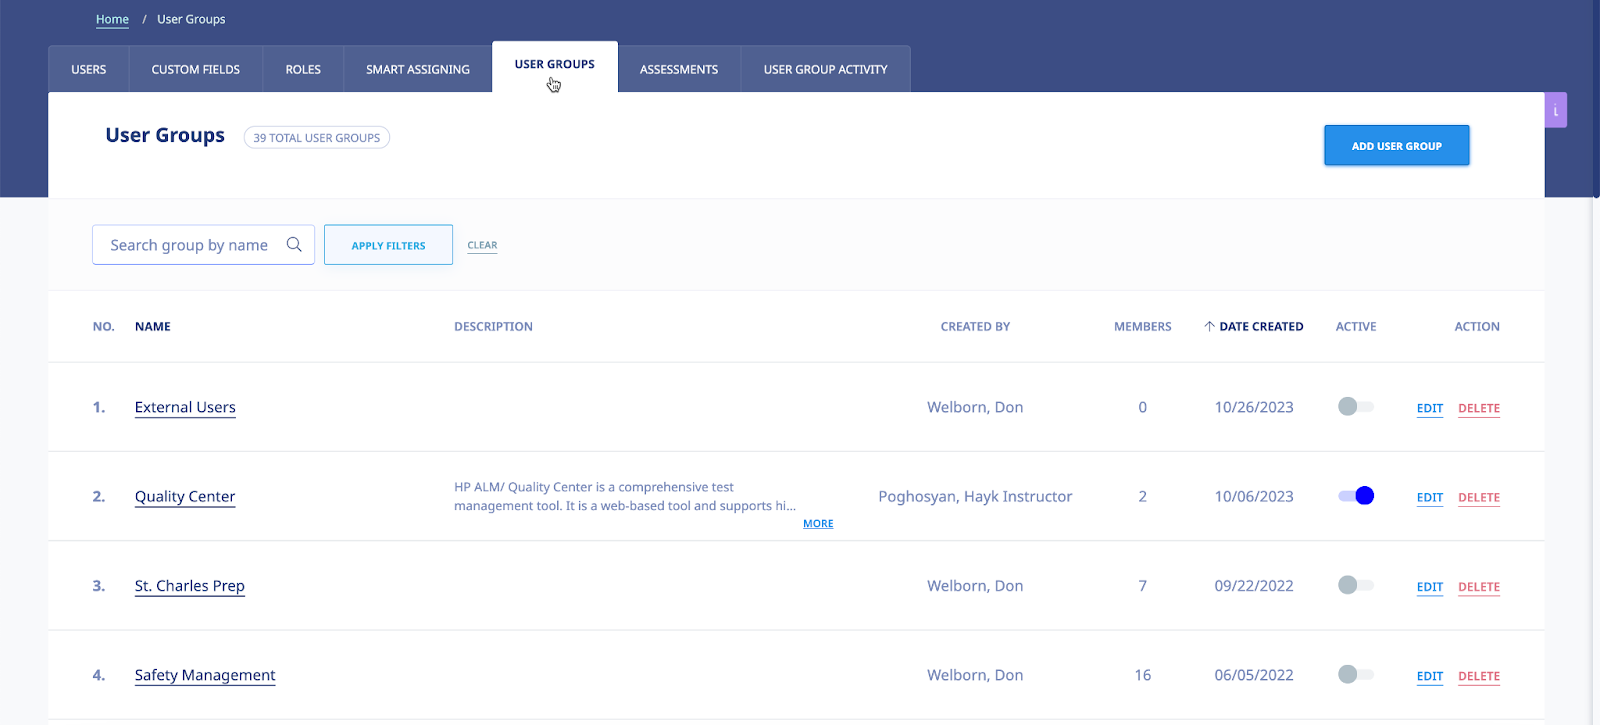
Note: You can add and delete members to/from a User Group. Just click on the specific User Groups you want to manage or edit.
Note: Create a test User Group for your courses and quizzes. First, deploy your courses, assessments, etc., to this User Group before deploying it to the entire company or learning group. This way, you can make changes if needed.
Note: You can ‘reuse’ an existing User list to create new User Groups. While the system won’t re-create new accounts for re-uploaded names, the system will add the names to the new User Group. So, if you want to create a new User Group using an existing list, simply upload the list into the new User Group.
Adding a New User Group
Clicking the link on the User Groups screen displays the Add User Group screen, as shown in the following illustration. Use the steps below to successfully add a User Group to the system.

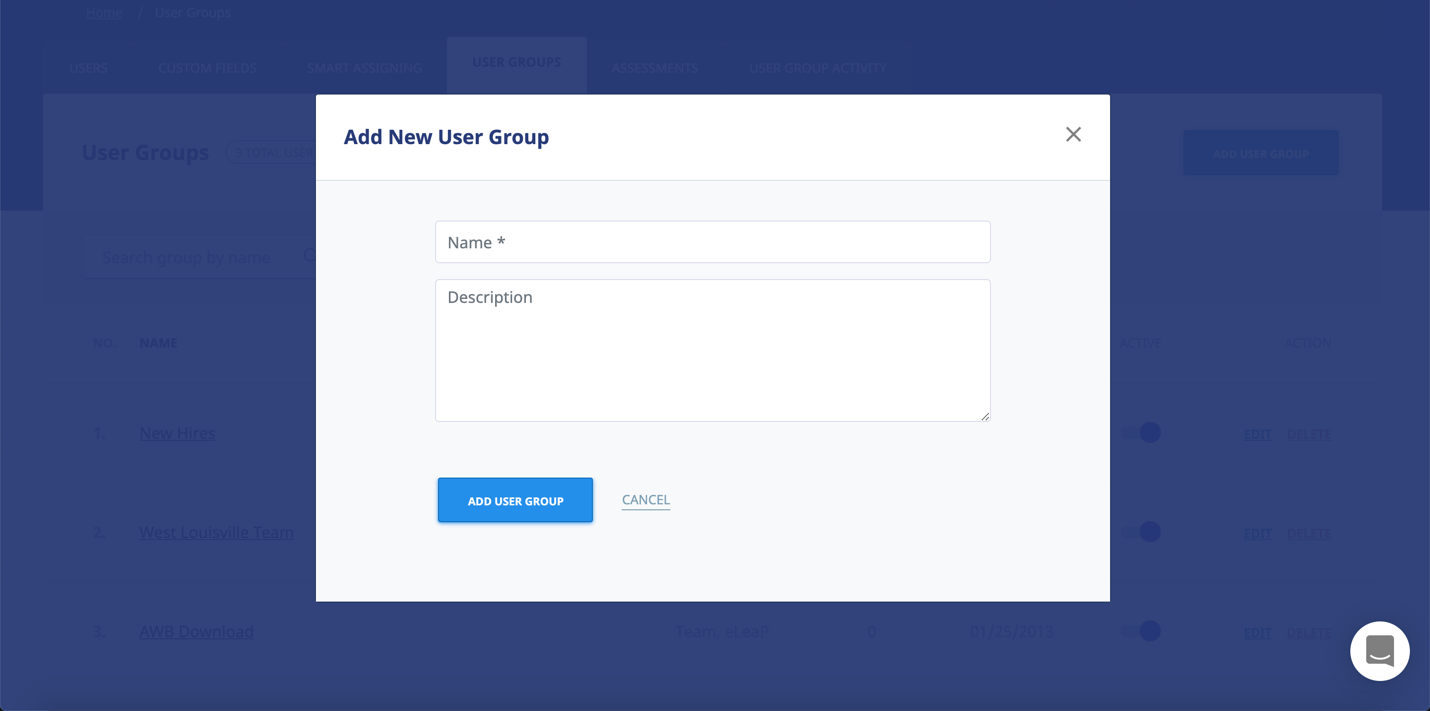
- Enter a name for the new User Group within the Name field.
- Enter a description for the new User Group within the Description field.
- Click . The new User Group will be added to the User Groups list alphabetically.
Note: To activate your new User Groups, you can toggle the active status to ON .
Adding Members to a User Group
Once you have created a User Group, you will need to add members to the group. This is accomplished by clicking the User Group’s name on the User Groups list. The User Group Details screen, shown in the following illustration, is displayed. Use the steps below to successfully add a member to a User Group.
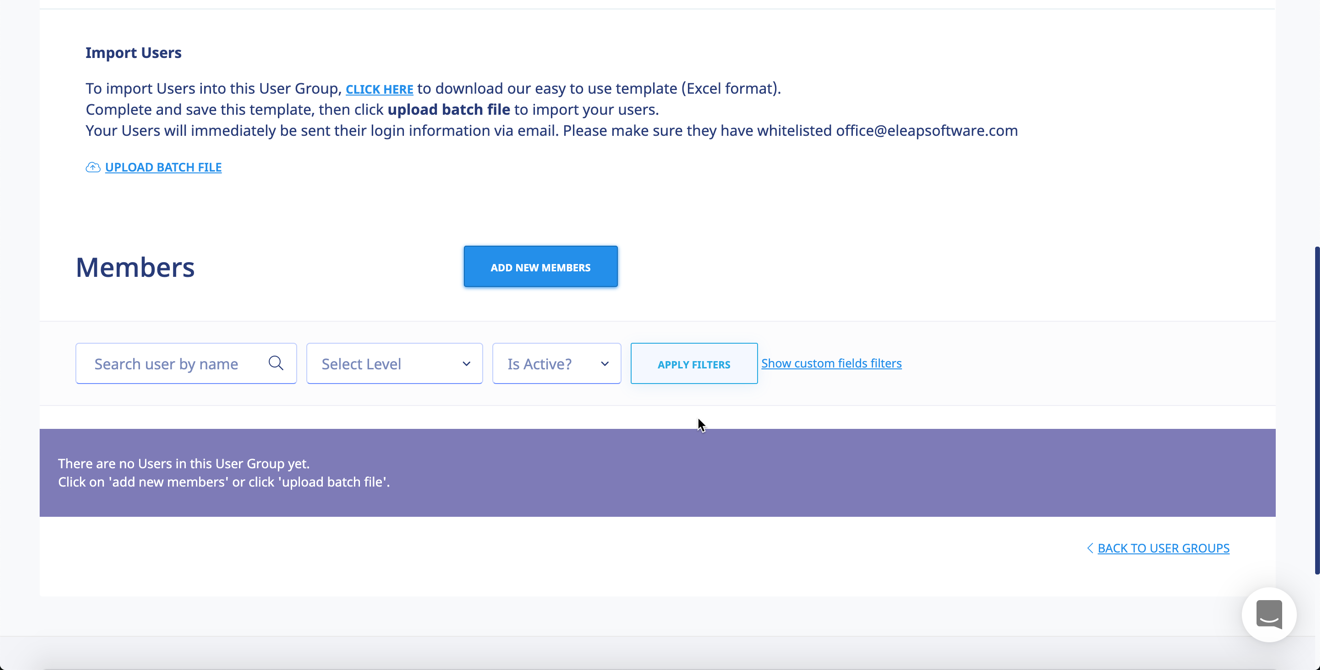
- Click the link in the bottom right-hand corner of the screen. A list of available Users is displayed, as shown in the following illustration. Select the check box for each User on the Users list that you want to add as a Member to the User Group, and then click .
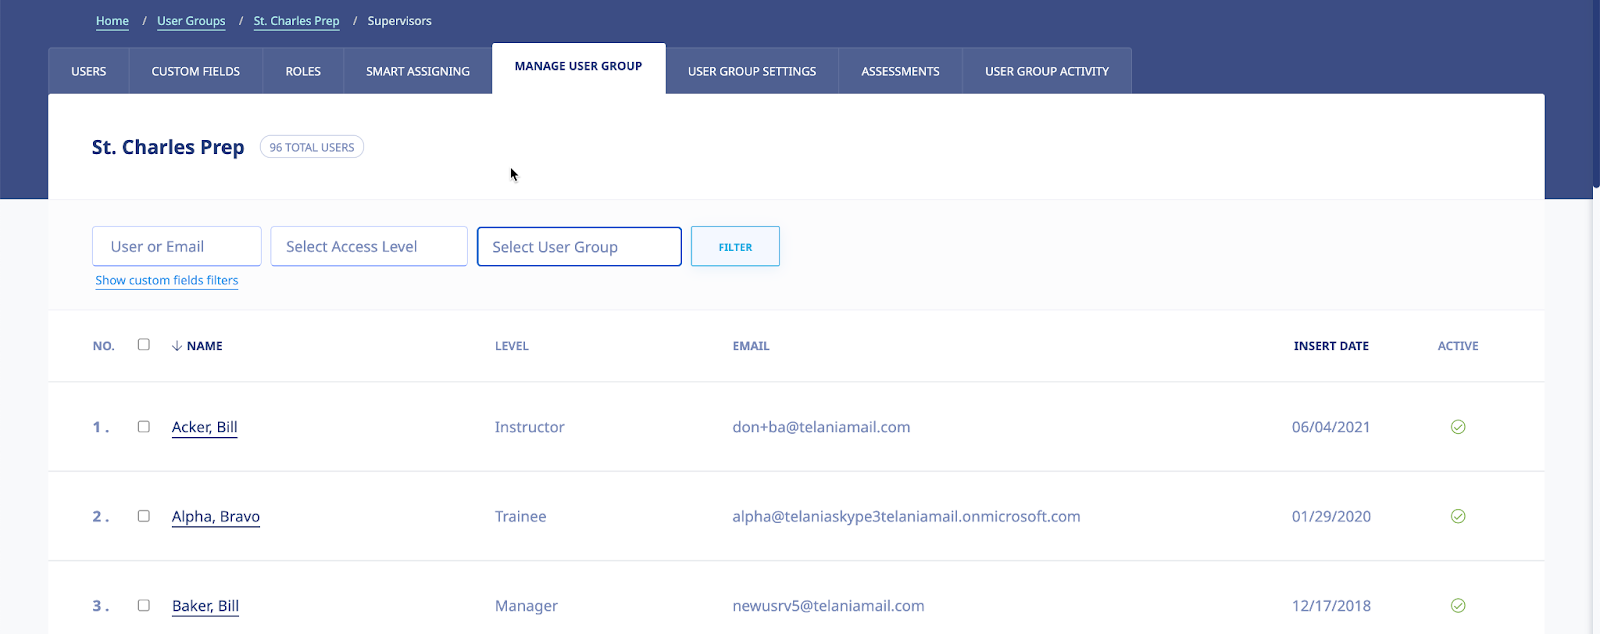
As shown in the following illustration, the Users you have selected are added to the User Group.
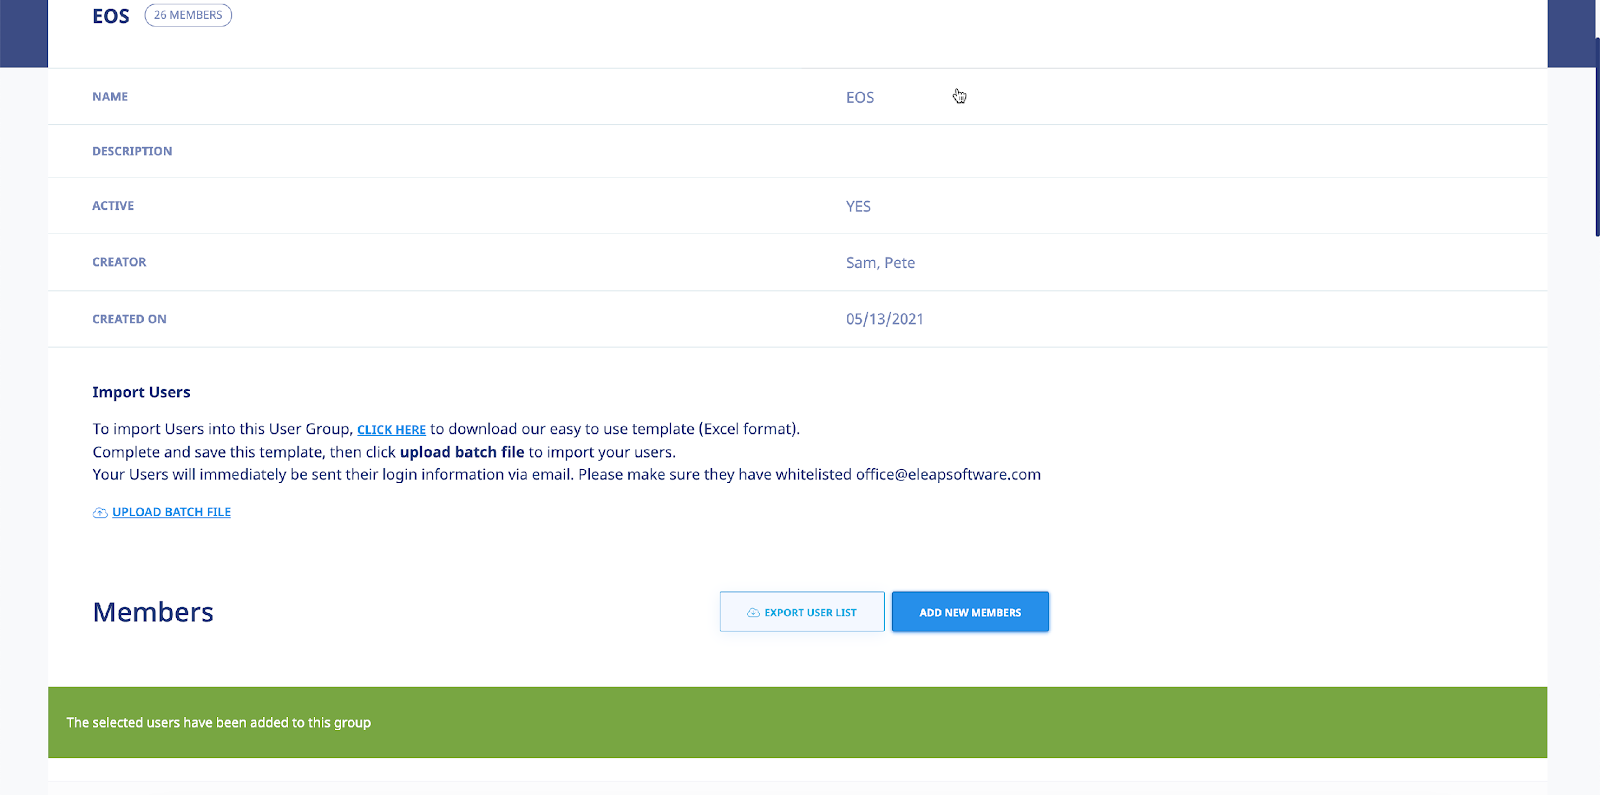
You can remove Members from the User Group at any time by selecting their check box on the Members list and clicking the Remove users from Group link. Additionally, you can send an email to any of the Members of the User Group by clicking their Email link.
- Optionally, you can import users/members by selecting the click here link within the Import Users portion of the screen. Please refer back to the Importing Users section of the document for details on how to import users into the system.
Editing a User Group
To edit an existing User Group, click the edit link for the group on the User Groups list within the User Groups screen. The Edit User Group screen, illustrated below, is displayed. Simply make any modifications necessary within the Name and/or Description field and then click to save your changes to the system.

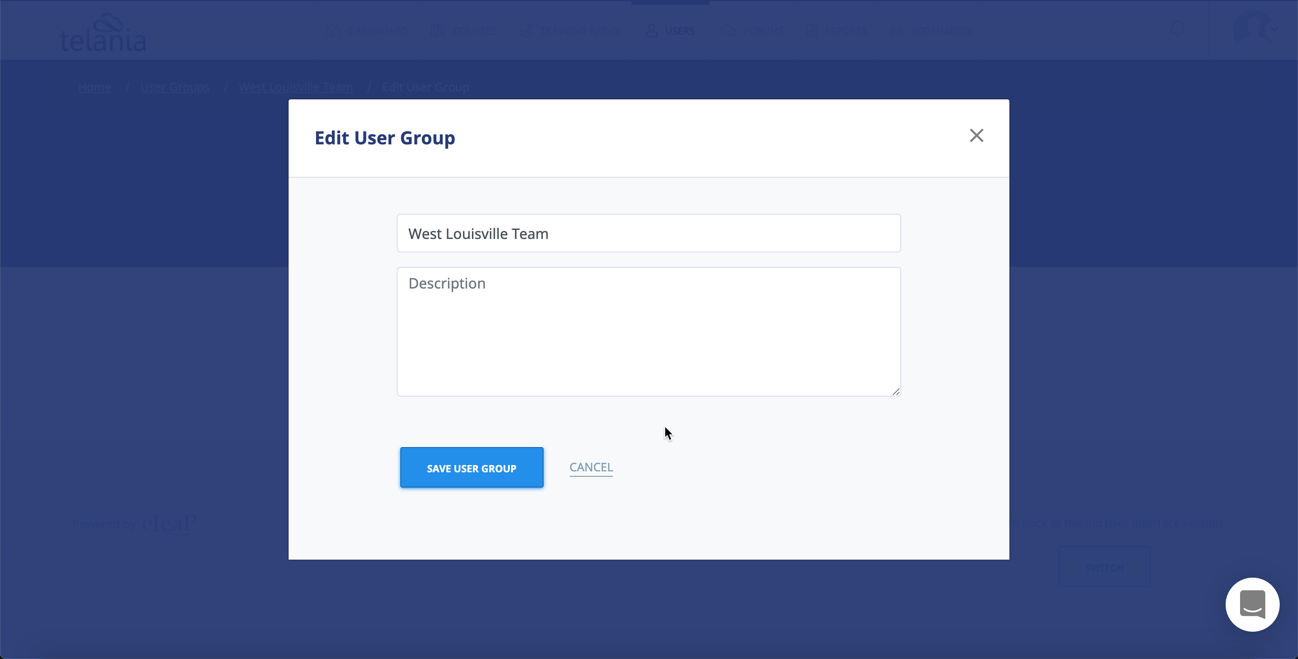
Deleting a User Group
To delete an existing User Group, click the delete link for the group on the User Groups list within the User Groups screen. As shown in the following illustration, the system displays a warning message before performing the deletion. Click to proceed with the deletion or click to cancel the deletion process.
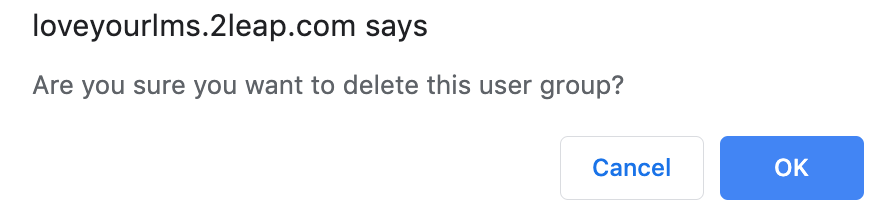
User Group Activity
Selecting the tab on the User Groups screen displays the User Group Activity screen, illustrated below. This screen displays the current activity for each Member of User Group on a User Group Activity list. A User’s Name, Course, Progress, Quiz, Quiz Completed, Release Certificate and Deadline details for a User and Course. You can filter what is displayed on the User Activity list by selecting a User Group from the User Group list, selecting a Course from the Course list, or by defining a date range using the Calendar icon to select the beginning and end date for the range or by manually entering those dates, and then clicking .

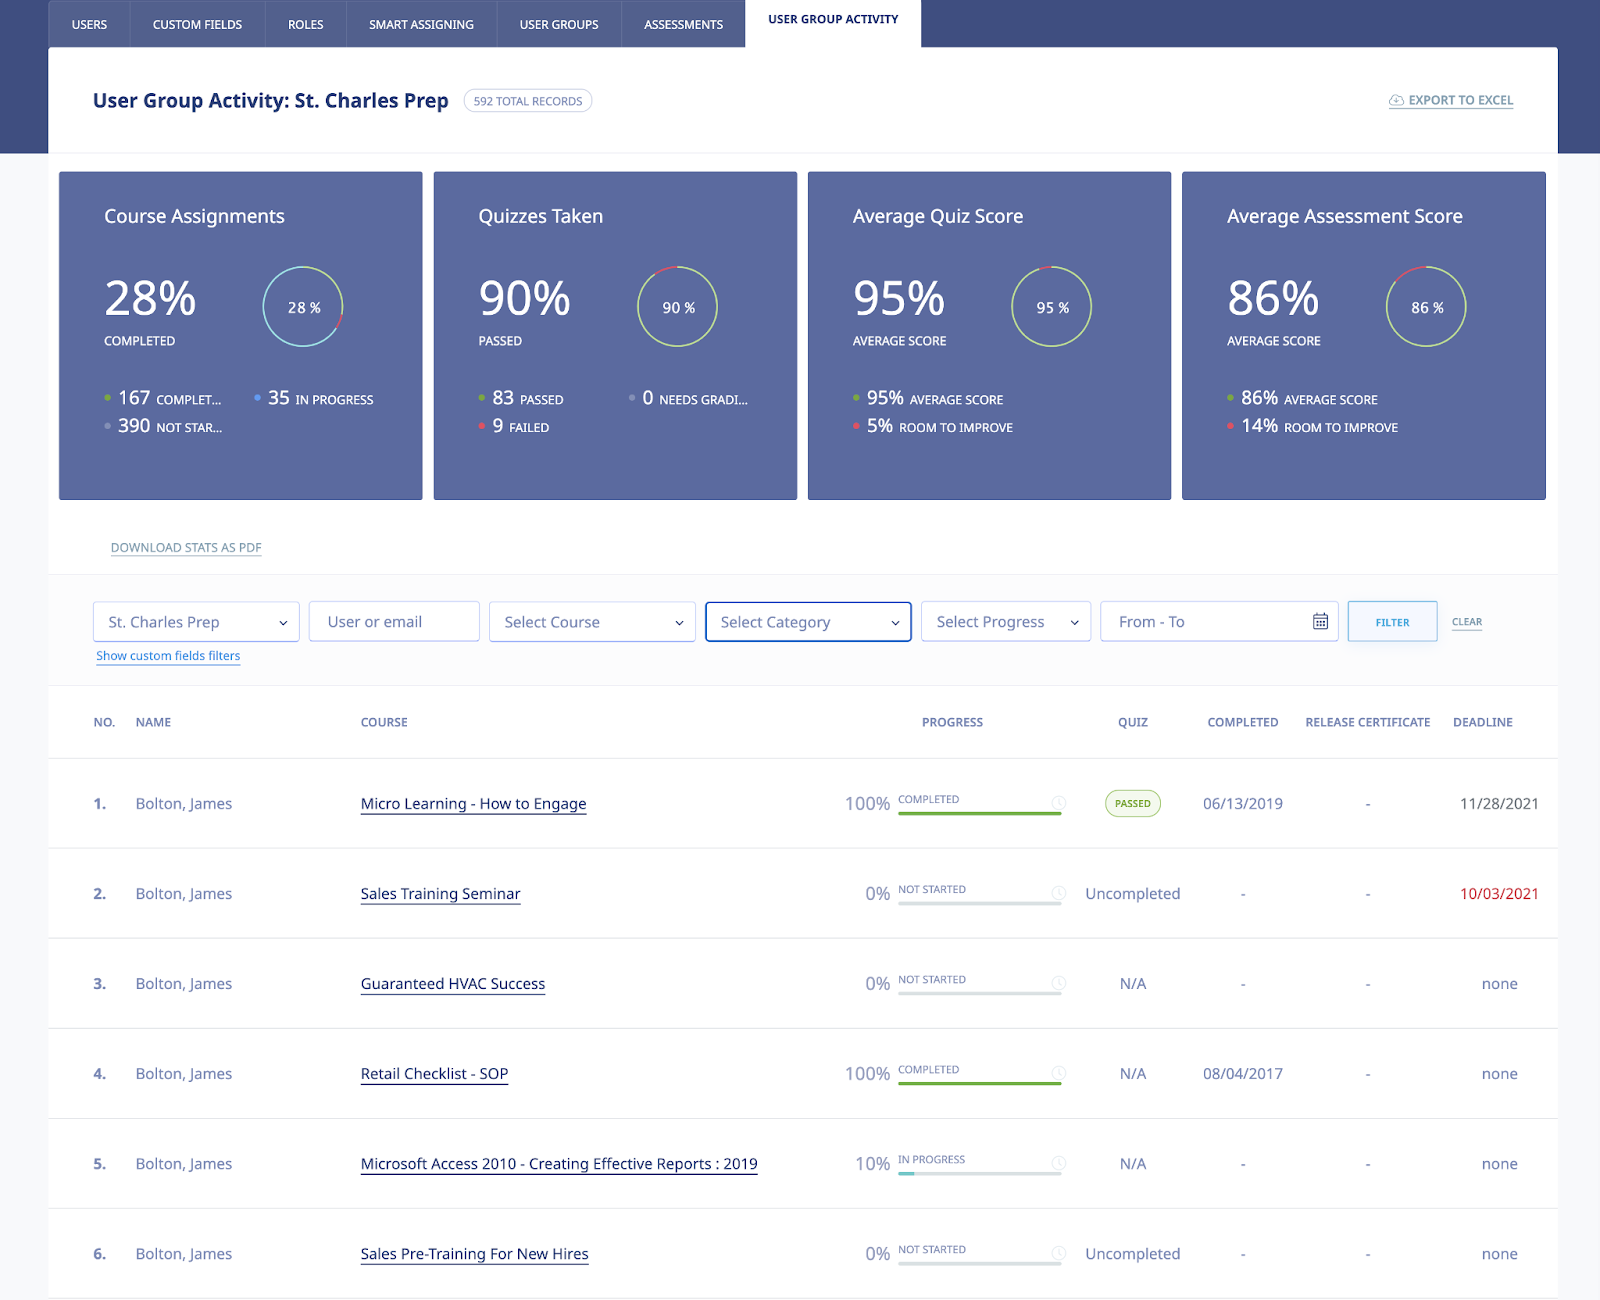
Exporting User Group Activity
Selecting the Export User Activity tab on the User Groups screen allows you to export all User Activity for the User Groups displayed on the Users Groups list to your computer. As shown in the following illustration, you are presented with the option to Open or Save the User Groups Activity.xls file to a local drive on your computer.
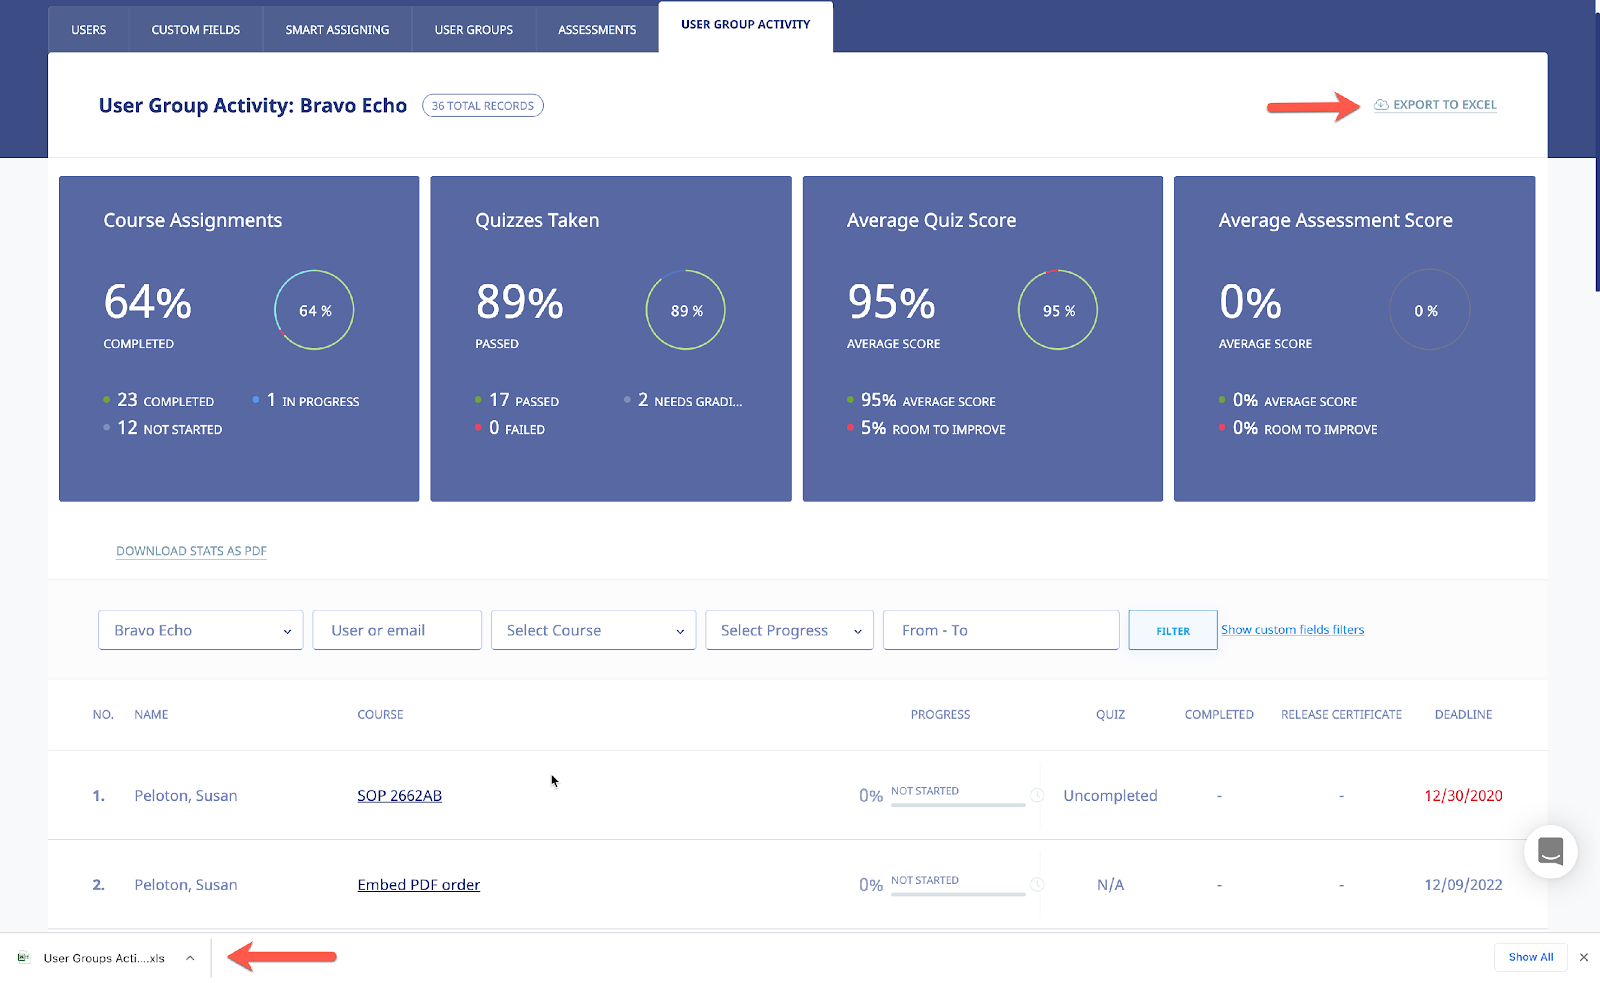
Once you have downloaded the file, it is displayed within Excel, as shown in the following illustration. The Course, Full Name, Email, Description, Assigned Date, Deadline, Progress, Completion Date, Quiz Completed, Quiz Score, Quiz Pass Score, Quiz Max Score, Quiz Status, Quiz Completion Date, User Groups(s) and Active/Inactive details for each User Activity/Course combination on the User Activity list is displayed.
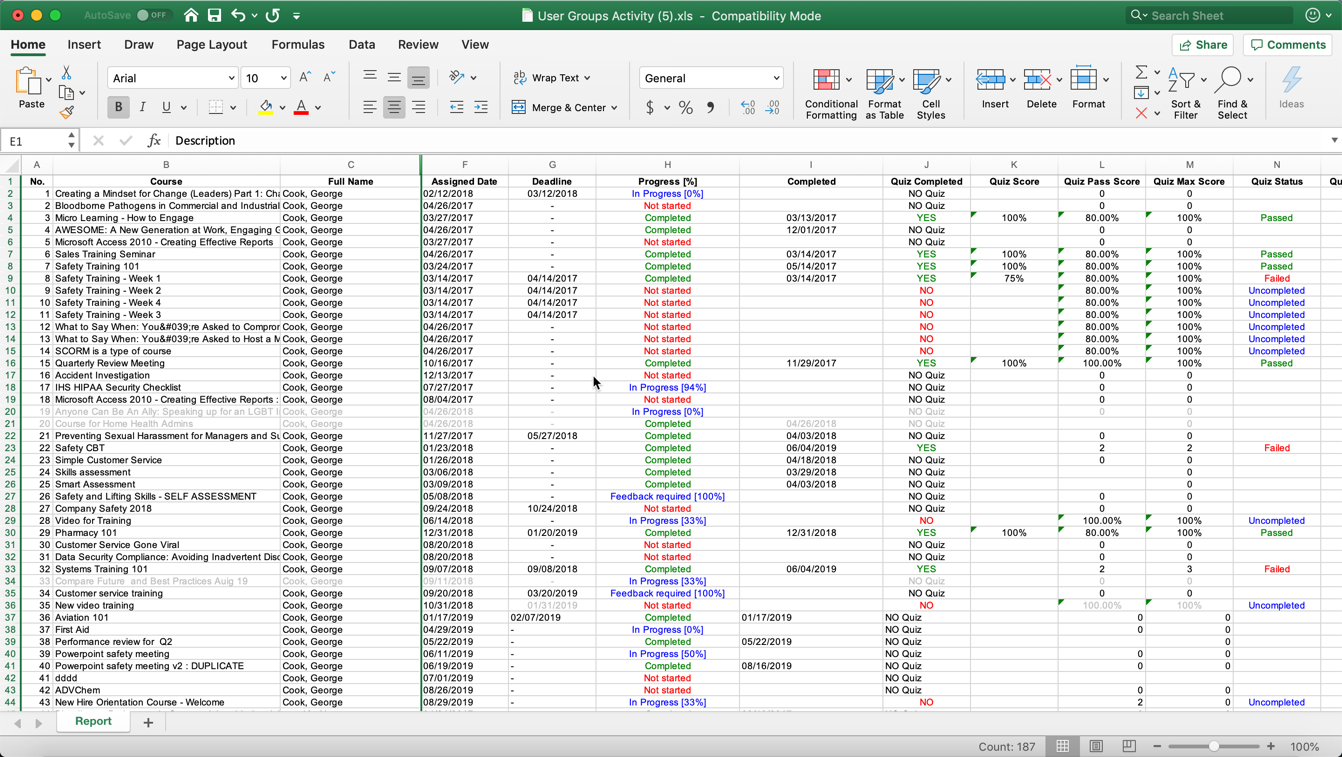
Quiz Results
You can access your Quiz Results and Grading and Assessment Center to learn how well your trainees/employees or students are doing. The Grading Center allows you to manually grade certain types of Quiz questions such as short essays, Hotspot type questions and other subjective questions.
To access your QUIZ RESULTS, click the tab in the COURSES menu. This screen consists of three tabs, QUIZ RESULTS, GRADING CENTER and SCORM RESULTS, with the QUIZ RESULTS tab displayed by default. You can filter the Results displayed on the Quiz Results list based on a date range, either by manually entering dates in the From and To fields, or by using the Calendar icon to display a calendar where you can select them and then clicking . Each Quiz Result on the Quiz Results list shows the Name, Instructor, and No. Quiz details displayed for each Quiz Result.


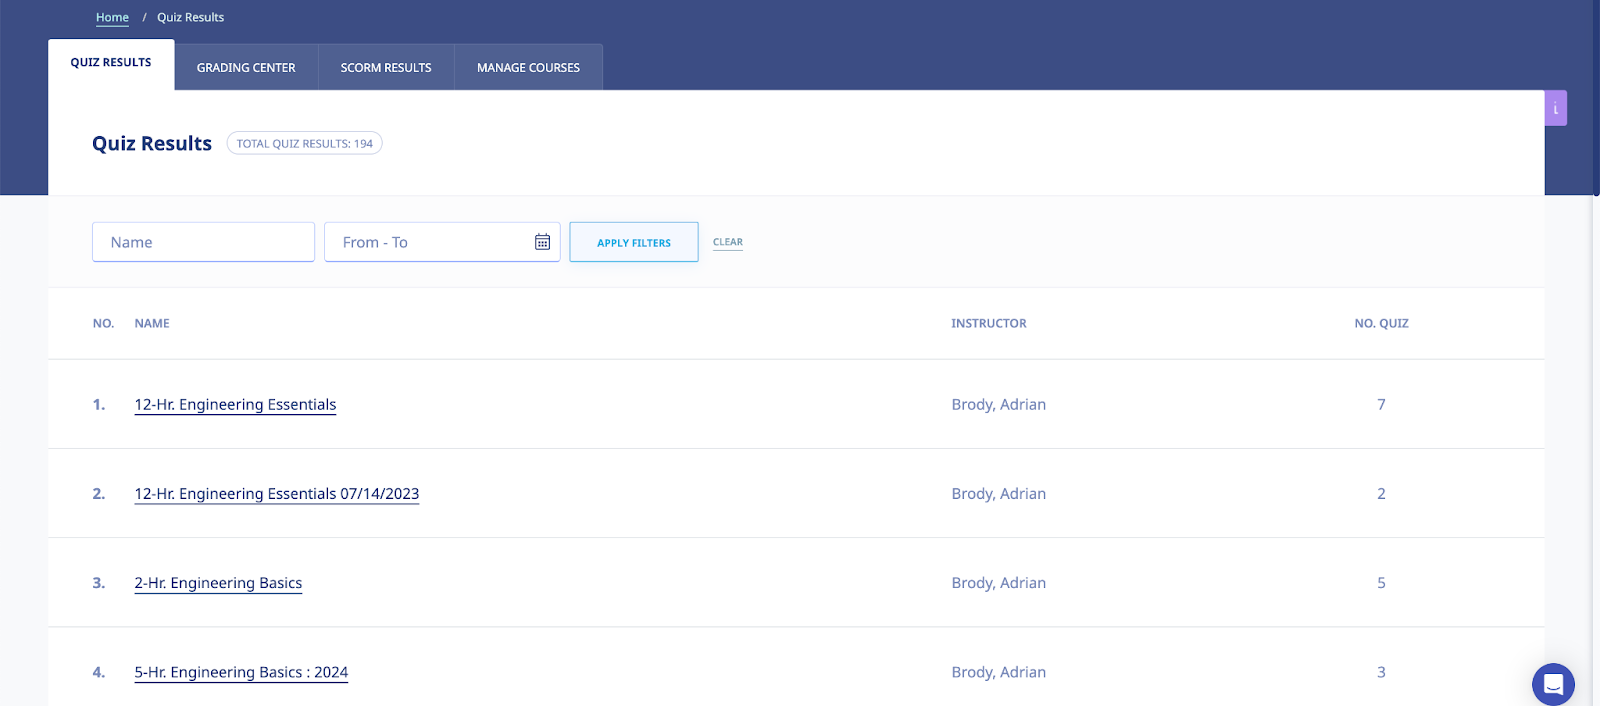
Selecting a Quiz Result on the Quiz Results list displays the Quiz Results Details screen for that Quiz Result, as shown in the following illustration. The Name, Points Earned, Date and Time and Pass/Fail details are displayed for this Quiz Result. You can click the Export to Excel link to export the Quiz Result to your computer, as well as click the quiz results summary link to view a summary of the Quiz Result. Additionally, you can select the Quiz Results check box and then click the delete selected results link to remove this Quiz Result from the system.
The system will automatically assign a temporary grade to employees, trainees or students. You would use the Grading Center to grade subjective questions and answers and assign the final grade.
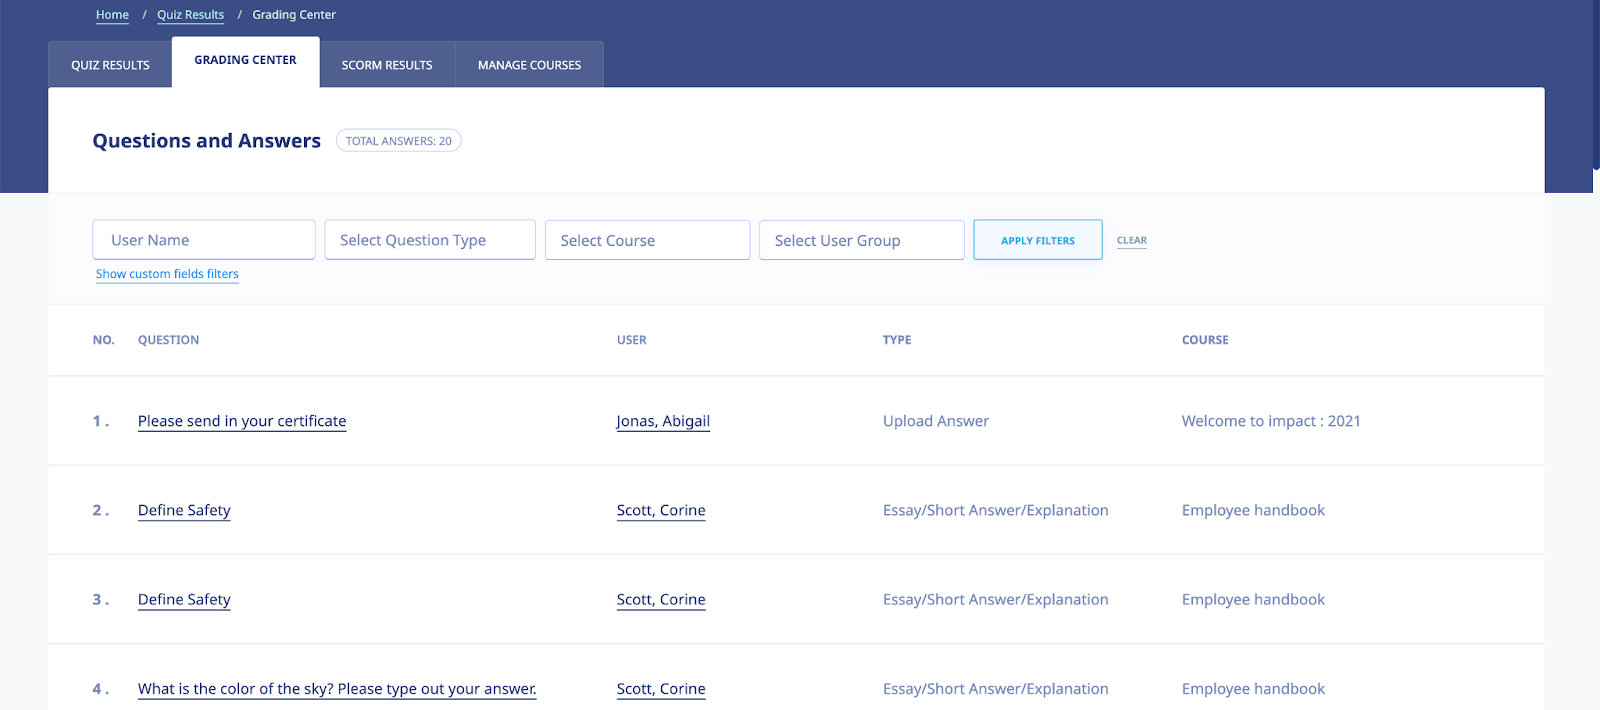
Exporting Quiz Results
Selecting the Export to Excel link on the Quiz Results Details screen will allow you to export the Quiz Results to your computer as an Excel file. As shown in the following illustration, you are presented with the option to either Open the file, or Save the file.
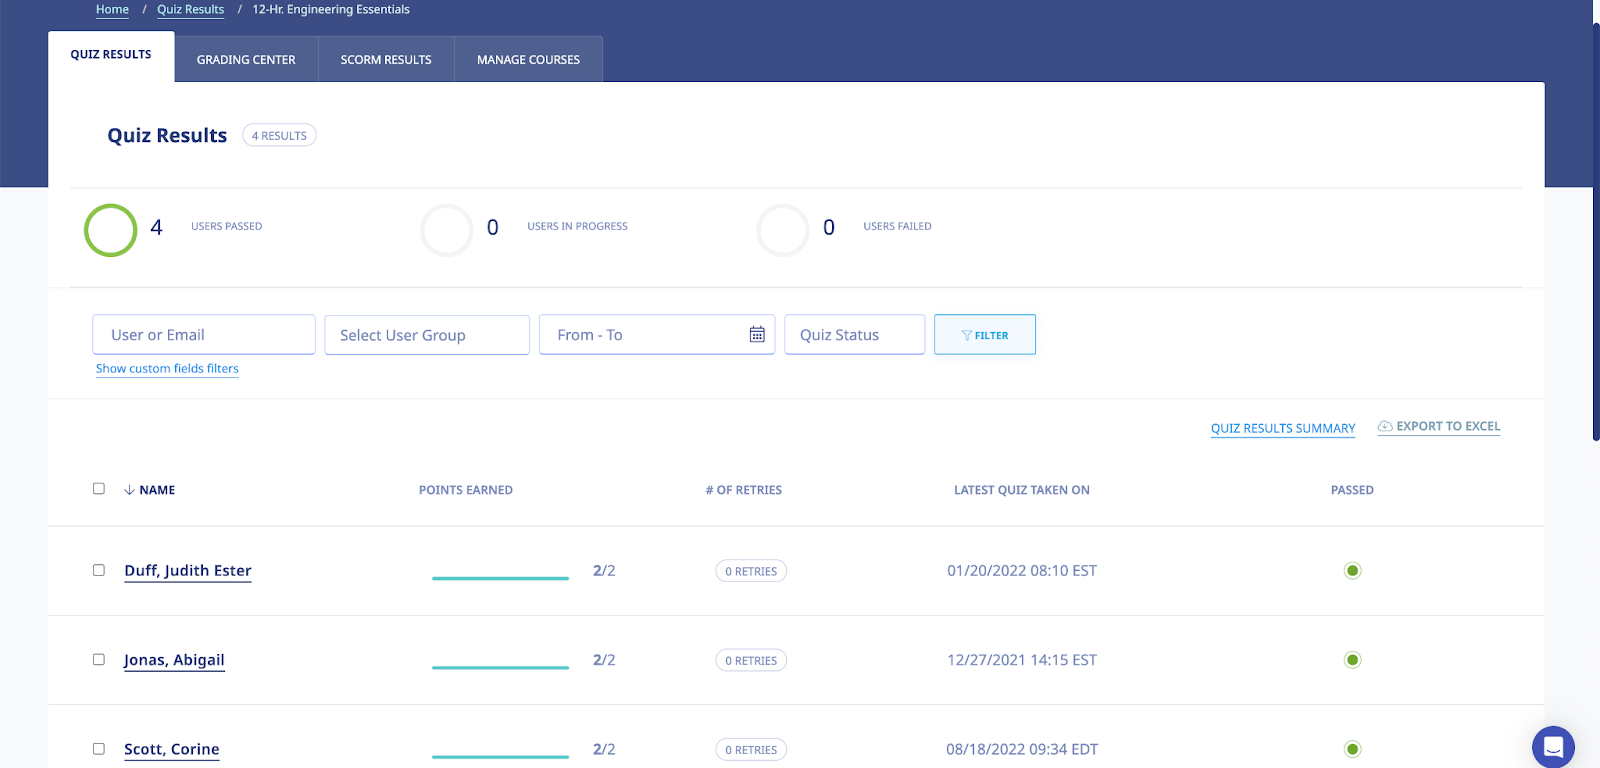
Selecting the Open option opens the file in Excel, as shown in the following illustration. You can then use the File->Save option within Excel to save the file.
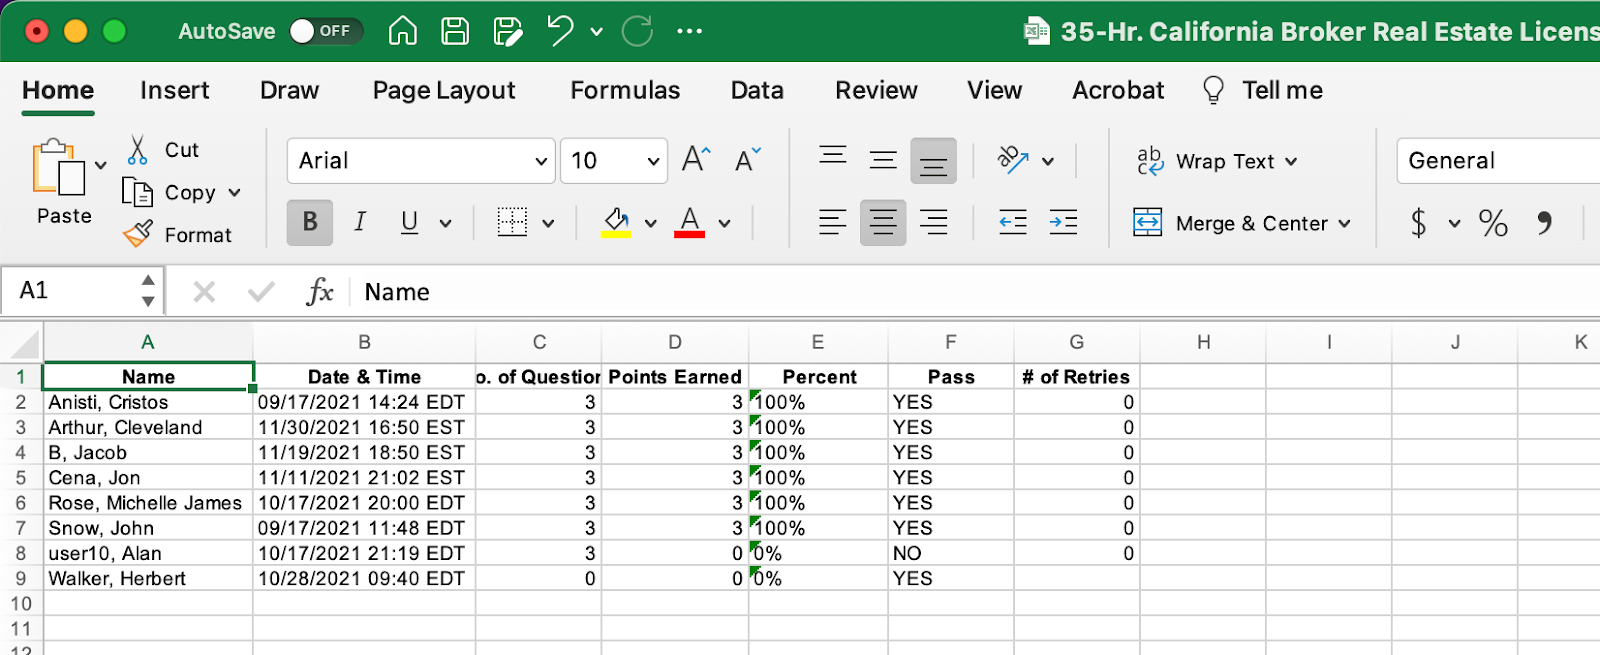
Viewing Individual User Quiz Results Details
Click the name of the individual user you want detailed results on. You will get detailed results including the number of quiz attempts and retries.

Download Individual User Quiz Results
Click the link to download and print a PDF version of the individual user’s quiz results details.

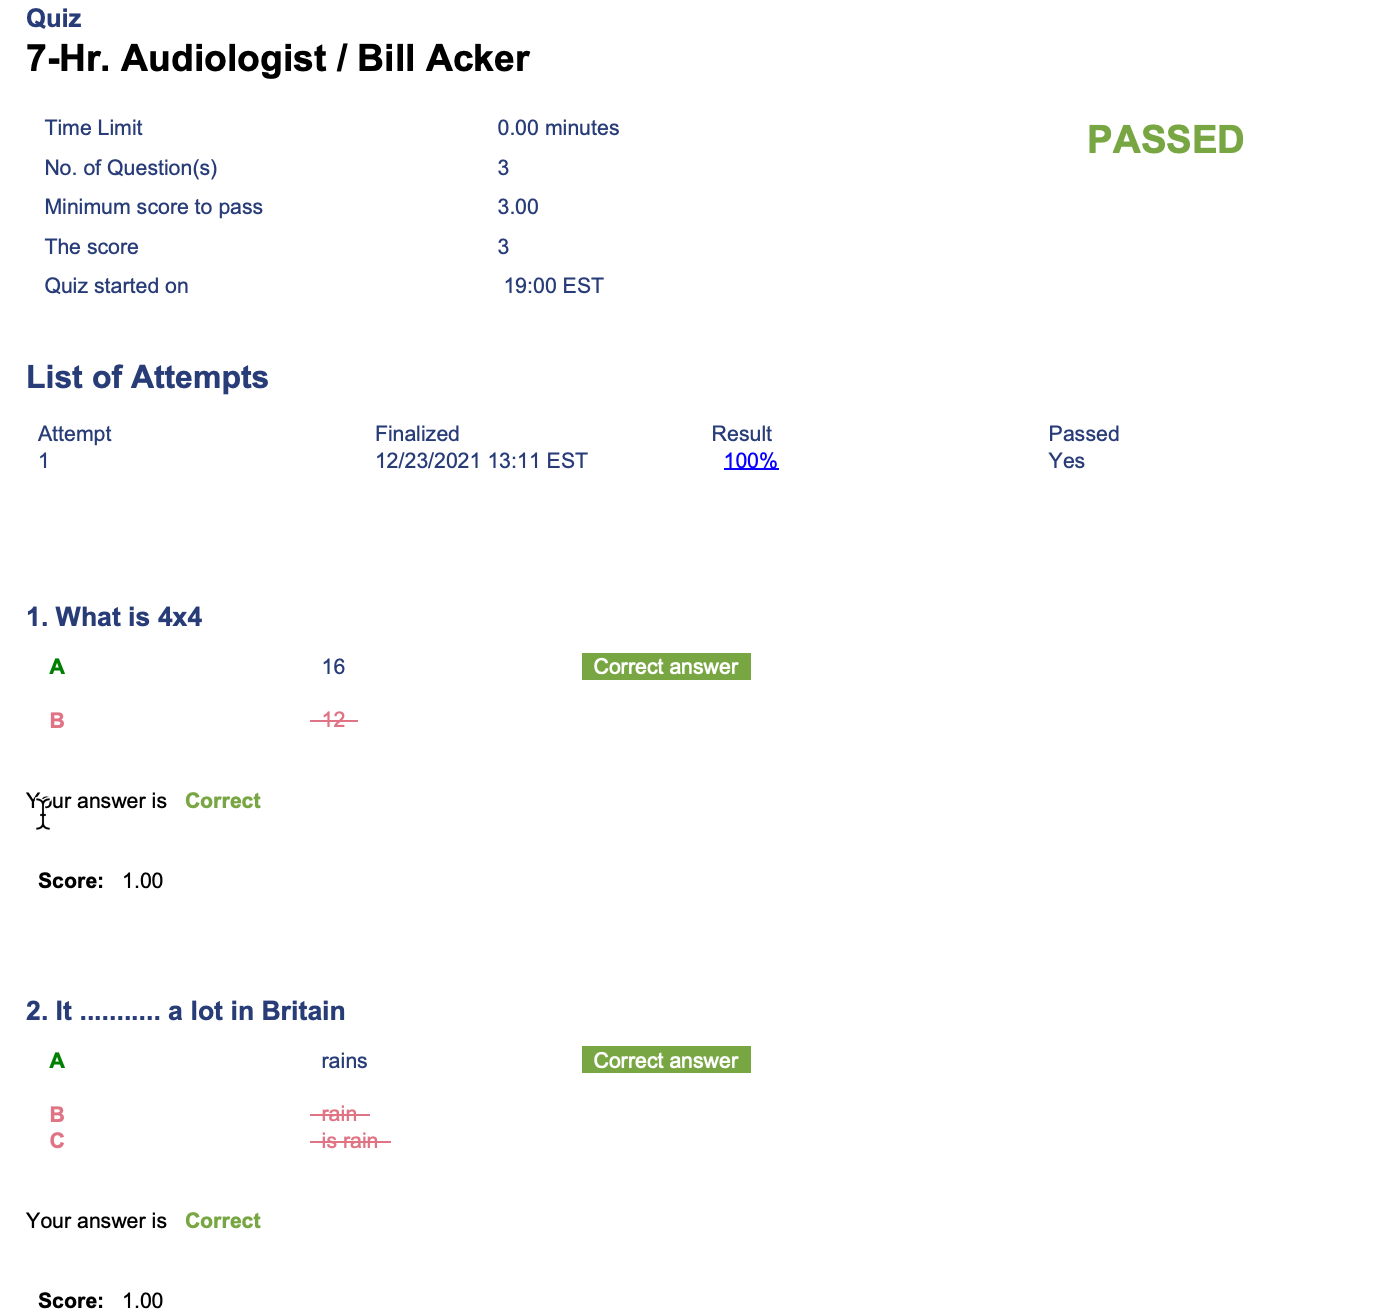
Viewing the Quiz Results Summary
Selecting the quiz results summary link on the Quiz Results Details screen displays the Summary screen, illustrated below. This screen presents a summary of how your Users scored on this Quiz. Each Quiz Question is displayed on a Quiz Questions list, with the No., Question, Level, Correct/Total and Percent details shown for each Question. You can filter what is displayed on this screen, if necessary, by entering a date range, if necessary, either by manually entering dates in the From and To fields, or by clicking the Calendar icon to use the Calendar to select those dates, and then clicking .
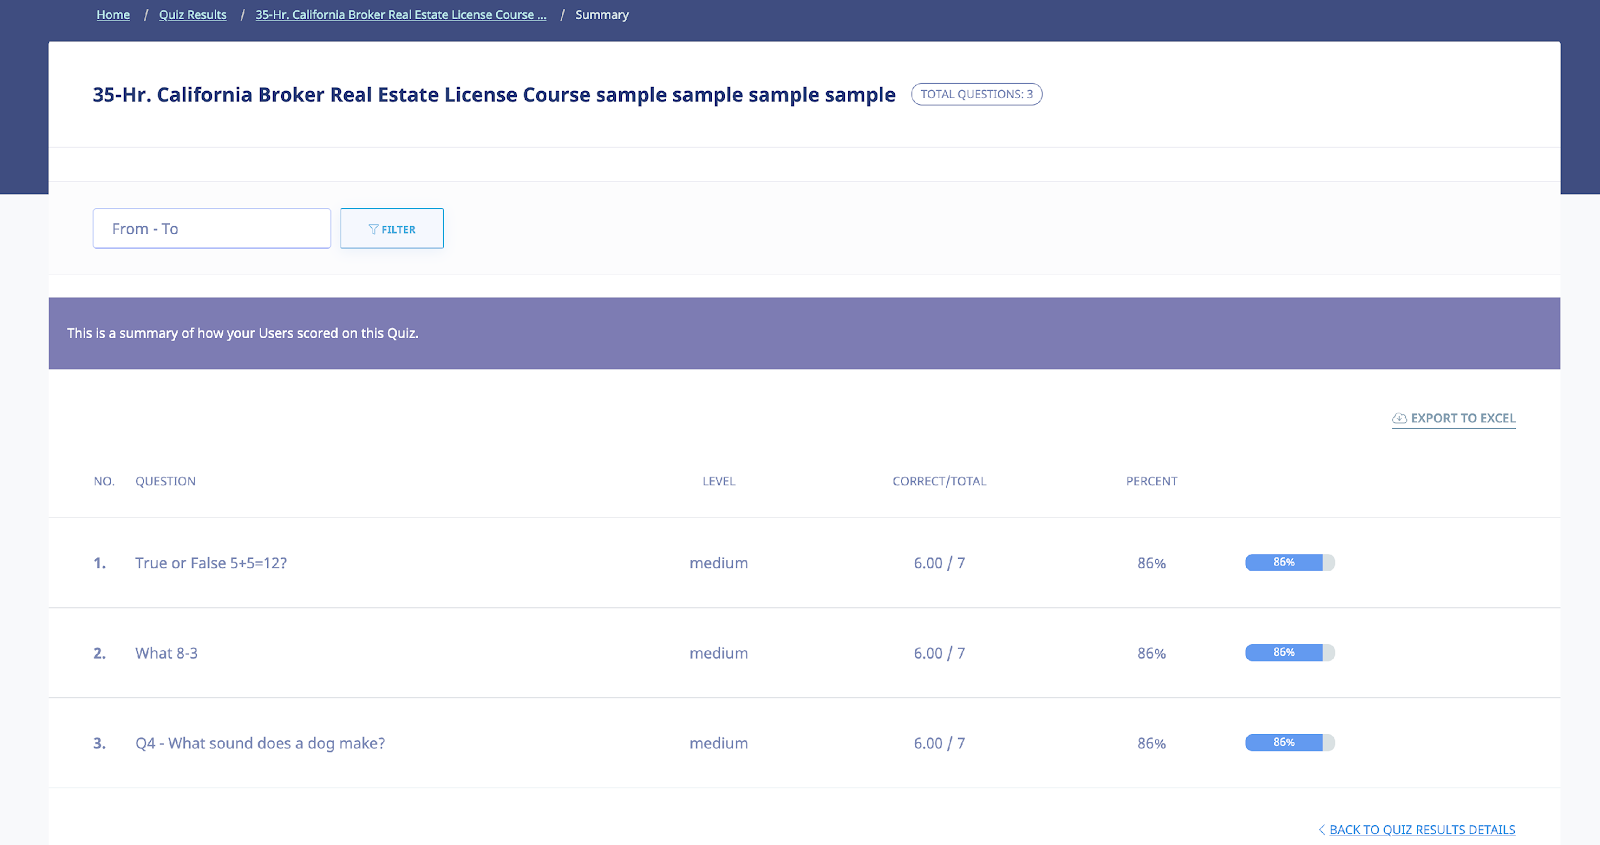
Exporting the Quiz Summary
You can click the Export to Excel link to export the Quiz Summary to your computer as an Excel file. As shown in the following illustration, you are presented with the option to either Open the file, or Save the file.
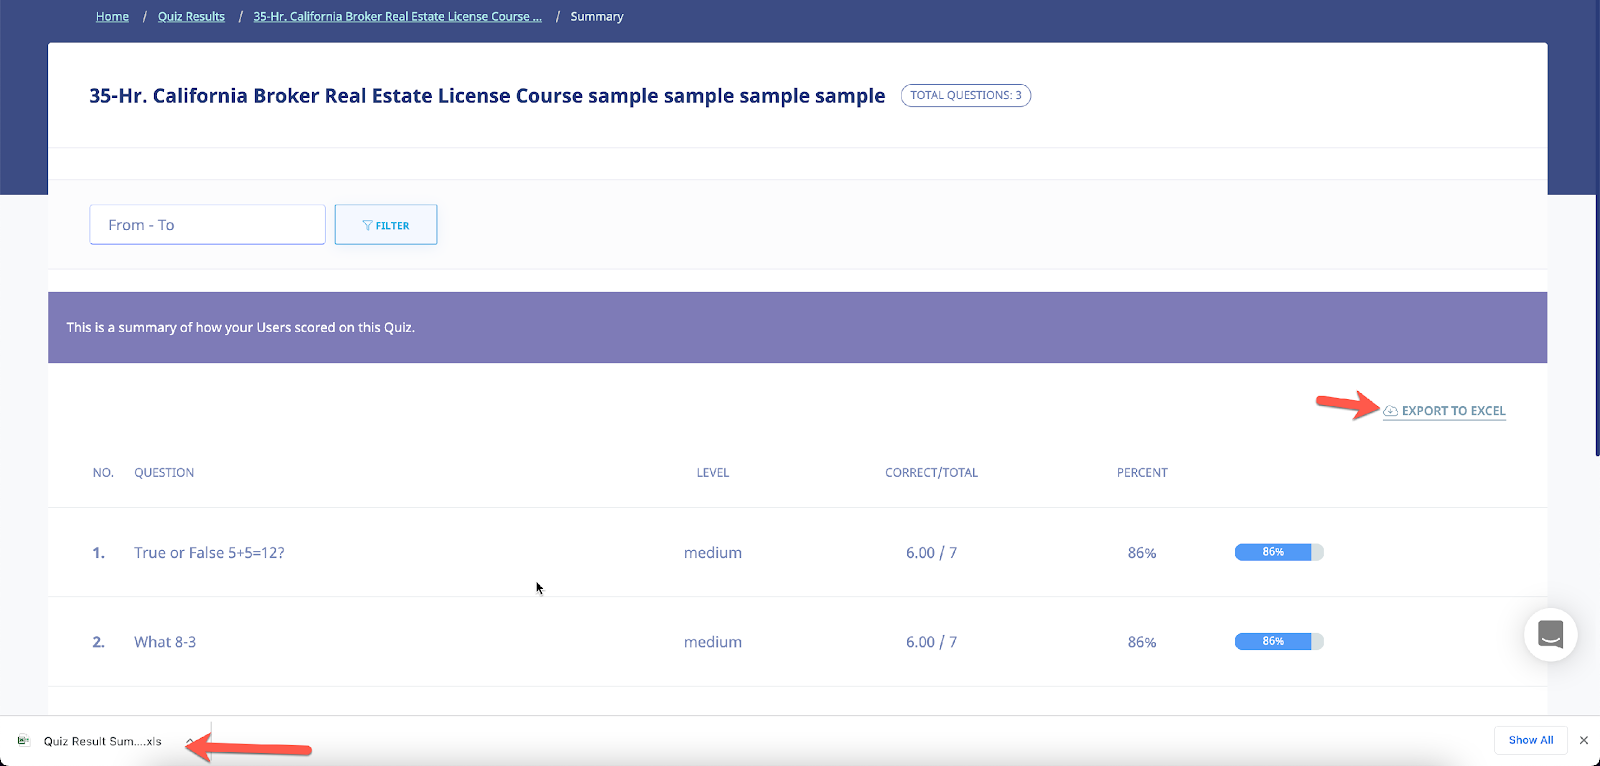
Deleting Quiz Results
You can delete the Quiz Results by selecting the check box and then clicking delete selected results, as shown in the following illustration.
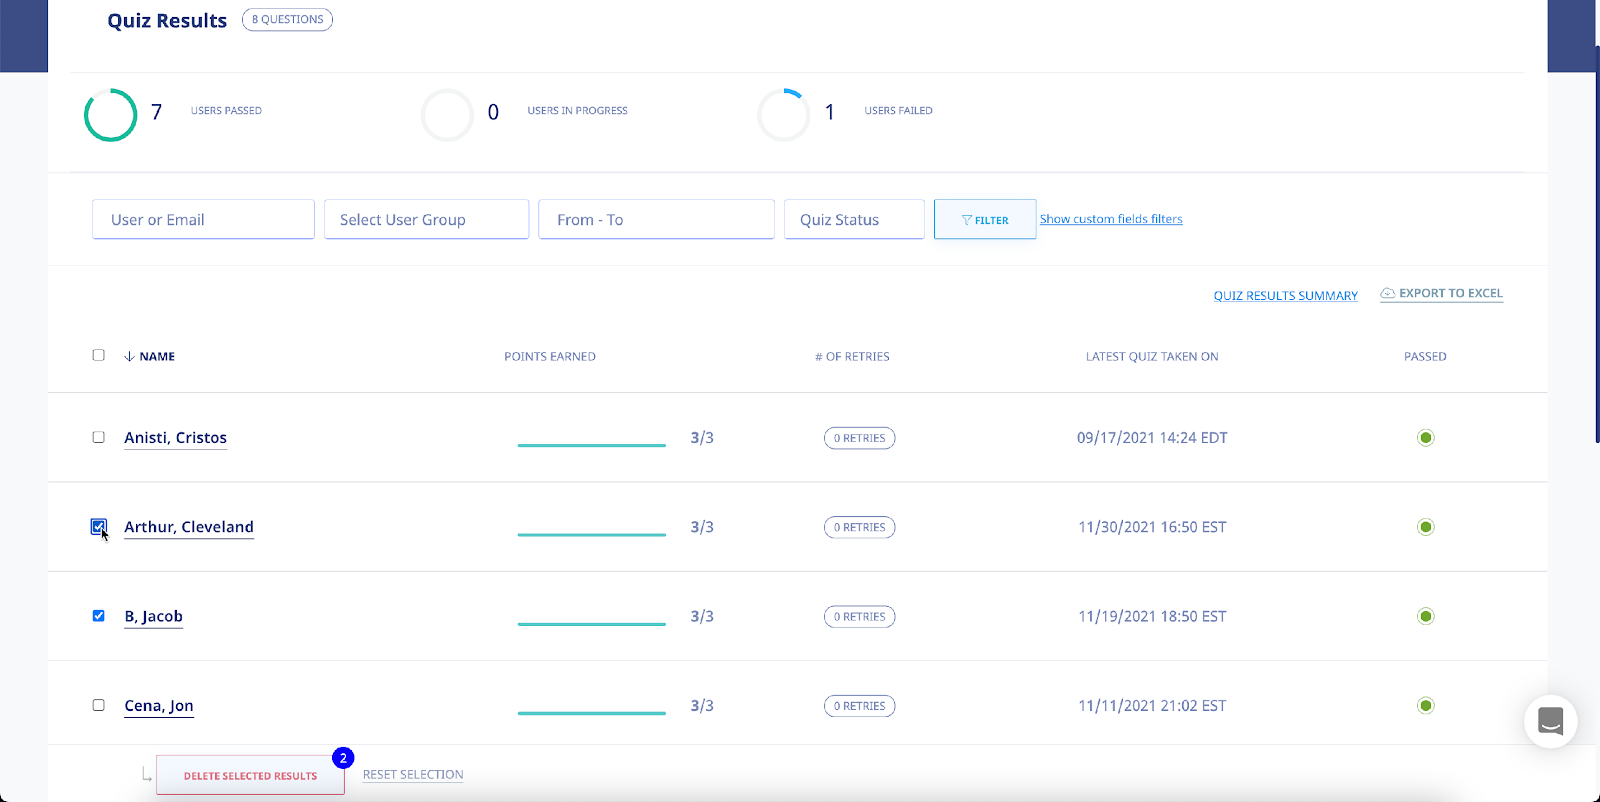
The system displays a warning message, as shown in the following illustration, before performing the deletion, to ensure that is your intention. Click to proceed with the deletion or click to cancel the deletion process.
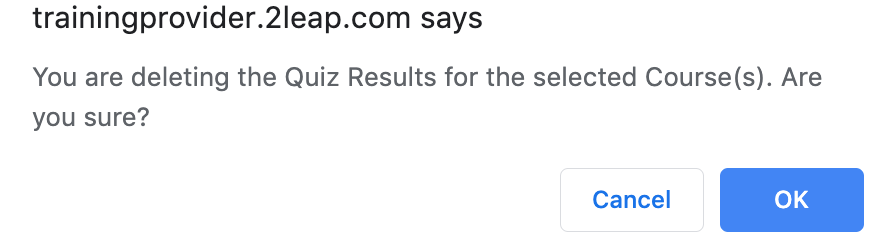
Grading Center
Selecting the GRADING CENTER tab on the Quiz Results screen displays the Questions and Answers screen, illustrated below. This screen displays the Questions associated with a Quiz, with the Question No., Question, Type and Course details for each Question on the Questions list. You can filter what is displayed on this screen, if necessary, by selecting from the Select Question Type list, making a selection from the Select Course list, or both, and then clicking .
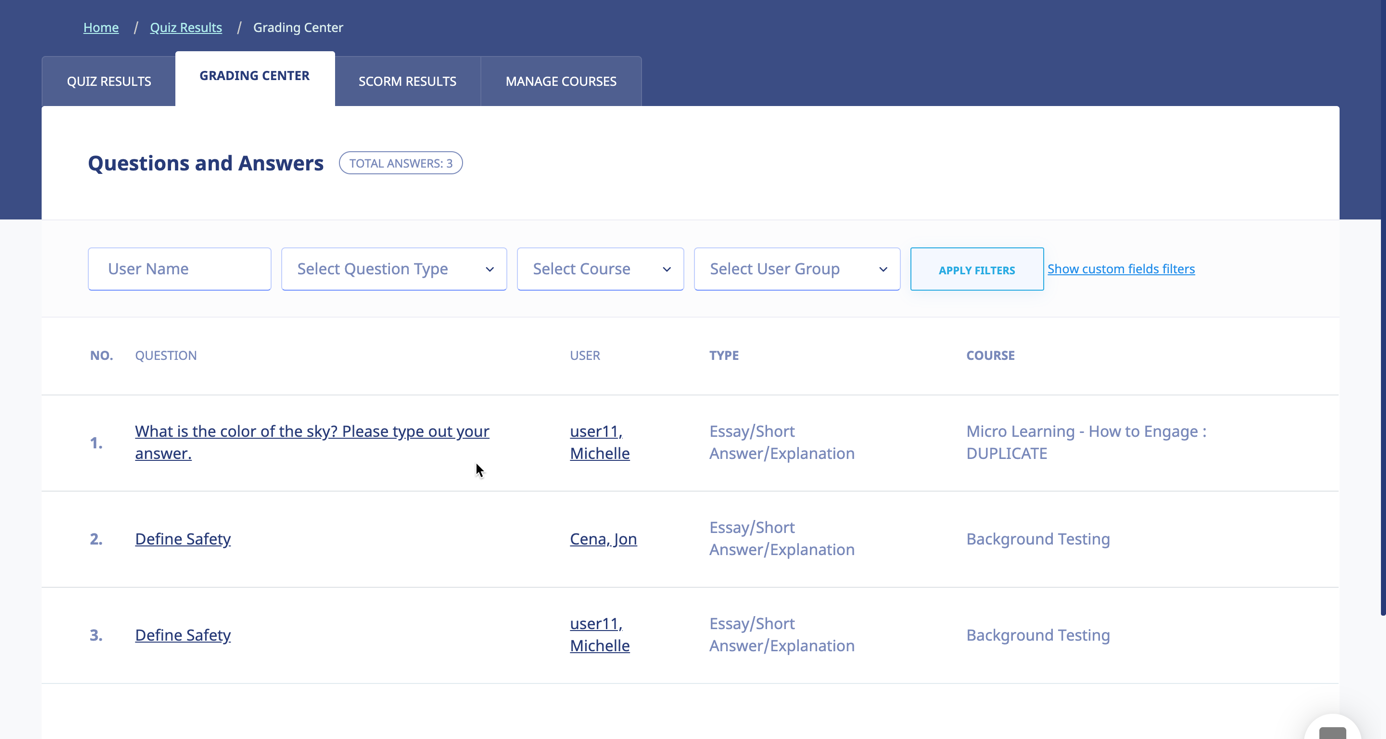
Clicking the Question link on the Questions list displays the Question Details screen, illustrated below. This screen shows the Question and the correct answer for that Question. You can assign a grade to the Answer by selecting from the Give a score list. Available options are 1.0 as the highest grade to 0.0 as the lowest. Additionally, you can provide feedback on the answer by entering text within the Feedback box. When finished, click to save these settings to the system.

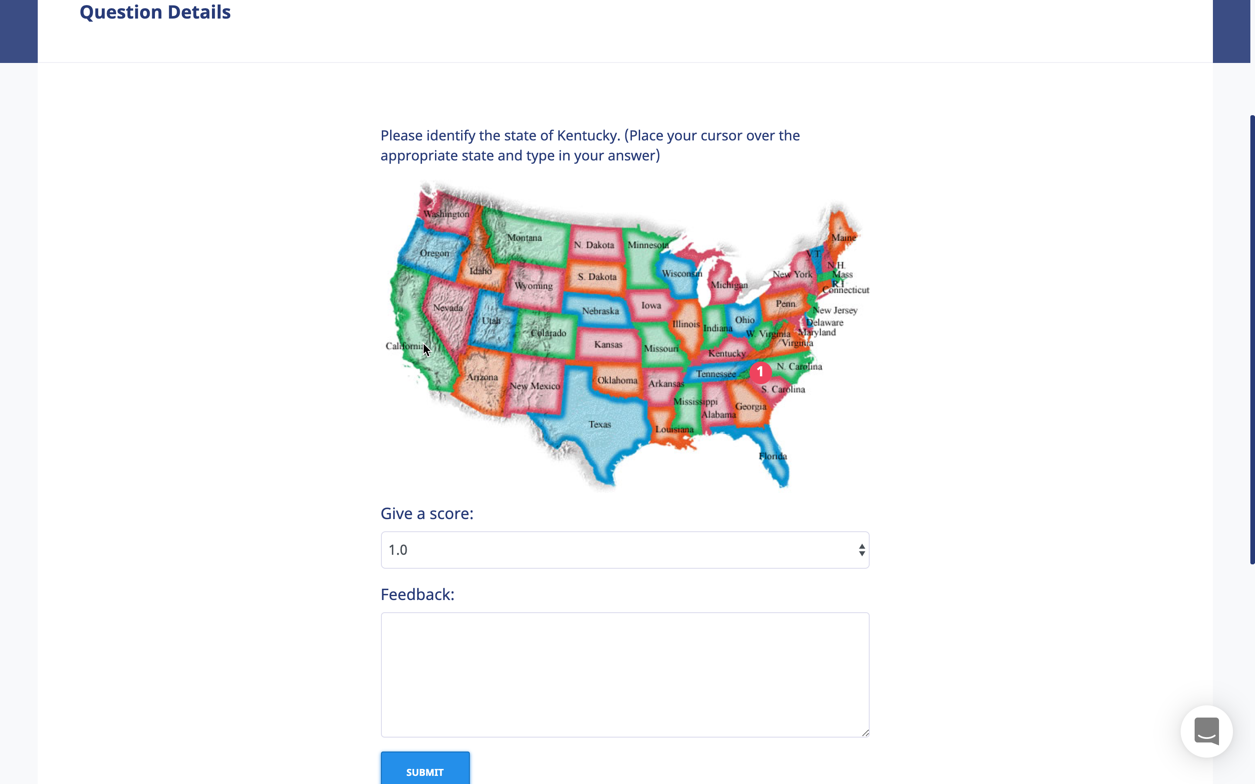
SCORM Results
Selecting the SCORM RESULTS tab on the Quiz Results screen displays the SCORM Results screen, illustrated below. This screen displays any SCORM Quiz Results on a SCORM Quiz Results list, with the Quiz’s Name, SCORM COURSE, Instructor and Total details for these Quiz Results. You can filter what is displayed on this screen by entering the name of a SCORM Course within the SCORM Course field or by defining a date range, either by manually entering the dates in the From and To fields or by clicking the Calendar icon and using the Calendar to select those dates and then clicking .
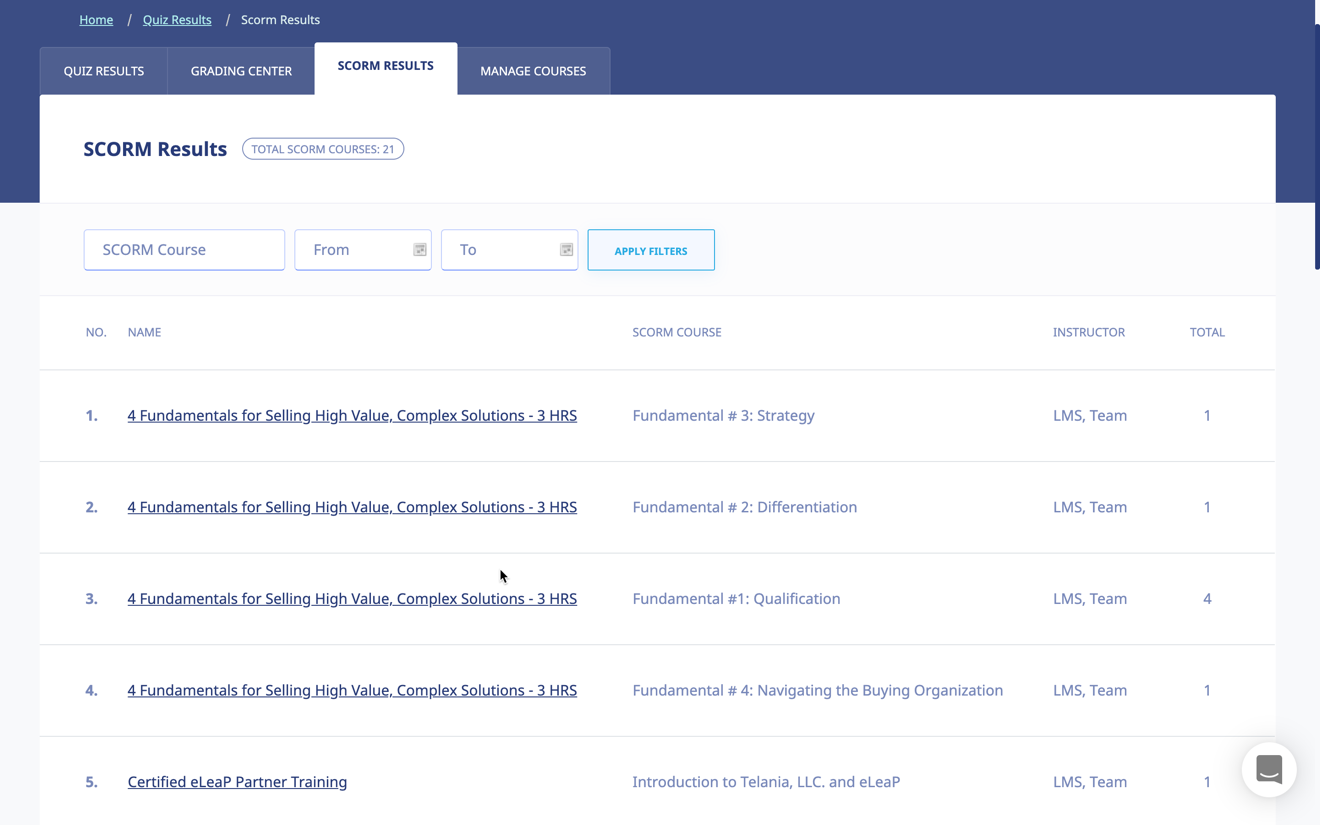
Selecting a SCORM Course on the SCORM Course Results list displays the details for the SCORM COURSE results for Students who have taken the Course, as shown in the following illustration. You can filter what is displayed here by entering a Student’s Name, making a selection from the Select User Group list or by entering a date range, either by manually entering the dates in the From and To fields, or by clicking the Calendar icon and using the Calendar to select those dates, and then clicking . Each line on the Students list shows the Student’s Name, Progress, Points Earned, Pass, Session Time and Date & Time details for this particular Course
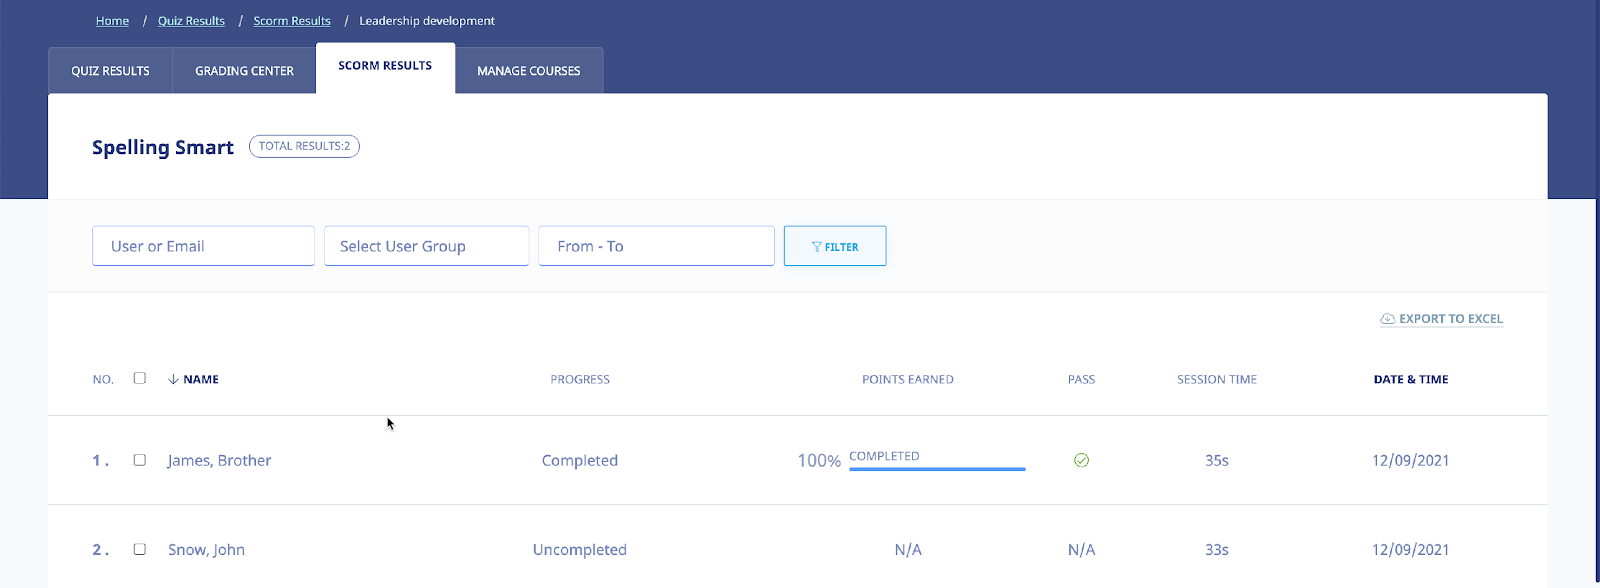
Exporting SCORM Results
Selecting the Export to Excel link on the SCORM Results Details screen will allow you to export the SCORM Results to your computer as an Excel file. As shown in the following illustration, you are presented with the option to either Open the file, or Save the file.
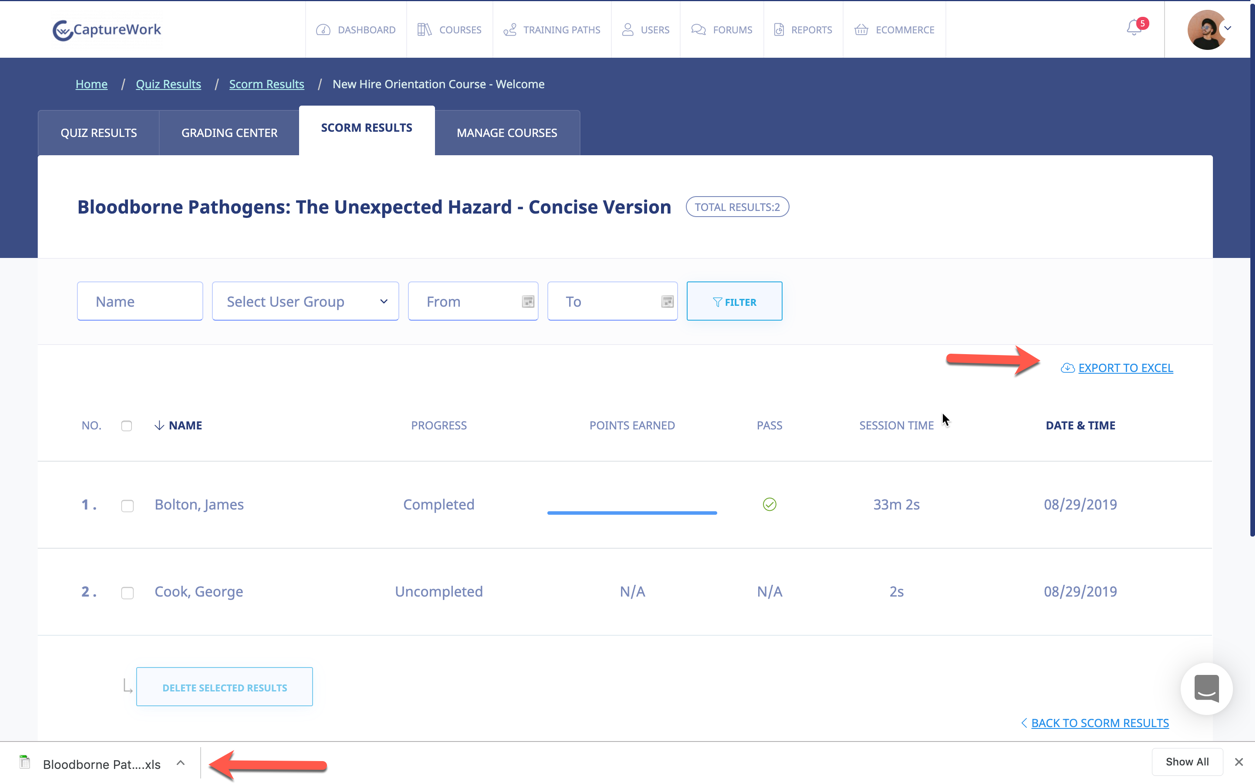
Deleting SCORM Results
You can delete a user’s results by selecting their check box on the User list and then clicking delete selected results. The system displays a warning message before performing the deletion, as shown in the following illustration, to confirm that is your intention. Click to proceed with the deletion or click to cancel the deletion process.
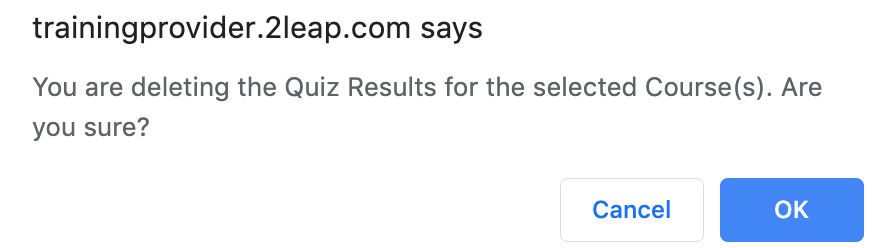
Forum
Selecting the icon in the main menu bar displays the Forum screen, illustrated below. Each Forum Category on the Forum Category list shows the Forum Category Name, Topics, and Date Created details for the Forum Category. Additionally, you can click the edit link to edit a Forum Category or the delete link to delete it. eLeaP™ believes that informal learning can be a vital part of designing powerful learning and training programs. After all, the experts tell us that “80% of workers get their job know-how informally” Jay Cross (June 2006 TD Magazine).

Forums are a great way to foster this informal and unorthodox learning. Forums allow users to share ideas, and best practices and even develop new methods of problem-solving or generating ideas. That million-dollar idea could come from your training portal’s forum site. We encourage you to use these interactive tools in your eLeaP package. Next, we’ll create a new Forum Category.
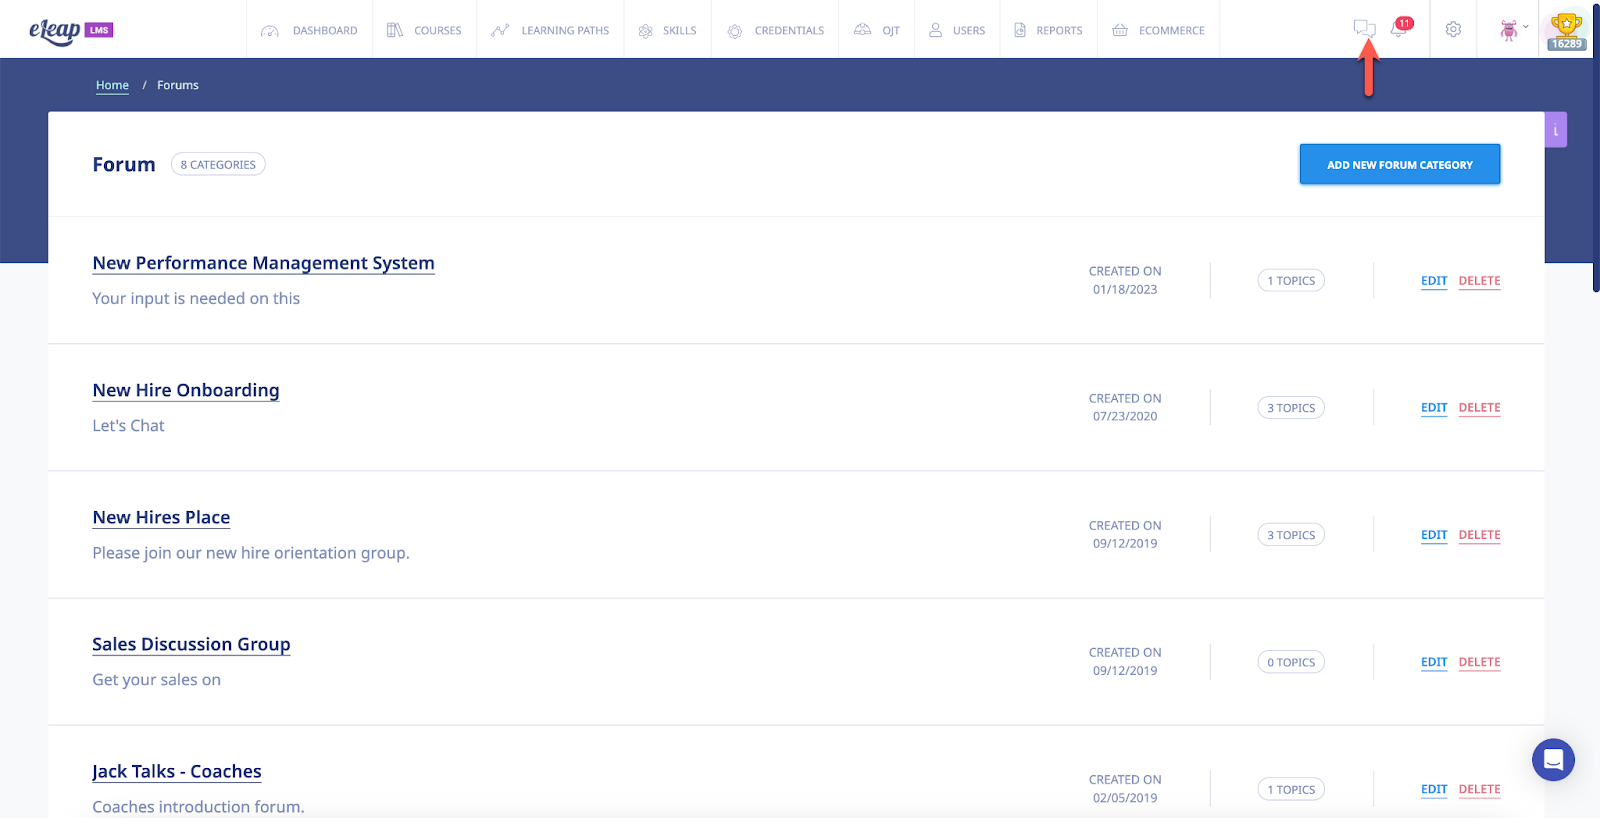
Adding a New Forum Category
Clicking the button on the Forum Categories screen allows you to add additional Forum Categories to the system using the Add Forum Category screen, as shown in the following illustration.
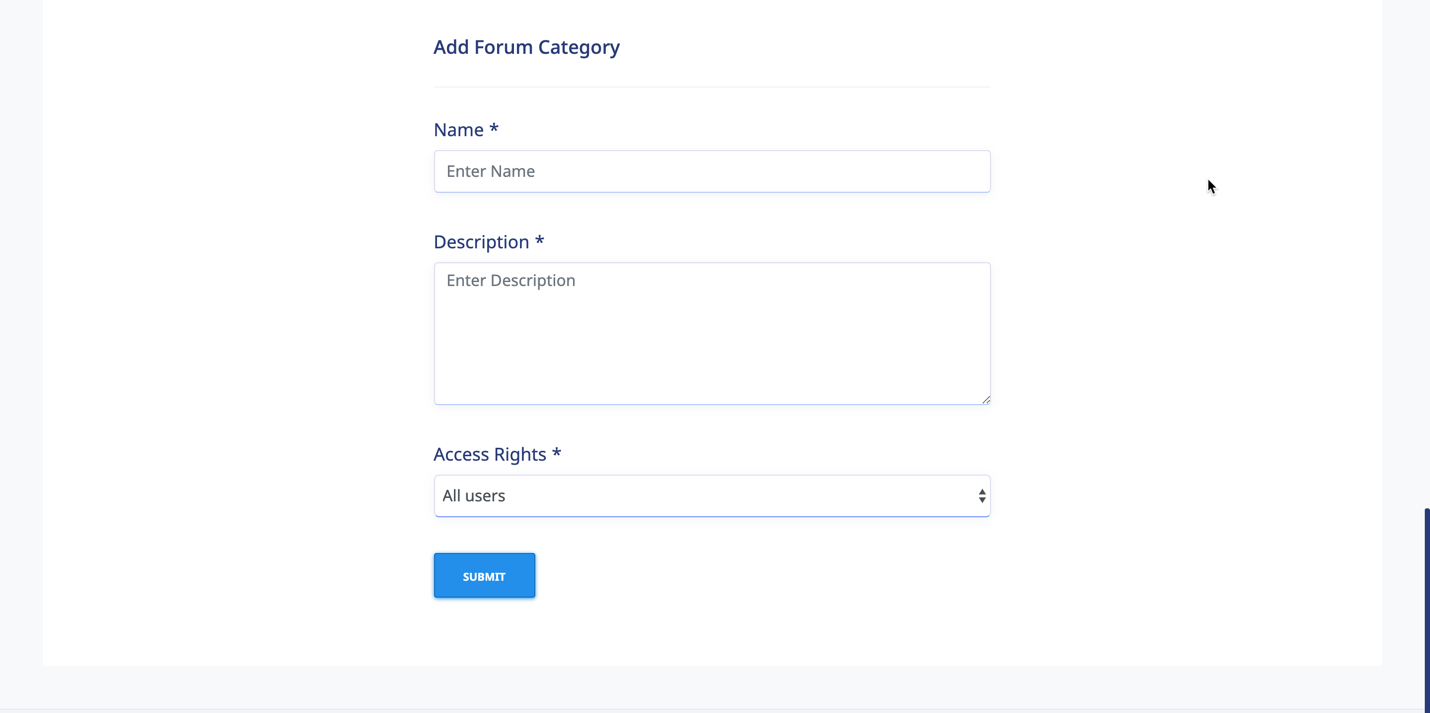
- Enter a name for the new Forum Category in the Name field.
- Enter a description for the new Forum Category in the Description box.
- Select either the All users option or the Defined Access Rules option from the Access Rights list.
- Click to add the new Forum Category to the system. The new Forum Category is displayed on the Forum Category list, as shown in the following illustration.
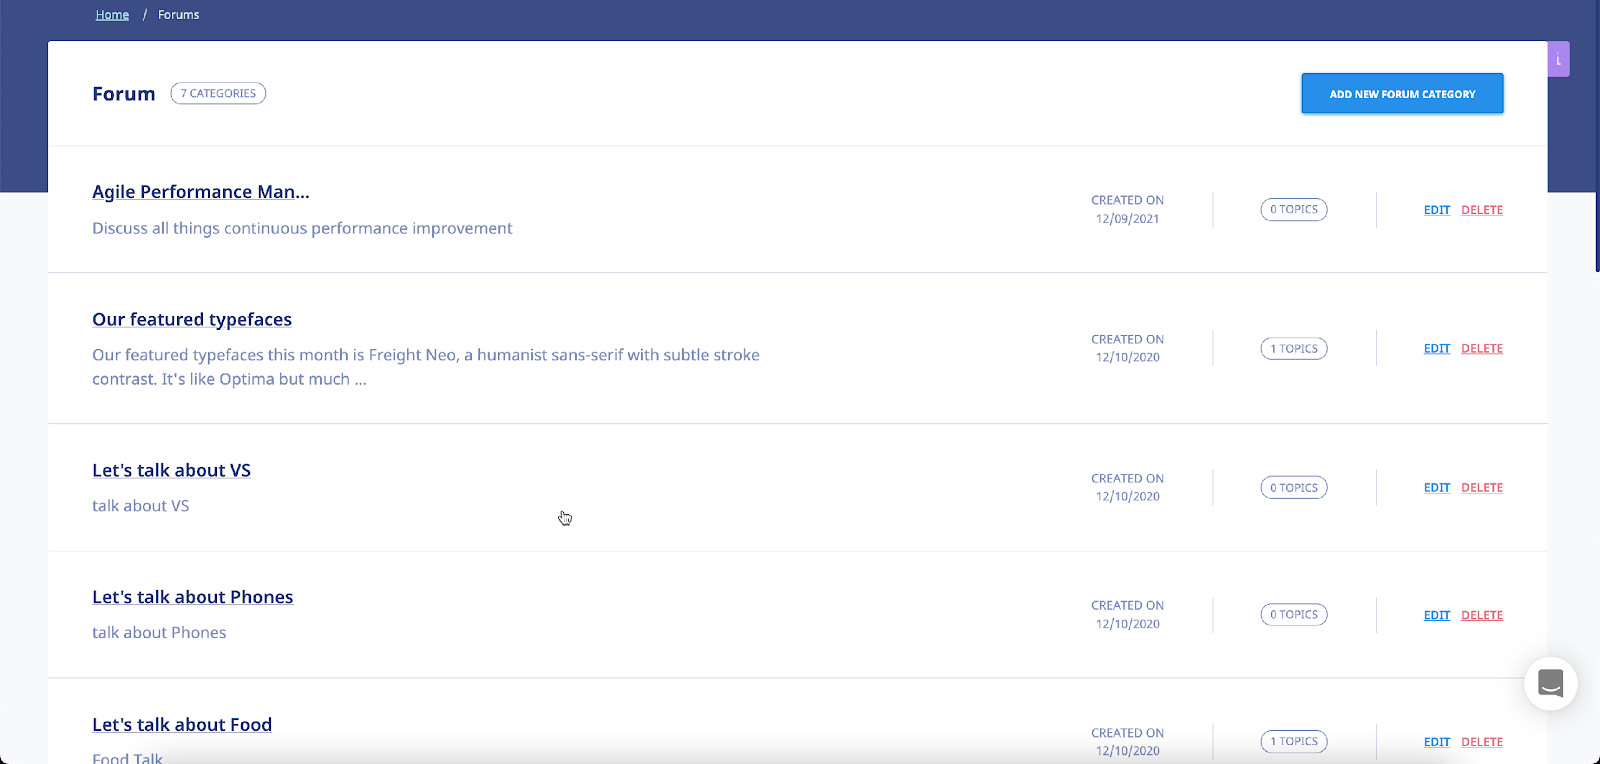
Editing a Forum Category
Clicking the link for a Forum Category on the Forum Category list allows you to make modifications to that Category using the Edit Category screen, as shown in the following illustration. Simply modify the Name, Description and/or Access Rights options and then click to save your changes to the system.
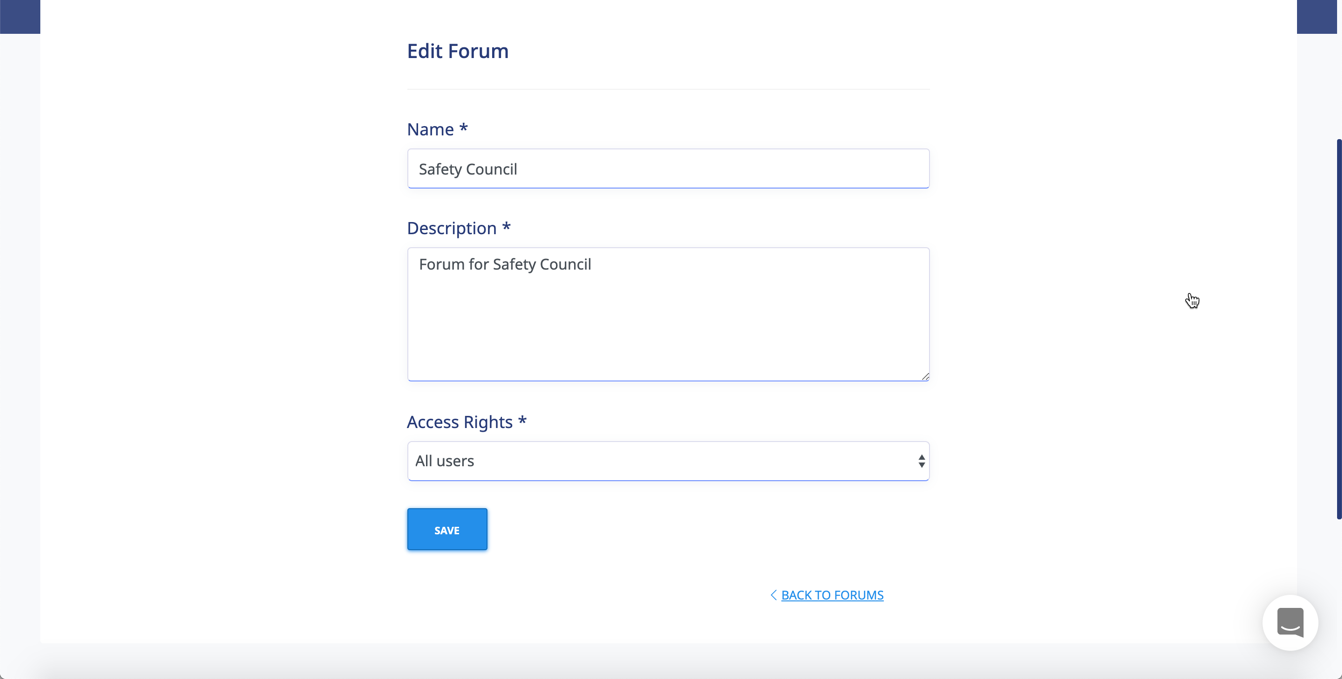
Deleting a Forum Category
Clicking the link for a Forum Category on the Forum Categories list allows you to remove a Forum Category from the system. The system first displays a warning message, as shown in the illustration below, to ensure that is your intention before performing the deletion. Click to proceed with the deletion or click to cancel the deletion process.
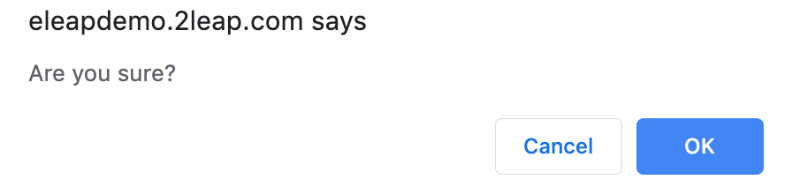
Adding a Forum Topic
Selecting a Forum Category on the Forum Categories list allows you to add Topics to that Forum Category using the Forum Category Details screen by clicking the add new topic link, as shown in the following illustration.
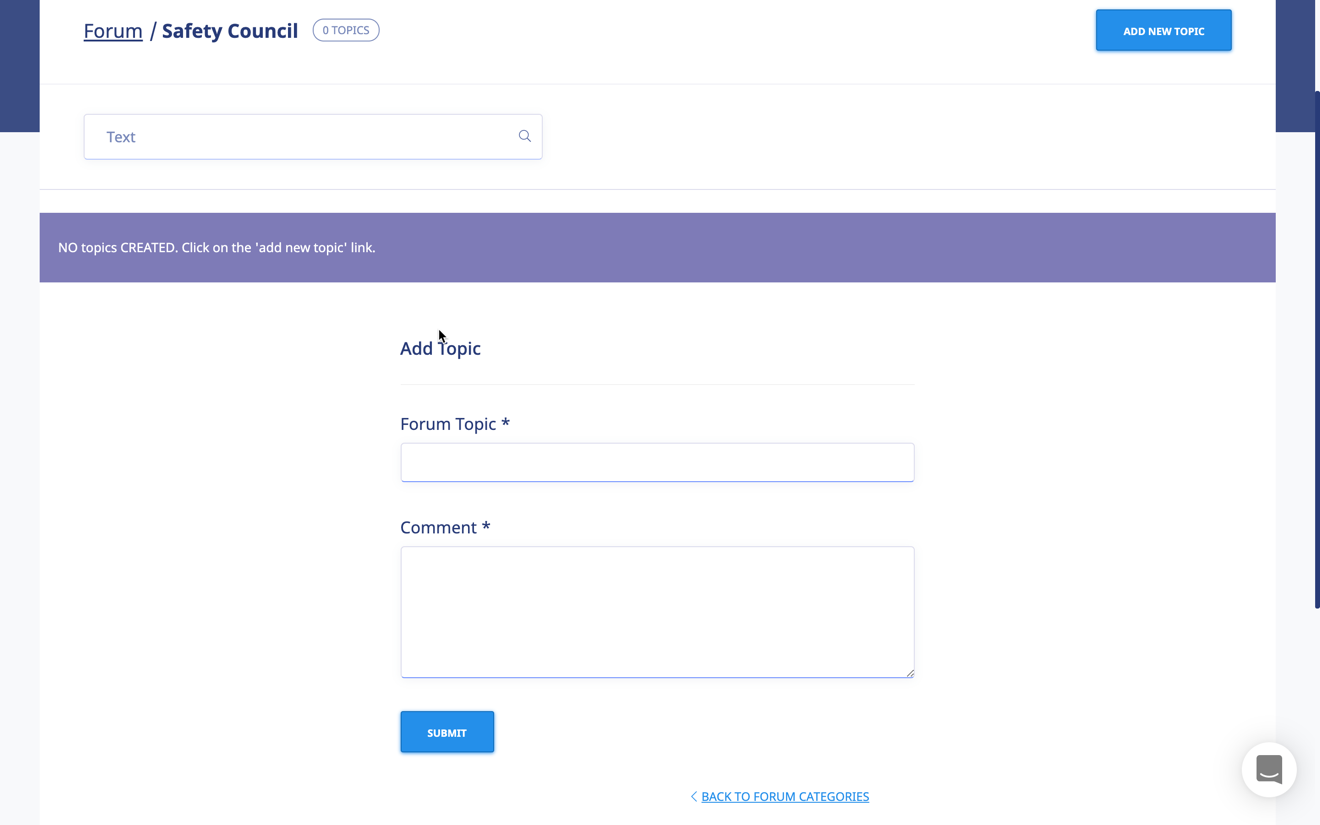
The Add Topic screen, shown in the following illustration, is displayed. Use the steps below to add a new Topic to a Forum Category.
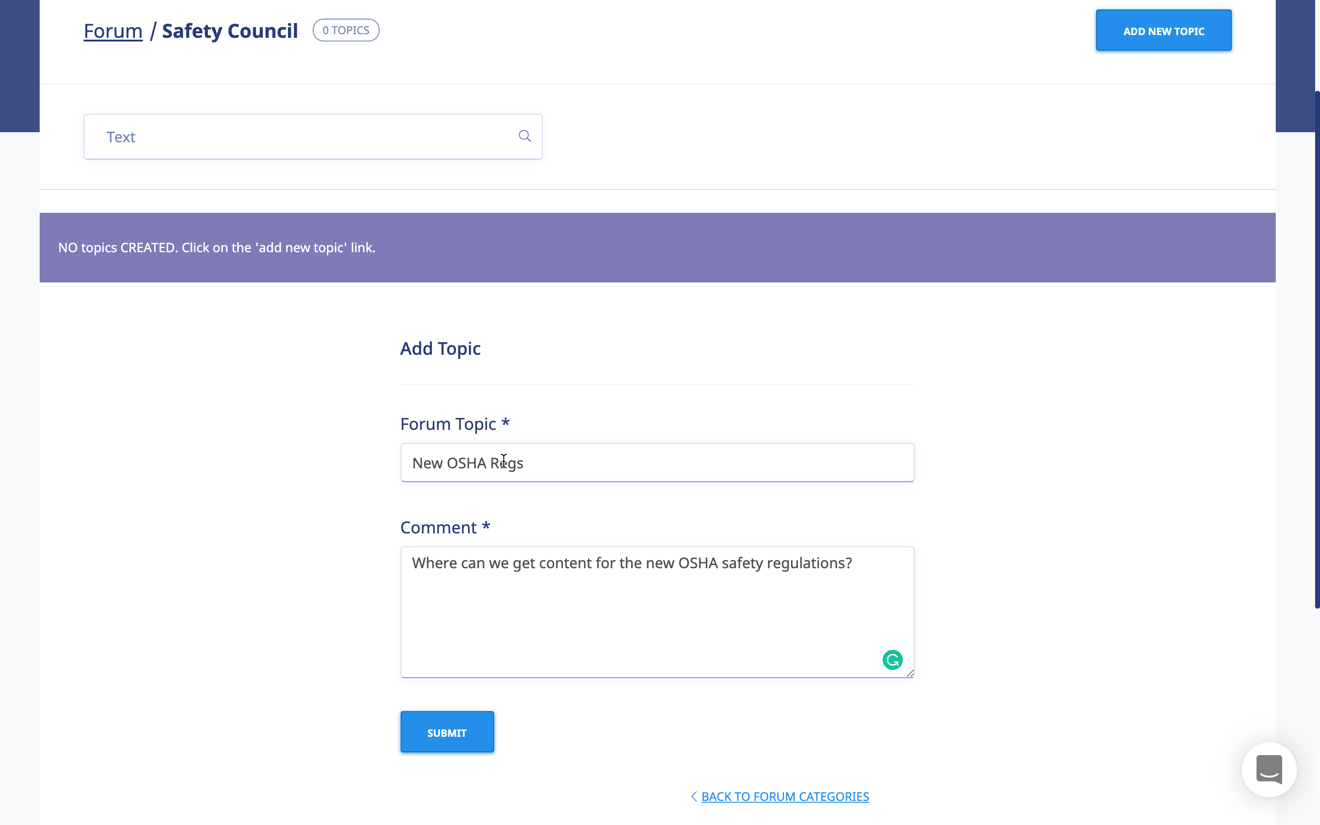
- Enter a name for the new Forum Topic in the Forum Topic field.
- Enter a Comment pertaining to the new Forum Topic in the Comment field.
- Click Submit.
As shown in the following illustration the Topic is added to the Topics list, with its Name, Started By, Posts and Open Date details displayed.
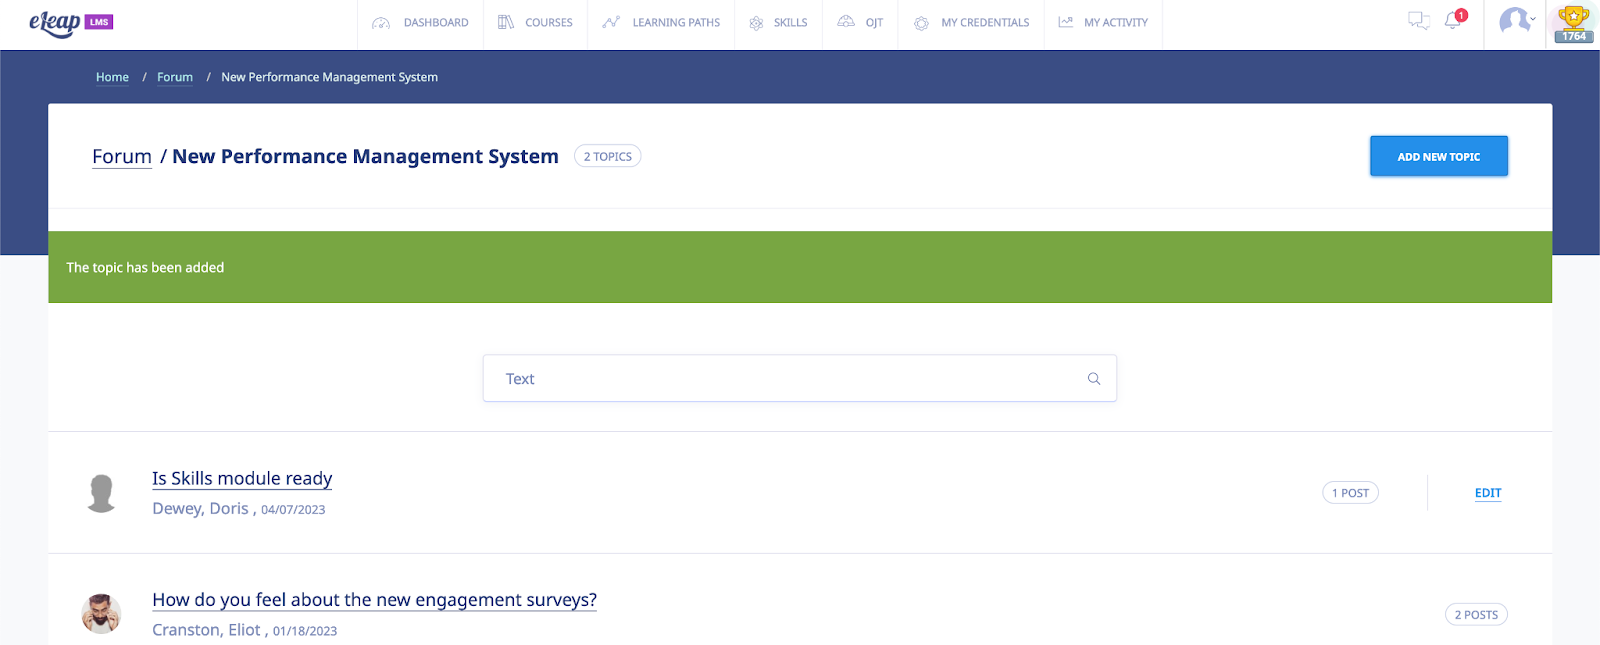
Editing a Forum Topic
Clicking the edit link for a Forum Topic on the Forum Topics list allows you to make any necessary modifications to that Topic using the Edit Topic screen, as shown in the following illustration. Simply make any necessary changes to the Forum Topic Name and/or the Forum Topic Description and then click to save those changes to the system.
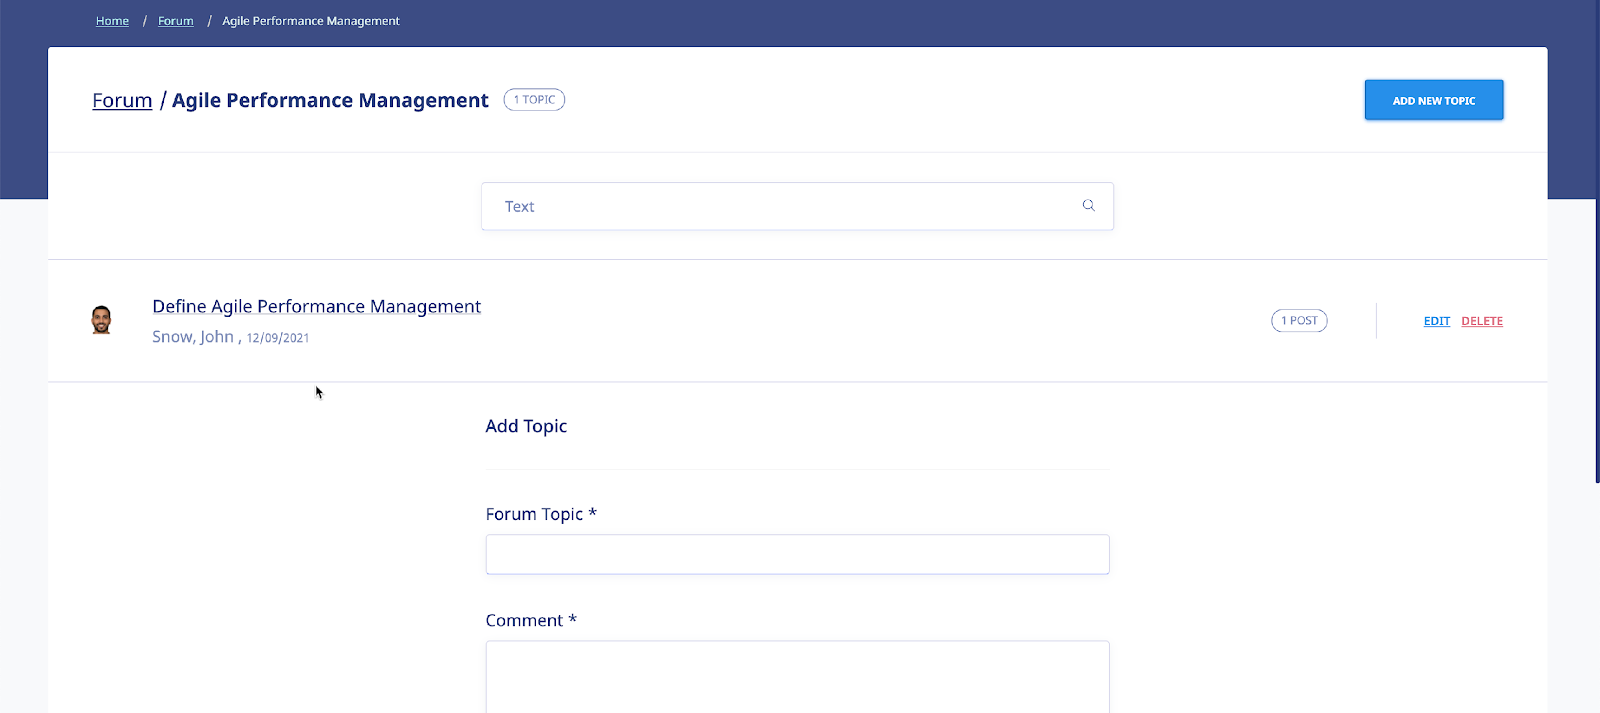
Deleting a Forum Topic
Clicking the delete link for a Forum Topic on the Forum Topics list allows you to remove a Topic from the system. The system first displays a warning message before proceeding with the deletion, as shown in the following illustration. Click to proceed with the deletion or click to cancel the deletion process.

Assigning User Access to a Forum Category
Selecting the tab on the Forum Category Details screen allows you to assign Users within the system access to that Forum Category using the User Access screen, as shown in the following illustration. To begin, click the assign new users link.


The Add Users screen, illustrated below, is displayed. To assign Users access to the Forum Category, select their check box on the Users list and then click .
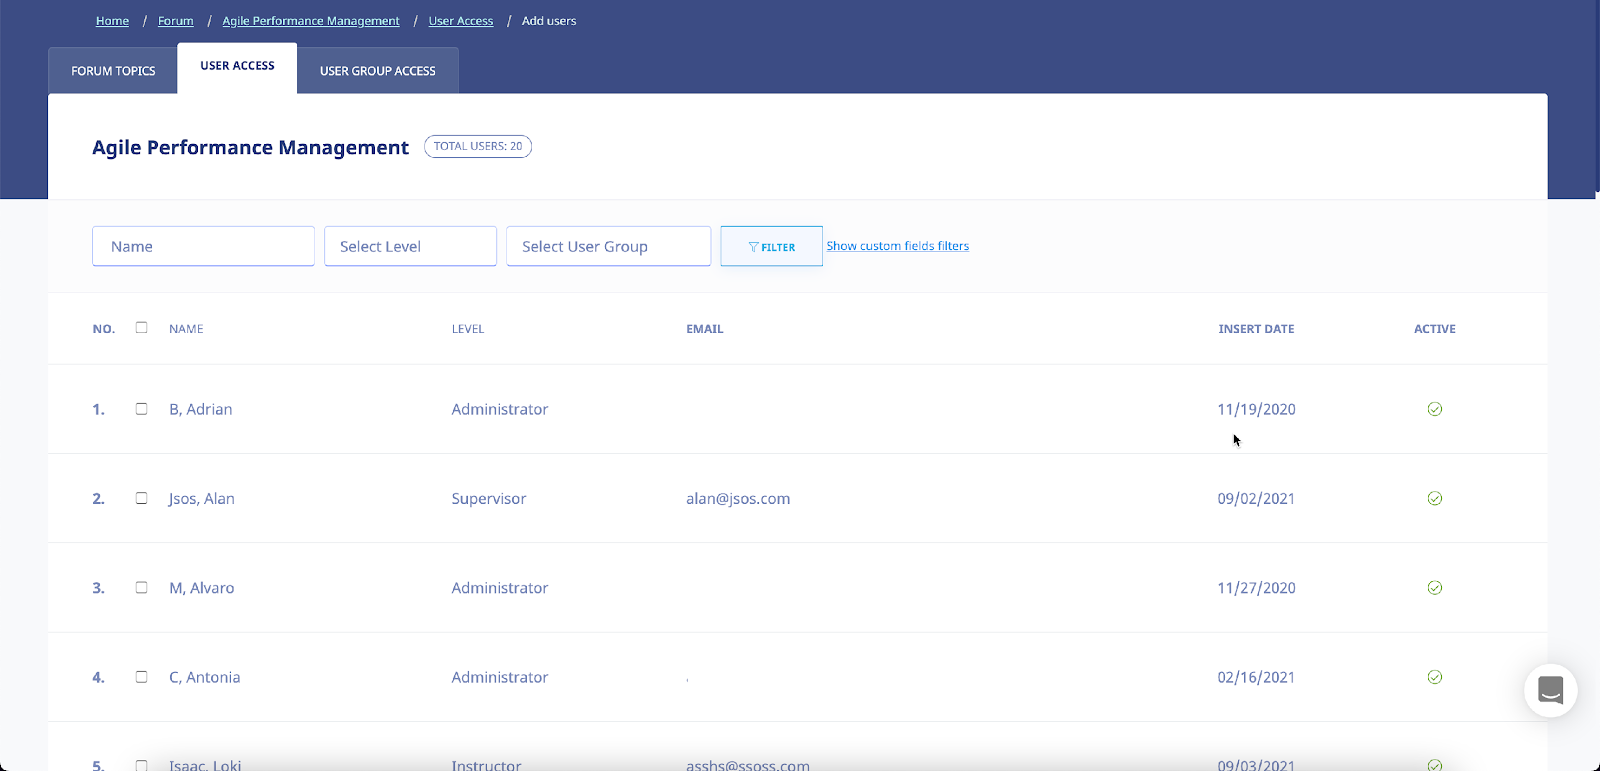
As shown in the following illustration, the Users are now assigned access to the Forum Category.
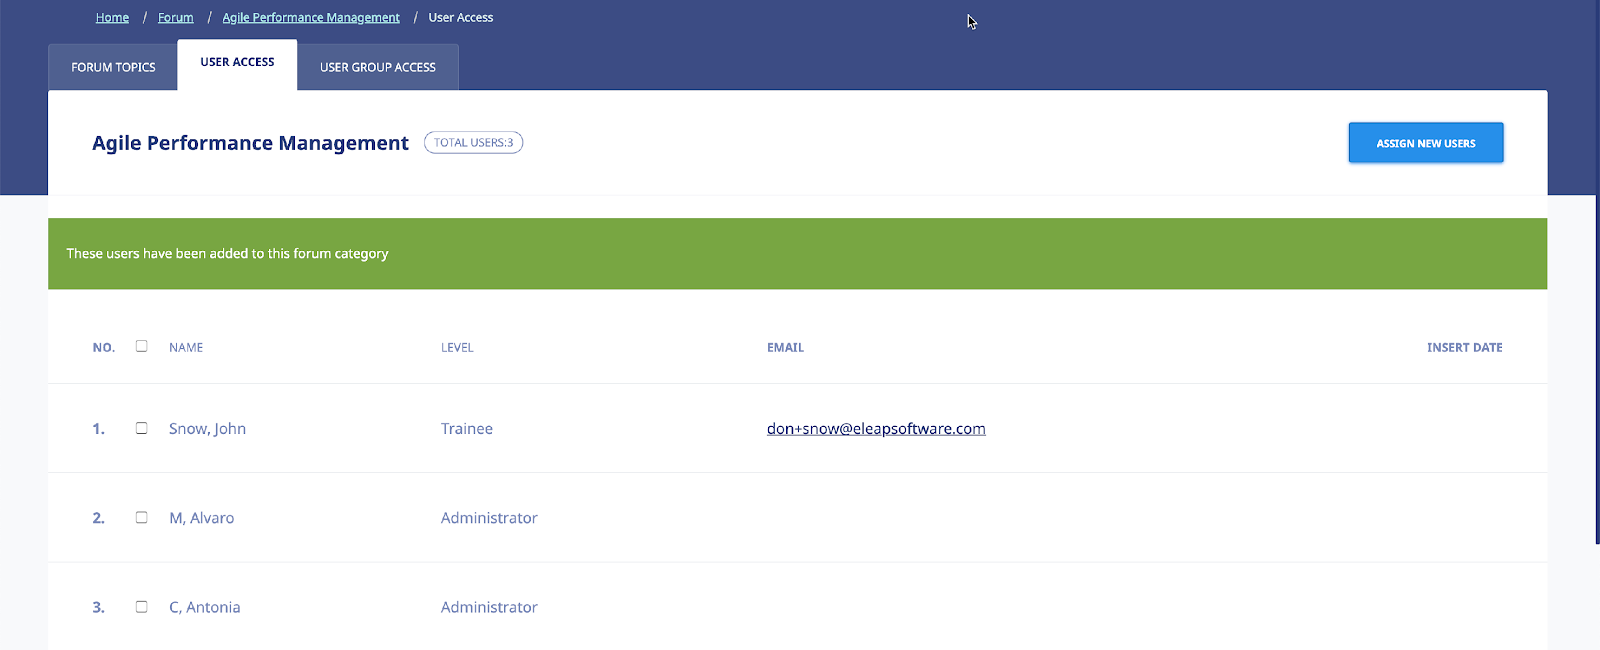
Unassigning User Access to a Forum Category
Selecting the USER ACCESS tab on the Forum Details screen, as shown in the illustration below, allows you to remove a User’s access to that Forum. As shown in the illustration, select the check box for a User on the Users list and click the unassign selected users button.
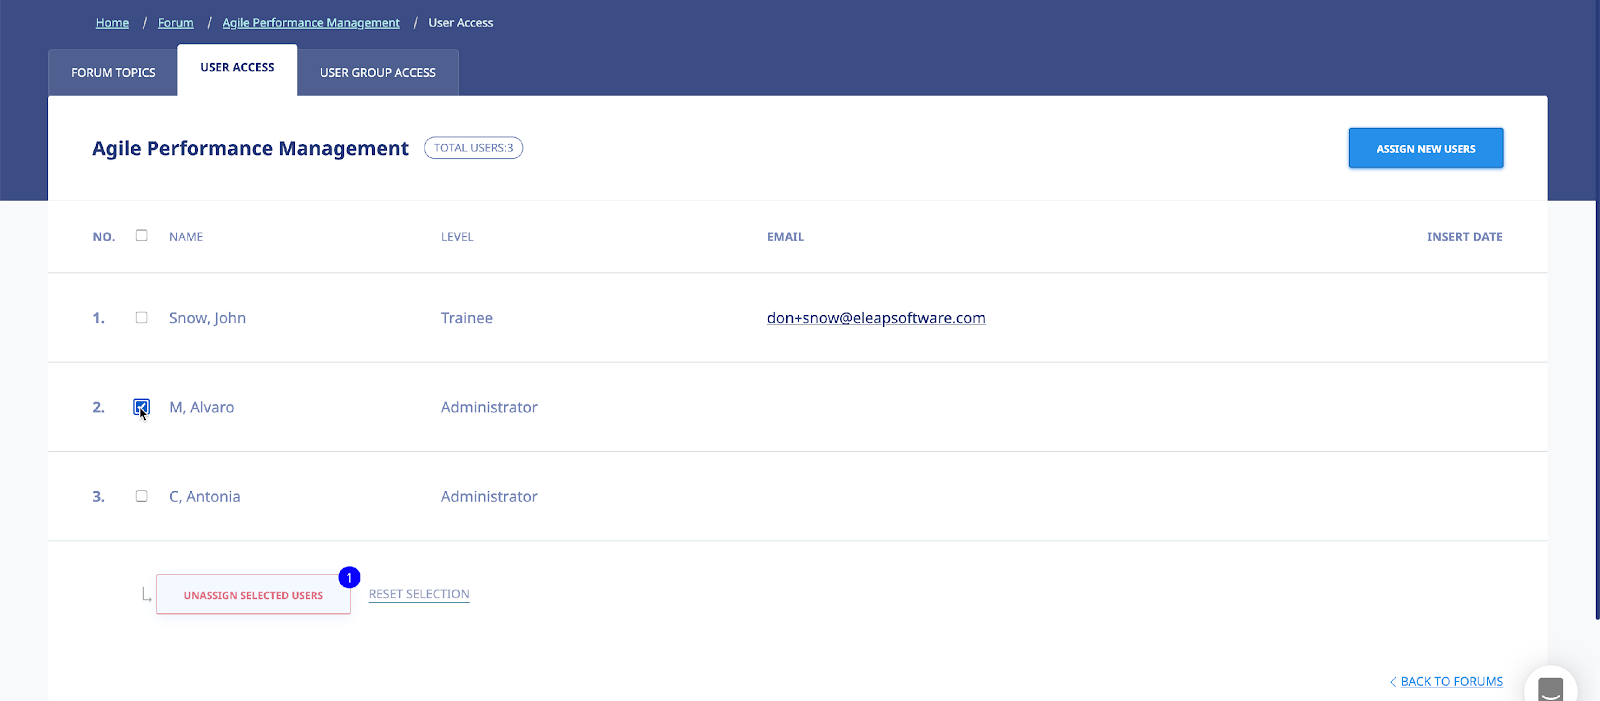
As shown in the following illustration, the system displays a warning message before unassigning the User to ensure that is your intention. Click to proceed with the un-assignment or click to cancel the deletion process.

Assigning User Group Access to a Forum Category
Selecting the tab on the Forum Category Details screen allows you to assign User Groups within the system access to that Forum Category using the User Group Access screen, as shown in the following illustration. To begin, click the assign new User Groups button.

The Add User Groups screen, illustrated below, is displayed.
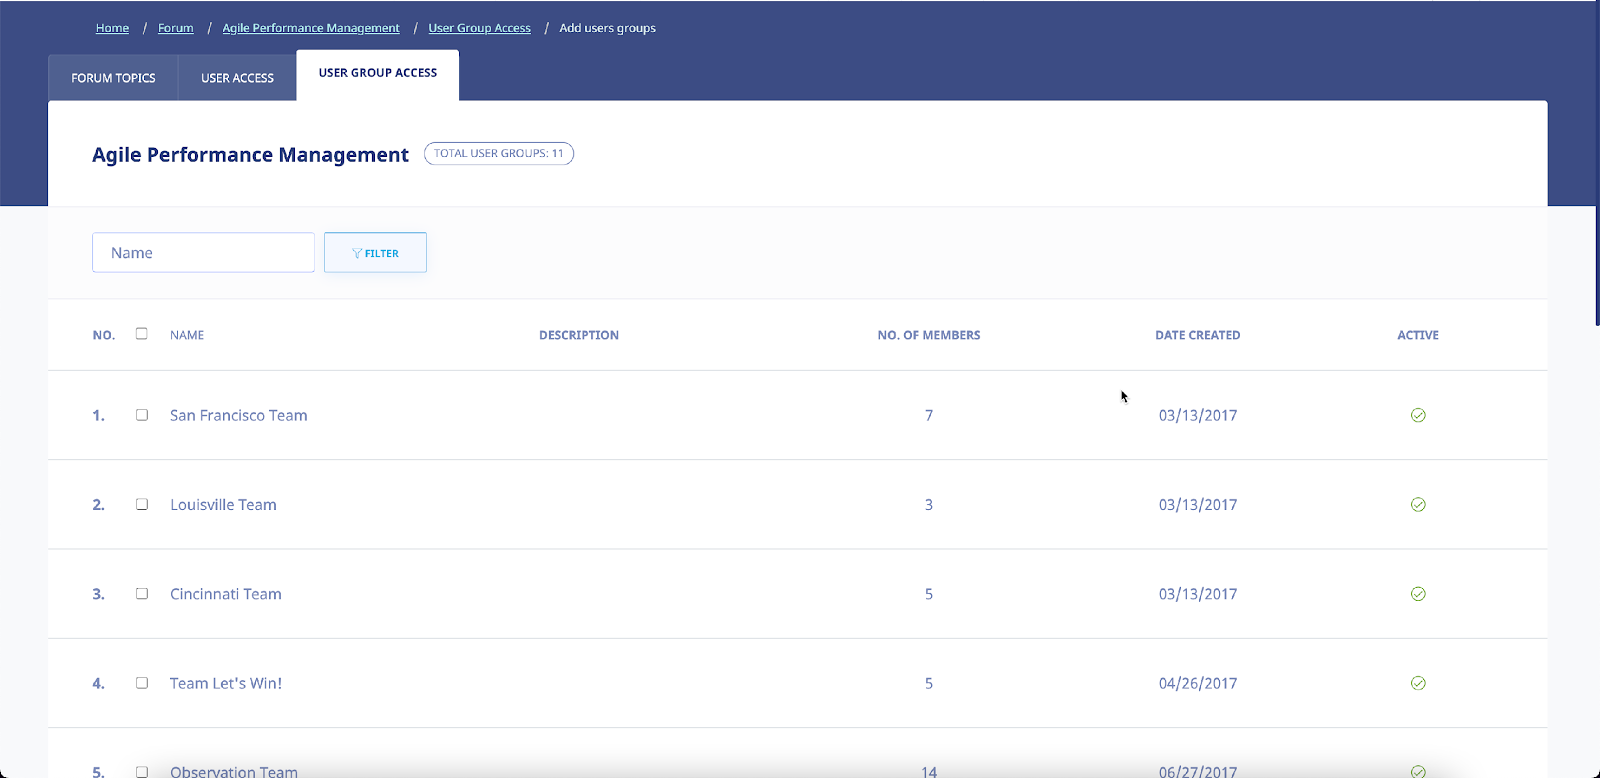
To assign User Groups access to the Forum Category, select their check box on the User Groups list and then click .
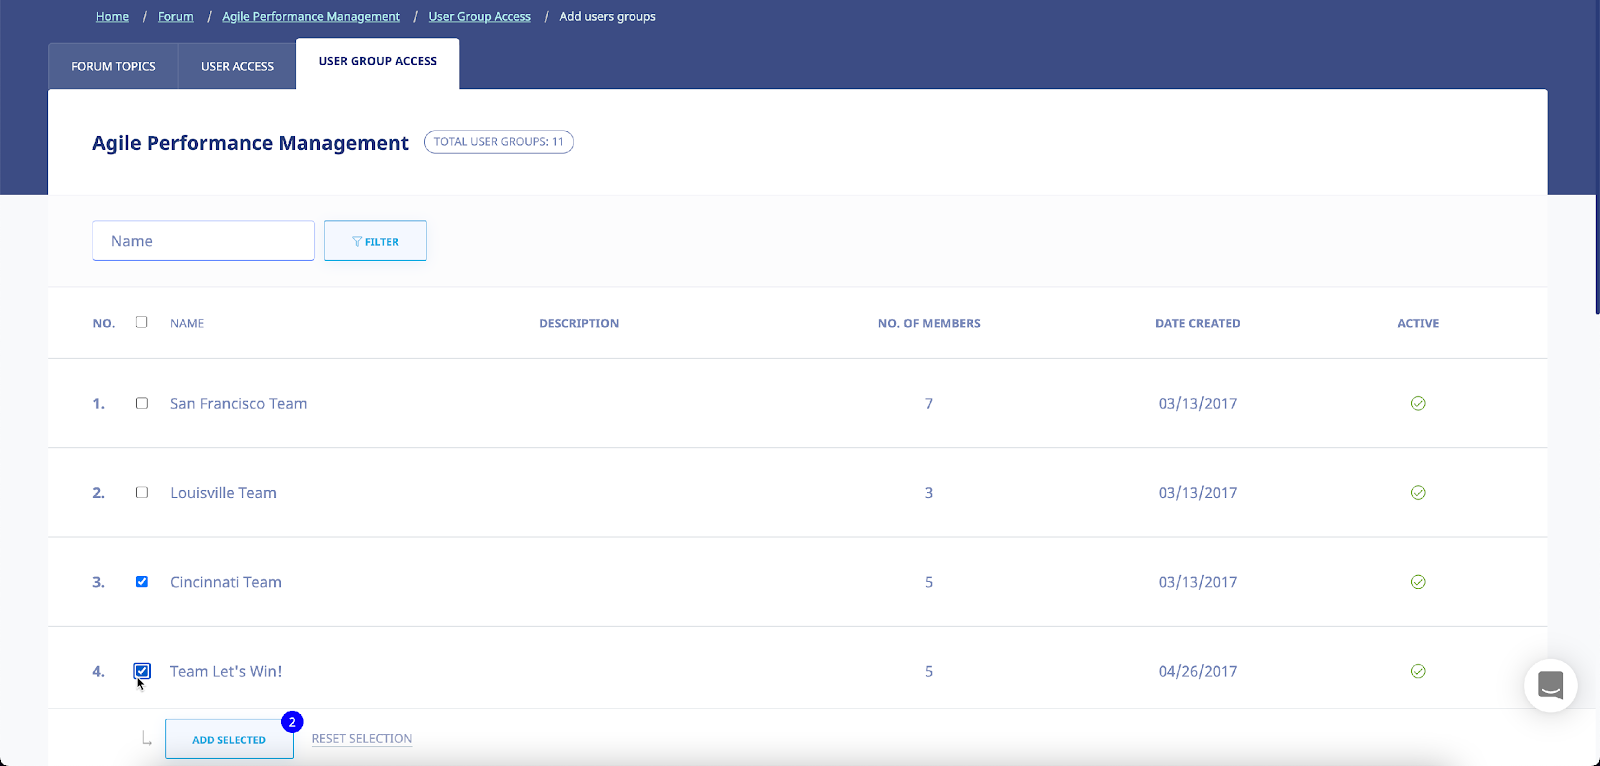
As shown in the following illustration, the User Groups are now assigned access to the Forum Category.
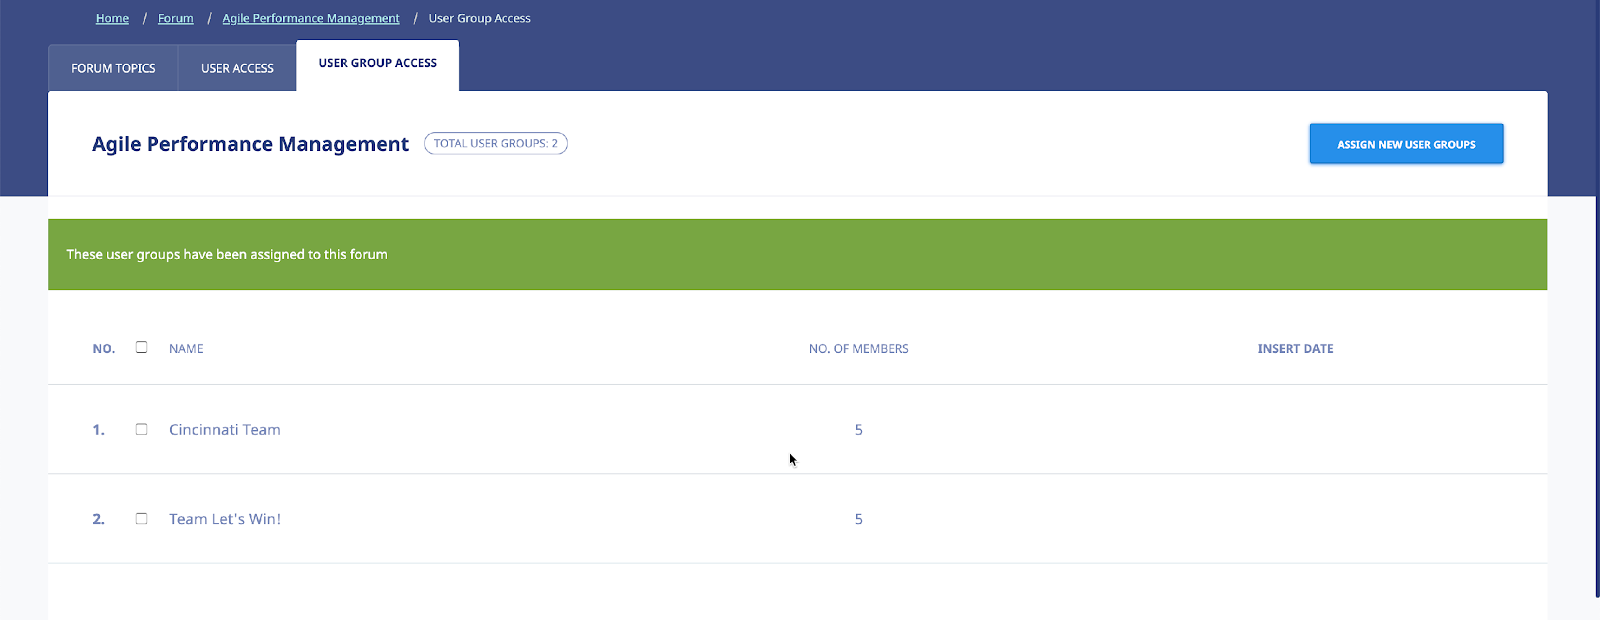
Unassigning User Group Access to a Forum
Selecting the USER GROUP ACCESS tab on the Forum Details screen, as shown in the illustration below, allows you to remove a User Group’s access to that Forum. As shown in the illustration, select the check box for a User Group on the User Groups list and click the delete selected user groups button.
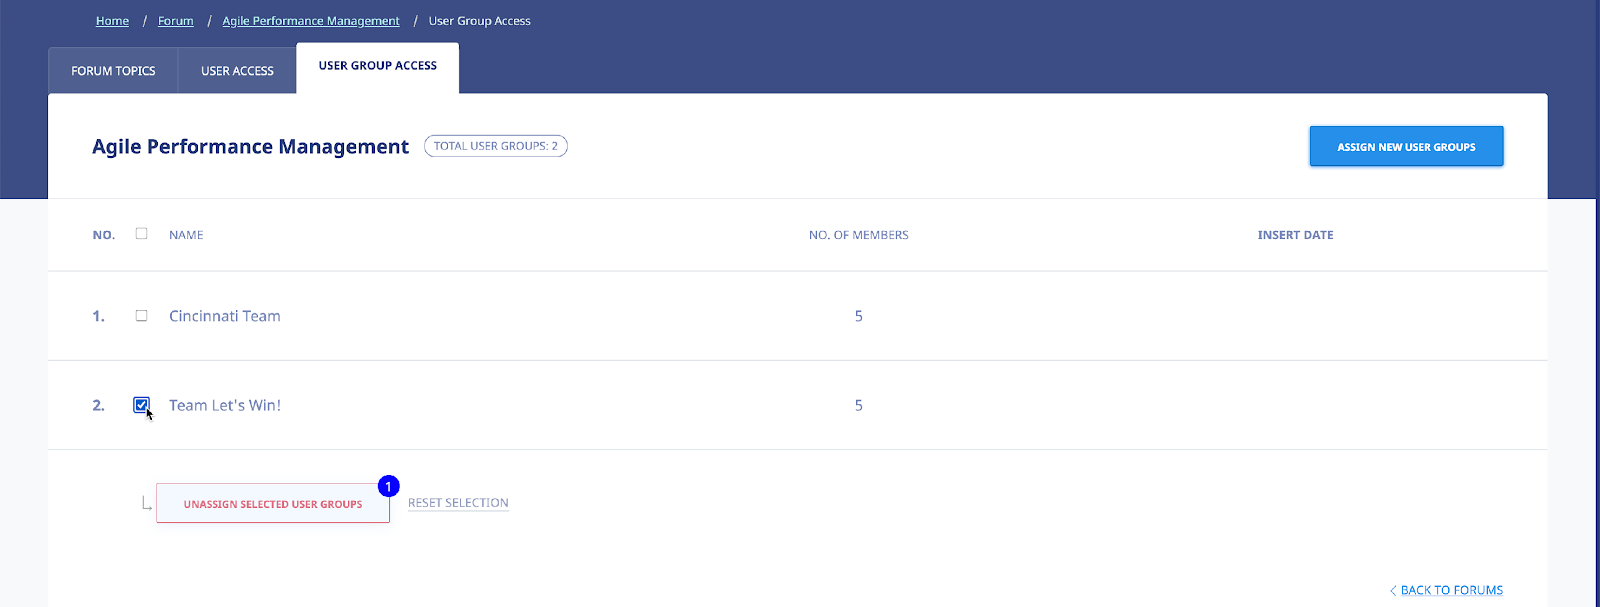
As shown in the illustration below, the system displays a warning message before performing the deletion, to ensure that is your intention. Click to proceed with the deletion process or click to cancel the process.
Reports
Main
Selecting on the menu bar displays the Reports screen, illustrated below. In addition to graphic representations of your Daily User Count, Course Completion Percentages and Quiz Results Percentages shown across the top of the screen, there are also several Report Type statistics displayed over the rest of the screen. Those Report Types are covered over the next few pages of the document.

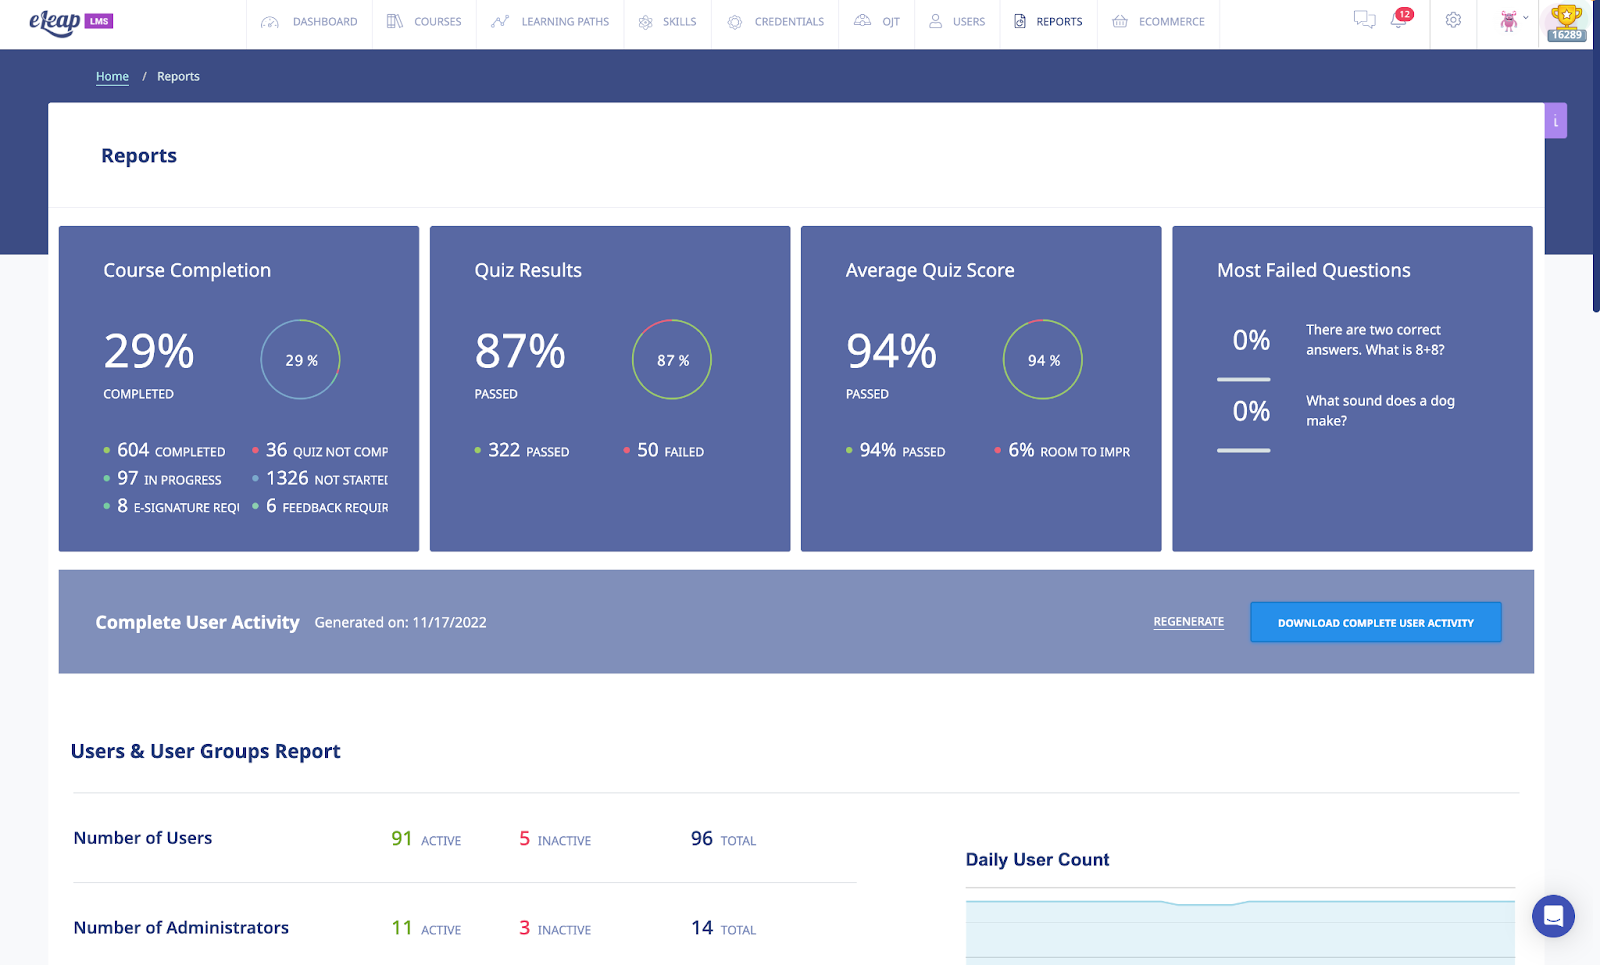
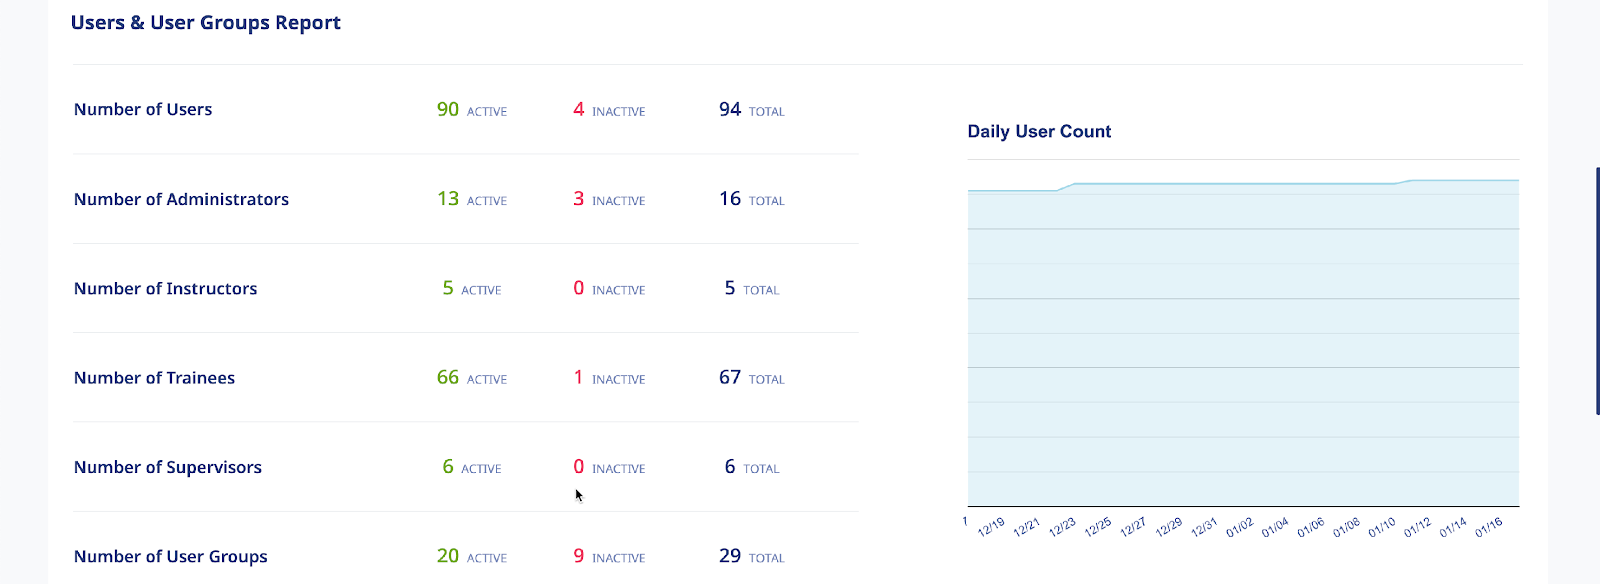
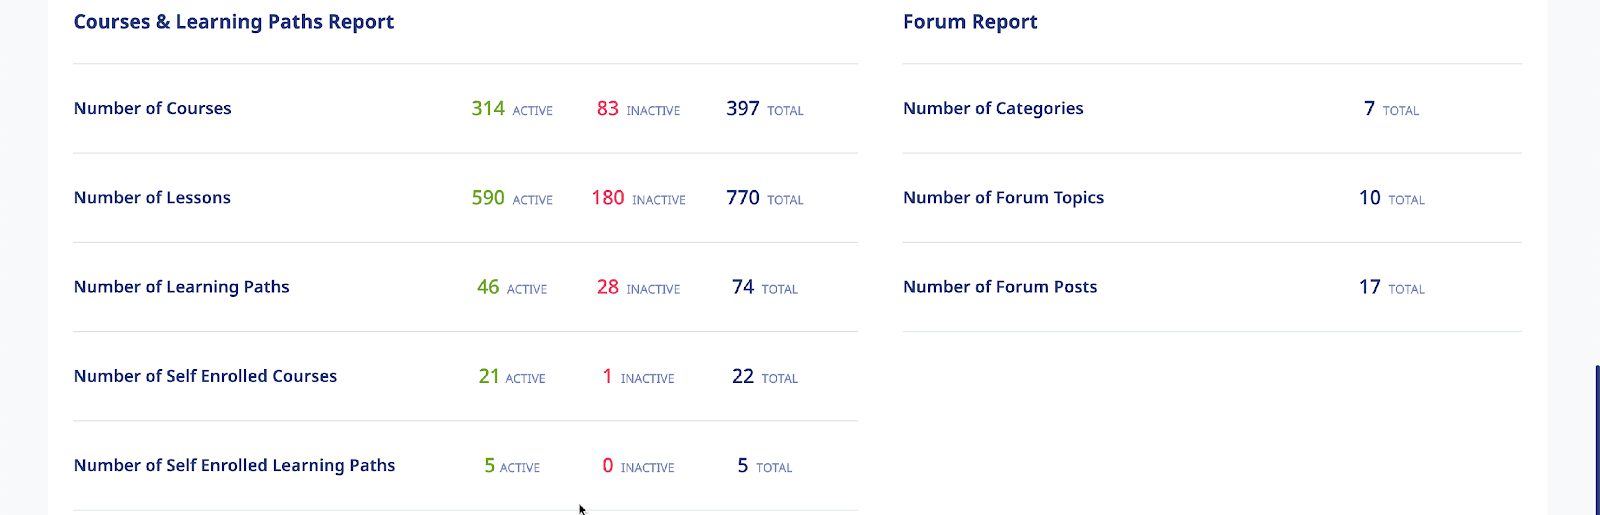
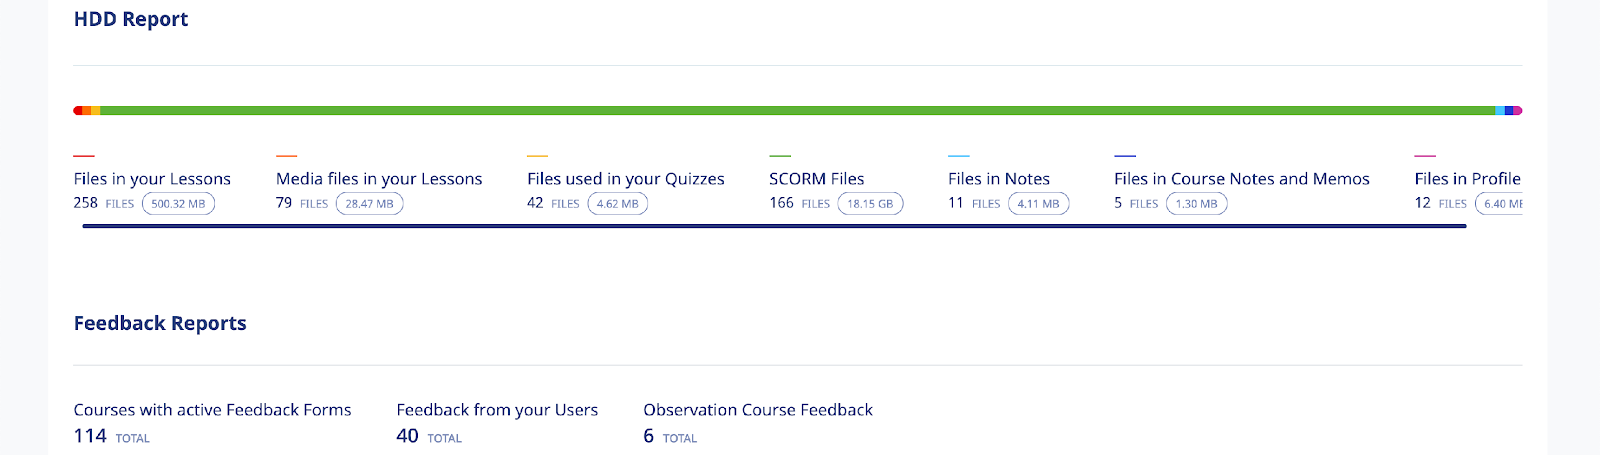
User and User Group Reports
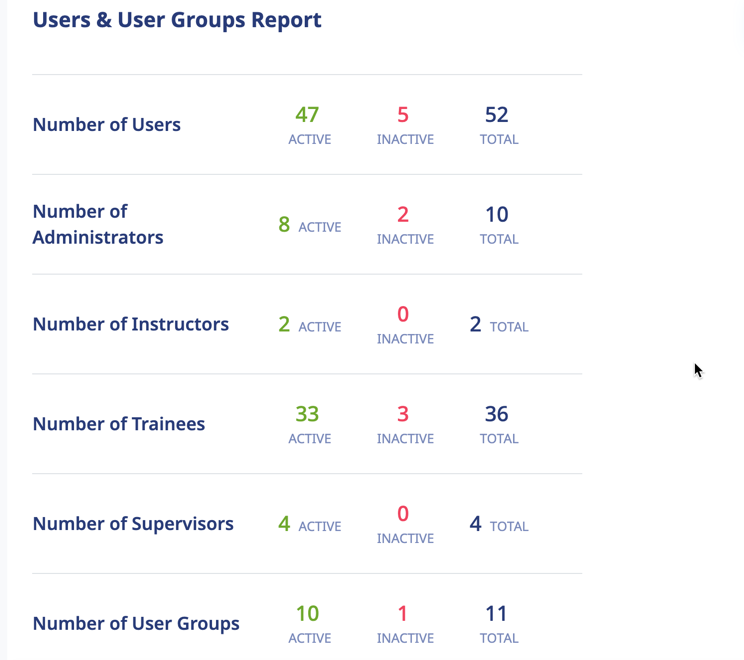
The Users and User Groups portion of the screen displays statistics for and links to the following Reports:
- Number of Users
- Number of Administrators
- Number of Instructors
- Number of Trainees
- Number of User Groups
Each Report Type displays the number of Active, Inactive and Total number of that User Type at the right-hand side of the screen.
Clicking a User Type Report’s Name displays a Registered User Type screen for that Report Type. For example, clicking the Number of Administrators Report Type displays the Registered Administrators screen, as shown in the following illustration.
Additionally, you can select the Download Complete User Activity link to download completion activity for all courses for all users going back 5 years. Depending on the amount of data available the report can be downloaded as an Excel file or a CSV file. You can use the date range selector to specify the date range for this report.
Courses Reports
The Course Reports portion of the Reports screen displays statistics and links to the following Reports:
- Number of Courses
- Number of Lessons
- Number of Learning Paths
Each Report Type displays the number of Active, Inactive and Total number of that Course Type at the right-hand side of the screen.
Clicking a Course Report Type Report’s Name displays the Report Course Type screen for that Report Type. For example, clicking the Number of Training Reports Report Type displays the Learning Paths screen, as shown in the following illustration.
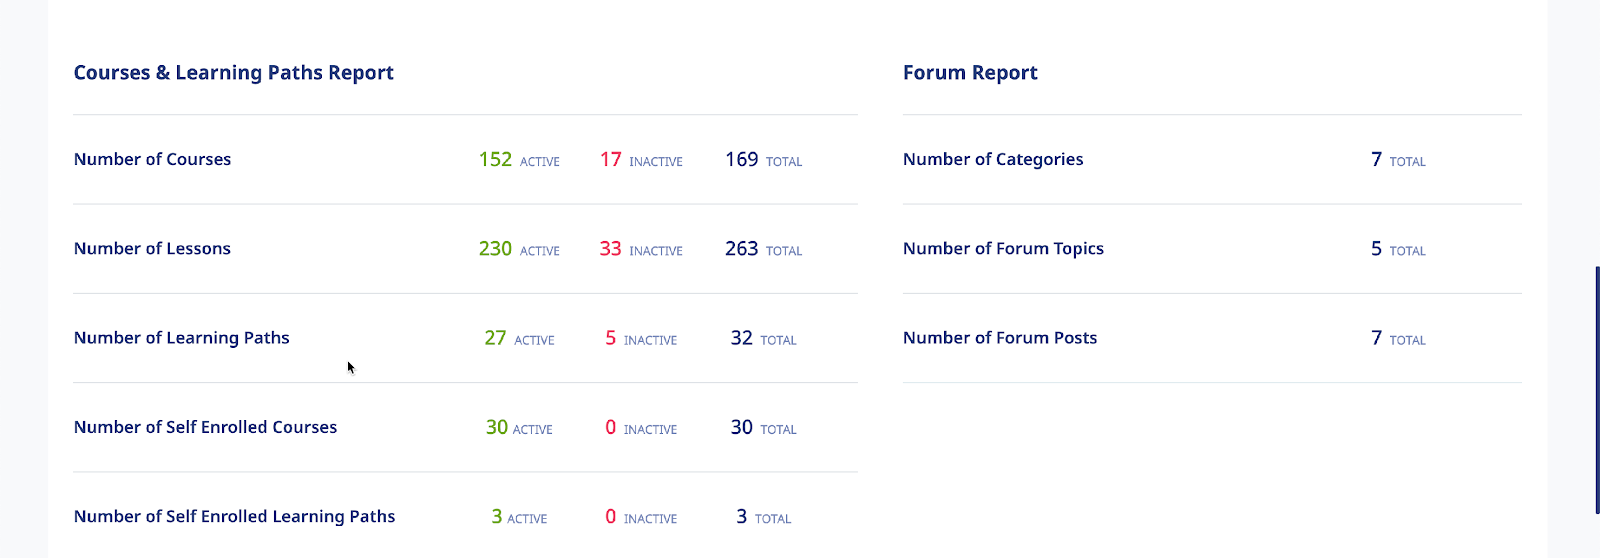
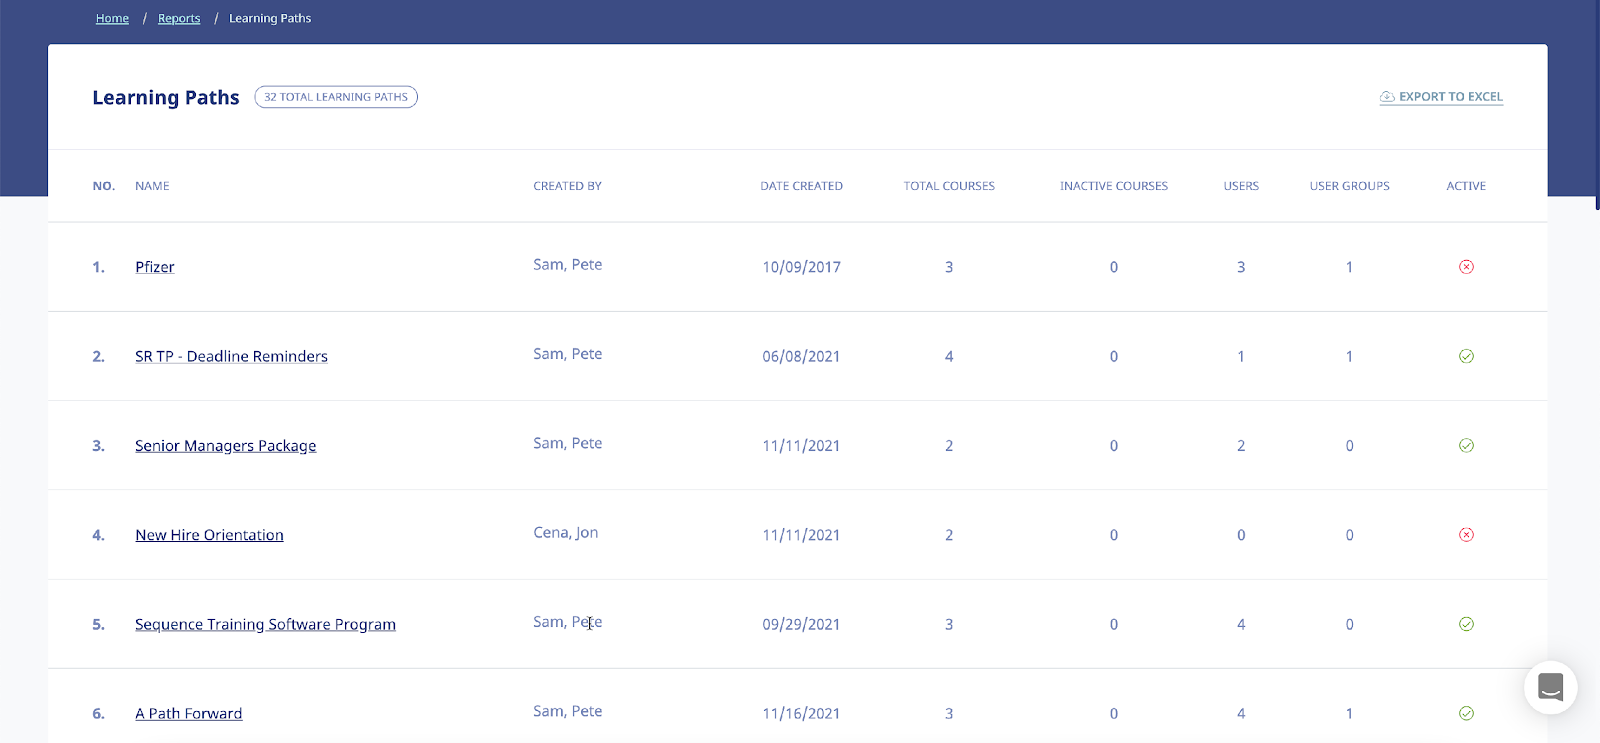
Clicking the link allows you to export this information to a local drive on your computer, when necessary.
Forum Reports
The Forum Reports portion of the Reports screen displays statistics and links to the following Reports:
- Number of Forum Categories
- Number of Forum Topics
- Number of Forum Posts
Each Report Type displays the number of Active, Inactive and Total number of that Forum Type at the right-hand side of the screen.
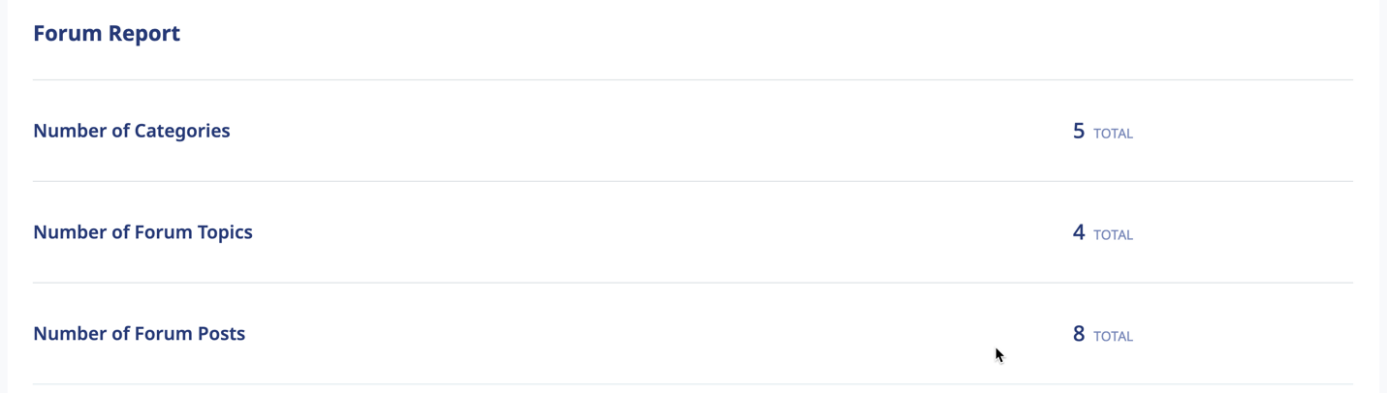
Clicking a Forum Report Type Report’s Name displays a Report on screen for that Report Type. For example, clicking the Number of Forum Categories Report Type displays the Report on Forum Categories screen, as shown in the following illustration.
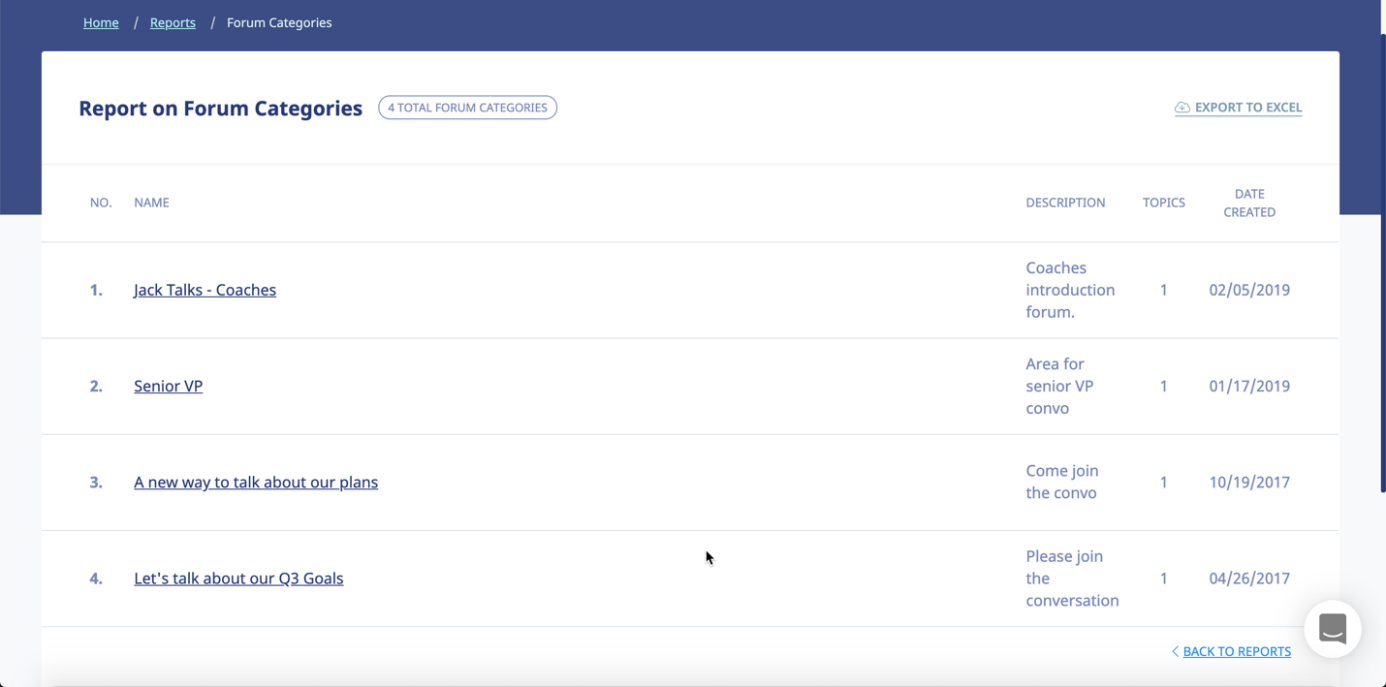
Clicking the link allows you to export this information to a local drive on your computer, when necessary.
HDD Reports
The HDD Reports portion of the Reports screen displays statistics and links to the following Reports:
- Files in your Lessons
- Media Files in your Lessons
- Files used in your Quizzes
- SCORM Files
- Files in My Stuff
- Files in Course Notes and Memos
- Files in Profile Notes
Each Report Type displays the number of Files and the Space taken up for that Forum Type at the right-hand side of the screen.

Clicking a Course Report Type Report’s Name displays a Report screen for that Report Type. For example, clicking the Files in your Lessons Report Type displays the Report: Files in your lessons screen, as shown in the following illustration.
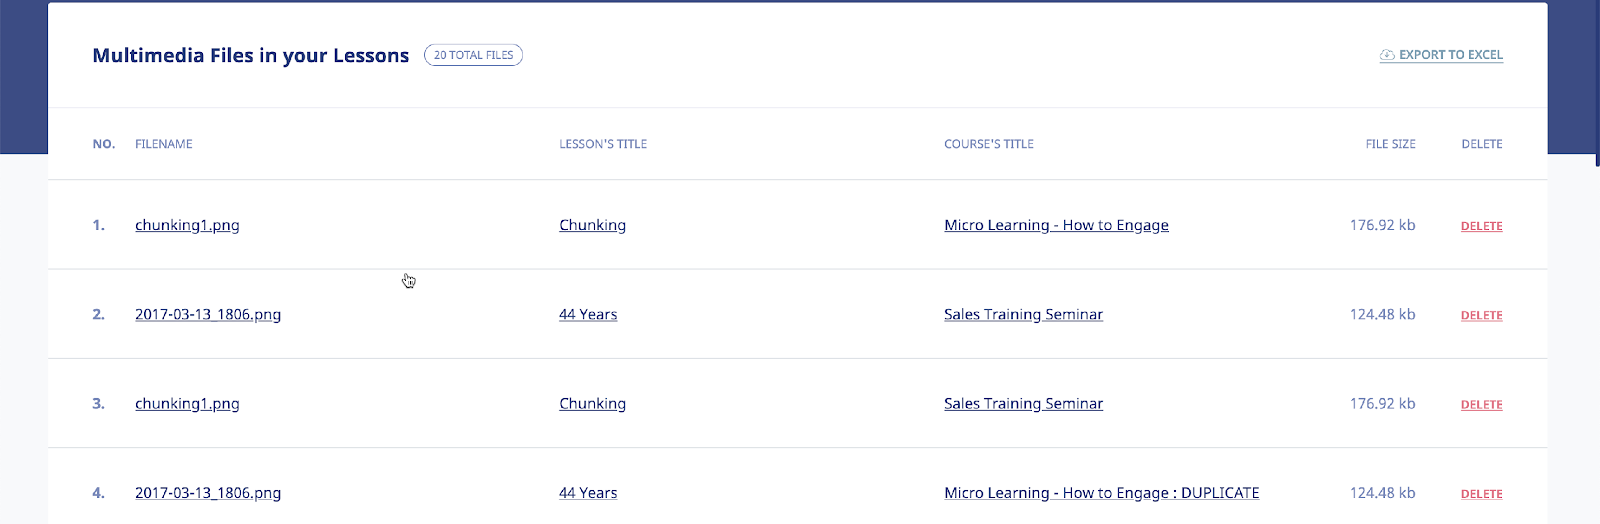
Clicking the link allows you to export this information to a local drive on your computer, when necessary.
Feedback Reports
The Feedback portion of the Reports screen displays statistics and links to the following Reports:
- Courses with Active Feedback Forms
- Feedback from your Users
Each Report Type displays the Total details for each Report Type at the right-hand side of the screen.
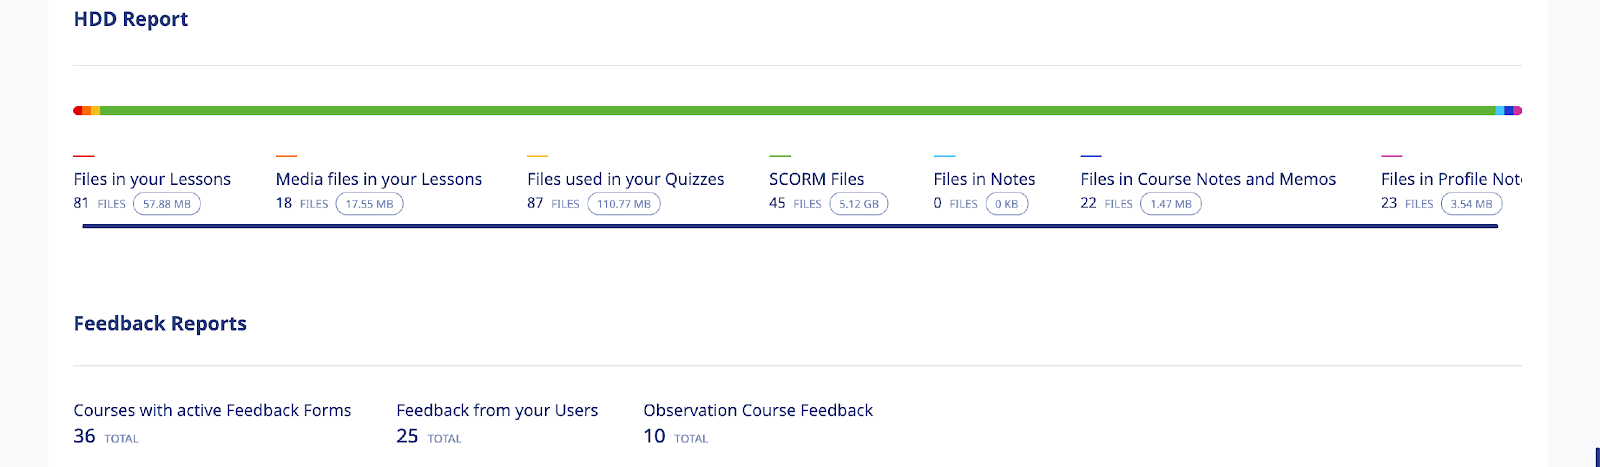
Clicking a Course Report Type Report’s Name displays a Report screen for that Report Type. For example, clicking the Courses with active Feedback Forms Report Type displays the Courses with active feedback screen, as shown in the following illustration.
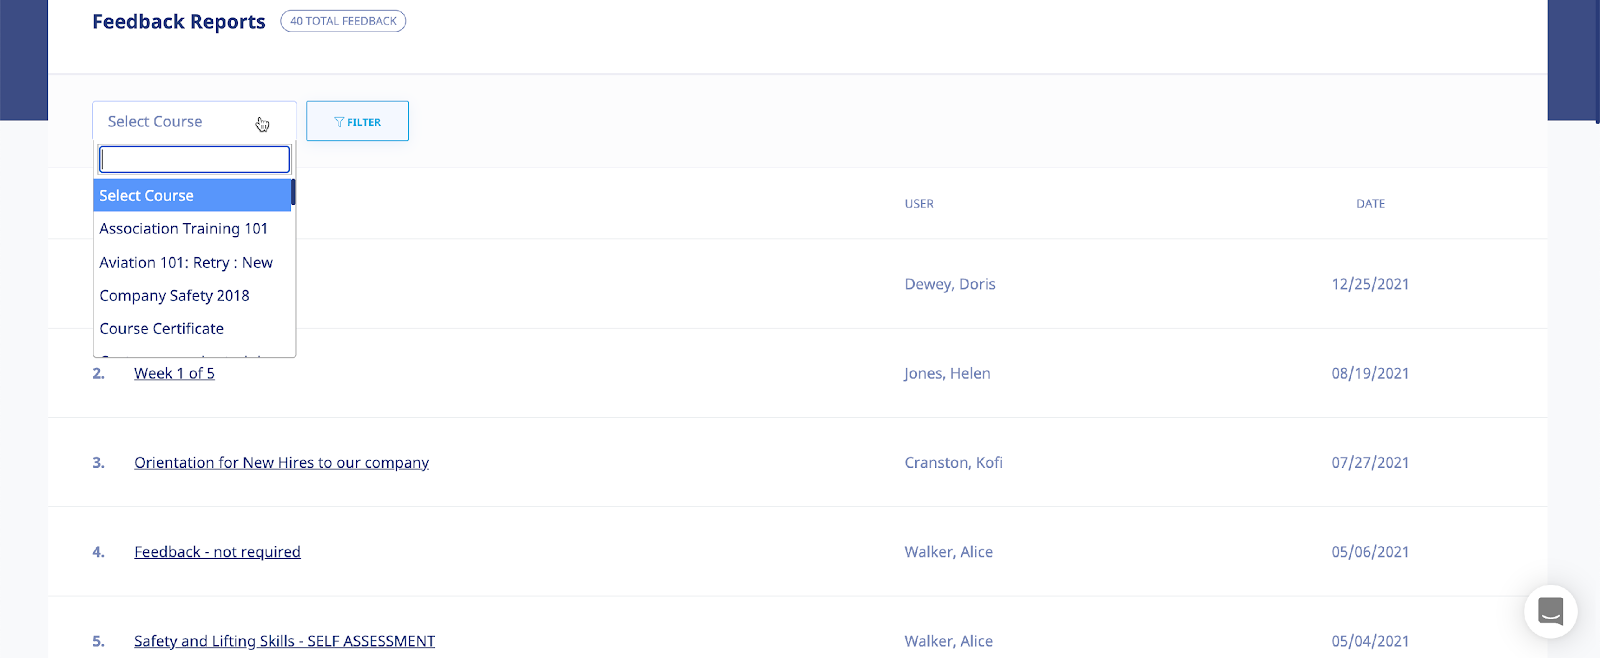
Clicking the link allows you to export this information to a local drive on your computer, when necessary.
My Reports
Add New Item
Clicking the button displays the Report generation system.
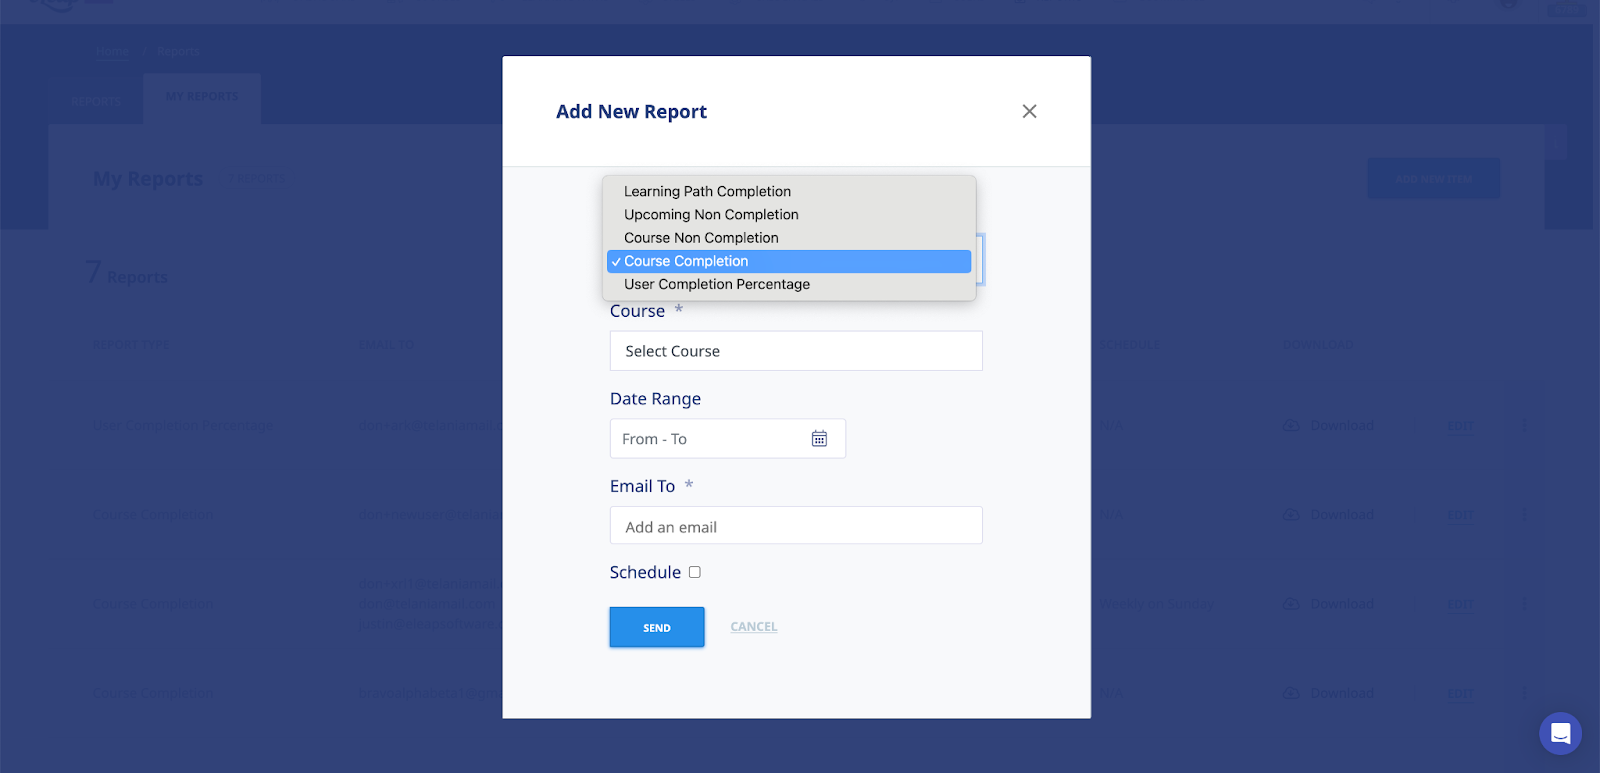
Report Type:
- Course Completion: A report showing course completions for a period of time.
- Course Non Completion: A report showing users/courses which have not been completed for a period of time.
- Upcoming Non Completion: A heads-up report showing courses which have not been completed based on set course deadline.
- Learning Path Completion: A report showing learning path completions for a period of time.
- User Completion Percentage: A report showing completion percentage of users based on the inputted percentage.
Report Target:
- Select a course/learning path: Specify the course or learning path you need data for.
- Select [All Courses], [All Learning Paths]: Get the report for all courses or learning paths.
- Select [User/All Users]: Get a report for a specific user or all users.
Date Range:
- Pre-set period of time: Easily select pre-set time frames like Today, Last 2 days, Last 7 days, Last 30 days etc.
- Custom date range: Select what ever date range you want to generate your reports.
Email to:
- Single Email: Select a single email address to send report to.
- Multiple Emails: Select multiple email addresses to send reports to. Emails can be for any user in your account.
- Non users: Should you want to share reports with non users, simply enter their email address and the system will send them a report.
Schedule:
Clicking the Schedule checkbox [] opens upt the report scheduling options:
- Daily: Emails go out each day ONLY IF the system has data available in the report.
- Weekly: Emails go out on a Weekly basis on the week day selected to receive the report. For example, if reports are scheduled to go out on Wednesdays, the system will send the report each Wednesday morning
- Monthly: If reports are scheduled to go out a Montly basis, the system will send the report on the selected date. For example, if reports are scheduled to go out on a Monthy basis each 17th of the month, that’s what the system will do.
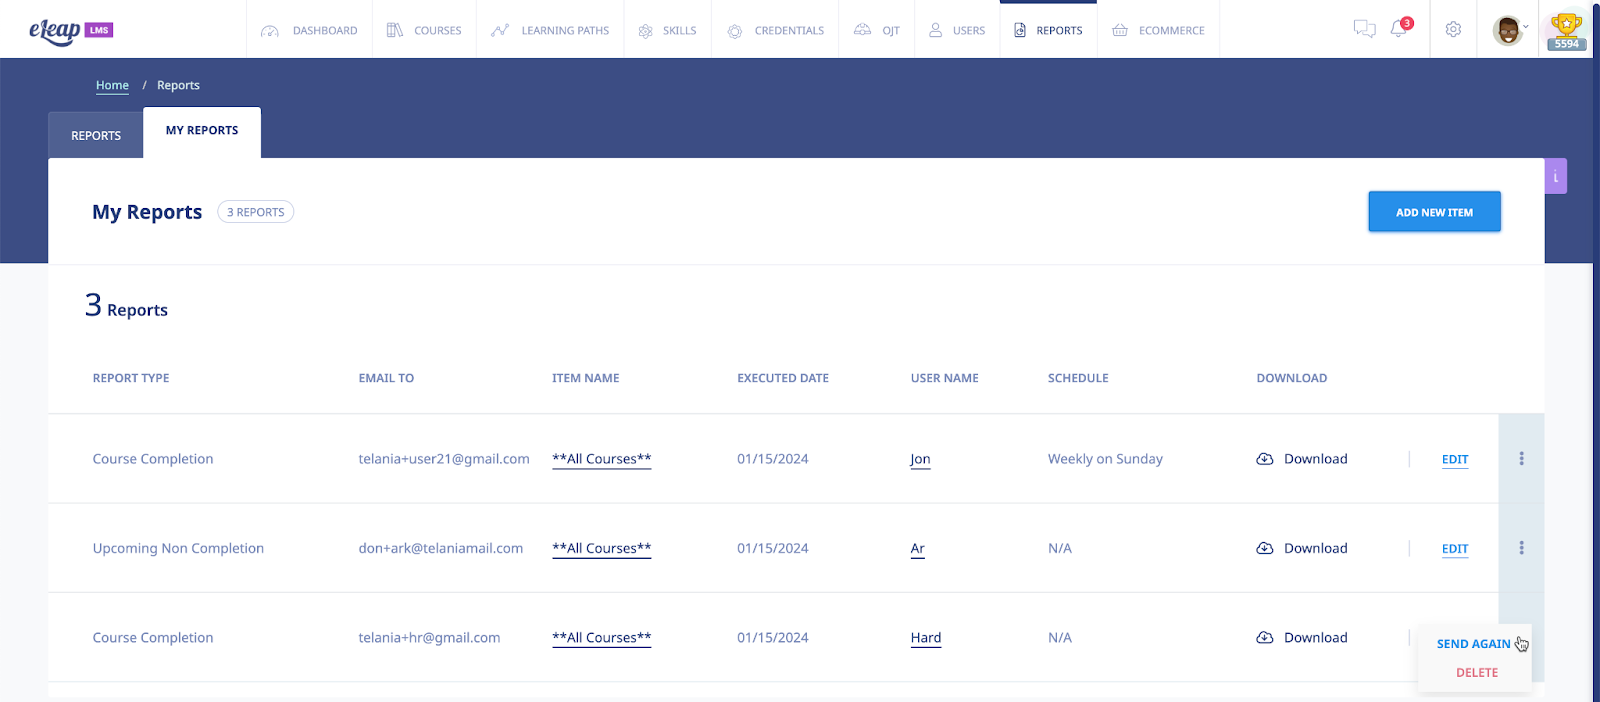
Other My Reports options:
- Download: The download link and icon enable the report creator to download the report without having to wait for an email.
- Edit: An existing report can be edited using the Edit option.
- Ellipsis: Additional settings for:
- Send Again: Report is re-sent if Send Again is clicked.
- Delete: Clicking the Delete option, deletes the created report.
Ecommerce Courses
Selecting on the menu bar displays the eCommerce courses screen, as shown in the following illustration. Each eCommerce course that you create is displayed here on an eCommerce Courses list, with the Course’s Name, Total Sales, Status and Date Created details shown. The Status for the Course indicates whether or not you have activated the course, whether or not eLeaP has activated the course, and whether or not the course is ready to sell. You can filter the Courses displayed on this screen, when it becomes necessary, by entering a Course Name in the Name field, and then clicking . You can also click the access course link within the Action column to access the eCommerce Course details.

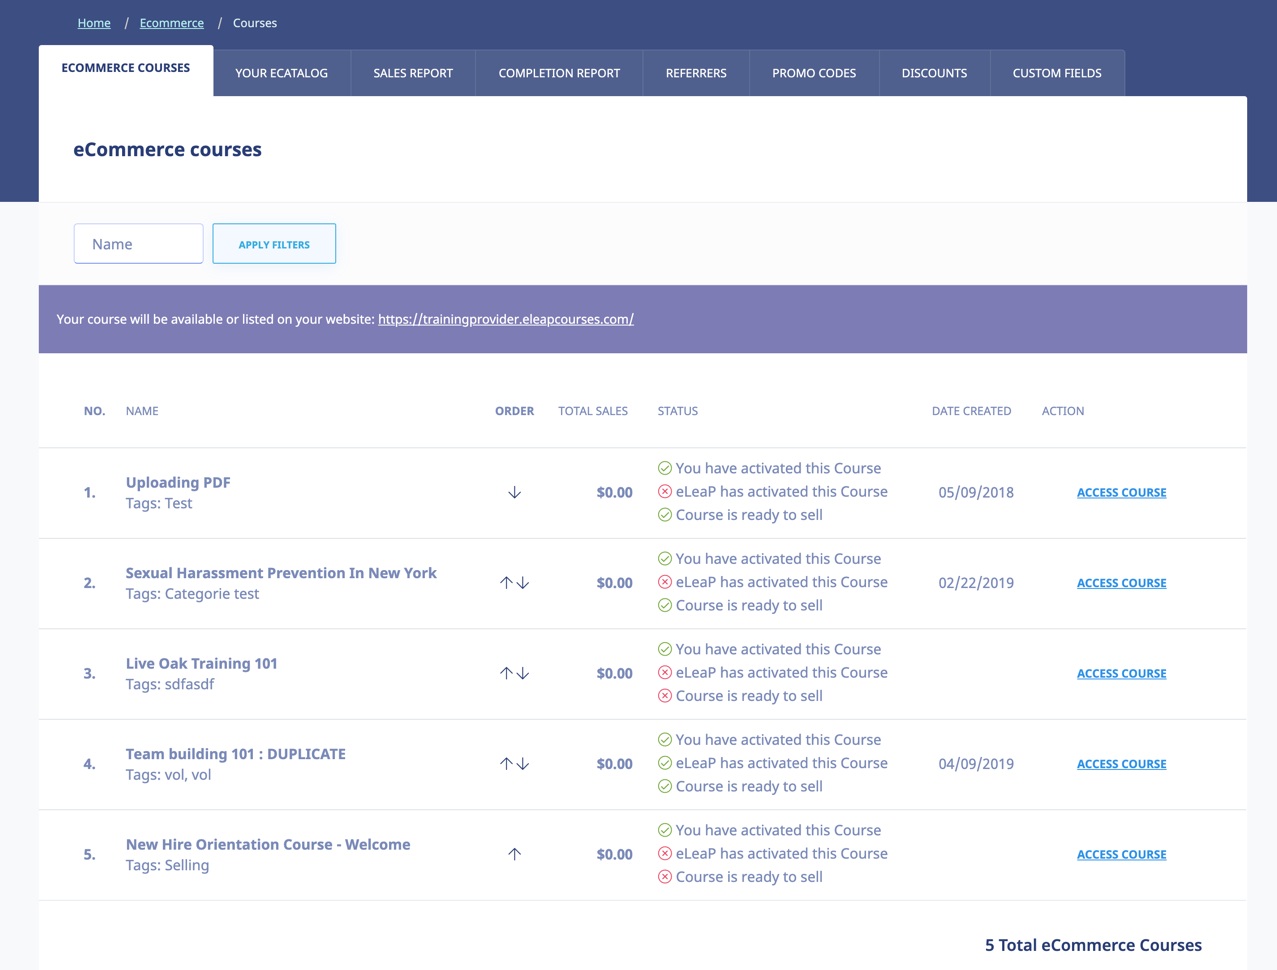
eCommerce Course Details
Selecting the access course link for an eCommerce Course on the eCommerce Courses list displays the ECOMMERCE COURSES tab/screen for that Course, as shown in the following illustration. This screen is where you will configure an eCommerce Course’s settings. Use the steps below to successfully configure an eCommerce Course.
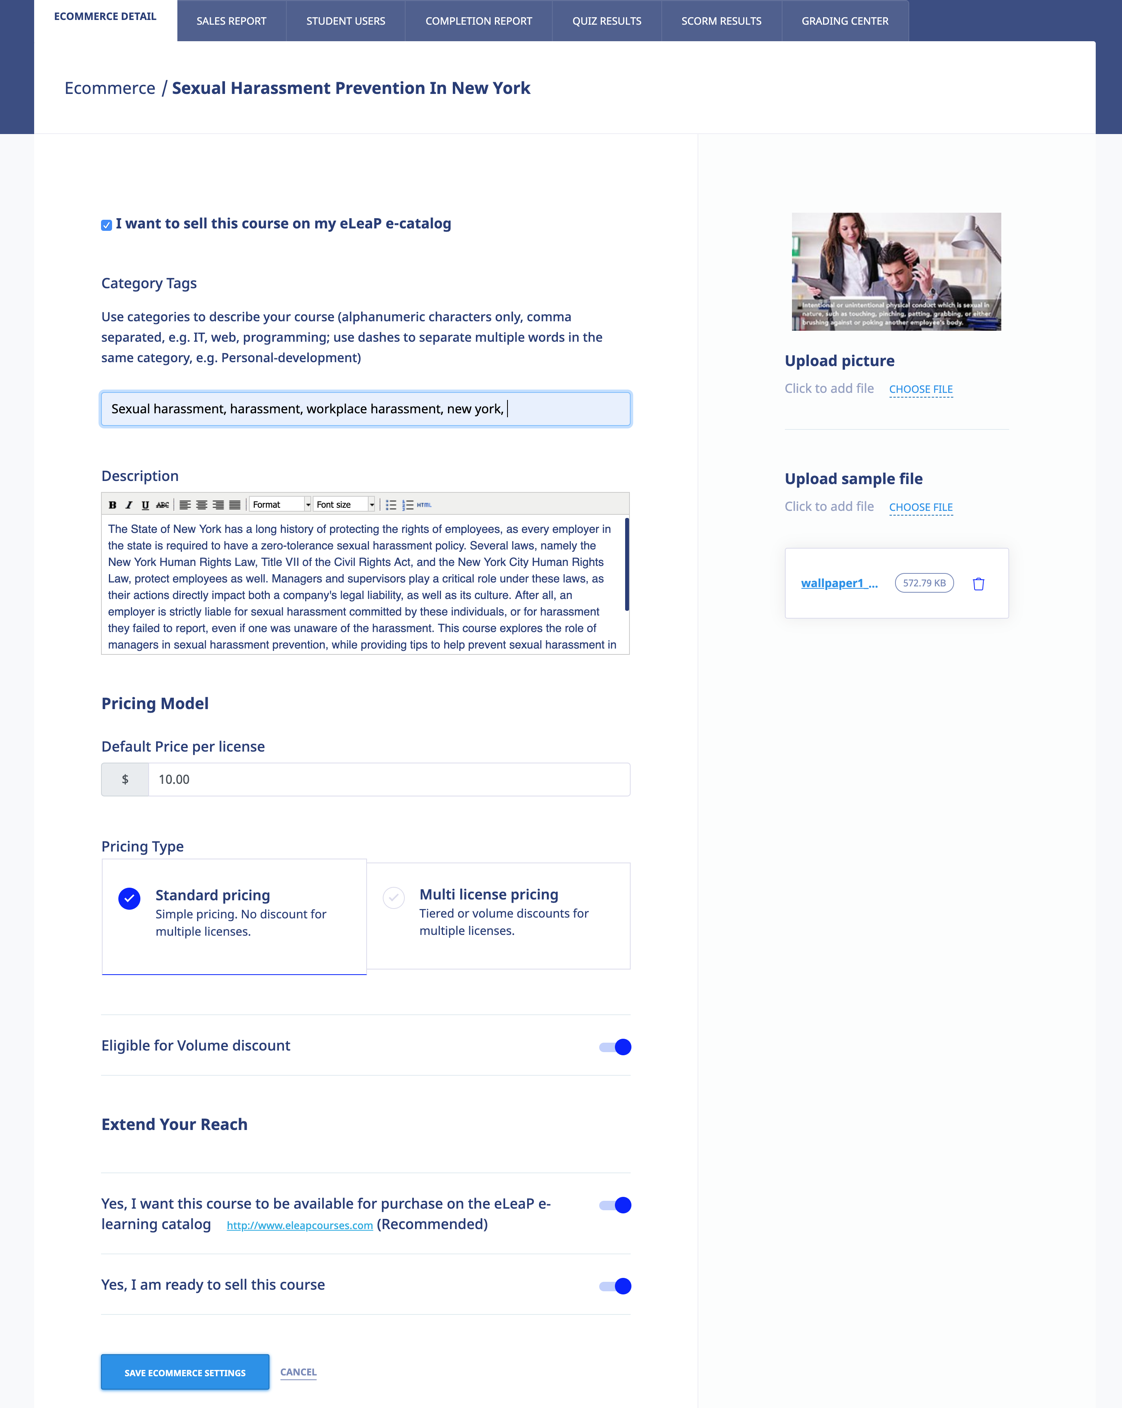
Within the Ecommerce portion of the screen:
- Select or deselect the I want to sell this course on my eLeaP e-catalog check box, depending on whether or not you want to offer the Course via your eCatalog.
Within the Category Tags portion of the screen:
- Use tags to describe your course (alphanumeric characters only, comma separated, e.g., IT, web, programming; use dashes to separate multiple words in the same tag, e.g., Personal-development).
Within the Prices portion of the screen:
- Enter the price for a single user to take a Course in the Course Price for a single user is field.
Note: You can create your own multi-user price based on the number of users below. For example, for a total number of users between 1 and 150, the price per user is $50. You can also change to Volume-based multi-license pricing.
- To use the Tiered or Volume option, select the Multi-license pricing option.
- Select either the Sum of previous order and new order total or the only new order total radio button as the Calculate upgrade pricing using method option, as appropriate to this Course.
- Enter the upper range value in the Upper Range field for the number of Users and then click . The pricing will be added to the Pricing Structure. Once pricing has been added, you can click the delete link to remove it.
Note: Since pricing is cumulative, deleting a single price level will void all other price levels.
Within the Sample File portion of the screen:
- Click the link to upload sample file. A sample file is a powerful marketing addition. eLeaP requires a course sample for display and marketing purposes. Samples can be in PDF format.
- Click the link to upload picture link to associate an image with the Course.
- Select the Yes, I want this course to be available for purchase on the eLeaP e-learning catalog http://www.eleapcourses.com (Recommended) check box and/or the Yes, I am ready to sell this course check box, as appropriate to your circumstances.
- Click to save your changes to the system.

Your ECatalog
Selecting the YOUR ECATALOG tab on the eCommerce screen’s menu bar displays the Your eCatalog screen, illustrated below. This screen allows you to add a description and miscellaneous information about your business/organization. You can also add a company motto and tagline to configure your eCatalog.
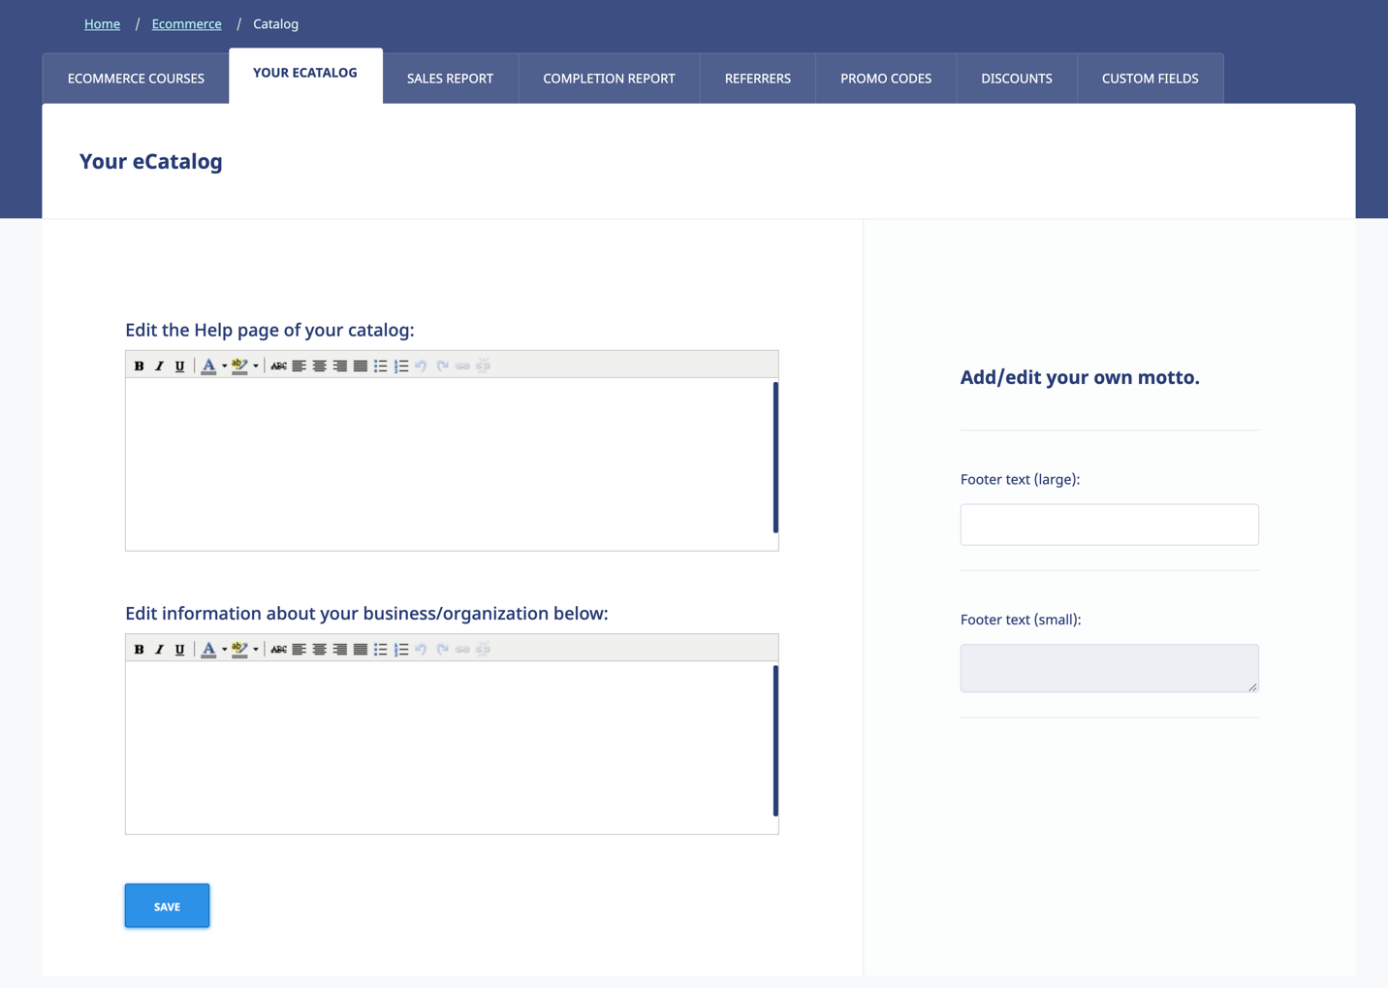
- Add information to be displayed on your Catalog Help page. This will help your customers get basic help and assistance. Of course, eLeaP provides your customers with customer service.
- Add information about your business/organization within the Add/edit a short description of your business/organization box. Use any of the functionality within the Content Editor to format this information.
- Within the Add/edit your own motto portion of the screen, enter a Title and a Motto within their respective fields to synopsize what your business/organization stands for.
- Click to save your changes to the system.
Sales Report
Selecting the SALES REPORT tab on the Ecommerce screen displays the Sales Report screen, shown in the following illustration. This screen shows the Course, No. of Licenses, No. of Sales and Total Amount details associated with a Course’s sales. Filter what displays on this screen by entering From and To dates, either entering the dates manually, or using the Calendar to select them, and clicking .
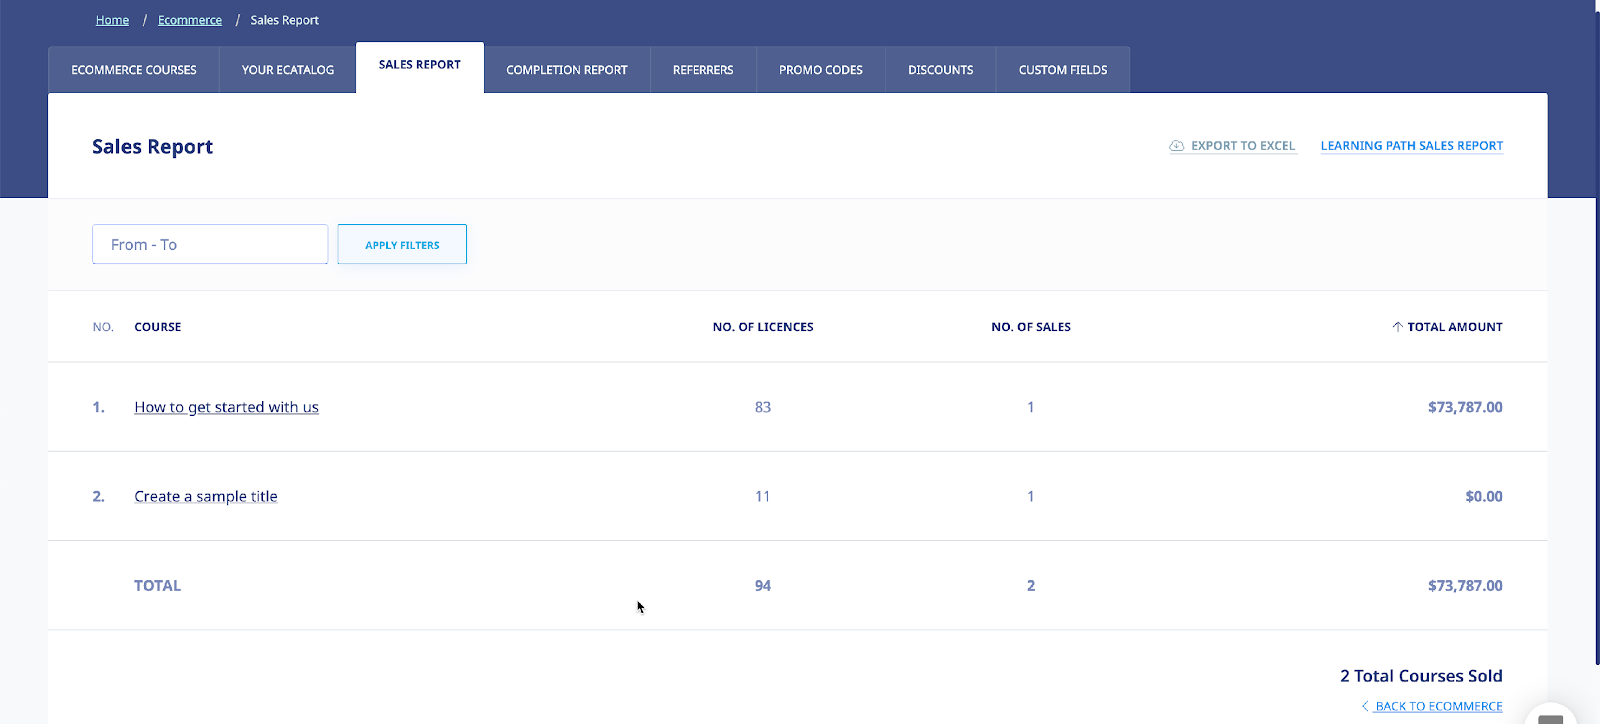
Viewing Course Details
Clicking on a Course Name on the Courses list displays the Course Details screen for that Course, as shown in the following illustration. This screen displays the Portal, Organization, Full Name, Email, Date, Number of Licenses and Amount details for each sale of that particular Course.
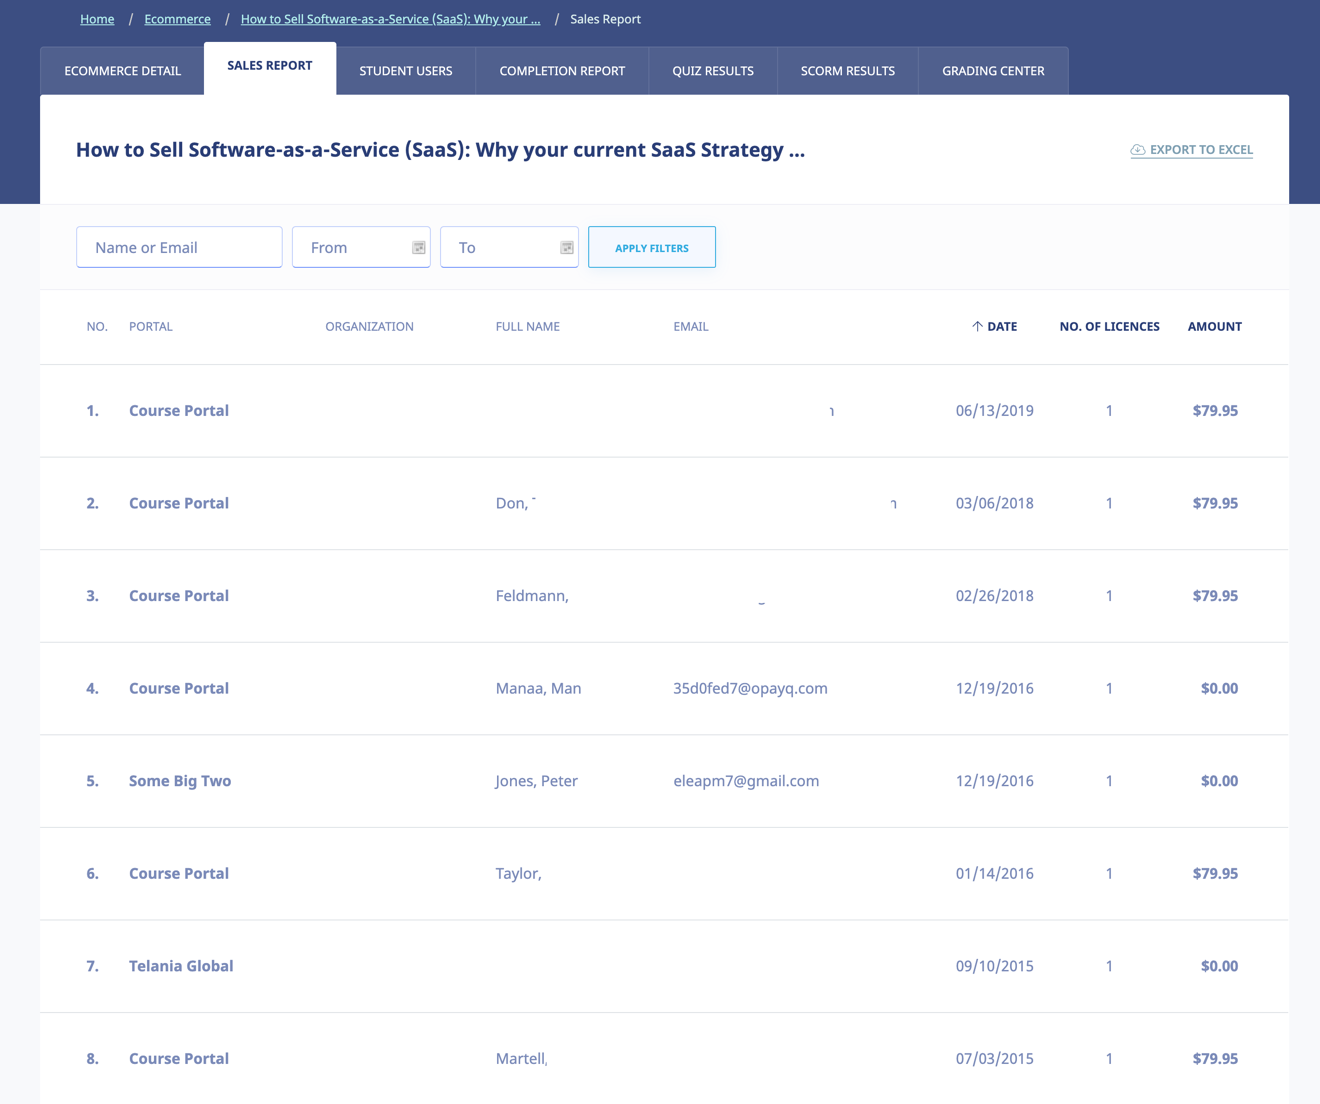
Exporting Sales Details
Click the link on the Sales Details screen to export Sales Details to a local drive on your computer.
Student Users
Selecting the STUDENT USERS tab within the Ecommerce screen displays the Student Users screen, illustrated below. This screen displays the Name, Email, Date Purchased and Date Assigned details for each Student on the Student Users list who has purchased this particular Course.
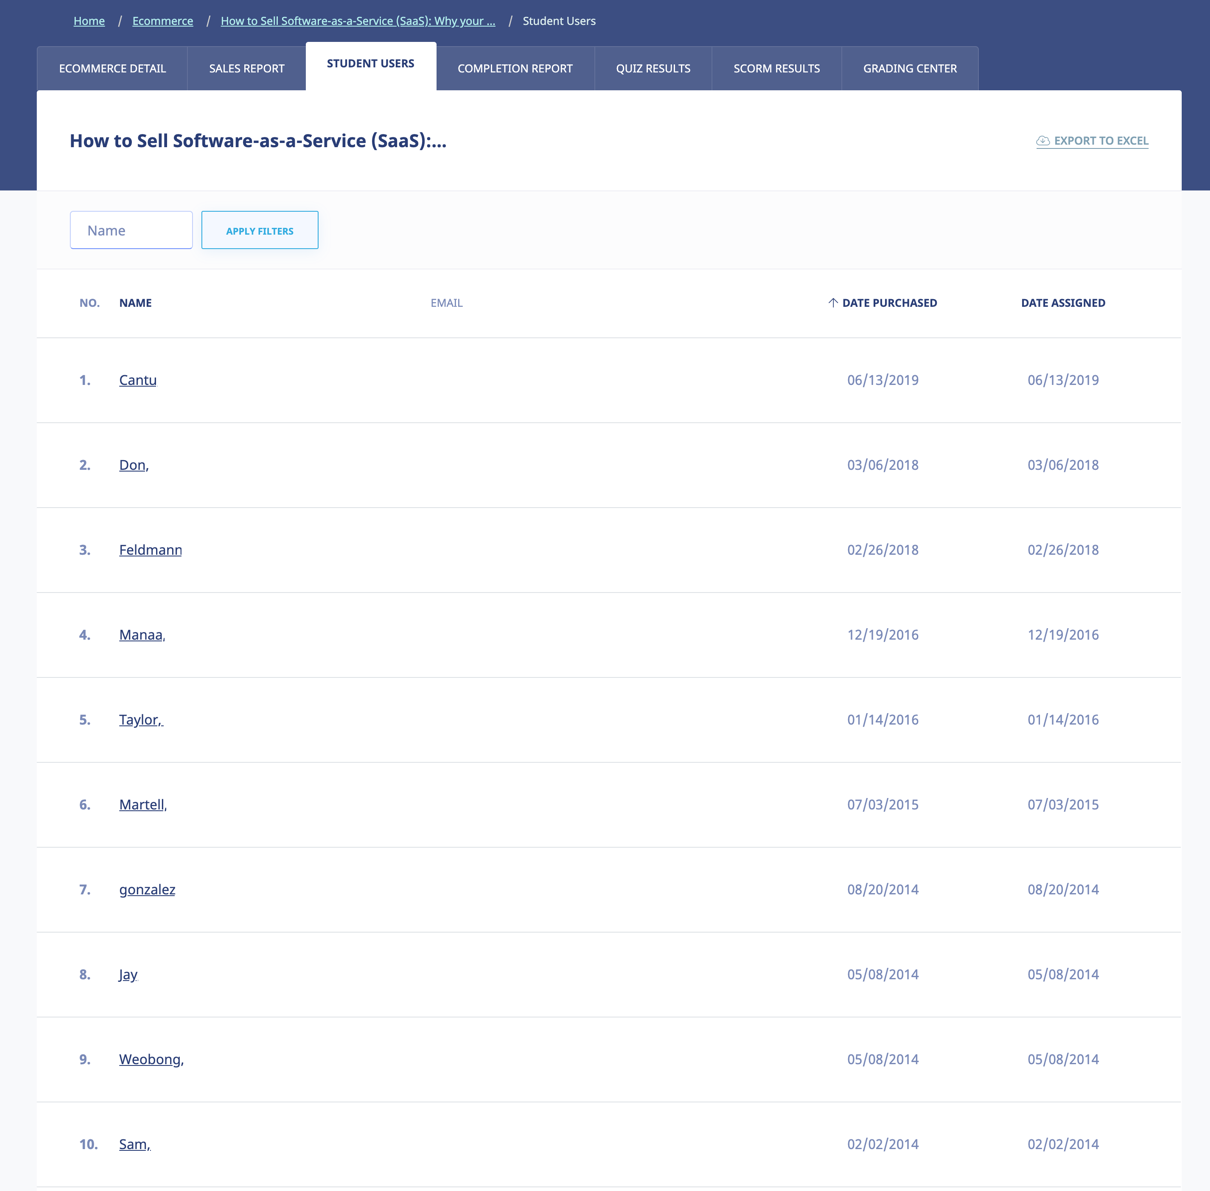
Viewing Student User Details
Selecting a Name on the Student Users list displays the Student User Details screen for that Student User. In addition to the Student User’s First Name, Last Name and Email details, this screen shows you the User Activity, Assigned Courses and Completed Quizzes associated with that Student User.
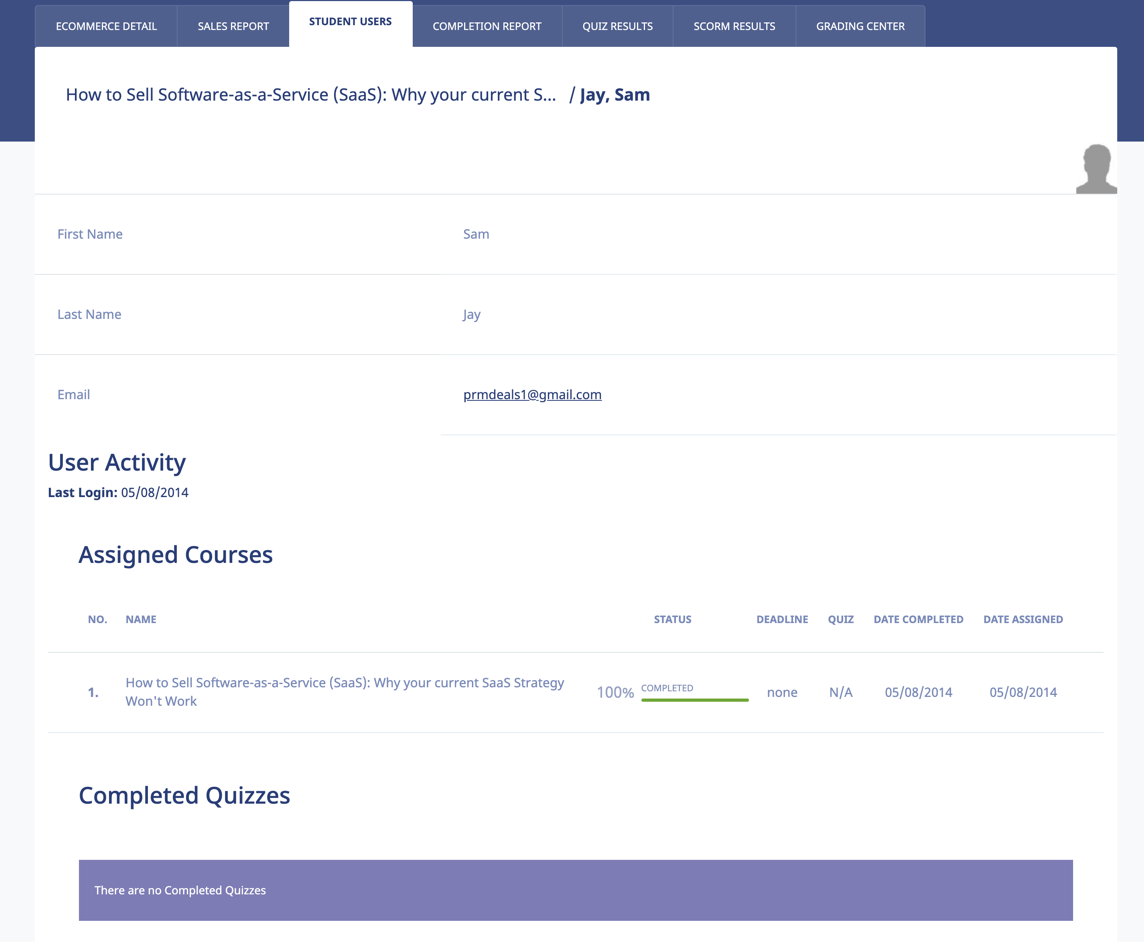
Exporting Student User Details
Selecting the link on the Student Users screen allows you to export all of this data to a local drive on your computer.
Completion Report
Selecting the tab within the Ecommerce screen displays the Completion Report screen, illustrated below. Each Completion Report on the Completion Reports list displays the Name and Users details for that Report.

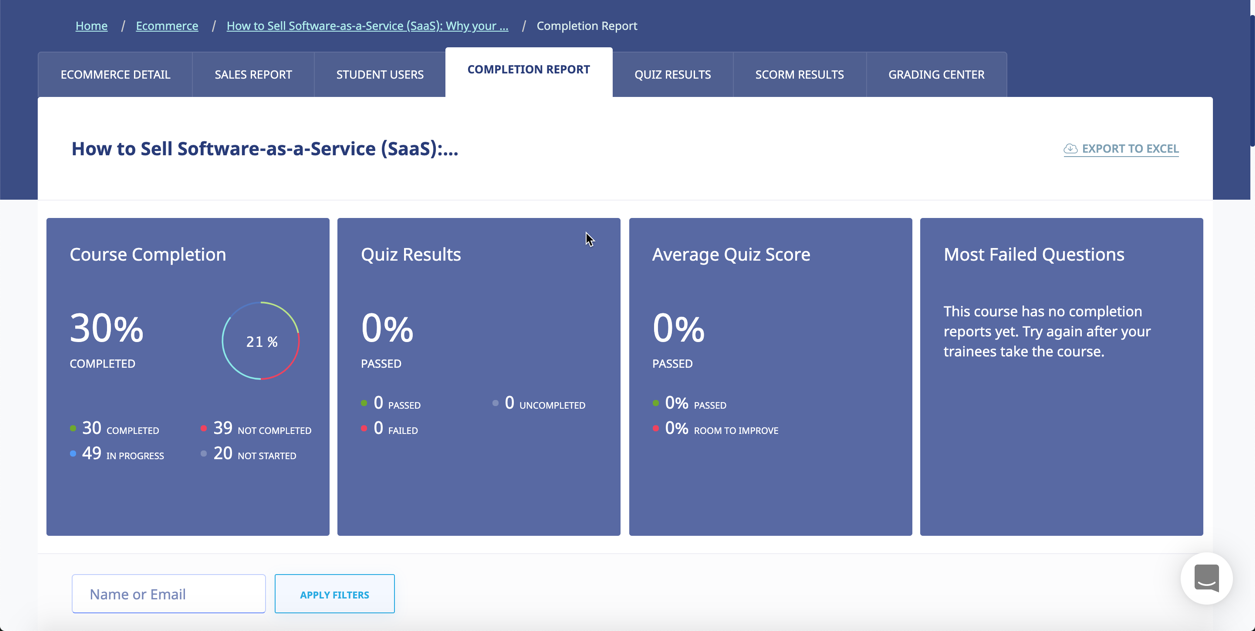
Clicking on the Completion Report Name displays the Completion Report Details screen, listing each of the Course’s registered Students, including the Name, Organization, Progress, Quiz, Quiz Completed and Deadline details for that Student.
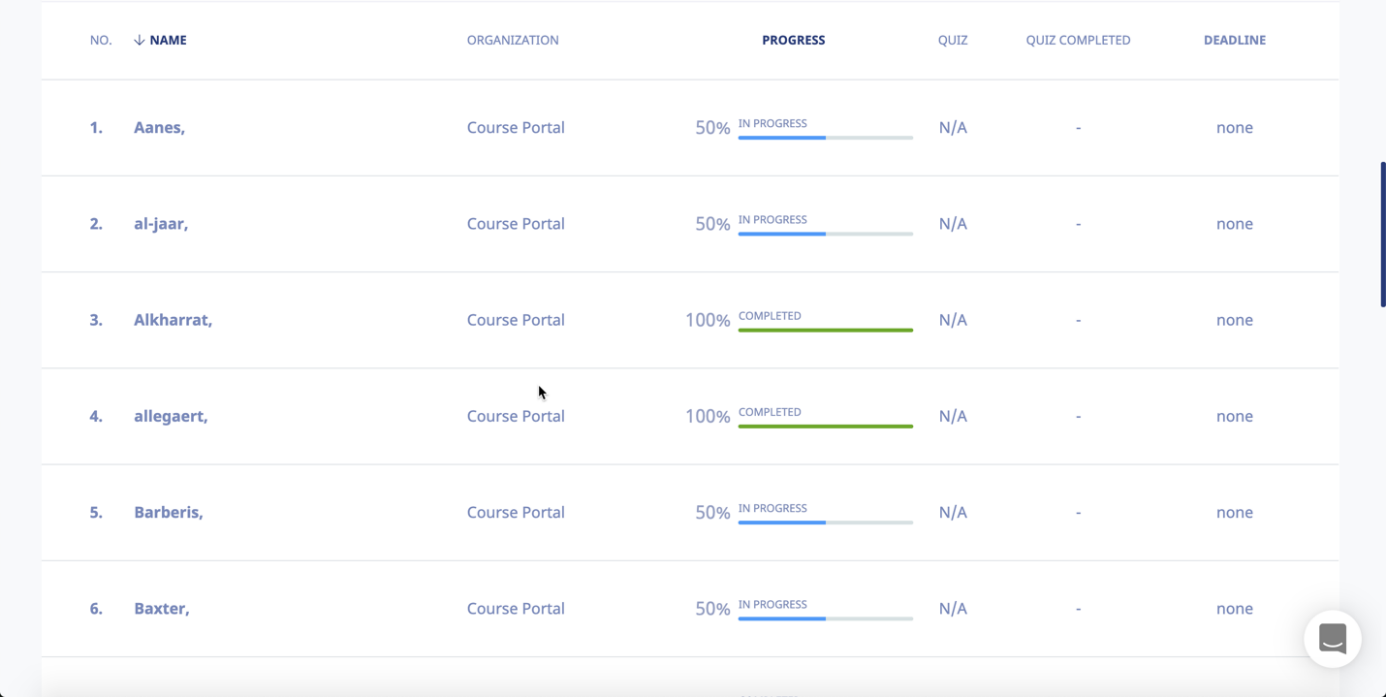
Exporting Completion Reports
Clicking the link on the Completion Report Details screen allows you to export this information to a local drive on your computer.
Referrers
Selecting the REFERRERS tab on the Ecommerce screen displays the Referrers screen, as shown in the following illustration. This screen displays a list of individuals or companies that have been referred as potential customers of the eLeaP system on a Referrers list, and shows the Name, Email, Commission, KEY and Date Created details for each Referrer on the list.
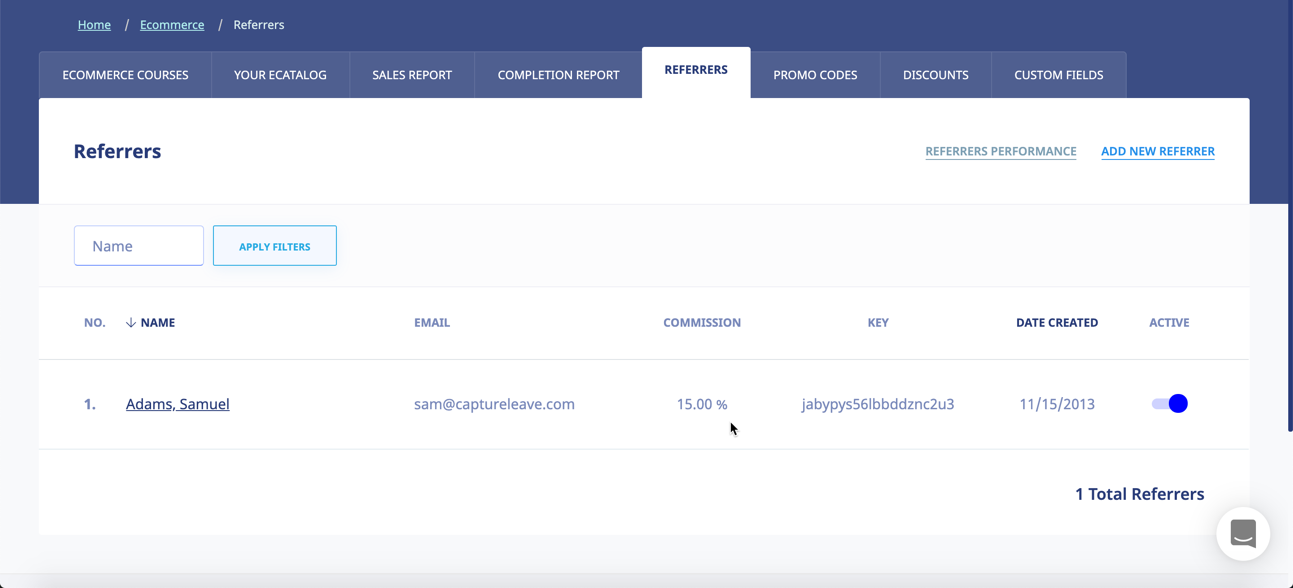
Adding a Referrer
Selecting the on the Referrers screen displays the Add Referrer screen, as shown in the following illustration. Follow the steps below to successfully add a Referrer to the system. Please note that the Key is a system-generated value.

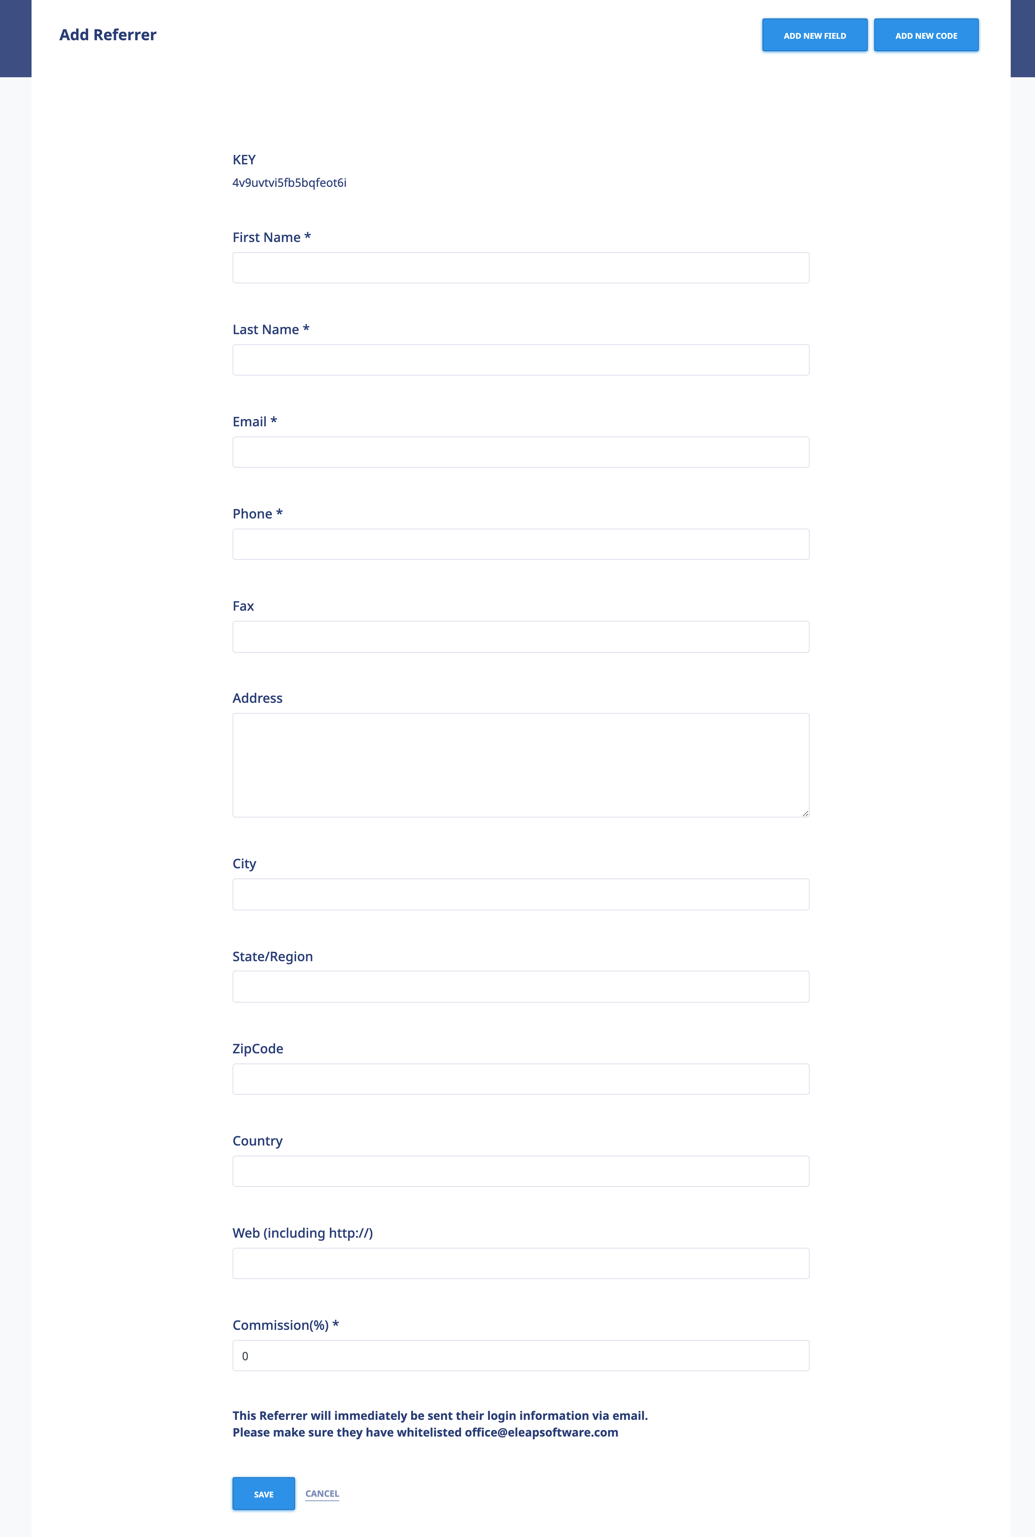
- Enter a First Name for the new Referrer in the First Name field.
- Enter a Last Name for the new Referrer in the Last Name field.
- Enter an Email Address for the new Referrer in the Email field.
- Enter a Phone Number for the new Referrer in the Phone field.
- Enter a Fax Number for the new Referrer in the Fax field.
- Enter a Street Address for the new Referrer in the Address field.
- Enter a City Location for the new Referrer in the City field.
- Enter a State/Region location for the new Referrer in the State/Region field.
- Enter a Zip or Postal Code for the new Referrer in the ZipCode field.
- Enter a Country Location for the new Referrer in the Country field.
- Enter a Web URL for the new Referrer in the Web (including http://) field.
- Enter a Commission Percentage for the new Referrer in the Commission (%) field. You are required to add a value within this field; it cannot be left set at 0.
- Click to create the new Referrer.
As shown in the following illustration, the Referrer has been added to the Referrers list on the Referrers screen
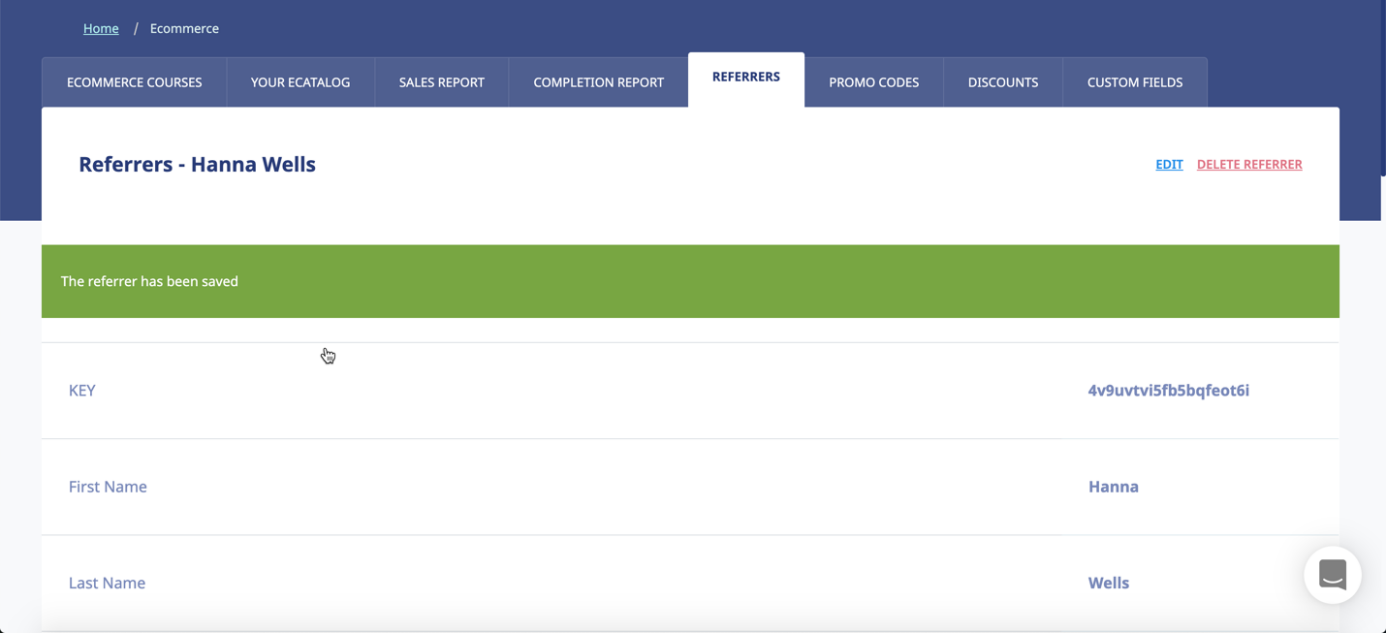
Referrers Performance
Selecting the REFERRERS PERFORMANCE tab within the Ecommerce screen displays the Referrers’ Performance screen, as shown in the illustration below. Each line on the Referrers list displays the Name, Email, Commission, Total Amount and Ref.Com details for that Referrer.
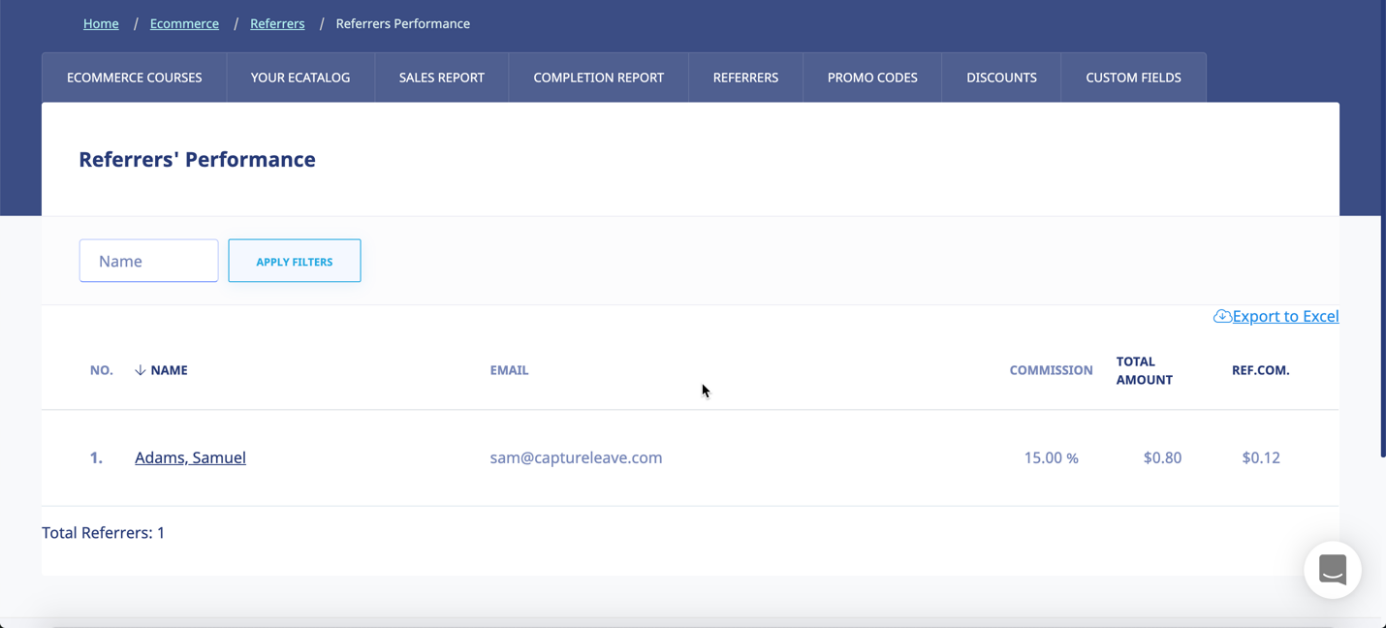
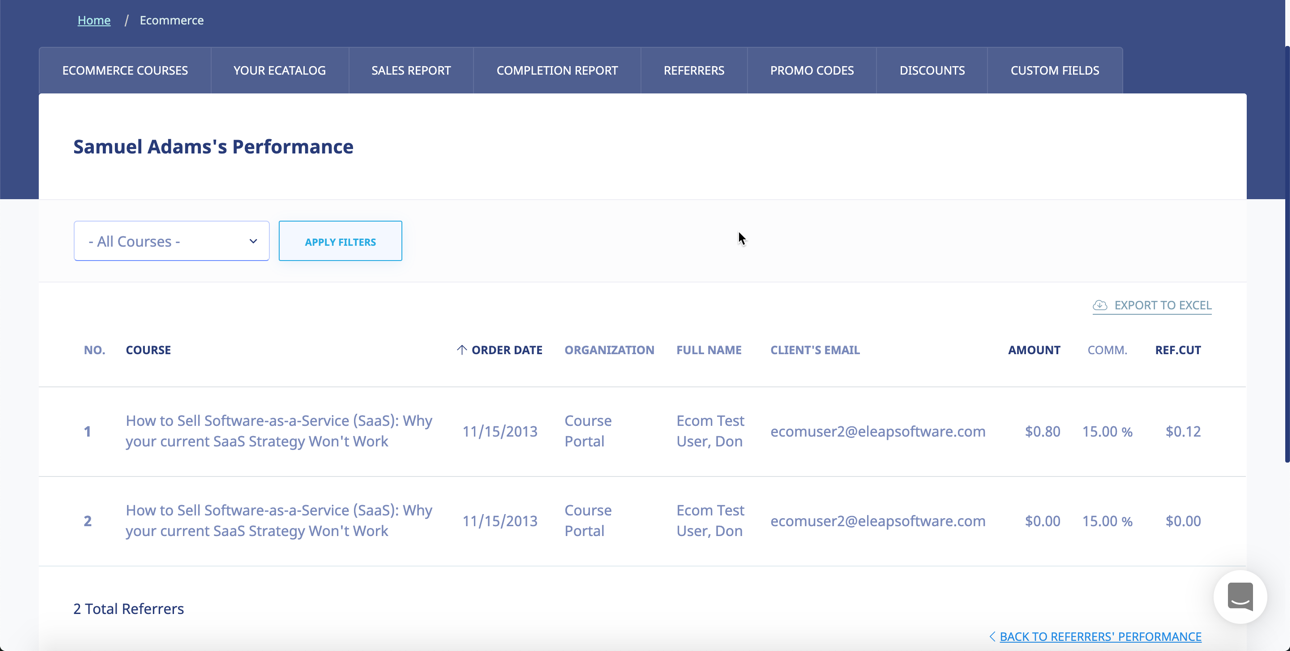
Exporting Referrer Performance
Selecting the Export to Excel link on the Referrers’ Performance screen allows you to export this information to a local drive on your computer. As shown in the following illustration, you are provided with the option to either Open or Save the file.
As shown in the following illustration, the file is displayed within Excel so that you now have local access to this information.

Promotional Codes
Selecting the PROMOTIONAL CODES tab within the ECOMMERCE group of tabs displays the Promotional Codes screen, illustrated below. Each Promotional Code on the Promotional Codes list displays the Promotional Code, Discount, Quantity, Expiration Date, Insert Date, and Active/Inactive status details for that Promotional Code.
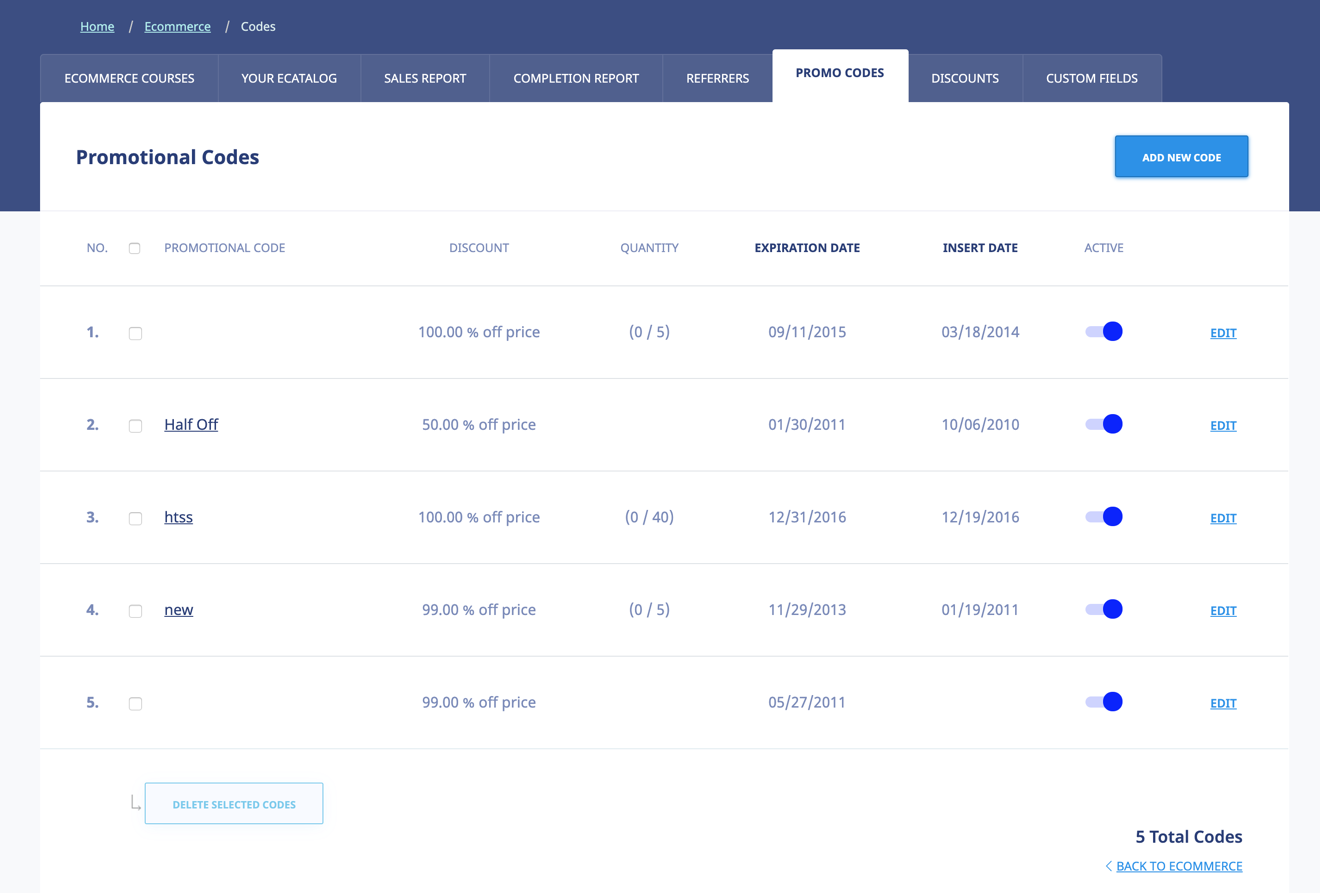
Adding a Promotional Code
Selecting the link on the Promotional Codes screen displays the Add New Promotional Code screen, as shown in the following illustration. Use the steps below to successfully add a Promotional Code to the system.

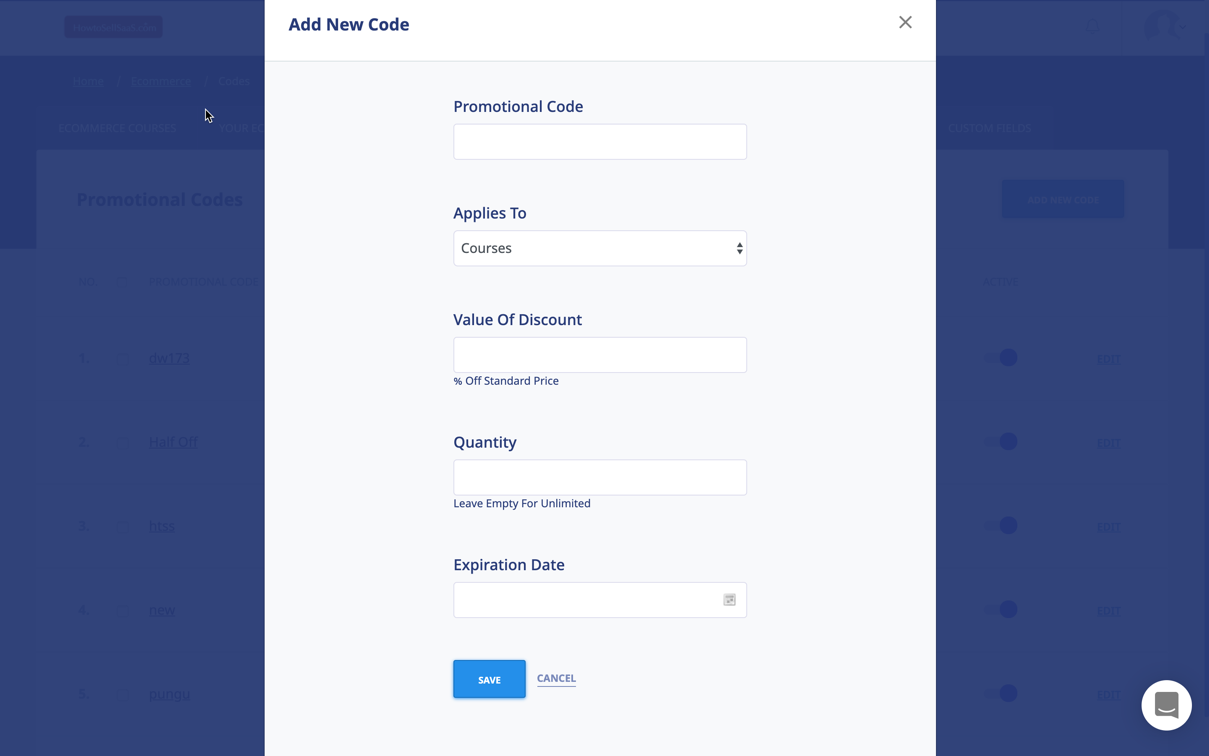
- Enter a name for the new Promotional Code in the Promotional Code field.
- Choose if the Promotional Code applies to Courses, Learning Paths or both
- Enter a percentage value within the Value of Discount field to indicate the percentage off the standard price that the discount promises.
- Enter a quantity amount within the Quantity field, if applicable, and leave this field empty if the quantity is unlimited.
- Enter an Expiration Date within the Expiration Date field, either by entering that date manually or by using the Calendar icon to display the Calendar for selecting the date.
- Click to save the new Promotional Code to the system.

Editing a Promotional Code
Clicking the edit link for a line on the Promotional Code list displays the Edit Promotional Code screen, as shown in the illustration below. Simply make any modifications to the Promotional Code, Discount Type, Value of Discount, Quantity and/or Expiration Date settings for the Promotional Code, and then click to save your changes to the system.

Deleting a Promotional Code
Selecting the check box for a Promotional Code on the Promotional Codes list and clicking the delete selected codes link, as shown in the following illustration, will remove a Promotional Code from the system.

As shown in the following illustration, the system displays a warning message before proceeding with the deletion, to ensure that is your intention. Click to proceed with the deletion or click to cancel the deletion process.
Support/Help Center and eLeaP™ Knowledgebase
eLeaP™ has an incredibly helpful online support center. To access support and help 24 hours a day, go to https://www.eleapsoftware.com/support/
At the Support Center, you can:
- Access our eLeaP Knowledgebase: This is a specialized library of articles and reports and powerful how-to tips on how to maximize your eLeaP learning and training system.
- Online Support: Do you have a particular question or need help with a feature in eLeaP? Use the onboard support system to get help anytime.
- Downloads: If you need special reports, White Papers, or even user guides or manuals, access our Downloads section to get this material.
- News: Visit our news section to learn about the latest happenings in eLeaP and our parent company Telania, LLC. You can also access our blog at www.eleapsoftware.com/blog to learn more about the world of eLeaP™.